
Latest Mods: DIY Twin Screw

Thread Starter
|
Veteran Member
Joined: Jan 2012
Posts: 2,953
Likes: 1,120
From: Phoenix, AZ USA
I actually received my kit on exactly the same day as Jeff in Tucson did, but being an engineer and liking to take things apart, I wanted to do the install myself. I had hoped that I'd learn something about these cars, and I certainly have, not the least of which is that they were designed to be built on an engine stand outside of the car. 
All the work here, excepting for the welding and polishing was done by 1 person, on weekends, over the course of about 2 months. It is an intimidating project but not really all that difficult. Anyone comfortable working on these cars wouldn't have any problem doing it.
There were a few hiccups along the way, most of them my fault, but Avos support is great. Best advice I can give is to follow the instructions and make absolutely sure that all the new electrical connections are solid and well soldered. One of my bad connections created an electrical gremlin that caused some pretty wacky behavior.
This is the Stage II Avos special:
2.6L Twin Screw
3.25" pulley
Custom intake elbow
90mm TB
3.5" MAF and intake tube
The Water/Meth system was installed before the twin screw and carried over.
I also added an RX Performance catch can to the part load breather side after seeing the amount of oil drek inside the intercoolers.
Ok, now the pictures.
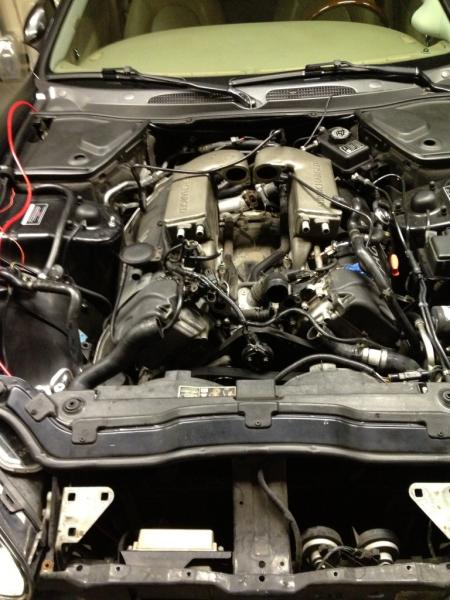
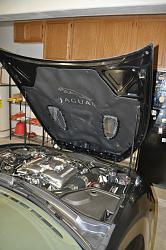
Bonnet and front bumper off the car. They were looking pretty little rough from a poorly executed, on the car respray that the previous owner did so a buddy and I did about a days worth of priming and blocking to get them both back into proper shape before painting again. Plus having the hood off makes getting to all those items at the front of the engine a lot easier.
Getting started:

Teardown:
New parts on the bench screaming to be installed:

Kenne Bell Inside

The twin screw is just a wee bit bigger:

Bench Mockup:

Bench Mockup:

Cleaned up valley and new hoses:
Test fitting the new blower:
Test fitting with intercoolers:

Coil covers looking a little worse for wear:

After a carbon fiber wrap:

"New" covers on the car:

Concealing the new electronics in the ECU box:

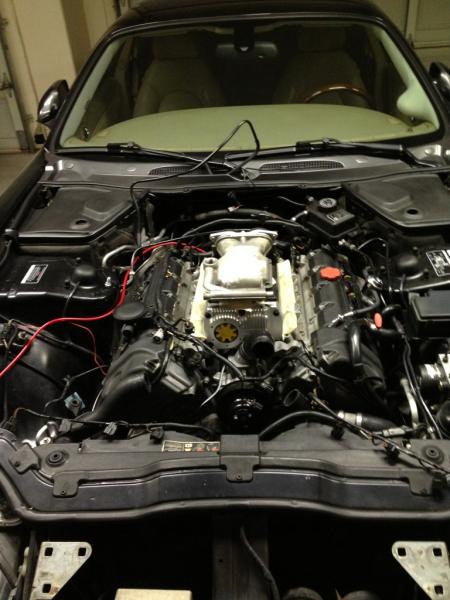
Installing polished intercoolers:

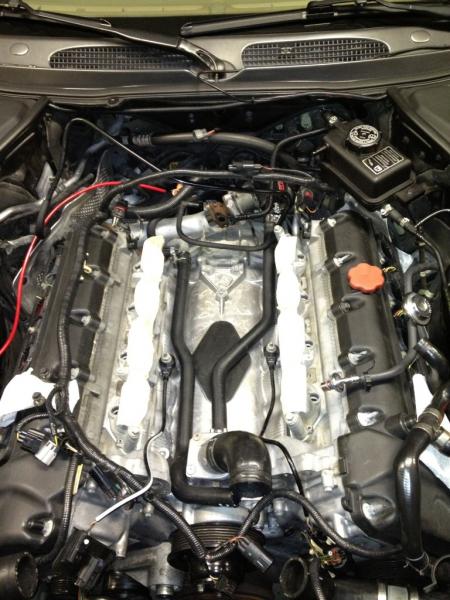
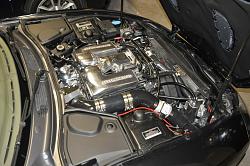
Twin screw in place:

Intake elbow:
Test fit & first start of the car. Turns out having the filter like that causes asymmetry in the air flow and really messes with the fuel trims. This is where the "follow the instructions" advice comes in. I was in a hurry to get it together and started but caused more trouble than anything else. After moving the filter to the final position in the bumper, all is well.
The rest of these are in a forum album so the quality isn't great, but the last two deserve a higher quality upload.
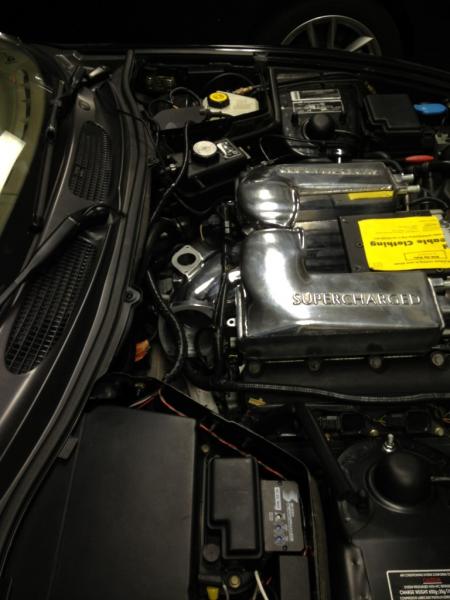
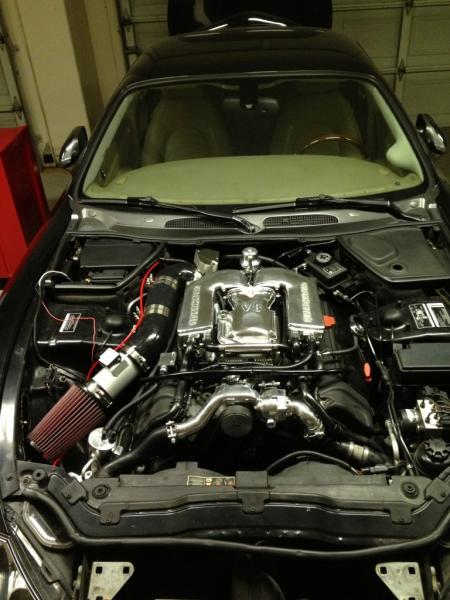
All wrapped up including the new hood liner and logo:
Engine bay ****. Catch can is at the lower right, mounted to a bracket that is attached where the old air box mounted:
All the work here, excepting for the welding and polishing was done by 1 person, on weekends, over the course of about 2 months. It is an intimidating project but not really all that difficult. Anyone comfortable working on these cars wouldn't have any problem doing it.
There were a few hiccups along the way, most of them my fault, but Avos support is great. Best advice I can give is to follow the instructions and make absolutely sure that all the new electrical connections are solid and well soldered. One of my bad connections created an electrical gremlin that caused some pretty wacky behavior.
This is the Stage II Avos special:
2.6L Twin Screw
3.25" pulley
Custom intake elbow
90mm TB
3.5" MAF and intake tube
The Water/Meth system was installed before the twin screw and carried over.
I also added an RX Performance catch can to the part load breather side after seeing the amount of oil drek inside the intercoolers.
Ok, now the pictures.
Bonnet and front bumper off the car. They were looking pretty little rough from a poorly executed, on the car respray that the previous owner did so a buddy and I did about a days worth of priming and blocking to get them both back into proper shape before painting again. Plus having the hood off makes getting to all those items at the front of the engine a lot easier.
Getting started:
Teardown:
New parts on the bench screaming to be installed:
Kenne Bell Inside
The twin screw is just a wee bit bigger:
Bench Mockup:
Bench Mockup:
Cleaned up valley and new hoses:
Test fitting the new blower:
Test fitting with intercoolers:
Coil covers looking a little worse for wear:
After a carbon fiber wrap:
"New" covers on the car:
Concealing the new electronics in the ECU box:
Installing polished intercoolers:
Twin screw in place:
Intake elbow:
Test fit & first start of the car. Turns out having the filter like that causes asymmetry in the air flow and really messes with the fuel trims. This is where the "follow the instructions" advice comes in. I was in a hurry to get it together and started but caused more trouble than anything else. After moving the filter to the final position in the bumper, all is well.
The rest of these are in a forum album so the quality isn't great, but the last two deserve a higher quality upload.
All wrapped up including the new hood liner and logo:

Engine bay ****. Catch can is at the lower right, mounted to a bracket that is attached where the old air box mounted:


What a fantastic job you've done! Kudos to you for doing it yourself. Well done! I like your polished aluminum bits, too. It is definitely engine ****... chicka-bow, chicka-bow-now.
I think that you'll be surprised even further if you elect to put a 3" pulley on that rascal after having driven it with the 3.25". The difference is substantial.
Now, it's your turn to post some twin screw videos... let her rip!
PS: The carbon fiber wrap looks way cool.
I think that you'll be surprised even further if you elect to put a 3" pulley on that rascal after having driven it with the 3.25". The difference is substantial.
Now, it's your turn to post some twin screw videos... let her rip!
PS: The carbon fiber wrap looks way cool.


Senior Member


Joined: Jan 2011
Posts: 540
Likes: 123
From: Morganton, NC
Great job Charlie. This is something I keep dreaming about once the kids are out of college---I'll have to schedule a business trip out to Phoenix one of these days to check this animal out.

Veteran Member
Joined: Apr 2010
Posts: 7,657
Likes: 3,020
From: Arlington VA USA
Trending Topics
Thread Starter
|
Veteran Member
Joined: Jan 2012
Posts: 2,953
Likes: 1,120
From: Phoenix, AZ USA
I do have the water/meth injection, but don't want to get into a situation where I'm dependent on it not to break things. It's an interesting thought though... maybe after some play time with the current version I'll take it to the next level.
Thanks. It's 3M 1080 carbon fiber wrap and it was my first time with wrapping something but it was was pretty easy to do with a heat gun and a little patience.
I wasn't sure that it would hold up well to the hot engine temperatures but it seems to be doing pretty well.
Thread Starter
|
Veteran Member
Joined: Jan 2012
Posts: 2,953
Likes: 1,120
From: Phoenix, AZ USA
Part of the kit is a new throttle body and a small electronics box to make it look like the Jaguar part so that the ECU is happy.

Thread Starter
|
Veteran Member
Joined: Jan 2012
Posts: 2,953
Likes: 1,120
From: Phoenix, AZ USA
I put the stock check valve back on with the can plumbed into the lines. Quiet as can be now and works great. The intake is pristine after several thousand miles.
Thread Starter
|
Veteran Member
Joined: Jan 2012
Posts: 2,953
Likes: 1,120
From: Phoenix, AZ USA
I have waited a long while for a comparable time of year to get the after dyno pull and I have to say that the ole Jag didn't disappoint me today. 
This was a DynoJet so reads higher than some other models, but it's the same dyno, the same guy driving, and a pretty similar day.
The only things changed are the Twin Screw kit with a reasonably conservative (as such things go) pulley. I do have water/meth injection, but that was installed for the baseline and it didn't make much difference on such a cool day anyway.
Blue is before: 328hp, 326tq
54.41F 28.87in-Hg 32% RH SAE: 0.99
Red is after: 454hp, 392tq
57.72F 29.1in-Hg 17% RH SAE: 0.99
You have to roll into it so that the car doesn't downshift, so full throttle isn't really until ~3700. After that it is an incredibly flat torque curve and never drops back below 375lb-ft. Now that's what you call usable power.
Respectable I think, and a testament to Avos's kit: 126hp and 66lb-ft. And those are just the peak differences, there is almost 100lb-ft more at 6000rpm, so the car just pulls and pulls like you wouldn't believe.
Assuming 15% loss in the driveline, that makes for 535hp at the crank. Still perfectly driveable too, and gets the same 27-28mpg that it did before.
There is plenty more power to be had if you wanted to pursue it, but I'm happy with it at this level. It was a good time learning about the car and installing the kit, so now will turn my attention to a LSD, suspension upgrades, maybe an interior refresh at some point.
Veteran Member
Joined: Jun 2012
Posts: 1,761
Likes: 279
From: Los Gatos, CA
I'd be interested to see a 0-100 mph video, from yours or any other twin screw car that is willing  I'd also like to see a 1/4 mile video too. I am curious to see how much faster it is than my much more simple 18 psi Eaton that ran approx 10.5-10.6 sec 0-100.
Approx 535 at the crank is verrry nice. Good to see some credible dynos posted.
You are running how much boost?
Congrats on a very fine install.
I'd also like to see a 1/4 mile video too. I am curious to see how much faster it is than my much more simple 18 psi Eaton that ran approx 10.5-10.6 sec 0-100.Approx 535 at the crank is verrry nice. Good to see some credible dynos posted.
You are running how much boost?
Congrats on a very fine install.
Last edited by WaterDragon; May 10, 2014 at 12:23 AM.
Member
Joined: Apr 2014
Posts: 79
Likes: 15
From: St Francis Bay South Africa
Charlie
Congrats on a superb mod. It just looks so neat and clean with a very professional look to it. Love the polished parts, it just adds to the real classy look.
That last photo you posted of the complete engine bay is pure eye candy.
Well done and thanks for sharing.
Congrats on a superb mod. It just looks so neat and clean with a very professional look to it. Love the polished parts, it just adds to the real classy look.
That last photo you posted of the complete engine bay is pure eye candy.
Well done and thanks for sharing.
