
Leather refurbishment


Been reading some posts on re-dying the leather seats in my 2001 XKR. Leather is in good condition, just color is wearing so I will be working on re-dying (Ivory NED) in the spring.
Question: Will I need to re-dye the other leather covered areas, console, doors etc for colors to match. Has anyone worked the other leather areas? I think I will be ordering the kits from furnitureclinic.co.uk. Any thoughts on using these products??
Thanks
Gary
Question: Will I need to re-dye the other leather covered areas, console, doors etc for colors to match. Has anyone worked the other leather areas? I think I will be ordering the kits from furnitureclinic.co.uk. Any thoughts on using these products??
Thanks
Gary

Joined: Dec 2011
Posts: 120,439
Likes: 17,001
From: Durham, UK
Gary,
I did the usual driver's seat wear areas on my XJ8L with NED trim and it matched the remainder perfectly.
Although I haven't used Furniture Clinic products, they are building a very good reputation among classic car owners in the UK. As their factory is only fifteen miles away from me, I'll be buying direct from them the next time I need to refurbish an interior.
Graham
Senior Member
Joined: Nov 2012
Posts: 702
Likes: 132
From: Singapore
I used Liquid Leather (Gliptone) out of the UK and have had good success. Like GGG my interior color was NED and the color match was spot on. It's not going to look like new but it easily took 6 to 8 years off. The whole kit cost about $110USD and shipped in about 10 days. Link below:
Leather Care | Leather Cleaner
Leather Care | Leather Cleaner
Joined: Dec 2011
Posts: 120,439
Likes: 17,001
From: Durham, UK
It was the Gliptone kit I used and Doug reported equally good results with the Leatherique kit.
Here's the 'before' and 'after' on my seat base:
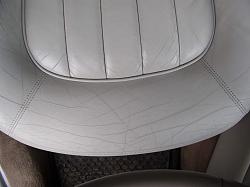

We both commented in different posts that we would use an air brush the next time for speed and being easier to get an even finish.
Graham
Here's the 'before' and 'after' on my seat base:


We both commented in different posts that we would use an air brush the next time for speed and being easier to get an even finish.
Graham
Last edited by GGG; Mar 13, 2013 at 06:57 PM.

Senior Member
Joined: Aug 2012
Posts: 298
Likes: 124
From: Chandler, AZ
I used the Gliptone kit, purchased on Ebay. I will have to say, the match was excellent. So good, in fact, that I did one full bottom seat panel, and about 2/3 of one seat side panel on my drivers seat... and you cant see any color difference. I blotted it on using the provided sponge, and adding a small amount of the glosser. The toughest part is cleaning your seat first!
Veteran member
Joined: Jan 2011
Posts: 1,638
Likes: 173
From: France (UK expat)
I used the Furniture Clinic kit to redo the two outer side bolsters on the driver's seat about two years ago. The colour match is perfect, but the finish was too shiny and the grain is rubbed away slightly leaving a surface that's too smooth compared to the rest of the leather in the car.
Trending Topics

Veteran Member


Joined: Dec 2010
Posts: 8,833
Likes: 2,920
From: Douglasville Ga.
I used the Leatherique kit, and while it's unfortunate that the grain is removed in a lot of areas, it was too coarse in some panels and looks better now.
The biggest change is that the cracks are now gone. The crack filler works great. I departed from the instructions a little by filling the cracks before sanding the surface, and therefor did not remove as much grain. Also sanding with 600 grit is much too slow for me. I started with 150 and then finished with a medium scotchbrite pad. I found that applying the dye with my airbrush was no faster than wiping the dye on with a piece of flannel. In fact, I think the seams came out better by wiping.
The biggest problem I had was color match for cashmere. The first dye I received looked gray, so I sent a leather sample and ordered another batch. That one is still off, being lighter, but much closer. By the time I get done doing both seats and the center console it will be okay, but I don't think I will go with Leatherique for my XJ6.

Thread
Thread Starter
Forum
Replies
Last Post
Currently Active Users Viewing This Thread: 1 (0 members and 1 guests)