
MOT Failure - excessive corrosion


Veteran Member


Joined: Apr 2012
Posts: 1,854
Likes: 987
From: UK
Buy the gas and do it yourself, you wont regret it and you will then be looking for the next welding job to do.
Here is how to do it courtesy of our friends at www.xkec.co.uk


Here is how to do it courtesy of our friends at www.xkec.co.uk
Thread Starter
|
Senior Member
Joined: Sep 2014
Posts: 163
Likes: 19
From: Wyre Forest UK
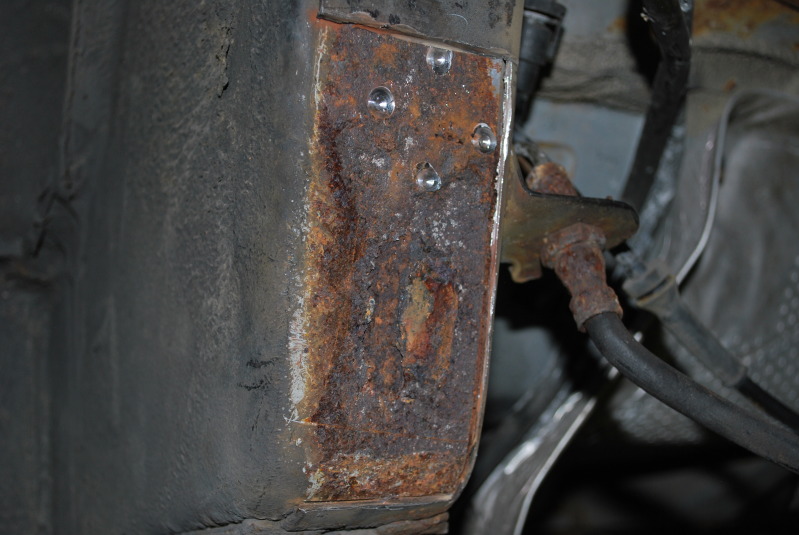
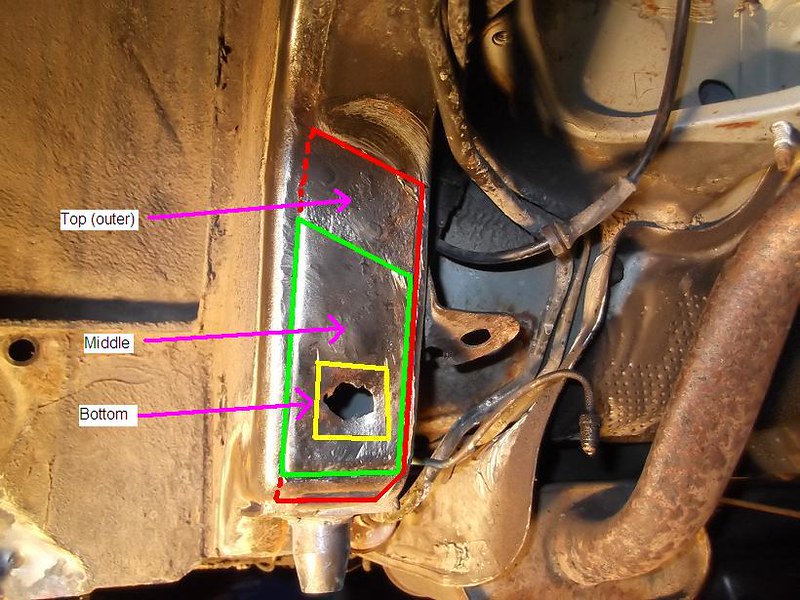
RD - please explain the 4 partial holes that were drilled (1st picture).
Is that trying to find good metal?
Also the black stuff in the 4th picture.
Is that seam sealer? - do you use this?
So, drawing on your XK8 welding experience, what do I need for a welding setup (I already have a Sealey MightyMig XL with cored 8mm wire), is the following suitable -
Hobbyweld 5 (93% Argon / 5% Carbon Dioxide / 2% Oxygen) Optimum weld depth 1mm to 5mm
6mm MIG wire
What replacement steel sheet (type and thickness) would I need and where am I likely to buy it from?
Thanks Mark
Veteran Member
Joined: Apr 2012
Posts: 1,854
Likes: 987
From: UK
Please explain the 4 partial holes that were drilled (1st picture).
Is that trying to find good metal?
This is where they have drilled out the spot welds. You should get a spot weld drill like this one.

Also the black stuff in the 4th picture.
Is that seam sealer? - do you use this?
It looks like it, I always use seam sealer over welds in case there are pin holes. As you can see this area is a 3 ply sandwich, best to also put weld through etch primer between the layers.
So, drawing on your XK8 welding experience, what do I need for a welding setup (I already have a Sealey MightyMig XL with cored 8mm wire), is the following suitable -
Hobbyweld 5 (93% Argon / 5% Carbon Dioxide / 2% Oxygen) Optimum weld depth 1mm to 5mm
6mm MIG wire
Spot on, well almost, it is 0.6mm wire.
What replacement steel sheet (type and thickness) would I need and where am I likely to buy it from?
I am not sure what the thickness is here could be 1.5 to 2mm mild steel (cut a bit off and check), you can buy mild steel sheet metal at local metal merchants or you can buy small sections on ebay.
Good luck!
Is that trying to find good metal?
This is where they have drilled out the spot welds. You should get a spot weld drill like this one.
Also the black stuff in the 4th picture.
Is that seam sealer? - do you use this?
It looks like it, I always use seam sealer over welds in case there are pin holes. As you can see this area is a 3 ply sandwich, best to also put weld through etch primer between the layers.
So, drawing on your XK8 welding experience, what do I need for a welding setup (I already have a Sealey MightyMig XL with cored 8mm wire), is the following suitable -
Hobbyweld 5 (93% Argon / 5% Carbon Dioxide / 2% Oxygen) Optimum weld depth 1mm to 5mm
6mm MIG wire
Spot on, well almost, it is 0.6mm wire.
What replacement steel sheet (type and thickness) would I need and where am I likely to buy it from?
I am not sure what the thickness is here could be 1.5 to 2mm mild steel (cut a bit off and check), you can buy mild steel sheet metal at local metal merchants or you can buy small sections on ebay.
Good luck!

Member
Joined: Sep 2013
Posts: 65
Likes: 22
From: Telford
Before cutting new steel, make sure the corrosion is cut back enough so you can get a good weld, rather than just burning away rust. This is most important and saves a lot of frustration as there is nothign worse than taking the time to make and fit a repair piece only to find there is nothing to weld it to!
Angle grinder time! use a thin cut off wheel to achieve a straight boundary to the area to cut away, then grind away the rest with a regular grinding wheel. The repair piece can be developed using a card template cut and bent where needed to fit. Only when the template fits perfectly, think about cutting steel.
Steel can be bought from your local steel stockholder. best to get some 1.5 and 2mm. (16 gauge and 14 gauge) They will usually will cut it to a manageable size for you. If you have no joy locally, let me know. Most body panel suppliers stock much thinner (0.7mm) and this is too thin for what you are doing and much more tricky to weld.
Cutting the stuff - snips are tough at this thickness. bandsaw is perfect, or a jigsaw set at a low speed with the right blade will do the job well. This is where a good template pays off as you are not trying to cut a repair piece lying under the car!
When the repair piece is cut and fit is good, bevel the edges to give a good bit of "weld prep" This means there is more surface welded and a stronger, flatter weld results. Don't bevel to a feather edge as this will be burned away.
Then make sure the repair piece is securely held in place before going near it with the welding torch. A few lengths of wood can usually be contrived to hold the repair piece in place.
If you are welding around the wheelarches, the heat from the weld will cause the glue to burn. Be ready for this.
When all is secure, tack the repair piece in place, and then tap down any areas that are not fully home before welding it all in.
When building up multiple layers, it is easy to plug weld subsequent layers.
Also, use seam sealer on all unsealed seams to stop the water getting in there and causing trouble again.

Veteran Member
Joined: Nov 2013
Posts: 1,286
Likes: 456
From: Malvern, England
Your certainly getting the advice. Just think when you have finished you should have a car that will be great for a couple of decades.
If you get your welding kit you will be able to tackle all those nasty expensive jobs and offer to do work for other forum members in the local area.
If you get your welding kit you will be able to tackle all those nasty expensive jobs and offer to do work for other forum members in the local area.

Veteran Member
Joined: Jul 2010
Posts: 7,362
Likes: 1,241
From: Austin tx and Daytona FL.
looks like its the spline shaft leaking were the nut is.
may as well replace the seals while your at it!
Veteran Member
Joined: Nov 2013
Posts: 1,286
Likes: 456
From: Malvern, England
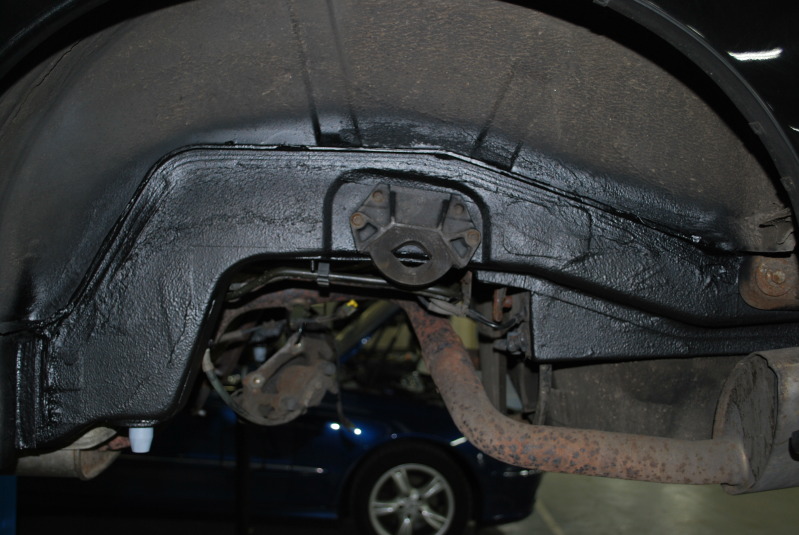
I have just spent a couple of days under-sealing my car. Oh what fun. I wont bother you with 'before' photos as I am sure you know what rust looks like. But this is after, its in the passenger side wheel well.

Thread Starter
|
Senior Member
Joined: Sep 2014
Posts: 163
Likes: 19
From: Wyre Forest UK
Nice job Frank - bet the underseal went more places than just the car.
Messy job indeed!
Messy job indeed!
Thread Starter
|
Senior Member
Joined: Sep 2014
Posts: 163
Likes: 19
From: Wyre Forest UK
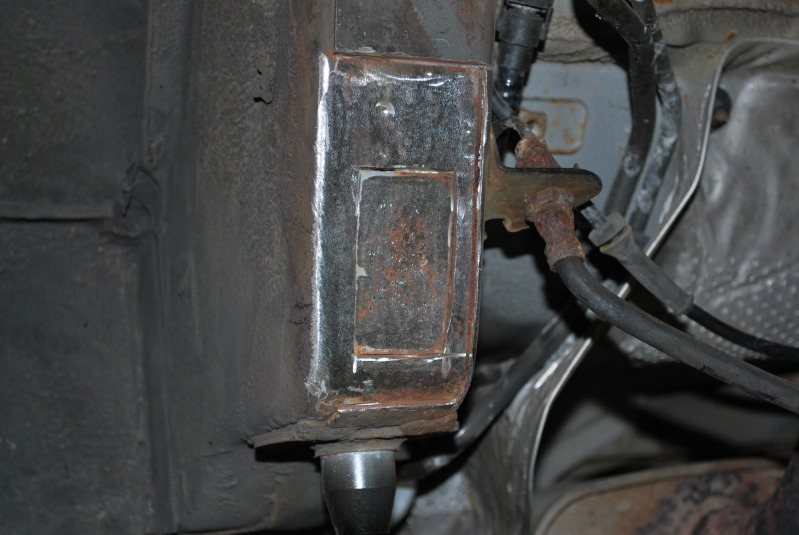
Cut away the rust bit by bit and eventually found some good steel.

As others have pointed out, there are three layers here -

I will cut out the small square section where the hole is with a jigsaw and weld a piece in, grind down and then weld in the middle piece then finally the top piece -
I'm using the lid off a Dell rack mount server for the steel and will be wire brushing the galvanizing off first for a better weld (and health!).
I now have my argon mix coupled up to my MIG and after 5 minutes setting the wire speed etc. seem to get reasonable welds (well the one on the left isn't too bad!) -
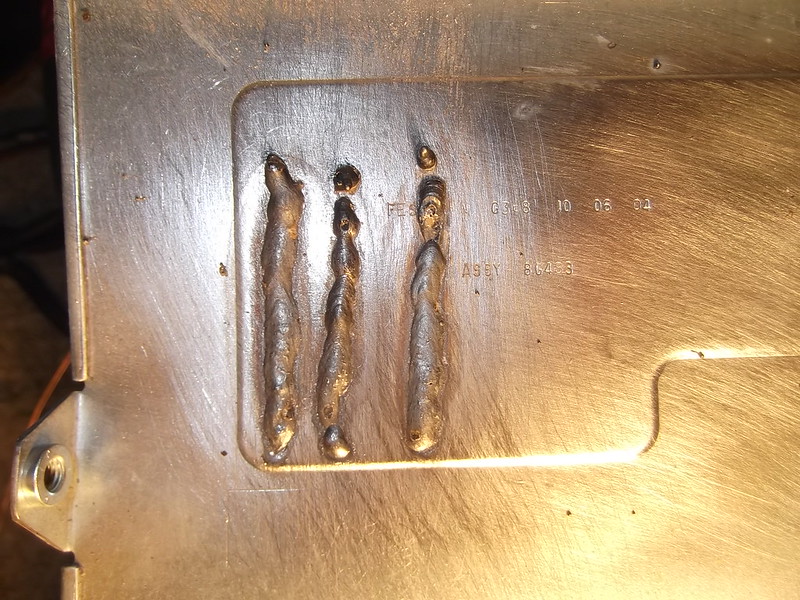
BTW - my car isn't brown underneath, I think that is a white balance issue arising from my halogen flood light
As others have pointed out, there are three layers here -
I will cut out the small square section where the hole is with a jigsaw and weld a piece in, grind down and then weld in the middle piece then finally the top piece -
I'm using the lid off a Dell rack mount server for the steel and will be wire brushing the galvanizing off first for a better weld (and health!).
I now have my argon mix coupled up to my MIG and after 5 minutes setting the wire speed etc. seem to get reasonable welds (well the one on the left isn't too bad!) -
BTW - my car isn't brown underneath, I think that is a white balance issue arising from my halogen flood light
Last edited by scoobie; Nov 29, 2014 at 11:40 AM.
Thread Starter
|
Senior Member
Joined: Sep 2014
Posts: 163
Likes: 19
From: Wyre Forest UK
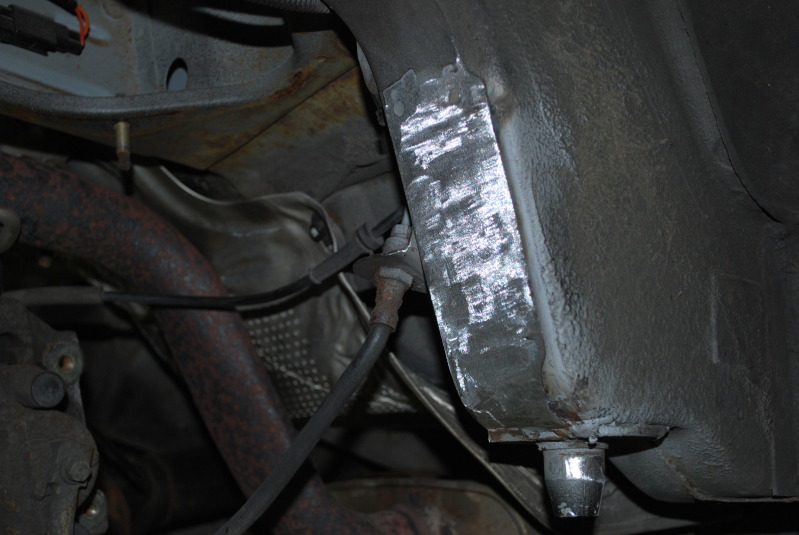
RD - unfortunately I don't have a micrometer but the the steel I am using looks similar thickness to the top skin of the chassis section , however I'm not sure if the bottom layer is different - I will know better when I jig-saw it out tomorrow.
My test welds look the same either side of the steel so I presume penetration is good.
I did think whilst painstakingly removing the layers that I bet there are some cars with just the top layer replaced or plated as nobody would know but obviously it would weaken the chassis.
My test welds look the same either side of the steel so I presume penetration is good.
I did think whilst painstakingly removing the layers that I bet there are some cars with just the top layer replaced or plated as nobody would know but obviously it would weaken the chassis.
Veteran Member
Joined: Apr 2012
Posts: 1,854
Likes: 987
From: UK
It almost makes you feel good that you found the rot in te first place!
Member
Joined: Sep 2013
Posts: 65
Likes: 22
From: Telford
That looks familiar! Just to point out to people who use such threads to make out the XK8 as a "Rot box" , this corrosion is from the "outside in" due to unsealed seams and should be very localised, where water/salt has collected and done its worst. Best of luck with the welding!
Veteran Member
Joined: Nov 2013
Posts: 1,286
Likes: 456
From: Malvern, England
Your doing a great job. One thing I would say though is try that Rustcure stuff. I was impressed with the effect on the rust after leaving it overnight. Just thinking of those connections I can see in the background.
Anyway keep up the good work
Anyway keep up the good work
Member
Joined: Jan 2015
Posts: 56
Likes: 16
From: Buckingham UK
Just to answer your original question - have you asked the tester exactly why it failed and where the areas are which attracted his greatest concern? In my experience testers are usually very helpful if you ask their advice rather than dispute their findings. After all they see far more cars than we do and are simply making sure we do not drive around in a death trap.

Junior Member
Joined: Nov 2017
Posts: 16
Likes: 3
My 2000 was about the same. I ended up welding in 19 plates, including the front chassis legs behind the front cross member, rear floor, seat belt mount and various other bits and pieces.
The rear A frame will probably be shot. Mine "looked" OK, until it was removed then holes were easily prodded.
The A frame brackets whare they bolt to the body can be de-rusted - an acid dip will do this. The floor mounts will need to be welded, they rot from the big plastic plug. That is probably where it has failed. it may well be that these have rotted due to bad sealing of the rear wing to inner wheelarch, so this area should be wire brushed and sealed properly before repainting.
The wheelarch flanges will not have failed it.
With respect to other posts, "covering up" rust with underseal type products is merely that, a cover up. This is OK for light surface rust, but it is the inside out rot that only accelerates when "covered up" (a local garage has a 1998 XKR for sale with a freshly black waxoyled underside hiding probably quire a lot!) I have used clear dinitrol so any new corrosion can be easily spotted should it dare to appear!
If you plan on keeping the car, suggest you remove the rear axle assembly so you can deal with all the rusty areas properly. Also the box section where the body goes over the rear axle may have rotted as the seams are not sealed. This can only be effectively repaired with the axle out. Best to really go looking for trouble, probing all likely rusty areas and welding up all that needs it in one hit, so it is done!.
Chances are chassis legs below the front spring mounts will have gone too, so front subframe will need to come out.
Might also be worth changing the brake pipes while you are at it!
Thanks!
Junior Member
Joined: Nov 2017
Posts: 16
Likes: 3
Sorry I did a double post. Is there any photos or diagrams I can look at to actually see what and where these "legs" are?
Last edited by uksimon; Nov 30, 2017 at 04:04 AM.
Junior Member
Joined: Nov 2017
Posts: 16
Likes: 3
FrankC told me to ask you I thought he was talking about car tuning. Duh!. The bits the garage showed me on the photo the garage took were " coming down from the interior bulkhead" and it looks like its sandwiched between two bits of metal covering it? Been sitting on this problem for a month or so and cant find the answers. From what I can see it is a common problem?
Last edited by uksimon; Nov 30, 2017 at 04:02 AM.