
My 2nd Tensioner replacement project

Thread Starter
|
Senior Member
Joined: Jun 2010
Posts: 102
Likes: 2
From: Charlotte, NC
Hi Everyone, first off a huge thank you for the wealth of information and expertise provided on this forum. Without such, I probably would not have taken on this project.
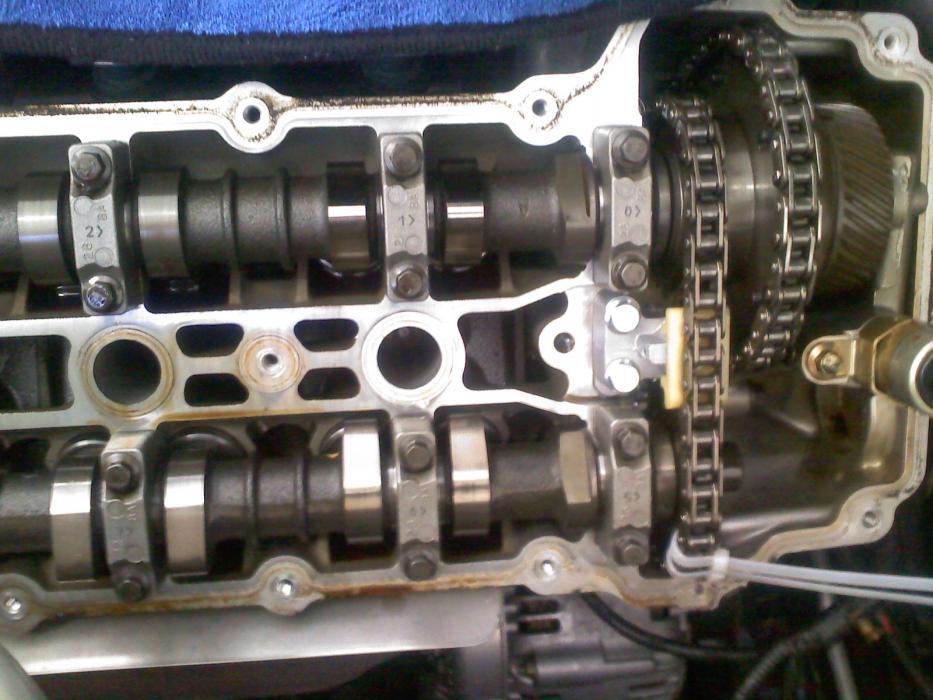
I finished the right bank (passenger side) today. It went surprisingly smooth. The engine was very clean for a 12 yr old car with 50K miles. But I took my time, as I am in no hurry. There was a small crack in the original tensioner, looks like a "Y".
And changing the spark plugs, since I'm already in there.
Tomorrow morning I'll do the drivers side.
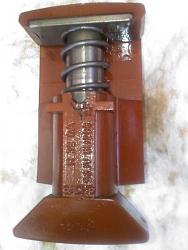


Veteran Member
Joined: Mar 2008
Posts: 5,390
Likes: 1,116
From: Ellijay
. . . and the best part will be that you get to explain how simple the tensioner replacement is . . .
. . . for the next 100 posts on the subject.
We should have a badge " I changed my own tensioners".
As an invited guest to a North Georgia Jaguar Club event I was introduced by my sponsor as 'he changed his own tensioners'.
. . . and your engine does looks very clean!
. . . for the next 100 posts on the subject.
We should have a badge " I changed my own tensioners".
As an invited guest to a North Georgia Jaguar Club event I was introduced by my sponsor as 'he changed his own tensioners'.
. . . and your engine does looks very clean!

Senior Member
Joined: Feb 2010
Posts: 830
Likes: 141
From: Daytona, USA
That engine looks super clean. Mine had a uniform brownish glaze over everything. Maybe by using Penzoil Platinum I'll clean it up a bit. Just for fun, can you pull off the plastic slipper that the chain rides on? Mine just flipped off easily and was probably ready to fly off.
Welcome to the tensioner club. We do need a patch. Any graphic artists out there?
Welcome to the tensioner club. We do need a patch. Any graphic artists out there?
Veteran Member


Joined: Sep 2010
Posts: 1,713
Likes: 451
From: New Jersey
That engine looks super clean. Mine had a uniform brownish glaze over everything. Maybe by using Penzoil Platinum I'll clean it up a bit. Just for fun, can you pull off the plastic slipper that the chain rides on? Mine just flipped off easily and was probably ready to fly off.
Welcome to the tensioner club. We do need a patch. Any graphic artists out there?
Welcome to the tensioner club. We do need a patch. Any graphic artists out there?
(Steve11 says that brownish glaze is some byproduct of oil in the presence of high heat. I forget exactly how he described it.)

Senior Member
Joined: Jan 2011
Posts: 883
Likes: 173
From: Columbus, OH
Jeesh, it is one mighty clean engine. I wish previous owners of my car were like that. Instead I have good old florida gunk all aver the damn thing. What do you think, is it too bad?
Trending Topics
Senior Member
Joined: Jan 2011
Posts: 883
Likes: 173
From: Columbus, OH
Hi Everyone, first off a huge thank you for the wealth of information and expertise provided on this forum. Without such, I probably would not have taken on this project.
I finished the right bank (passenger side) today. It went surprisingly smooth. The engine was very clean for a 12 yr old car with 50K miles. But I took my time, as I am in no hurry. There was a small crack in the original tensioner, looks like a "Y".
And changing the spark plugs, since I'm already in there.
Tomorrow morning I'll do the drivers side.
Attachment 8037
Attachment 8038
Attachment 8039
When you do driver's side, make sure small breather is not jammed with deposits. Mine was nearly completely shut, so I opened up shield, cleaned wire sponges and unclogged the hole.

Senior Member

Joined: Oct 2010
Posts: 206
Likes: 53
From: Geneva, IL USA
DaveNC,
It's nice to here that the first half went smoothly. I order the parts for my car last week and should be tackling the job in a few days. Hoping that my engine will look as clean as yours.
Test point, I like the idea of a grill badge. Hopefully I can get one in a few weeks
It's nice to here that the first half went smoothly. I order the parts for my car last week and should be tackling the job in a few days. Hoping that my engine will look as clean as yours.
Test point, I like the idea of a grill badge. Hopefully I can get one in a few weeks
Thread Starter
|
Senior Member
Joined: Jun 2010
Posts: 102
Likes: 2
From: Charlotte, NC
The drivers side cam was a bitch...more tension, and the way the cams were aligned. But after awhile I got her to do what I wanted and slapped in the new tensioner. This one was also cracked, like a mirror image of the first one. Small, shaped like a "Y".
I warmed up the car for 10 minutes, watching for leaks and strange sounds. The old oil on the exhaust manifold quickly burned away. So I went for a 20 mile drive and we are back in business...Idles the same as it used to, so I that's fine.
PS - I could not figure out how to remove that part load breather tube. So a quick search on here, came up with a JTIS, that showed inserting a clip into the plastic housing to expand it. Well no clip, so I took a pair of pliers and gently squeezed opposite of the where the JTIS shows it expands and it popped right off.
Senior Member
Joined: Mar 2010
Posts: 309
Likes: 84
From: Collingwood, Ontario
I've been following these 'cam chain tensioners' threads with great interest, as I'm getting ready to tackle the re-fit on my 2000 xk8.
I must have missed the thread on the 'tie wrap' method, however, Anybody know where (or when) that approach was discussed?
Thanks in advance
I must have missed the thread on the 'tie wrap' method, however, Anybody know where (or when) that approach was discussed?
Thanks in advance
Senior Member
Joined: Oct 2010
Posts: 206
Likes: 53
From: Geneva, IL USA
As I am planing on doing the same operation next week, do you have any suggestions that might make it easier? Is it just a matter of loosing up the cam "very slowly"? I know the cams can break so any help would be wonderful. Thanks!
Thread Starter
|
Senior Member
Joined: Jun 2010
Posts: 102
Likes: 2
From: Charlotte, NC
Hi Glenn,
I spent a good 90 minutes or so messing with that cam. And I'm glad I did... That one had tension on opposite ends, from the chain and the last two cams towards the firewall. Problem was the chain end of the cam wouldn't come up from where the cam rests, so it was stuck. (this did not occur on the passenger side). So I ended up repeating the whole loosening/tightening sequence about 3-4 times to kind of urge that chain end up. I hope that helps, it's hard to explain. Basically I finessed it free, and went on with the rest of the job.
Edit: I wanted to add that the final tightening down of the cam on this side took awhile to keep the stress even across the cam, so it seats properly. Not a rush job by any means, at least for me.
Last edited by DaveNC; Feb 20, 2011 at 05:01 PM.
Veteran Member
Joined: Sep 2010
Posts: 1,713
Likes: 451
From: New Jersey
Scott,
Glenn,
Unsolicited advice follows; may well be worth what you paid for it.
The twist-tie method really, really scares me. Here's a recent example of a broken cam. https://www.jaguarforums.com/forum/showthread.php?t=49784
Other things can go wrong that might not show up immediately.
If everything goes just right this method is, I suppose, the easiest and requires no special tools. But things can go terribly wrong.
By way of comparison, the cam-lock method (secondaries only) requires locking only the cams, not the crank, and it's pretty hard to do anything horrible with this method. There was a loaner set of locking tools around when I did mine. Anyone know if still true?
I'm sure there are other opinions on this. I just like to take the worst possible outcomes off the table.
FWIW. Good luck in any case.
Last edited by Dennis07; Feb 20, 2011 at 05:12 PM.
Senior Member
Joined: Mar 2010
Posts: 309
Likes: 84
From: Collingwood, Ontario
Thanks, Dennis. I still can't seem to find an explanation of the 'tie wrap' approach, but it would seem to involve removing a camshaft, and breaking it upon re-installation. Guess I'll avoid that one. I've gone over Blackonyx's step by step tutorial, but it goes way deeper into the engine than I had planned (hoped!) Also, his replacement tensioner appears to be plastic also. Would these be the 'second gen' tensioners, now replaced by 'third gen' metal ones? I'm trying to get a grasp on what I'm in for if I tackle this myself by studying these pictures carefully. It sure looks as if secondary chains with a master link (I saw this mentioned somewhere) would greatly simplify this procedure!
Veteran Member
Joined: Apr 2010
Posts: 7,657
Likes: 3,020
From: Arlington VA USA
Veteran Member
Joined: Mar 2008
Posts: 5,390
Likes: 1,116
From: Ellijay
The use of a repair link for the secondary chain is only considered, and not for very long, when you have a broken chain. It has nothing to do with replacing the tensioners.
That is when I would consider removing the intake cam to install the chain from the rear.
This is not rocket surgery, clamp down the cam flats, remove the exhaust cam sprocket and replace the tensioner.
That is when I would consider removing the intake cam to install the chain from the rear.
This is not rocket surgery, clamp down the cam flats, remove the exhaust cam sprocket and replace the tensioner.
Veteran Member
Joined: Sep 2010
Posts: 1,713
Likes: 451
From: New Jersey
Scott,
Yup, that busted cam thing could ruin your whole day.
This thread from a UK forum ... http://www.jaguarforum.co.uk/viewtopic.php?t=11333 ... has a great discussion of the secondaries-only / cam-lock procedures. Trouble is, it looks like the image links are dead. They were very good, as I recall. But I think you have pictures from another source, right?
(My only disagreement with it is that I do not see a need to lock both cams simultaneously, and did not do this on myown car. But keep the car keys in another room, just to be safe.)
Anyway, let us know if you can "see" the job from this description.
Anybody know the whereabouts of loaner or rental tools for the cam locking?
Last edited by Dennis07; Feb 21, 2011 at 05:00 PM.
Senior Member
Joined: Feb 2010
Posts: 830
Likes: 141
From: Daytona, USA
I borrowed mine from maxperformancecars.com - they're listed under the max! tab. You may have to join the forum, but that's okay (assuming the forum is still going). Arguably the best way is lock the cams, unbolt the chain sprockets, and replace the tensioners. The only hard part I had was getting the sprocket bolts loose, but a breaker bar worked. Impossible to mess up timing or break a cam. And BTW, getting those cam covers off is really annoying.