
Rear Suspension Bushes

Thread Starter
|
Veteran Member
Joined: Sep 2012
Posts: 1,473
Likes: 655
From: Devon. U.K.
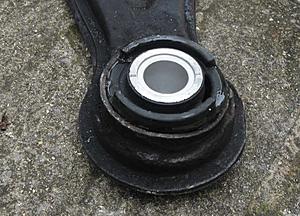
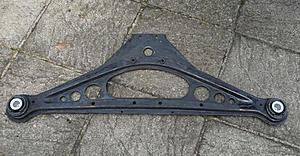
Installed new rear subframe bushes today. Got a new (old) A frame from a breaker and, after a certain amount of research and consideration, decided to replace like with like rather than go with Polyurethene bushes. Reasoning is that Jaguar put a lot of thought into a very complicated structure - aluminium centre bonded to a steel core surrounded by a rubber compound which must be aligned in a very specific way. I'm just not convinced that a big chunk of yellow or purple or black industrial polymer will have the same characteristics and I don't drive in a way that requires a stiff suspension with some loss of noise isolation.
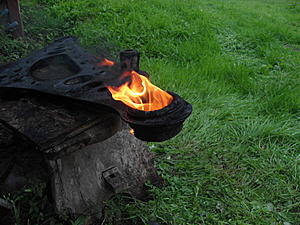
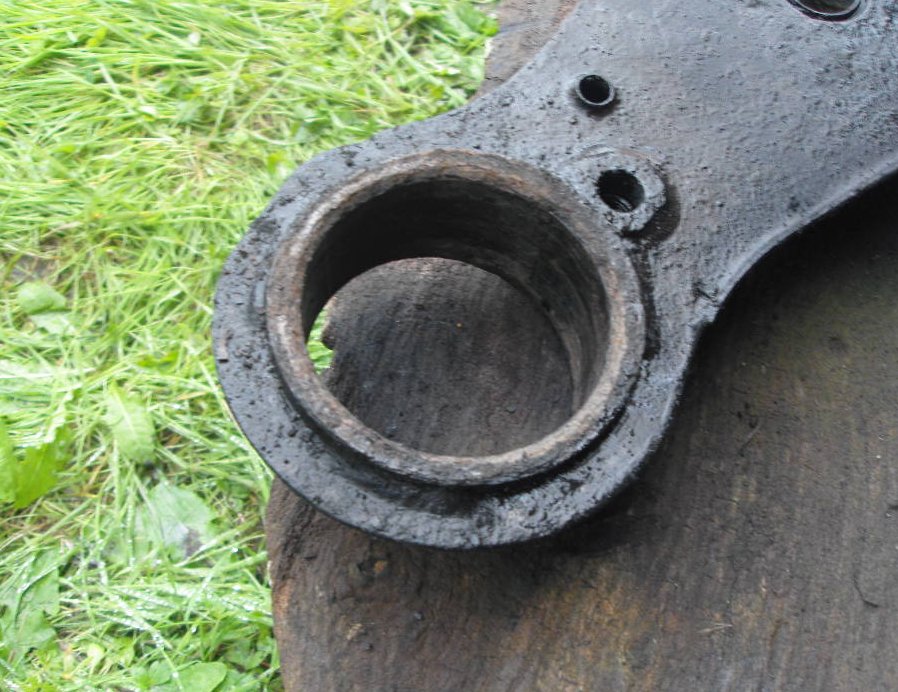
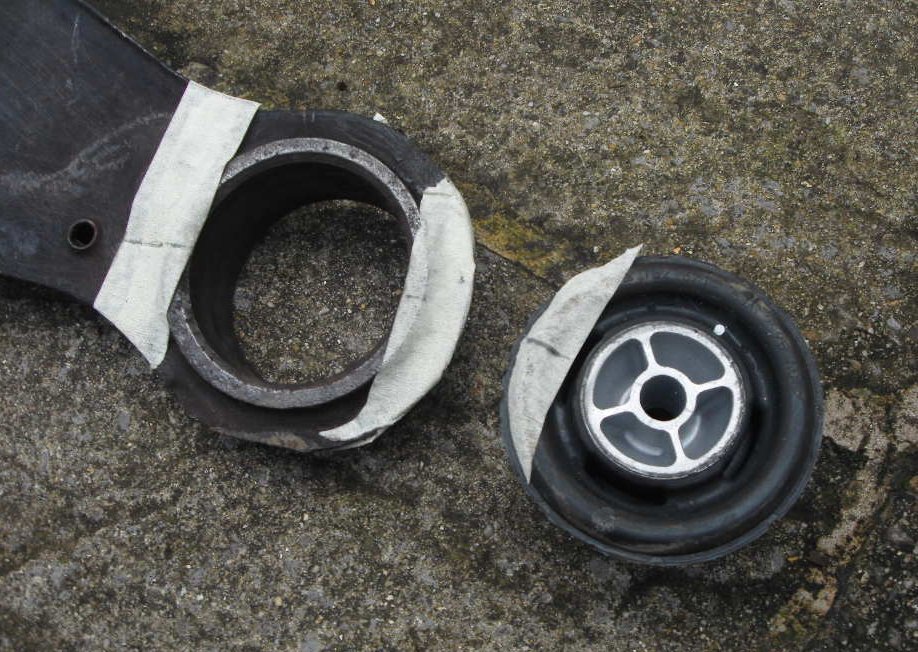
Got the old ones out fairly easily - cut out the centre aluminium core with a standard jig-saw, then set fire to the rubber with a blowtorch - let it burn for 15 minutes or so - then tapped out what was left with a hammer. Some fairly nasty toxic smoke, so don't try this indoors or close to the neighbour's small children, but worked for me !
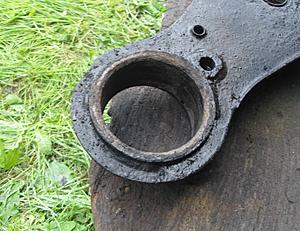
Cleaned up the internal surfaces with a wire brush. The new bushes are bonded in with epoxy resin glue. Orientation is very specific so lots of marks on masking tape to get it exactly right.
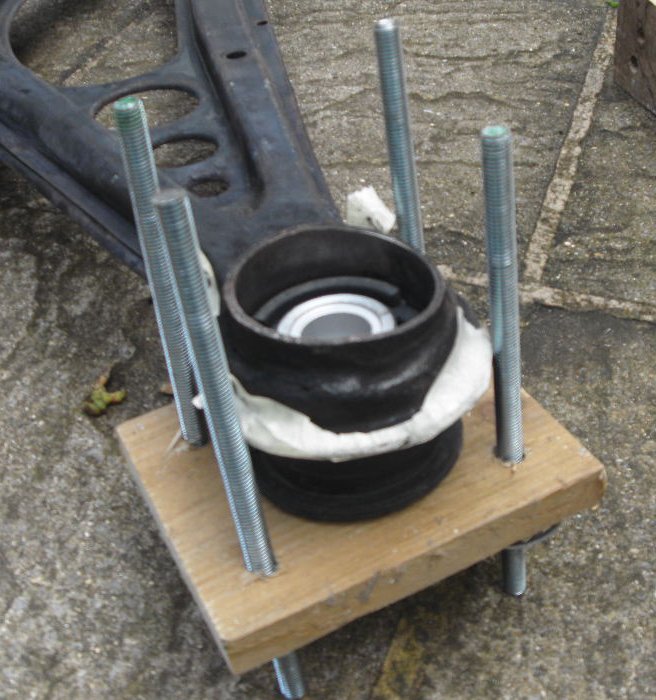
The "proper" way to do this is with a hydraulic press but I don't have one of those so decided to make a special tool out of a couple of bits of timber and some threaded studding (total cost around �5.00 = $7US). Jaguar also specify quick drying epoxy, but I figure that's more about getting the car off the 4 post lift as soon as possible whereas I have plenty of time so went with a standard "don't disturb for 24 hours" type of stuff.

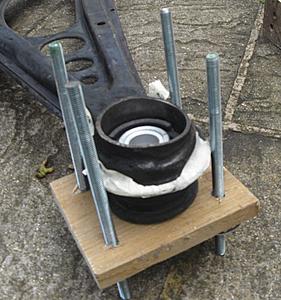
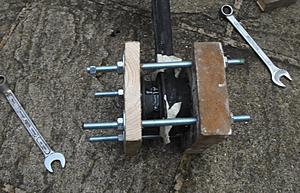
Everything went extremely well, but as the bushes are slightly longer than the bore in the A frame, I needed an additional special tool for that final inch or so - four more bolts.
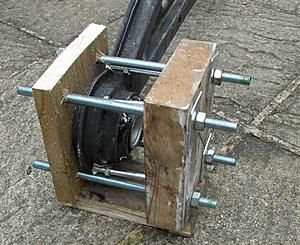
I reckon getting the old ones out took around an hour, and pretty much the same for getting the new ones in. Just need to clean up the A Frame - give it a coat of rust inhibitor and paint - and then it's old one off, new (old) one in.
Got the old ones out fairly easily - cut out the centre aluminium core with a standard jig-saw, then set fire to the rubber with a blowtorch - let it burn for 15 minutes or so - then tapped out what was left with a hammer. Some fairly nasty toxic smoke, so don't try this indoors or close to the neighbour's small children, but worked for me !

Cleaned up the internal surfaces with a wire brush. The new bushes are bonded in with epoxy resin glue. Orientation is very specific so lots of marks on masking tape to get it exactly right.
The "proper" way to do this is with a hydraulic press but I don't have one of those so decided to make a special tool out of a couple of bits of timber and some threaded studding (total cost around �5.00 = $7US). Jaguar also specify quick drying epoxy, but I figure that's more about getting the car off the 4 post lift as soon as possible whereas I have plenty of time so went with a standard "don't disturb for 24 hours" type of stuff.

Everything went extremely well, but as the bushes are slightly longer than the bore in the A frame, I needed an additional special tool for that final inch or so - four more bolts.


I reckon getting the old ones out took around an hour, and pretty much the same for getting the new ones in. Just need to clean up the A Frame - give it a coat of rust inhibitor and paint - and then it's old one off, new (old) one in.


Member
Joined: Sep 2014
Posts: 34
Likes: 23
From: Winchester
That's is a really clever and neat way to install the new bushes DevonDavid. Thanks for posting pictures - as I have mentioned I have the yellow polybushses in my A frame so hopefully a job never to repeat, but your method is a very good idea that can be applied for other bush installation. cheers
Thread Starter
|
Veteran Member
Joined: Sep 2012
Posts: 1,473
Likes: 655
From: Devon. U.K.
That's is a really clever and neat way to install the new bushes DevonDavid. Thanks for posting pictures - as I have mentioned I have the yellow polybushses in my A frame so hopefully a job never to repeat, but your method is a very good idea that can be applied for other bush installation. cheers


Thread Starter
|
Veteran Member
Joined: Sep 2012
Posts: 1,473
Likes: 655
From: Devon. U.K.
I'm lucky in that my car is "an old man's hobby" rather than a daily driver / essential means of transport. So - I can take my time to do stuff, and I also enjoy the challenge of doing it myself.
It's not really about saving money and I have a very good local garage (shop) that does work on my other cars and, if it's tyres or welding or things I really can't do, I trust them to work on the XK8. But - there's a feeling of satisfaction when a lump of wood and a few bolts makes what looks like a difficult job into quite an easy one.
It's not really about saving money and I have a very good local garage (shop) that does work on my other cars and, if it's tyres or welding or things I really can't do, I trust them to work on the XK8. But - there's a feeling of satisfaction when a lump of wood and a few bolts makes what looks like a difficult job into quite an easy one.
Trending Topics

Veteran Member
Joined: Oct 2012
Posts: 1,847
Likes: 696
From: Atlantic, Canada
Excellent David, nice work. Making, rather than buying a tool is half the fun.
I found used polymer cutting boards from yard sales work well for projects. I've made table saw guides and router guides from them in the past.
I found used polymer cutting boards from yard sales work well for projects. I've made table saw guides and router guides from them in the past.
Thread Starter
|
Veteran Member
Joined: Sep 2012
Posts: 1,473
Likes: 655
From: Devon. U.K.
Making, rather than buying a tool is half the fun.
Don't disagree with that but ............... I live about 10 minutes away from here :
Axminster Tools & Machinery - Power Tools, Hand Tools, Woodworking, Metalworking & more!
Don't tell Mrs. DD but there are many times when temptation gets the better of me !!
Don't disagree with that but ............... I live about 10 minutes away from here :
Axminster Tools & Machinery - Power Tools, Hand Tools, Woodworking, Metalworking & more!
Don't tell Mrs. DD but there are many times when temptation gets the better of me !!