
Thermostat housing - details for replacement

Thread Starter
|
Member
Joined: May 2013
Posts: 37
Likes: 2
From: UK
Hi all,
I am looking at the details of my very first DIY job on my lovely XK8: replacing the thermostat housing to upgrade with a full alloy one (and replacing the thermostat at the same time). That follows a small leak of coolant I noticed just a week ago (with a "low coolant" warning on the dash). It seems pretty clear (to me) that the seal at the bottom of the housing is the source of my troubles (white marks all around). The other possibility could be the water pump seal - the pump will be changed anyway if my problem persists or later in the summer otherwise.
Specific questions for the replacement of the thermostat housing:
1) Do I need to consider the replacement of the plastic outlet duct ? Has it a propensity to crack / break if disturbed ? It looks reasonably robust but plastic may age quite badly.
2) Spring clips: can I envisage to replace them by some more conventional hose clips ? I understand that a special tool is required for spring clips - which I don't have. Probably not a big deal but advices are welcome.
3) The access to the screws at the back seems to be a pain in the neck. Do I need to remove the inlet manifold for a better access ? I read that breaking the old plastic housing can do the trick - it sounds quite drastic !
Many thanks
Jerome

Veteran Member


Joined: Dec 2010
Posts: 8,836
Likes: 2,924
From: Douglasville Ga.
Hi Jerome, welcome to the forum.
1. I would replace the pipe.
2. No special tool needed. You can use pliers(English translation?) Do a search for procedure, or someone will chime in.
3. I broke mine up. Just keep track of the pieces. Removing the inlet maniflod is not a great idea.
1. I would replace the pipe.
2. No special tool needed. You can use pliers(English translation?) Do a search for procedure, or someone will chime in.
3. I broke mine up. Just keep track of the pieces. Removing the inlet maniflod is not a great idea.

Veteran Member
Joined: Mar 2008
Posts: 5,390
Likes: 1,116
From: Ellijay
Been there, done that!
1) Do I need to consider the replacement of the plastic outlet duct ? Has it a propensity to crack / break if disturbed ? It looks reasonably robust but plastic may age quite badly.
I would suggest that you replace it. The plastic seems to 'rot'.
2) Spring clips: can I envisage to replace them by some more conventional hose clips ? I understand that a special tool is required for spring clips - which I don't have. Probably not a big deal but advices are welcome.
No special tool. Squeeze the connector together and using a sharp pointed tool lift the top side. No big deal.
3) The access to the screws at the back seems to be a pain in the neck. Do I need to remove the inlet manifold for a better access ? I read that breaking the old plastic housing can do the trick - it sounds quite drastic !
The manifold should not be removed! Break the plastic housing with a pair of pliers. What, you want to keep the old housing?
You might still be faced with hard to reach 8mm bolt heads. Do a search on 'bent wrench' or 'ground socket' and you will see how it is done.

Senior Member

Joined: May 2013
Posts: 160
Likes: 17
From: Essex, UK
Hi Jerome,
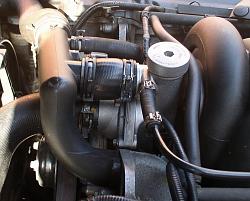
This was one of the forst jobs I did on my car, reasonably straight forward. Removing the outlet tube improves access to the stat tower and allows for close inspection, mine was ok but I have read of them cracking so take a close look. Get new seals for replacement. The hose clips can be compressed with water punp pliers. Breaking the old tower to remove is one way but the new one has to be refitted unbroken so to remove the rearmost fixings for the tower I bought an 8mm combi-spanner and bent it at the ring end to form an 'L' shape (not quite 90deg). That allowed the ring to fit onto the bolt head, then a simple adjustable onto the open end of the spanner provided the turning force. Refit the new in the same way. Watch the wiring clips either side of the tower, they are a little tricky to unclip and easily broken.
This was one of the forst jobs I did on my car, reasonably straight forward. Removing the outlet tube improves access to the stat tower and allows for close inspection, mine was ok but I have read of them cracking so take a close look. Get new seals for replacement. The hose clips can be compressed with water punp pliers. Breaking the old tower to remove is one way but the new one has to be refitted unbroken so to remove the rearmost fixings for the tower I bought an 8mm combi-spanner and bent it at the ring end to form an 'L' shape (not quite 90deg). That allowed the ring to fit onto the bolt head, then a simple adjustable onto the open end of the spanner provided the turning force. Refit the new in the same way. Watch the wiring clips either side of the tower, they are a little tricky to unclip and easily broken.
Veteran Member
Joined: Feb 2012
Posts: 2,997
Likes: 714
From: Waco, Texas, US

You may want to check the upper and lower radiator hoses, mine had started to get the old bulge and would collapse when the engine was not running. After all you are going to have to drain the radiator.(My hoses were the original ones installed when new) I also used the standard screw type hose clamps. Jim
Trending Topics

Joined: Dec 2011
Posts: 120,439
Likes: 17,014
From: Durham, UK
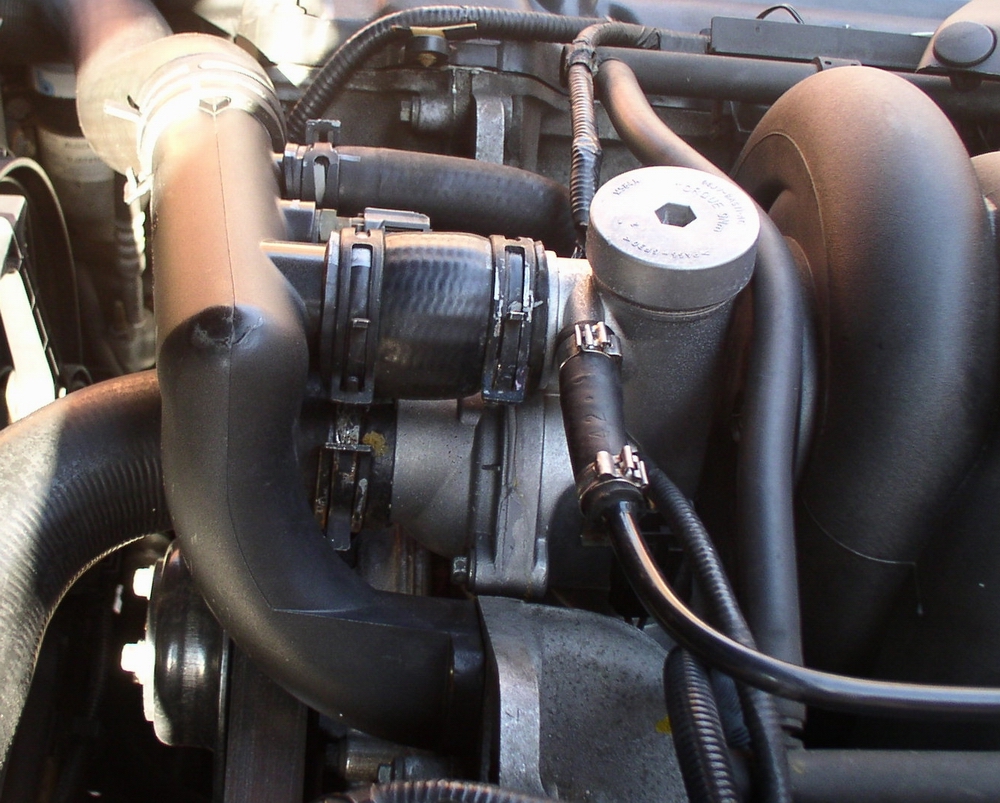
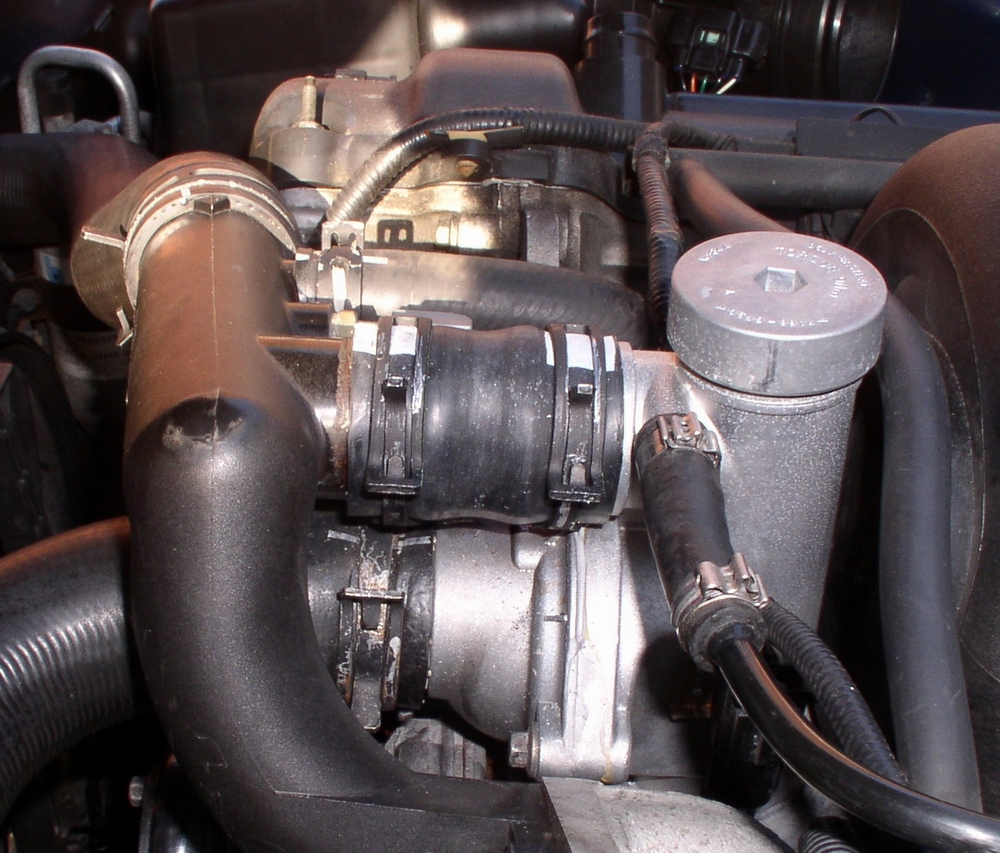
You may also want to check the condition of the short ByPass Hose from the Thermostat Tower.
Almost every one I see is bloated like this:
A new one looks like this:

The spring clips are used for two reasons:
1. quick to assemble in production
2. give constant and pre-determined tension
If you replace the with Jubilee (worm drive) clips, be careful not to overtighten on the plastic components.
Graham
Almost every one I see is bloated like this:
A new one looks like this:
The spring clips are used for two reasons:
1. quick to assemble in production
2. give constant and pre-determined tension
If you replace the with Jubilee (worm drive) clips, be careful not to overtighten on the plastic components.
Graham

Thread Starter
|
Member
Joined: May 2013
Posts: 37
Likes: 2
From: UK
Chaps, many thanks for your replies. Spot on, really ! The JagRepair website is just great, step by step with pictures, what else could I ask 
I was not planning to replace the various radiator hoses but I will carefully double check their condition this WE.
Also I would rather flush the coolant once I have got access to a ramp later this summer. Let's start gradually !
I was not planning to replace the various radiator hoses but I will carefully double check their condition this WE.
Also I would rather flush the coolant once I have got access to a ramp later this summer. Let's start gradually !

Thread
Thread Starter
Forum
Replies
Last Post
al_roethlisberger
XJ XJ6 / XJR6 ( X300 )
7
Sep 11, 2015 10:04 PM
KarimPA
New Member Area - Intro a MUST
8
Sep 3, 2015 07:32 PM
Currently Active Users Viewing This Thread: 1 (0 members and 1 guests)