
timing chain tensioners, need help with a few questions

Thread Starter
|
Senior Member
Joined: Oct 2010
Posts: 157
Likes: 5
From: Ridgewood NY
ive started preparing myself and my xk8 for the new secondary tensioners. i went ahead and removes the intake, coils, closed up the spark plus holes, removed the valve covers, cleaning the covers ect.
i was scrolling through the forums trying to find a diy with pics on exactly how to change the tensioners. i stumbled across this
https://www.jaguarforums.com/forum/x...ion-faq-37415/
now i have a few questions,
1. why would i need to drain the radiator? i got the valve covers off without the reservoir being removed. it was so simple. maybe it gets in the way for supercharged owners? im not sure but is there any reason why it would be removed?
2. i dont want to get any special tools if i can simply lift the exhaust cam with the help of a friend. problem is that i cant seem to understand or find where the exhaust cam caps are.
thanks for the help in advance
Veteran Member
Joined: Aug 2011
Posts: 1,294
Likes: 372
From: South Carolina
Hello Dead Anthony.
1. If you're just changing the secondary (upper) timing chain tensioners, and not the lower tensioners or chain guides, you can do it without draining the radiator. No problem.
2. Not sure how familiar you are with engine timing and its importance...but a screw-up here can ruin your engine. You basically have two methods for changing the tensioner without screwing with the timing...buy and use the special tools, or use the zip-tie method to make sure the upper timing chain DOES NOT move in relation to the sprocket and attached exhaust cam. I used the zip-tie method myself. Search on this forum and really read up on the procedure...there are a few different DIY posts on it, so you can get a few different perspectives.
The exhaust cam caps are the rectangular pieces of metal literally holding the exhaust cam in place. There are five of them for each cam, I believe. They MUST be reinstalled in the same ORDER and ORIENTATION in which you took them off.
Below, I've posted another perspective on the zip-tie method, as written up by someone on the XJ forum (same engine) a while back.
"Once you removed the valve cover (and all the spark plugs), put a 24mm socket wrench onto the bolt that holds the big belt-pulley on the front of the engine.
Use the wrench to turn the engine clockwise (viewed from the front of the car) until the cam flats are ligned up to check for chain strech.
(If the cam flats line up perfectly, your chain is not streched.)
Turn the engine until the exhaust cam is in a "good position" to remove it.
(With "good position" I mean that no valves are pushed down completely by the cam lobes. At this position you'll have as less force on the cam as possible.)
Now put a Zip Tie through one of the holes in the exhaust cam sprocket wheel to secure the timing chain on the exhaust cam. (See pic above.)
Remove all cam caps EVENLY and in this process lift the cam by hand as you loosen the caps. Once there is a point when there's no more force on the cam at all. Now you can remove all cam caps and lay them aside. (Make sure the caps will come back on in the same order!)
Loose the tensioner bolts, lift up the exhaust cam, remove the tensioner bolts and remove the tensioner.
Clean the surface where the tensioner sits and put in/on the new tensioner. Push exhaust cam back in and place all cam caps back in place.
Now it is important to fasten the cam caps EVENLY to not to break the cam!
(I constantly whiggled and turned at the exhaust cam while fastening the cam cap bolts to make sure the cam turnes free and is not wedged.)
When the cam caps are all bolted on again, use the wrench to turn the engine slightly to get tension on the timing chain. Remove red pin from new tensioner and your timing chain should be good to go.
Now you can slowly turn the engine with the wrench to make sure everything is in place and your timing is right. (Check cam flats again!)
Thats basically it...
One additional hint...
The new tensioners need to get filled with oil to build up their full dampening quality.
Before you start the replacement, pull the fuel pump relais in the trunk (#4 for NA engines) and start the car. The engine will start, but die instantly.
After the removal of the tensioners, leave that relais out and crank the engine to get the oil pressure to built up and to get the new tensioners filled with oil. Put the relais back in and your car will start immediately.
(If you skip that process it is possible that the timing chain builts up that much slack that it will slip one tooth and you probably risk your engine!)"
Last edited by The Coupe; Nov 9, 2011 at 03:12 PM.
Thread Starter
|
Senior Member
Joined: Oct 2010
Posts: 157
Likes: 5
From: Ridgewood NY
you have been a big help coupe! now i only have 1 more question. the exhaust cam is the big one in front of the tensioner right? i just want to be sure
(btw my user name fit me back when i had an is300. i was a member on this forum because my dad owned the xk8 before me)
(btw my user name fit me back when i had an is300. i was a member on this forum because my dad owned the xk8 before me)
Veteran Member
Joined: Aug 2011
Posts: 1,294
Likes: 372
From: South Carolina
The exhaust cam is the LOWER of the two cams you see when you take off the cam cover. It's attached to the exhaust cam sprocket, which is where you will use a zip-tie to tightly secure the chain (through one of the holes in the sprocket), so that your timing stays true. Don't forget to remove the zip-tie once you've installed the tensioner and resecured the cam caps to the proper torque.
You've got to be extremely careful in the operation you are now entering. Study up on the procedure, the parts, everything before you really get in.
You've got to be extremely careful in the operation you are now entering. Study up on the procedure, the parts, everything before you really get in.
Last edited by The Coupe; Nov 10, 2011 at 10:18 AM.

Senior Member
Joined: Sep 2010
Posts: 140
Likes: 56
From: Leawood, KS.
Having replaced my cam tensioners a few months ago, I want to reinforce what Coupe is saying about studying the various threads involved with the procedure of replacing the cam tensioners (There are a number of threads, some pictorial, to assist you).
I would also like to add one additional piece of information. In your initial post, in which you refer to a procedure you are following, it states that when replacing the cam caps and tensioners, the torque is 80 NM. They are NOT 80 NM. They are 9-11 Nm for the cam caps and 10-14 Nm for the tensioners.
There is a nice pictorial thread posted by EZDriver covering the tensioners. "experience & pics of replacing the upper cam chain tensioners". Unfortunately, I am not proficient at moving the thread to this post; however a search for posts by EZDriver will list it and a search in the threads "tensioners" about 5, 6, pages into the threads will also list this thread.
Last edited by Jag13cat; Nov 10, 2011 at 11:44 AM.


Joined: Oct 2007
Posts: 121,135
Likes: 6,653
From: PHX some of the time
Trending Topics
Thread Starter
|
Senior Member
Joined: Oct 2010
Posts: 157
Likes: 5
From: Ridgewood NY
once again id like to thank you al for the help. i looked at those pictures and i feel like my engine bay is slightly different (and dirtier thanks to old oil from sitting im guessing)
here is what im looking at
passenger side
drivers side
now i noticed that i dont have that sensor in the front like ezdriver and that metal thing in front of the cams are different
now are these the bolts that are holding the tension of the cams that i need to slowly remove 1 turn at a time?
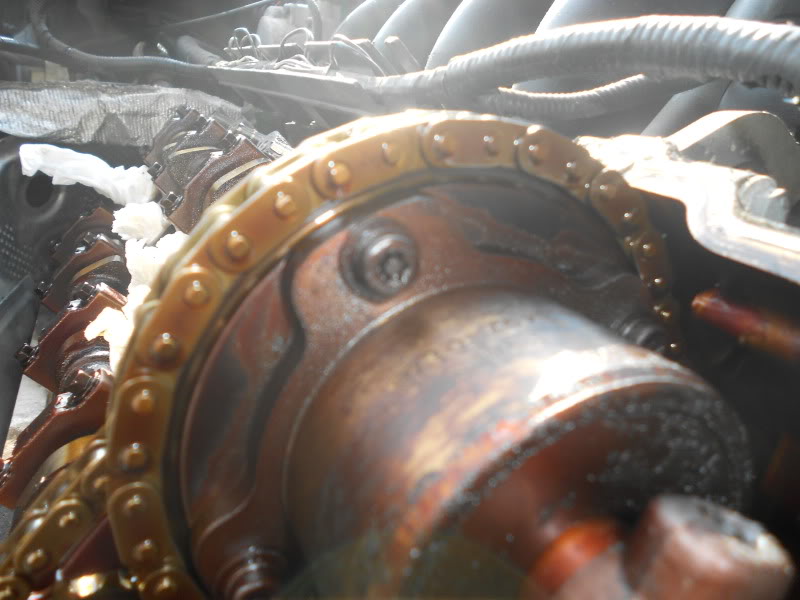
if they are, does that metal cap slide forward with the cam? im not sure what to expect when i start removing them
here is what im looking at
passenger side
drivers side
now i noticed that i dont have that sensor in the front like ezdriver and that metal thing in front of the cams are different
now are these the bolts that are holding the tension of the cams that i need to slowly remove 1 turn at a time?
if they are, does that metal cap slide forward with the cam? im not sure what to expect when i start removing them


Joined: Apr 2009
Posts: 1,689
Likes: 452
From: Central Florida
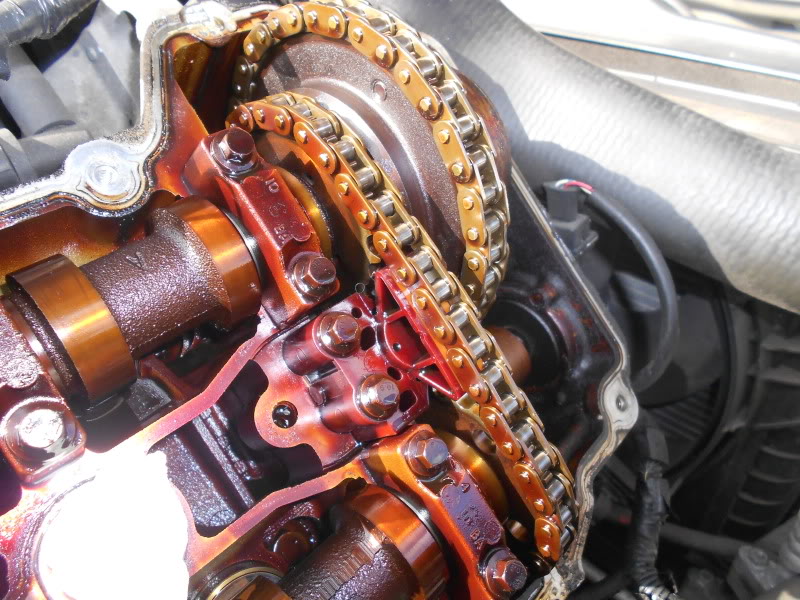
In the attached photo, the exhaust cam is marked with the blue arrow and the cam bearing cap bolts are marked with red arrows.
Cam sprocket hole for zip tie is marked with a green arrow.
Make sure you turn the engine over clockwise with a 24mm socket on the large nut at the front of the engine until the cam lobes are off the valves. Do one side and them turn it over again to set the other side. This is important because it takes the stress off the cam, otherwise you might break it when you put it back in.
Vector
Last edited by Vector; Aug 15, 2012 at 04:54 PM.

Senior Member
Joined: Jun 2011
Posts: 355
Likes: 112
From: Vancouver
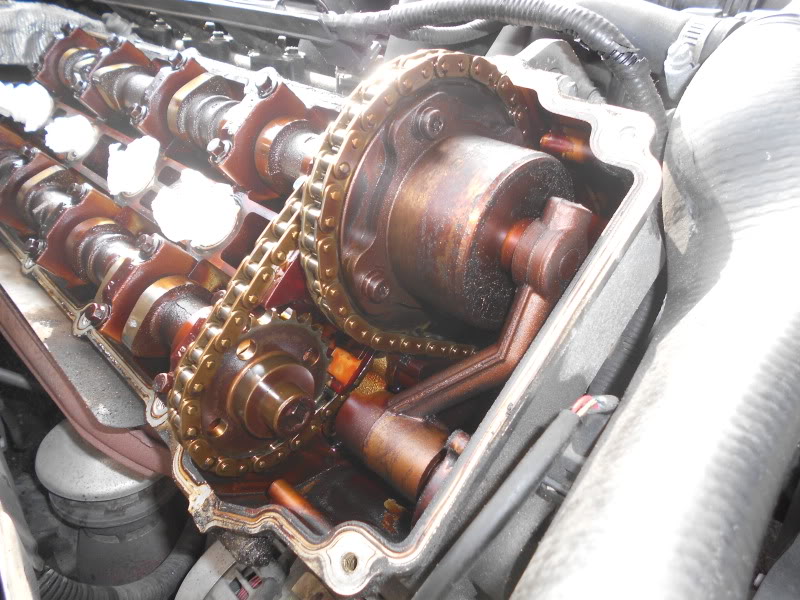
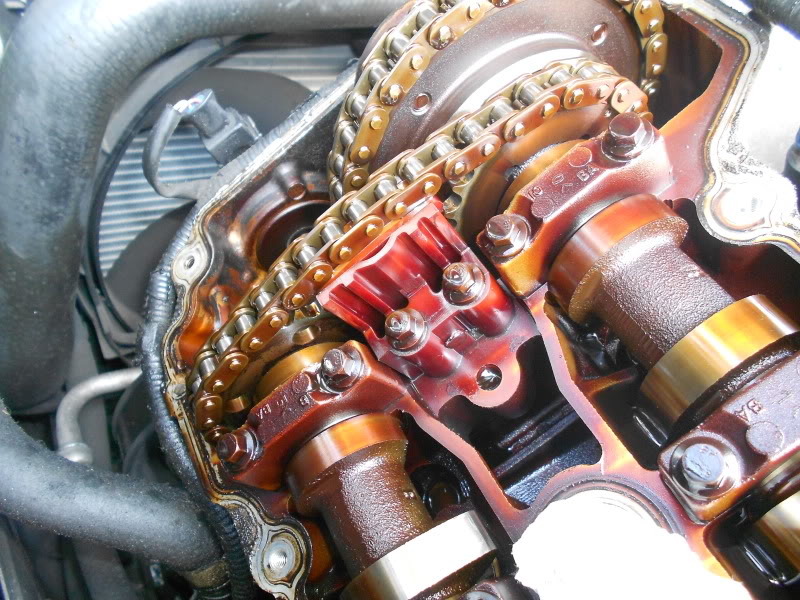
As The Coupe and Vector mentioned, your exhaust cam is the bottom one, not the big one up top.
Using the zip tie procedure, use one of the "eyes" in the exhaust cam sprocket (your photo DSN...929 shows the eyes clearly", or see Vector's photo), put the zip tie through the eye and tighten it around the chain to get the chain position secure on the sprocket.
Then you can remove the cam caps, which is what holds the cam down (again, Vector nicely marked these for you with the red arrows). You might need to give the cam a LITTLE tap to get it loose so you can lift it up.
Thread Starter
|
Senior Member
Joined: Oct 2010
Posts: 157
Likes: 5
From: Ridgewood NY
you guys are seriously awesome! thank you so much! im about to call sunroad ford because they havent mailed out my tensioners yet and its been almost a week. they say the screws are on order but how long does it take to get screws?

Senior Member

Joined: Oct 2011
Posts: 877
Likes: 79
From: Rocklin, CA
There is a special hole in the flywheel to lock down the crank. You should do that if you are not going to use the Jag tools (there is someone who loans that set out for shipping costs). The last think you want is to have that crank turn and throw everything off. I wouldn't risk it all on zip ties.
Joined: Apr 2009
Posts: 1,689
Likes: 452
From: Central Florida
Have you done this job?
Vector

Veteran Member
Joined: Dec 2010
Posts: 2,125
Likes: 279
From: Holly Lake Ranch, Texas
After reading the latest replies I am confused about the recommendations for changing the upper tensioners. Especially removing the engine. I did that using the zip tie method on the exhaust cam and did not lock the engine. Did not worry about locking the cams. And certainly did not remove the engine. It is really simple. The hardest part is removing the cam covers. After that just zip tie the exhaust cam. In very small steps remove the cam caps being sure the cam comes up even and level. Lift the exhaust cam slightly and remove the tensioner and put the new one in. I did this last fall and posted eleven pictures with instructions. Find my post and keep it simple. Don't do a lot of work you don't have to do. That can cause more porblems just messing with things that don't have to be messed with.
EZDriver
EZDriver

Senior Member
Joined: Apr 2011
Posts: 368
Likes: 32
From: Monaco
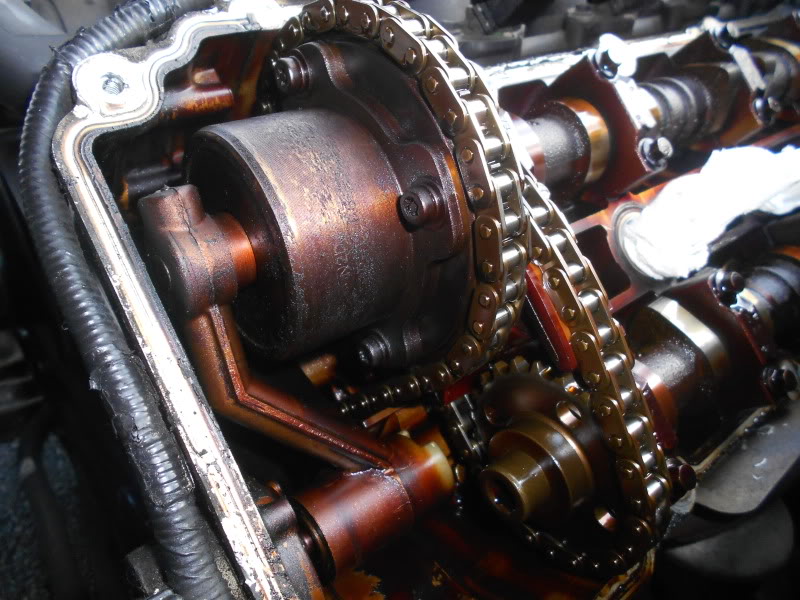
Still amazed how terrible these engines look inside.
You guys must use different oil in the states, because this is not the first engine looking like this.
Have not seen a single engine where the parts a so contaminated here in europe, and I have seen many engines
You guys must use different oil in the states, because this is not the first engine looking like this.
Have not seen a single engine where the parts a so contaminated here in europe, and I have seen many engines
Veteran Member
Joined: Sep 2010
Posts: 1,713
Likes: 451
From: New Jersey
I believe what you're seeing here is the result of heat. Can't remember the name of the redish residue gunk that accumulates when the oil gets sort of fried, but it doesn't seem to show up in engines which have not gotten too hot. My engine has none after ~ 80k miles.