When you click on links to various merchants on this site and make a purchase, this can result in this site earning a commission. Affiliate programs and affiliations include, but are not limited to, the eBay Partner Network.
Understanding VVT and Repair with pictures. WRITEUP
I have received a lot of help here on the boards and thought I would contribute a writeup on a subject that is not really discussed into detail. From this writeup, you should attain a good understanding on how the VVT unit works, how to assemble and dissassemble the unit, and even how to repair it. Keep in mind I am writing this at 3am, so i appologize beforehand for the run-on sentences and grammatical/spelling errors that you may have to deal with.
If you plan on using my information to repair your VVT, I advise that you only do this if you are sure your vvt is faulty. This is not a maintenance step! Work at your own risk, I am in no way responsible for what happens to your car, or how you apply my information.
First off, I will say that there is NO WAY to remove the VVT solenoid without removing the front timing chain cover so it is a bit of work. I have read that it is possible to remove the VVT with just the removal of the valve covers but I assure you this information is false.
Now, the reason I had to take apart my VVT will most likely differ from why you may tackle this job. While doing the tensioners, I for some reason removed the 5 torx bolts holding the vvt to the sprocket. When i removed the last bolt, the spring loaded vvt popped off the sprocket and fell to the floor. Not thinking anything of it, upon completion of the tensioners, I just screwed the VVT back on. Once I assembled everything, i started the car up and the car idled horribly (lots of shaking). I figured it had to be the VVT. I started
reading up on the VVT, and couldn't find much info, so i decided to take it apart and see how it worked, giving me an understanding of how to fix my situation. THis is what I found.
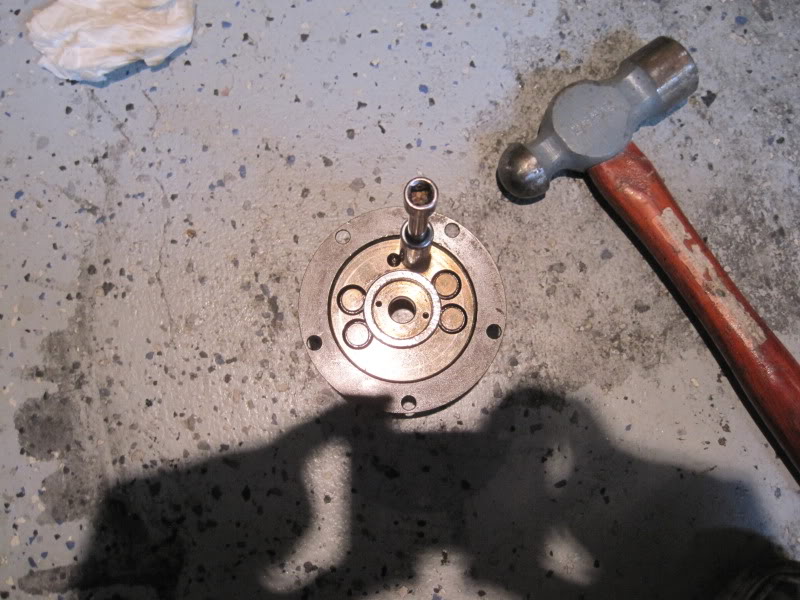
As you can see, there are 4 parts that make up this solenoid. I don't know the correct terminology but heres a description.
1. Housing
2. Spring
3. Small Gear
4. Big Gear
When people say that the VVT has failed, I honestly don't see how this piece could fail. All the pieces are solid, and I would be surprised to see any of these pieces break. Mine did have a lot of sludge in it, which could be the problem for those whose vvt's are not properly advancing/retarding. If you hear the VVT clicking, it is most likely the o-rings in the VVT Bush carrier (the piece that looks like the mount for the VVT). As we go on, you will see how the vvt works and how it moves internally.
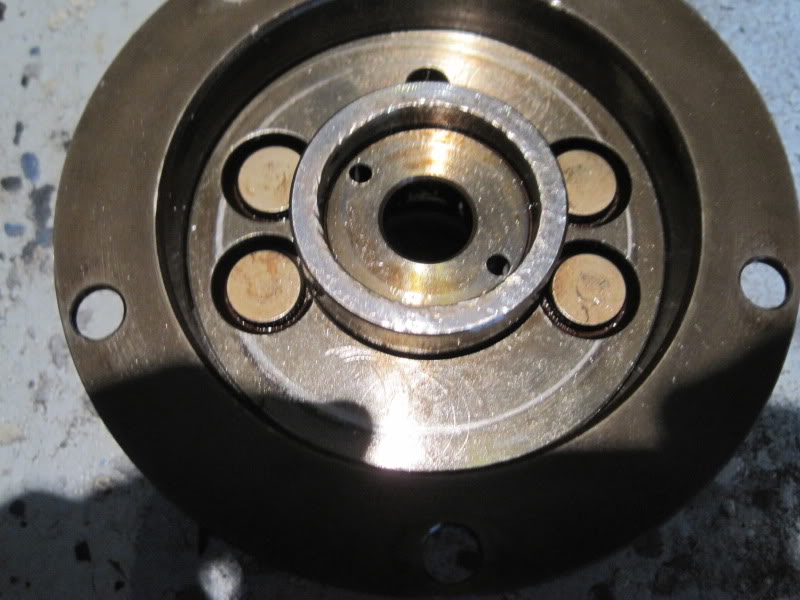
The picture you see below is the gear from the top view. As you can see, there are two small holes (these holes are for adjusting the vvt to the "full retarded position". Jaguar has a special tool for this, but i rigged something up as we will see further.
After cleaning all the parts, I soaked them in wd40 and then put them back together. First, I took the small gear with the 2 adjusting holes and fit it into the larger gear. The larger gear has two of it's sides that are not fixed, in that they move very slightly. you will need to move these two pieces slightly to get the small gear to fit in (once you have it apart, you will know what I am talking about. Once this piece is fitted, you then take the big gear with the small gear installed and assemble it into the housing. Make sure the teeth
are all lined up. I spent about an hour trying to figure out how to put this piece back. I almost gave up which is when i pulled out my hammer and tried to bang it in there. Turns out it went in. Just to make sure i didn't damage anything, I pulled it out and inspected everything. No damage. As far as I am concerned, this is the only way to get it back together. Don't bang too hard, just light taps. You should have something that looks like this. I hammered the center of the small gear with the adjustment holes.
Now, i flipped the housing over and with my thumb slightly pushed in the hole where the bush carrier fits into to slightly push the small gear up. You want to push this gear very slowly to make sure it doesn't pop out of place. THis gear needs to be pushed up so the big gear can be properly seated in the housing (IF YOU DO NOT PUSH THIS LITTLE GEAR UP, THE BIG GEAR WILL NOT, I REPEAT WILL NOT BE PROPERLY SEATED). Now, if you look at the picture above, you will see that i have a socket with an extension on the big gear. This is what i used to gently hammer the big gear down. In this step, you are not hammering the small gear with the 2 adjustment holes, you are Hammering the big gear (the location where the socket is standing). When the gear is fully seated, you should have something that looks like this.
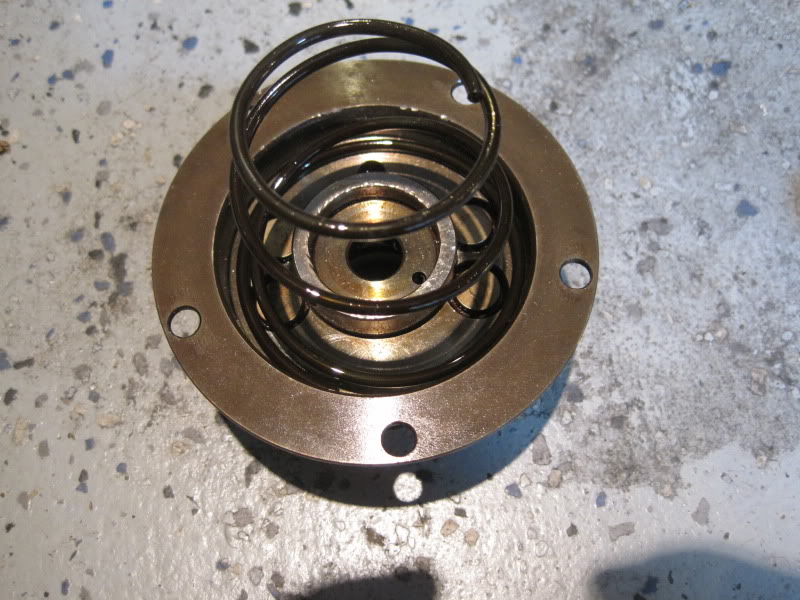
As you can see, the big gear went down and the small gear came up. I believe this to be the FULLY RETARDED POSITION. The big gear that is seated down will move up with oil pressure, thus advancing timing. THe big spring seen below will keep this in the retarded position when installed. As seen below, make sure the larger diameter of the spring is rested on the big gear, and the smaller goes to the cam sprocket.
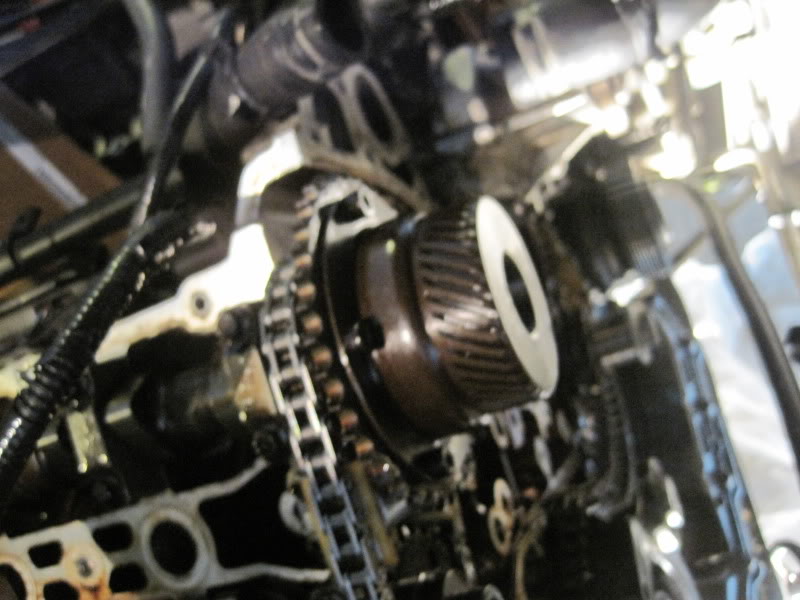
Once you have the spring on, bolt down the vvt to the intake cam with the 5 torx bolts. VVT installed will look like this (but you probably already knew that)
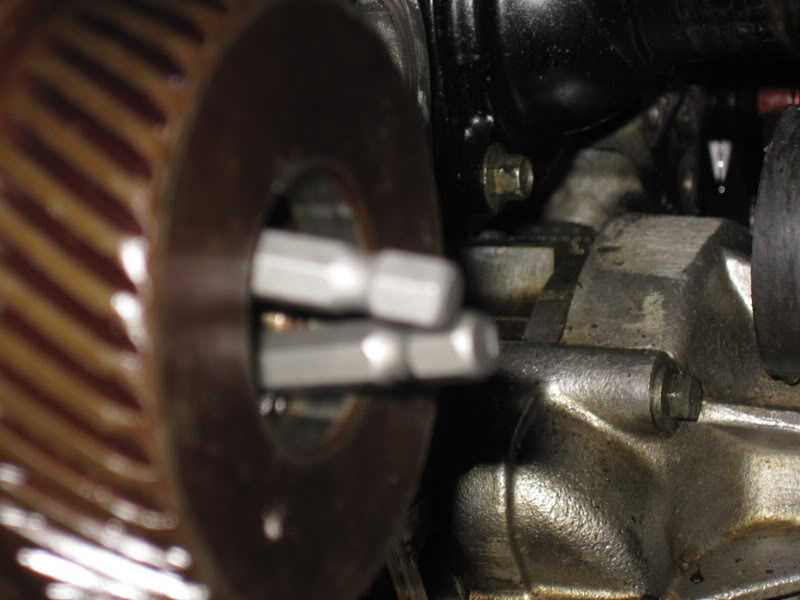
Now, at this point, I was pretty sure this piece was in the fully retarded setting. just to double check, I got two very small torx bits that i can fit into the two adjustment holes and twisted them with a vise grip. As i suspected, they would not twist in the counter clockwise position (retarded), but they would twist in the clockwise position (advanced). This reaffirmed my belief that it was in the fully retarded position. I twisted the two bits back to the fully retarded position by twisting counter clockwise. Keep in mind that spinning the vvt with these two bits was a huge pain in my ****, but is possible. I'm sure the tool would have made this a ten second job instead of 2 minutes of frustration and aggravation.
When i was sure I had everything set properly, I tightened my intake cam bolt, and then installed the bush carrier. The bush carrier has 3 different lenght 10mm bolts. Before you install the bush carrier, take the bolts and put them in their holes just to make sure you know which length bolt goes in which hole. I put everything back together, and voila!!!! I have a purring kitty.
You've gone to a lot of effort to document all this. Thanks.
So: was this the source of the funny compression readings you were getting on the one bank after doing tensioner work there. Was it a valve timing issue after all? It sure seemed like one.
Nice detailed write c/w pics too.......thanks so much for sharing and contributing to the board.
I'm sure this will be of use to others in the future and will no doubt be FAQ'd by one of the mods shortly
This, without a doubt, is a very useful thread. More so now than even at the time it was first posted.
The thing I have noticed though, is that on the earlier version, there are four bolts holding the vvt to the sprocket. Are the internal workings different with the earlier engine? I can't see anything on the earlier version on here. Maybe someone could verify?
Steve
For a couple of years I have been living with the VVT rattle on cold startup. Does that mean the unit(s) needs replacing? Or can they be refurbed? Either way, great writeup!
I do not believe that a cold start-up VVT rattle automatically points to replacement. At 114,600 miles, I occasionally hear the same brief noise on my wife's 2006 XK8 if I happen to be outside near it when she starts her car. It does not concern me so I do not even mention it to her....
I am at present looking into this "problem" I can see that it isn't really a lot to worry about, it would be nice to have a cure of some sort as I find it an irritating noise.
As far as I can make out, the cause of it is either a poor acting solenoid, or the lack of volts to it, or the lack of basic oil pressure. Or maybe a combination of all three.
There is just one other thing and that is oil sludge inside the vvt itself. The oil passage to the solenoid housing on the front of the head casting, just before it enters the solenoid housing there is a small filter. If that filter is partially blocked, you could do a lot of work before you found that one.
I've read in various forums that the use of a decent flushing oil on oil changes would be a good thing plus a valid oil pressure test before taking anything apart.
Steve
Yes, the noise is annoying but apparently not a symptom of a serious problem. I'm in no rush to pull the VVTs apart, so I can live with the brief occasional rattle.
I do not believe that a cold start-up VVT rattle automatically points to replacement. At 114,600 miles, I occasionally hear the same brief noise on my wife's 2006 XK8 if I happen to be outside near it when she starts her car. It does not concern me so I do not even mention it to her....
I've just started to hear a similar rattle with mine,sounds like a diesel but not a constant noise.Noticed it first when changing gear and bringing the clutch in and loading the engine again.also when accelerating with any gusto but only above about 2,000 RPM.
could this be VVT issues?only asking as paid a bargain price for a stunning motor and I'm worried it's going to be a major expense.
Hi Andy,
Not sure if what you describe is a VVT issue, although the AJ25 V6 is a somewhat different beast to the motor that powers our XKs; you will be better placed in the X-type forum.
I imagine one of our tireless mods will be along to move your question over.
Yes that code�s correct!! Thanks for your response. Well it�s coming apart for the 4th time. I�m getting good at removing the front cover... this time I�ll clean the VVT oil ports and make sure mechanically all�s well. Should have done that from the start. It all started when I replaced the chains, guides and tensioners. One guide almost completely disintegrated with its reminisce settling in the oil pan and apparently in the VVT. There are no shortcuts. Next time...
Would love to resolve my startup chatter.
There is very little intel out there on the VVT system on these cars.
Giving consideration to the idea that the chatter is based on a loss of oil pressure to the VVT when engine is stopped, can you pinpoint where the oil feed is to the VVT when you take another look? Basically, trying to figure out the level of complexity to tackle the VVT setup for that particular issue.
When you can, check the pickup in the pan as well. I have a car with 75k miles and I changed the oil pan gasket not long ago. It kinda ended up turning into a fiasco (was resolved without too much pain thankfully), but on removal of the plastic screened pickup in the sump I would say that it was at LEAST 20% gummed up. Maybe more. Not big, solid or crumbly types of debris, just good ol fashion oil sludge...caked solid.
One thing I will NOTE is to take the pick up off in stages. Turn the first bolt 2 or 3 turns, then the other, then back again, and repeat... It will slowly come down. If ALL cars are the same design as what I have, the two bolts that hold the plastic pickup to the underside of the engine have these special washers on them that keep the bolts in the pickup arms which will BRING/PULL the plastic pick up down with them as you remove/turn out the bolts from the engine block. If this isn't realized while removing, it is possible to snap the pickup, either the arm(s), or the body, or both. Jus say'n.
Certainly, a valid consideration in the process but the oil pressure does arrive a second or so after initial startup.
MY feeling is that there must be some sort of check valve arrangement that holds the oil pressure once the engine is shut off.
Like many others, if I start the car again withing a short period of time (like 10-20 minutes), there is no chatter on the start. If it is left for a hour or longer, it chatters again for a second. The common wisdom is that the oil pressure is lost to the chain tension assembly (oil pressure controlled) and the system has to basically reset when oil pressure finally arrives. This is the chatter that is first heard as the chains on the VVT are essentially loose when you start the car and then suddenly tension up.
Ove the years, I have heard and seen many folks saying that is just an annoyance and is not detrimental to the car (not like the camchain tensioner issues of the 4.0 engines). I can confirm that after 4+ years of ownership with the issue, the engine is fine, and the chatter has neither increased nor decreased over the years.