
Working thru issues on my newly acquired 04 XK8

Thread Starter
|
Veteran Member


Joined: Jan 2009
Posts: 2,199
Likes: 1,371
From: Hudson, Florida
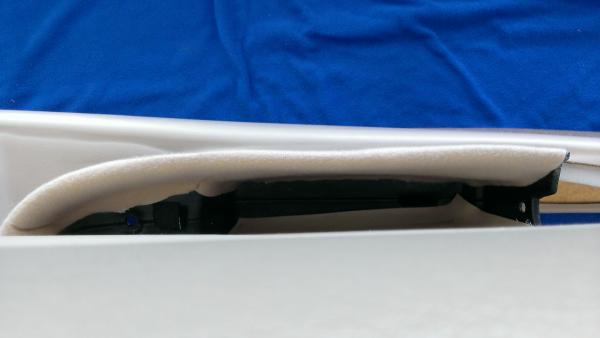
I removed the door panels to replace the fabric down in the hand grip hole. It suffered from foam crumbling and caused the fabric to be loose. Not really that noticeable but now that I knew it was a mess I could not just ignore it.
I pulled the panels off and removed the screws that held on the armrest. When I pulled out the fabric the foam turned to dust. After cleaning that up I realized that there was another piece of fabric that was stuck to the black plastic. Apparently the foam was in between the two types of fabric. So I peeled the 2nd fabric off the black plastic.

The original fabric was sewn onto the end of a short piece of vinyl that was tucked in to place. I cut the old fabric off and left the vinyl where it was.

I laid the old fabric onto some leftover headliner material and cut a new piece from that pattern. I decided not to reuse the old fabric like I did for the A pillars and header. I liked the feel of the new headliner fabric better.
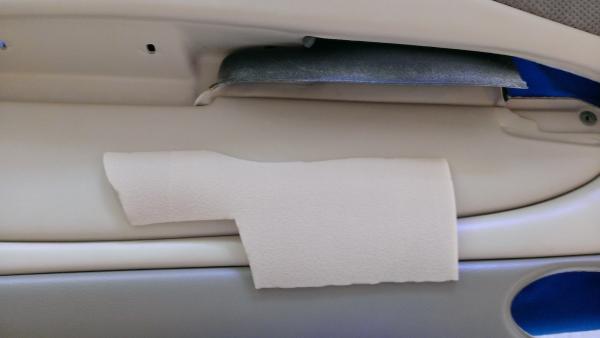
Here is the new piece covered with the headliner adhesive.

And now mounted to the black plastic tub.
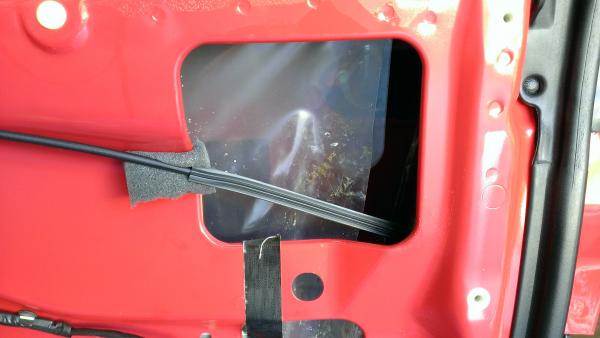
Now time to address the clunks and rattles. I removed the passenger side insulator panel and tightened all the mounting bolts for the regulator. The bottom bolt was very loose and allowing about 3mm play. Probably the source of the clunk I was hearing. The driver side door had zero loose bolts. I also removed the speakers to have a better look inside the doors.

Since I had the speakers out I cleaned and lubed the sliders for the door swing limiters.

Checking for rattles I found that this cable could slap the door metal when closing the door. So a little foam padding fixed that.
I have always thought that the interior door handles felt cheap and sloppy. On the passenger side I put some padding behind the plastic housing. That helped a lot.

The driver side got the same padding behind the plastic but also needed some work to make the memory button panel not so wobbly. It is one of the cheapest feeling parts of the interior.
First I made a 2mm dense foam pad for behind the switch panel.
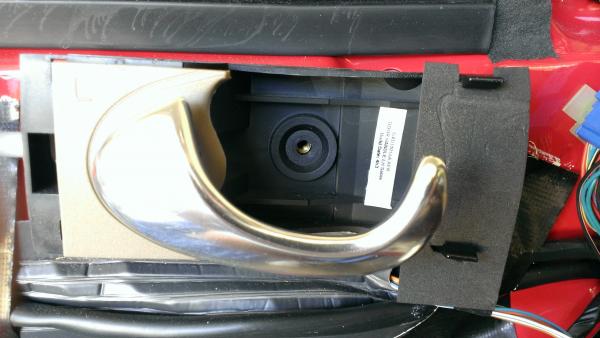
The real problem with this panel is the retaining tabs. They are poorly designed and too weak to hold the switches in place. They needed a little help to stay tight and secure. Zip ties worked great.

Now the switch panel is aligned flush and rock solid.

Doors and panels are now good for another 10 years.
I pulled the panels off and removed the screws that held on the armrest. When I pulled out the fabric the foam turned to dust. After cleaning that up I realized that there was another piece of fabric that was stuck to the black plastic. Apparently the foam was in between the two types of fabric. So I peeled the 2nd fabric off the black plastic.
The original fabric was sewn onto the end of a short piece of vinyl that was tucked in to place. I cut the old fabric off and left the vinyl where it was.
I laid the old fabric onto some leftover headliner material and cut a new piece from that pattern. I decided not to reuse the old fabric like I did for the A pillars and header. I liked the feel of the new headliner fabric better.
Here is the new piece covered with the headliner adhesive.
And now mounted to the black plastic tub.
Now time to address the clunks and rattles. I removed the passenger side insulator panel and tightened all the mounting bolts for the regulator. The bottom bolt was very loose and allowing about 3mm play. Probably the source of the clunk I was hearing. The driver side door had zero loose bolts. I also removed the speakers to have a better look inside the doors.
Since I had the speakers out I cleaned and lubed the sliders for the door swing limiters.
Checking for rattles I found that this cable could slap the door metal when closing the door. So a little foam padding fixed that.
I have always thought that the interior door handles felt cheap and sloppy. On the passenger side I put some padding behind the plastic housing. That helped a lot.
The driver side got the same padding behind the plastic but also needed some work to make the memory button panel not so wobbly. It is one of the cheapest feeling parts of the interior.
First I made a 2mm dense foam pad for behind the switch panel.
The real problem with this panel is the retaining tabs. They are poorly designed and too weak to hold the switches in place. They needed a little help to stay tight and secure. Zip ties worked great.
Now the switch panel is aligned flush and rock solid.
Doors and panels are now good for another 10 years.
Veteran Member
Joined: Feb 2011
Posts: 2,916
Likes: 547
From: North Carolina
I wish I had read this while I was doing my remote top installation. I never thought about checking all the screws to tighten up everything. I too, have those clunks. I think I'll pull off the panels yet again and try a few of your maintainance ideas!!

Thread Starter
|
Veteran Member
Joined: Jan 2009
Posts: 2,199
Likes: 1,371
From: Hudson, Florida
However now I think the rear end seems less stable on bumpy roads. Probably because the front is in such good shape now I have nothing else to notice but the rear. I guess I'll have a look at that next.
Thread Starter
|
Veteran Member
Joined: Jan 2009
Posts: 2,199
Likes: 1,371
From: Hudson, Florida
My car is almost to 40K miles and looked to have the original front brakes on it. The pads were worn down to maybe 1-2mm left on them and rotors had a good lip. So time to replace all the old stuff and spruce up the calipers.
Since I removed the caliper mounting bracket to replace the rotors I painted them too. I liked the paint scheme I used on my 05 VDP brakes so I decided to do the XK8 the same way. My car has enough red on it already so no red calipers for me.
I painted the brackets a gunmetal gray color along with the back of the outer pad. Then painted the calipers bright silver. The rotor centers and vanes were coated with high heat flat black.
I cleaned the backing plates, etc since it was all accessible. Never like to reassemble dirty parts.
Finished paint job

A nice match for the wheels and their shadows I think

Since I removed the caliper mounting bracket to replace the rotors I painted them too. I liked the paint scheme I used on my 05 VDP brakes so I decided to do the XK8 the same way. My car has enough red on it already so no red calipers for me.
I painted the brackets a gunmetal gray color along with the back of the outer pad. Then painted the calipers bright silver. The rotor centers and vanes were coated with high heat flat black.
I cleaned the backing plates, etc since it was all accessible. Never like to reassemble dirty parts.
Finished paint job
A nice match for the wheels and their shadows I think

Veteran Member
Joined: Jan 2009
Posts: 13,083
Likes: 4,740
From: Raleigh, NC
Very nice touch on refinishing the calipers, but how will you keep them reasonably clean without damaging your new paint?
I'm planning to install new brake pads and clean the calipers on my wife's XK8 as part of my 72,000-mile service on that car (probably in late October), but I'm not going to do any painting....
I'm planning to install new brake pads and clean the calipers on my wife's XK8 as part of my 72,000-mile service on that car (probably in late October), but I'm not going to do any painting....
Thread Starter
|
Veteran Member
Joined: Jan 2009
Posts: 2,199
Likes: 1,371
From: Hudson, Florida
Very nice touch on refinishing the calipers, but how will you keep them reasonably clean without damaging your new paint?
I'm planning to install new brake pads and clean the calipers on my wife's XK8 as part of my 72,000-mile service on that car (probably in late October), but I'm not going to do any painting....
I'm planning to install new brake pads and clean the calipers on my wife's XK8 as part of my 72,000-mile service on that car (probably in late October), but I'm not going to do any painting....
I use ceramic pads to minimize dust and buildup. For this car I bought Wearever rotors and pads from Autozone. About $200 total.
The rears look to have been replaced recently but I still plan to swap out the pads and clean up the calipers to match the fronts.
Thread Starter
|
Veteran Member
Joined: Jan 2009
Posts: 2,199
Likes: 1,371
From: Hudson, Florida
I finally got around to converting one of my keys to the newer switchblade style. I used the valet key as a donor for the transmitter and stalk. My 05 VDP had me very accustomed to the newer style and I wanted that for my XK8 too.
I followed these instructions. Took me about an hour.
https://www.jaguarforums.com/forum/x...ictures-93167/
Now I don't have to use the dangling key/fob anymore.

I followed these instructions. Took me about an hour.
https://www.jaguarforums.com/forum/x...ictures-93167/
Now I don't have to use the dangling key/fob anymore.
Thread Starter
|
Veteran Member
Joined: Jan 2009
Posts: 2,199
Likes: 1,371
From: Hudson, Florida
I took the car in to the dealer for an oil change and to get it up on their lift for a good look. I have already addressed all the issues I could find. Perhaps another set of eyes and a different vantage point would uncover some more. Mileage is still just under 40K.
The tech I was working with gave my car a big thumbs up and said "I can't find anything to sell you. This is a great car." That gave me a big smile for sure. We reviewed every aspect of the car and I am a pretty happy guy.
We did notice a small crack in the short fat hose to the evap canister. I had a single occurrence of P0456 slow evap leak and that is probably the cause. So I ordered a hose while I was there and will replace it next week.
Taking a car to the dealer for oil changes is not cheap at $90. Having a good relationship with a dealer is worth every extra penny.
My experience with this new to me XK8 has been a great one so far. Really enjoying all the tinkering with it.
Now that the car is essentially back in shape, next is to take it on a road trip. Planning to drive it to Vermont if weather stays favorable. I expect the car to make me proud all along the way.
I think I'll swap out the original battery before I go...just in case.
Veteran member

Joined: Mar 2007
Posts: 11,345
Likes: 1,165
From: Oak Ridge, TN
Originally Posted by rothwell
Taking a car to the dealer for oil changes is not cheap at $90. Having a good relationship with a dealer is worth every extra penny.
Thread Starter
|
Veteran Member
Joined: Jan 2009
Posts: 2,199
Likes: 1,371
From: Hudson, Florida
Today I replaced the battery. The car still had the original one. It was not giving me any trouble but now that I am planning to put a lot of miles on it I thought it wise to retire the old battery and avoid any issues while traveling north in non-Florida climates.
I chose this battery. I bought it online using a 30% off code. Picked it up at my local store. Cost was about $134 out the door.AutoCraft Gold AGM Battery, Group Size H8, 900 CCA-H8-AGM - Advance Auto Parts

While pulling out the old one I noticed this gold bolt that does not appear to do anything. It was at the negative end of the battery and screwed into the floor. Anybody know why it is there??

I chose this battery. I bought it online using a 30% off code. Picked it up at my local store. Cost was about $134 out the door.AutoCraft Gold AGM Battery, Group Size H8, 900 CCA-H8-AGM - Advance Auto Parts
While pulling out the old one I noticed this gold bolt that does not appear to do anything. It was at the negative end of the battery and screwed into the floor. Anybody know why it is there??
Thread Starter
|
Veteran Member
Joined: Jan 2009
Posts: 2,199
Likes: 1,371
From: Hudson, Florida
I finally got around to starting the car with the new battery installed. I was shocked at how much faster/easier the engine cranked over. I guess my old battery was struggling even though it had not given up totally.
Thread Starter
|
Veteran Member
Joined: Jan 2009
Posts: 2,199
Likes: 1,371
From: Hudson, Florida
I got a P0456 code one time a few weeks ago. I wrote it off as a gas cap issue, reset the code and waited for it again. Since then I had the car up on a lift and could see the real reason for the code. The short hose connecting the valve to the canister was cracking. I ordered a hose from the dealer (P/N NJC6068CA - $12) and installed it yesterday.
First, I see nothing special about the hose. You could probably get a suitable piece of hose from any auto parts store for less money.
I removed the passenger rear wheel to get to the canister. It is held on by three studs with 10mm hex nuts. Easy to get to once the wheel is off. On the end of the canister there are two connections. One is the hose that needed replacing, the other is a plastic flex pipe with an oring connector that just plugs into the canister with a friction fit. Once that flex pipe was pulled out I removed the spring clip on the cracked hose and slid the canister and hose out and off the valve (which does not need to be removed).
The hose was cracked pretty good. No wonder I was getting a code.

What it looks like with the canister removed. Hose goes onto the white connector.

View from the wheel area

I replaced the hose with the new one. The hose goes onto a similar connector that the flex pipe used with the oring fit. I removed the spring clip, slid on the new hose, and returned the spring clip.
Then I remounted the canister while sliding the hose onto the white coupling. Returned the spring clip and plugged in the flex hose.

Back go the three 10mm nuts and done! Whole thing took less than 30 minutes.
Hopefully no more P0456 for me.
First, I see nothing special about the hose. You could probably get a suitable piece of hose from any auto parts store for less money.
I removed the passenger rear wheel to get to the canister. It is held on by three studs with 10mm hex nuts. Easy to get to once the wheel is off. On the end of the canister there are two connections. One is the hose that needed replacing, the other is a plastic flex pipe with an oring connector that just plugs into the canister with a friction fit. Once that flex pipe was pulled out I removed the spring clip on the cracked hose and slid the canister and hose out and off the valve (which does not need to be removed).
The hose was cracked pretty good. No wonder I was getting a code.
What it looks like with the canister removed. Hose goes onto the white connector.
View from the wheel area
I replaced the hose with the new one. The hose goes onto a similar connector that the flex pipe used with the oring fit. I removed the spring clip, slid on the new hose, and returned the spring clip.
Then I remounted the canister while sliding the hose onto the white coupling. Returned the spring clip and plugged in the flex hose.
Back go the three 10mm nuts and done! Whole thing took less than 30 minutes.
Hopefully no more P0456 for me.
Veteran Member
Joined: Aug 2007
Posts: 3,431
Likes: 573
From: Los Angeles
Hey Rothwell--it has been a while since I visited your ongoing post and the information and photos are great. It would be good if each of these projects could be written up as a separate "sticky" in the diy section. I was especially noting your write-up on the door panel as the first "flaw" if found in my car is a cigarette burn or something in that felt material in the grip hole. Nobody can see it but I can feel it. I always wondered how or of that grip can be removed to get at the fabric. Also, it gives me incentive to try for a third time to locate the rattle coming from the rear of the door. The previous times I never really totally removed that cardboard door card to get access, and the interior plastic crap material kept getting in the way.
Doug
Doug
Member

Joined: Feb 2013
Posts: 32
Likes: 3
From: albuquerque new mexico
OK so I got my 03 XK8 convertible one year ago. Here is the list of fixes I have done, all with the help of this forum. Rothwell inspired me to post this list.
1. Replaced battery
2. Repaired passenger side visor vanity mirror cover that was falling off
3. Replaced overhead console mounting bracket to stop the overhead console from falling off.
4. Inside rearview mirror fell off so I successfully re-attached it and recalibrated the compass.
5. Replaced passenger side, side marker light that had broken clips, causing it to fall off.
6. Had minor paint work done on driver side rear fender
7. Re-covered center console leather with new replacement hide from ebay.
8. 4 new Michelins
9. Replaced little canister hose, no check engine light now for three weeks!
10. Cleaned wheel speed sensors
Next up, stop driver door window rattle when window is down all of the way, and find problem in drivers seat that causes the air bag light to come on at random times, and find a way to refinish the tops of the door panels that are cracking.
Thanks to everyone for such great advice!!
Thread Starter
|
Veteran Member
Joined: Jan 2009
Posts: 2,199
Likes: 1,371
From: Hudson, Florida
On the way back from Vermont to Florida I noticed an increasing vibration in the passenger rear. Since being back in Florida it just got worse and then I noticed that one rear tire is coming apart internally. The tires were crap BFGoodrich G-Force that were noisy and too stiff for my taste anyway and I had it planned to replace them as soon as I could wear them out.
So my timeline for replacing them got moved up and today I replaced them with new Michelin Pilot Sport A/S 3 tires. My local tire shop matched the tire rack prices.
Only put a few miles on them so far but wow what a difference. Extremely quiet, better ride and handling is smoooooooth.
So my timeline for replacing them got moved up and today I replaced them with new Michelin Pilot Sport A/S 3 tires. My local tire shop matched the tire rack prices.
Only put a few miles on them so far but wow what a difference. Extremely quiet, better ride and handling is smoooooooth.