LOG IN
REGISTER
Forums
General Jaguar Forums
New Member Area - Intro a MUST
Jaguar Forums Feedback & Suggestion Center
General Tech Help
Jaguar Models ( Current )
XF (X260)
F-Type ( X152 )
XE ( X760 )
E-Pace
F-Pace (X761) / C-X17
I-Pace EV
Jaguar Models ( Modern )
XF and XFR ( X250 )
XJ ( X351 )
X-Type ( X400 )
S-Type / S type R Supercharged V8 ( X200 )
XJ XJ6 / XJ8 / XJR ( X350 & X358 )
XJ XJ8 / XJR ( X308 )
XJ XJ12 ( X305 )
XJ XJ6 / XJR6 ( X300 )
XK8 / XKR ( X100 )
XK / XKR ( X150 )
Jaguar Models ( Classics )
Mark V - X 420G
MKI / MKII S type 240 340 & Daimler
XK120 XK140 XK150
E type ( XK-E )
XJ6 & XJ12 Series I, II & III
XJS ( X27 )
XJ40 ( XJ81 )
XKSS
XJ220
Other Jaguars
Other Jaguar Models / Concepts / Replicas
Diesel variants
Diesel variants - All models
Non Jaguar vehicles
Non-Jaguar Vehicles
Brand Review
Jaguar Press release
Jaguar Customer Relationship Centre
Jaguar Engines & transmissions
Wheels / Tires, Suspension & handling
Interior
Exterior
Audio/Visual Electronics
Detailing / Car care
Motorsports
Jaguar Classifieds
Marketplace
PRIVATE For Sale / Trade or Buy Classifieds
VENDOR 'For Sale' Classifieds
Regional
US Northeast
US Central
US Southwest
US Western
US Northwest
US Midwest
US Mid Atlantic
US Lower Atlantic
US Southern Midwest
Canada
Mexico, South America
UK & Eire
Europe
Australia - Queensland
Australia - New South Wales / ACT
Australia - Victoria / Tasmania
Australia - Western
Australia - South / NT
New Zealand
Other Areas
Official Site Sponsors
VENDOR Threads
General Interest / History
Sights N Sounds
Photography
Forum announcement archives / Forum History
Jaguarforums Merchandise
Memorial Section
News
Marketplace
Vendor Directory
Become a Vendor
Member Marketplace
Vendor Marketplace
Site Store
New Posts
Tools
Car Payment Calculator
Tire Rim Calculator
Vin Decoder
Recalls
Technical Service Bulletins (TSBs)
Members List
Live Feed
Gallery
View Dark Mode
Please register or login to enable Dark Mode.
Log In
Register
Threads
Google
Threads
Posts
Advanced
Dark Mode
Please register or login to enable Dark Mode.
Log In
Forgot your Password?
By logging into your account, you agree to our
Terms of Use
and
Privacy Policy
, and to the use of cookies as described therein.
or
Login with Google
Login with Facebook
Recent
Commented
Albums
My Pictures
My Post Pictures
mikebaker3
November 10, 2018
352
0
Sort:
Default
Default
Most Recent
0
2019/06/10 09:42:51
mikebaker3
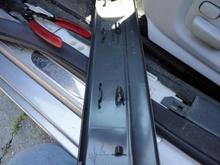
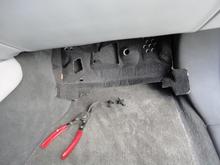
trim removal pliers used to pop loose threshold plate
0
2019/06/10 09:42:53
mikebaker3
view with threshold plate removed before removal of front kick panel
0
2019/06/10 09:42:55
mikebaker3
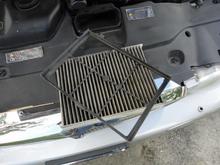
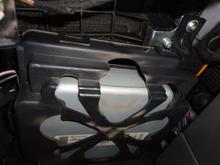
Cabin air filter after debris removed.
0
2019/06/10 10:35:24
mikebaker3
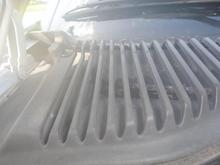
Leaves and debris as initially observed view is from front of car facing toward rear.
0
2019/06/10 10:35:26
mikebaker3
0
2019/06/11 09:31:45
mikebaker3
I assume this is the ECM?
0
2019/06/11 09:47:13
mikebaker3
The Quart of Water that I poured in to test drain rate drained quickly
0
2019/06/11 09:47:15
mikebaker3
The Housing Drain for the filteris almost centered in this photo
0
2019/06/11 09:47:16
mikebaker3
Part Number for Cabin Air Filter
0
2019/06/11 09:47:18
mikebaker3
Retainer for Filter Element
0
2019/06/11 09:47:20
mikebaker3
Make Sure to insert the two Tabs on the bottom of the retainer into the slots before inserting the element. I found out the hardway that it cannot be inserted with the element in place.
0
2019/06/11 09:47:22
mikebaker3
Insulation under the glove box
0
2019/06/11 09:47:24
mikebaker3
The two retainers for the insulation located at the two corners of the insulation. Insulation just slid out to the rear after the retainers were removed
0
2019/06/11 09:47:25
mikebaker3
Water draining from the cabin filter housingat the rear of the richthand fender well
0
2019/06/11 09:47:27
mikebaker3
0
2019/06/16 08:50:31
mikebaker3
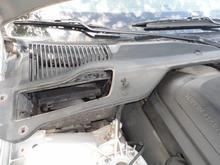
More dirt and leaves clogging drain at lower corner of windshile fould while removing trim to remove the microfilter tub
0
2019/06/16 08:50:35
mikebaker3
1/4 inch drive long extension and 10mm socket used to remove two nuts securing top of tub. I used a telescoping magnet to keep the nut from falling
0
2019/06/16 08:50:42
mikebaker3
This trim covered the drainage to the lower right corner of the windshield. There is a ridge on the underside that fits into a groove on the bottom of the windshield seal
0
2019/06/16 08:50:52
mikebaker3
With the microfilter tub removed, more debris
0
2019/06/16 08:50:54
mikebaker3
Retainer clip for the lower windshield trim
0
2019/06/16 08:50:57
mikebaker3
Hard to see, but there are two retaining nuts accessible through the cown vent grill
0
2019/06/16 08:51:13
mikebaker3
Trim retainer clips are single pin type. With a small common screw driver pry the square head pin and lift out the trim retainer. I ended up removing all of them so that I could lift the trim and get room underneath.
0
2019/06/16 08:51:19
mikebaker3
Extension in place, telescoping magnet used to keep the nuts from falling into the abyss.
0
2019/06/16 08:51:23
mikebaker3
Lifting the microfilter tub out
0
2019/06/16 08:51:27
mikebaker3
I don't remember what I was trying to show in this photo
0
2019/06/16 08:51:36
mikebaker3
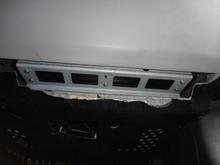
Main firewall connectors after the cabin microfilter tub was removed.
0
2019/06/16 08:51:41
mikebaker3
I am still assuming that this module under the glove box is the ECM? At the top of the photo appears to be the underside of insulation? I only see one six point torx and one Phillips.
0
2019/06/16 13:24:18
mikebaker3
Is this the same insulation seen from the top? I did not see any opening into the fender behind the inner wheel whell just looking at this photo
0
2019/06/16 13:25:25
mikebaker3
Better view of screws that secure the underside of the ECM cover
0
2019/06/18 13:25:17
mikebaker3
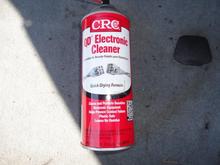
Cleaner used on connectors
0
2019/06/18 13:25:20
mikebaker3
Rubber seal that fits around ECM connectors with male pins on ECM and gets sandwiched between black plastic cage and the firewall.
0
2019/06/18 13:25:24
mikebaker3
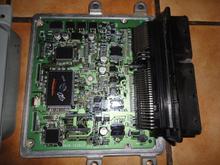
Top of ECM Circuit Board
0
2019/06/18 13:25:34
mikebaker3
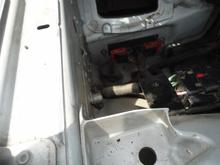
Ground stud almost centered in photo and two ECM connectors
0
2019/06/18 13:25:47
mikebaker3
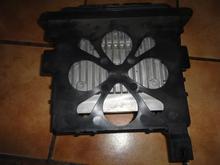
Top of ECM and Cage after removal
0
2019/06/18 13:25:55
mikebaker3
Underside of ECM secured with four Phillips #2 screws
0
2019/06/18 13:26:08
mikebaker3
Rubber Seal that is sandwiched between firewall and ECM Cage
0
2019/06/18 13:26:17
mikebaker3
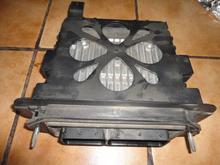
Underside of ECM with Cover removed
0
2019/06/18 13:26:24
mikebaker3
0
2019/06/20 10:30:25
mikebaker3
0
2019/06/20 10:30:34
mikebaker3
First
Page
2 of 9
Last
Go To
Page
1
2
3
4
5
6
7
8
9
2 of 9
Go To
GO
Go to page
of 9
pages
1
2
3
4
5
6
7
8
9