Jaguar Forums - Jaguar Enthusiasts Forum
  • LOG IN
  • REGISTER
  • Forums
    • General Jaguar Forums
      • New Member Area - Intro a MUST
      • Jaguar Forums Feedback & Suggestion Center
      • General Tech Help
    • Jaguar Models ( Current )
      • XF (X260)
      • F-Type ( X152 )
      • XE ( X760 )
      • E-Pace
      • F-Pace (X761) / C-X17
      • I-Pace EV
    • Jaguar Models ( Modern )
      • XF and XFR ( X250 )
      • XJ ( X351 )
      • X-Type ( X400 )
      • S-Type / S type R Supercharged V8 ( X200 )
      • XJ XJ6 / XJ8 / XJR ( X350 & X358 )
      • XJ XJ8 / XJR ( X308 )
      • XJ XJ12 ( X305 )
      • XJ XJ6 / XJR6 ( X300 )
      • XK8 / XKR ( X100 )
      • XK / XKR ( X150 )
    • Jaguar Models ( Classics )
      • Mark V - X 420G
      • MKI / MKII S type 240 340 & Daimler
      • XK120 XK140 XK150
      • E type ( XK-E )
      • XJ6 & XJ12 Series I, II & III
      • XJS ( X27 )
      • XJ40 ( XJ81 )
      • XKSS
      • XJ220
    • Other Jaguars
      • Other Jaguar Models / Concepts / Replicas
    • Diesel variants
      • Diesel variants - All models
    • Non Jaguar vehicles
      • Non-Jaguar Vehicles
    • Brand Review
      • Jaguar Press release
      • Jaguar Customer Relationship Centre
      • Jaguar Engines & transmissions
      • Wheels / Tires, Suspension & handling
      • Interior
      • Exterior
      • Audio/Visual Electronics
      • Detailing / Car care
      • Motorsports
    • Jaguar Classifieds
      • Marketplace
      • PRIVATE For Sale / Trade or Buy Classifieds
      • VENDOR 'For Sale' Classifieds
    • Regional
      • US Northeast
      • US Central
      • US Southwest
      • US Western
      • US Northwest
      • US Midwest
      • US Mid Atlantic
      • US Lower Atlantic
      • US Southern Midwest
      • Canada
      • Mexico, South America
      • UK & Eire
      • Europe
      • Australia - Queensland
      • Australia - New South Wales / ACT
      • Australia - Victoria / Tasmania
      • Australia - Western
      • Australia - South / NT
      • New Zealand
      • Other Areas
    • Official Site Sponsors
      • VENDOR Threads
    • General Interest / History
      • Sights N Sounds
      • Photography
      • Forum announcement archives / Forum History
      • Jaguarforums Merchandise
      • Memorial Section
  • News
  • Marketplace
    • Vendor Directory
    • Become a Vendor
    • Member Marketplace
    • Vendor Marketplace
    • Site Store
  • New Posts
  • Tools
    • Car Payment Calculator
    • Tire Rim Calculator
    • Vin Decoder
    • Recalls
    • Technical Service Bulletins (TSBs)
    • Members List
    • Live Feed
  • Gallery
  • View Dark Mode
    • Please register or login to enable Dark Mode.
  • Log In
  • Register
Jaguar Forums - Jaguar Enthusiasts Forum
    • Threads
      • Advanced
Dark Mode

Please register or login to enable Dark Mode.

Log In

Forgot your Password?

By logging into your account, you agree to our Terms of Use and Privacy Policy, and to the use of cookies as described therein.
or
 
  • Recent
  • Commented
  • Albums
  • My Pictures

My Post Pictures

Peter_of_Australia
August 13, 2022
 965
 0
Sort:
Most Recent
  • Default
  • Most Recent
I cleaned both sides (upper and lower) thoroughly with a water pressure cleaner and laundry detergent (liquid). There is a lot of foam underneath (and the previous owner managed to make sure it got soaked with coffee of Cola).
0 2023/05/29 06:03:39 Peter_of_A
Above you can see where to find the right lever mechanism...
0 2023/05/29 05:39:22 Peter_of_A
...and not that black triangular lever, which I am moving to the right with my finger...: With the side piece still attached one needs to push the hand behind it to push that lever to the right side to release the side piece!
0 2023/05/29 05:39:19 Peter_of_A
...and this here is the "hole" where the rear seat clip goes thru: As you can see I can fit my hand underneath from the front (underneath, sideways). So I think once one knows that it should be possible to squeeze those wings together, which should make it a lot easier to pull the rear seat up.
0 2023/05/29 05:39:17 Peter_of_A
Back to the side pieces: This is the upper fixing lug of that side piece...
0 2023/05/29 05:39:15 Peter_of_A
At the bottom this clip holds it in place... Seriously? There is normally no way to rip this out without breaking those extra long "wings", but without them, they would still sit in their supposed location. But as you can see, somehow I got this one out without breaking those wings off. This involved the use of 1 or 2 screwdrivers and quite a bit of wiggling and bending the metal, where it sat in a bit. Note that this same clip is used for the bottom part of the rear seat...
0 2023/05/29 05:39:13 Peter_of_A
That is the side piece, I am talking about.
0 2023/05/29 05:39:09 Peter_of_A
Mission completed. Carpet is loose and ready to be pulled out.
0 2023/05/28 05:09:40 Peter_of_A
That's the tool I used...
0 2023/05/28 05:09:38 Peter_of_A
I had tried carefully to lever out the bottom bit of the gas-pedal: No luck - as I later saw, it is bolted on, and those bolts are accessible only after the carpet is removed. Hence, what I did was the only way: I used a tool, which is for the removal of those press-in clips and used it a lever to pry the carpet over the gas-petal-base.
0 2023/05/28 05:09:35 Peter_of_A
Now: That complete carpet is not split at the very front (the last approx. 5cm). This would mean that you would have to disassemble a whole lot more parts... or, and this makes much more sense: Use a carpet-cutter and cut the last 5cm, but do not cut your fingers...
0 2023/05/28 05:09:33 Peter_of_A
To get better access to the connector of that wire, I pushed the coin-holder thru to the upper side, where I had batter access to the connector, so I could disconnect it easier.
0 2023/05/28 05:09:31 Peter_of_A
Pull the handbrake-cover over the handbrake and pull up the armrest carefully. Note the wire...
0 2023/05/28 05:09:29 Peter_of_A
Remove the 2 torx-screws still holding the arm-rest piece onto the car-body.
0 2023/05/28 05:09:26 Peter_of_A
Pulling off the "carpet bits" to the left and right of the centre console. Remove the Philip head screws first on the sides. Expect one of those clips to break off... sadly...
0 2023/05/28 05:09:24 Peter_of_A
Removal of the 3 screws in the arm-rest tray.
0 2023/05/28 05:09:21 Peter_of_A
Removal of the 2 screws next to the coin holder.
0 2023/05/28 05:09:19 Peter_of_A
Removal of gear selector bezel: Lifting up at front.
0 2023/05/28 05:09:16 Peter_of_A
Tricky part about removing the seats: The seat belt! I do not think that it is possible to remove the seatbelt on that end, which connects to the seat. Hence: removal of all the plastic covers on the inner B-pillar and remove the complete seat belt, which is actually a plus, as this allows you to also clean the seat belt with a water pressure cleaner and detergent. (I did not apply water onto the seat-belt coil though).
0 2023/05/28 05:09:14 Peter_of_A
If you do not have this kind of gas pedal, which is fixed on the floor, you are lucky (my 2.1L, 2006 has a normal gas pedal (like the brake pedal next to it). I took a bright torch and figured out, how to remove that gas pedal (which is in the way when removing the carpet). So: WD40 onto the "floor-rail" and use the help of a hammer...
0 2023/05/28 05:09:09 Peter_of_A
My new fix on top of the electrical tape: Black silicone (roof and gutter silicone).
0 2023/05/17 20:42:09 Peter_of_A
Yet another damaged cable close to the connector...
0 2023/05/17 20:42:07 Peter_of_A
0 2023/05/16 02:56:16 Peter_of_A
0 2023/05/16 02:56:11 Peter_of_A
0 2023/05/15 23:31:25 Peter_of_A
0 2023/05/15 00:43:30 Peter_of_A
0 2023/05/15 00:43:26 Peter_of_A
0 2023/05/13 17:38:37 Peter_of_A
0 2023/05/11 04:42:59 Peter_of_A
0 2023/05/11 04:35:50 Peter_of_A
0 2023/05/11 04:35:47 Peter_of_A
0 2023/05/11 04:35:42 Peter_of_A
Close-up, where you can see better all the added insulation tape.
0 2023/05/03 05:11:13 Peter_of_A
The arrow point at that ONE wire, which I had not yet insulated properly with electric tape. Before I started this "fix", EVERY connector was trailed by exposed wires.
0 2023/05/03 05:11:10 Peter_of_A
The 2 arrows point to 2 places where the wire in the front has damaged insulation - and not to be seen: the wire in the back also had a bit of insulation mission. I forgot to take a picture of the other connector/wires, where it was even worse.
0 2023/05/03 05:11:05 Peter_of_A
Then place a definitely waterproof tarps over it. Secured with clothline on the bottom thru all the lugs. Maybe you find one in silver... When I used this clear one, the effect was that I created a glasshouse/greenhouse and it got very hot inside and it discoloured the hailcover. Thus, my next improvement now is that I place a silver tarps over the clear tarps. I.e., even if the silver tarps is not perfectly waterproof, the clear one is.
0 2023/04/23 17:38:48 Peter_of_A
Then put a proper hail-cover over it. (Using this without blankets and without my next layers would potentially scratch some sections of paint.)
0 2023/04/23 17:38:46 Peter_of_A
First clean the car properly to make sure that there is no dirt left acting as sandpaper, then cover the car with old blankets.
0 2023/04/23 17:38:42 Peter_of_A
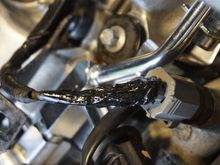
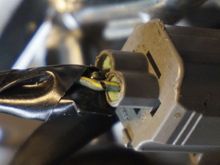
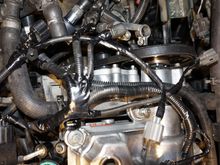
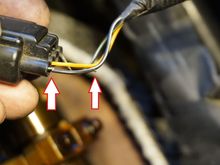
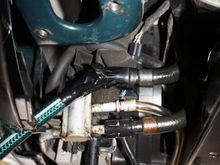
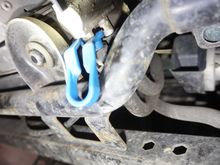
After putting the plugs (drain- & check-plug) back on and filling about 5L of new ATF Fuchs Titan 4400 into the transmission, I was ready for the next phase: Letting a little helper start the engine very briefly - initially to confirm that the ATF would come out of the pipe, where I expected it - it did not, which is why I placed just pipes over everything to avoid a mess. As it turned out, the ATF came out by the green garden-hose, i.e. the upper pipe was the one coming FROM the transmission.NN
0 2023/04/12 06:17:26 Peter_of_A
This time attempted to remove the transmission-pipes on the radiator without removing that cross-bar - that was a no go.
0 2023/04/12 06:17:24 Peter_of_A
First
Page
13 of 25
Last
Go To
Page
  • 1
  • ...
  • 11
  • 12
  • 13
  • 14
  • 15
  • ...
  • 25
13 of 25
Go To GO
Go to page of 25 pages
  • 1
  • ...
  • 11
  • 12
  • 13
  • 14
  • 15
  • ...
  • 25

Top
Jaguar Forums - Jaguar Enthusiasts Forum
  • Contact Us
  • FAQ
  • Archive
  • Advertising
  • Cookie Policy
  • Privacy Statement
  • Terms of Service
  • Your Privacy Choices
  • Manage Preferences

© 2026 MH Sub I, LLC dba Internet Brands

Follow Us        


When you click on links to various merchants on this site and make a purchase, this can result in this site earning a commission. Affiliate programs and affiliations include, but are not limited to, the eBay Partner Network.