Jaguar Forums - Jaguar Enthusiasts Forum
  • LOG IN
  • REGISTER
  • Forums
    • General Jaguar Forums
      • New Member Area - Intro a MUST
      • Jaguar Forums Feedback & Suggestion Center
      • General Tech Help
    • Jaguar Models ( Current )
      • XF (X260)
      • F-Type ( X152 )
      • XE ( X760 )
      • E-Pace
      • F-Pace (X761) / C-X17
      • I-Pace EV
    • Jaguar Models ( Modern )
      • XF and XFR ( X250 )
      • XJ ( X351 )
      • X-Type ( X400 )
      • S-Type / S type R Supercharged V8 ( X200 )
      • XJ XJ6 / XJ8 / XJR ( X350 & X358 )
      • XJ XJ8 / XJR ( X308 )
      • XJ XJ12 ( X305 )
      • XJ XJ6 / XJR6 ( X300 )
      • XK8 / XKR ( X100 )
      • XK / XKR ( X150 )
    • Jaguar Models ( Classics )
      • Mark V - X 420G
      • MKI / MKII S type 240 340 & Daimler
      • XK120 XK140 XK150
      • E type ( XK-E )
      • XJ6 & XJ12 Series I, II & III
      • XJS ( X27 )
      • XJ40 ( XJ81 )
      • XKSS
      • XJ220
    • Other Jaguars
      • Other Jaguar Models / Concepts / Replicas
    • Diesel variants
      • Diesel variants - All models
    • Non Jaguar vehicles
      • Non-Jaguar Vehicles
    • Brand Review
      • Jaguar Press release
      • Jaguar Customer Relationship Centre
      • Jaguar Engines & transmissions
      • Wheels / Tires, Suspension & handling
      • Interior
      • Exterior
      • Audio/Visual Electronics
      • Detailing / Car care
      • Motorsports
    • Jaguar Classifieds
      • Marketplace
      • PRIVATE For Sale / Trade or Buy Classifieds
      • VENDOR 'For Sale' Classifieds
    • Regional
      • US Northeast
      • US Central
      • US Southwest
      • US Western
      • US Northwest
      • US Midwest
      • US Mid Atlantic
      • US Lower Atlantic
      • US Southern Midwest
      • Canada
      • Mexico, South America
      • UK & Eire
      • Europe
      • Australia - Queensland
      • Australia - New South Wales / ACT
      • Australia - Victoria / Tasmania
      • Australia - Western
      • Australia - South / NT
      • New Zealand
      • Other Areas
    • Official Site Sponsors
      • VENDOR Threads
    • General Interest / History
      • Sights N Sounds
      • Photography
      • Forum announcement archives / Forum History
      • Jaguarforums Merchandise
      • Memorial Section
  • News
  • Marketplace
    • Vendor Directory
    • Become a Vendor
    • Member Marketplace
    • Vendor Marketplace
    • Site Store
  • New Posts
  • Tools
    • Car Payment Calculator
    • Tire Rim Calculator
    • Vin Decoder
    • Recalls
    • Technical Service Bulletins (TSBs)
    • Members List
    • Live Feed
  • Gallery
  • View Dark Mode
    • Please register or login to enable Dark Mode.
  • Log In
  • Register
Jaguar Forums - Jaguar Enthusiasts Forum
    • Threads
      • Advanced
Dark Mode

Please register or login to enable Dark Mode.

Log In

Forgot your Password?

By logging into your account, you agree to our Terms of Use and Privacy Policy, and to the use of cookies as described therein.
or
 
  • Recent
  • Commented
  • Albums
  • My Pictures

My Post Pictures

Peter_of_Australia
August 13, 2022
 965
 0
Sort:
Default
  • Default
  • Most Recent
SO the longer tube in the jar connects to the tube from the diff and the other connects to my old vacuum cleaner, which I keep in the garage, and which has a garden hose as suction end by default. This garden hose fits just nicely over my aluminium tube. Note that I use 2 more cut offs of the antenna as adapters and as shown above I widened up the tubes again with the long nose pliers and the heat gun to make the tube fit over the aluminium pipes.
0 2023/09/28 04:26:00 Peter_of_A
Here you see the suction of the vacuum cleaner in action - you can see a bit of oil being sucked into the jar.
0 2023/09/28 04:26:04 Peter_of_A
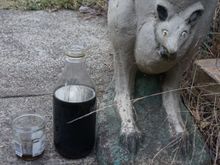
On the right is a 1.5L bottle with the old diff oil, which I had removed with the transfer pump. I the jar is, what I removed with the vacuum cleaner. It may not seem much, but I wanted to get out as much as possible, plus, the was some fine particle debris in the jar as well - good to have that removed from the diff as well...
0 2023/09/28 04:26:07 Peter_of_A
And while I could have used the transfer pump to  fill the new diff oil into the diff, it would have been wasteful due to the long tubes and I would not know exactly, how much new diff oil I had filled in there. Which this 100ml syringe, which I filled 15 times, I know exactly that I have filled 1.5L in there.
And while I could have used the transfer pump to fill the new diff oil into the diff, it would have been wasteful due to the long tubes and I would not know exactly, how much new diff oil I had filled in there. Which this 100ml syringe, which I filled 15 times, I know exactly that I have filled 1.5L in there.
0 2023/09/28 04:26:09 Peter_of_A
I think this was an attempt to get one step closer to the OLD S-Type (1963-1968) design...  ;) And I note that the orange side reflectors disappeared as well.
I think this was an attempt to get one step closer to the OLD S-Type (1963-1968) design... ;) And I note that the orange side reflectors disappeared as well.
0 2023/09/30 04:18:30 Peter_of_A
I loosened the inner wheel arch lines... but that did not help, as the wiper wash bottle behind the bumper makes sure that access with your hand is impossible from behind. So not even taping the nut to the finger would help here (as I did it when replacing the rear left reflector (see above)).
0 2023/09/30 04:47:07 Peter_of_A
Hence, I new approach is required: I "glued" a nut onto the position, where it will be needed behind that silver latch. Then I tightened the bolt so that the nut would hold on to that position a day later. That's kind of the idea in a "weld-nut"...
0 2023/09/30 04:47:11 Peter_of_A
I made again those metal extensions - pretty much the same as for the rear reflector replacements.
0 2023/09/30 04:47:14 Peter_of_A
The power for the new clear indicators comes again via a splice on the wires to the front indicator.
0 2023/09/30 04:47:16 Peter_of_A
That square module in the centre of the picture is the controller of the front indicator LED bulb, which doubles up are DTRL when the indicator is not active.
0 2023/09/30 04:47:18 Peter_of_A
Note that I had to improve on my metal latch design: Not as wide on the end and bent inwards in a step.
0 2023/09/30 04:47:21 Peter_of_A
It works.
It works.
0 2023/09/30 04:47:23 Peter_of_A
I used 30mm wide chrome moulding (plastic) and I had bent the edges inwards a bit, before fixing it with black roof silicone and securing it with household sticky-tape for 2 days. And the oval S-Type side indicators are not also LED and crystal clear.
0 2023/09/30 04:47:26 Peter_of_A
Certainly a big improvement.
0 2023/09/30 04:47:28 Peter_of_A
I think I used tiny screwdriver (or needle) to move the plastic bit to the side, which held the original "hollow" pin 15 in position, so that I could push the original pin out of the connector. Next I extended the wire-length a bit and soldered the new "hollow" pin onto that extension and pressed the new pin back into it's position.
0 2023/09/30 05:48:09 Peter_of_A
It's easy to see, which pin looks different - but that is only, because the pins is of slightly different design. With that new pin, I finally had achieved proper electrical contact and no more ABS light on. That nut was really hard to crack!
0 2023/09/30 05:48:13 Peter_of_A
0 2023/10/09 01:52:51 Peter_of_A
0 2023/10/10 14:10:11 Peter_of_A
0 2023/10/12 04:13:00 Peter_of_A
0 2023/10/12 04:13:04 Peter_of_A
0 2023/10/12 04:13:07 Peter_of_A
0 2023/10/12 04:13:11 Peter_of_A
0 2023/10/12 04:13:13 Peter_of_A
0 2023/10/12 14:28:02 Peter_of_A
0 2023/10/14 15:13:53 Peter_of_A
0 2023/10/18 00:45:16 Peter_of_A
0 2023/10/18 00:45:20 Peter_of_A
0 2023/10/18 00:55:20 Peter_of_A
0 2023/10/18 00:55:22 Peter_of_A
...a fancy cardigan for your leaper...
0 2023/10/23 01:32:48 Peter_of_A
...especially, when it's cold...   ;)
...especially, when it's cold... ;)
0 2023/10/23 01:34:00 Peter_of_A
0 2023/10/29 05:18:57 Peter_of_A
0 2023/10/30 15:31:14 Peter_of_A
0 2023/10/30 15:35:50 Peter_of_A
After pulling off the cover, you can pull off the motor (it is just stuck on contacts there) and remove the 2 pins of the plastic gears (left of the motor) by either letting gravity help you, or use a magnet to pull them out, although, you need to pull only the bigger pin of the gear, which is bereft of life... then you just pull out the late gear.
0 2023/11/04 03:59:19 Peter_of_A
So this is my problem: The (outer) teeth of the upper gear, which were supposed to drive the lower gear are utterly worn off. So that is an "Ex-gear", just like Monty Python's Ex-Parrot...: It's passed on - this gear is no more - it has ceased to be - it's expired and gone see it's maker - this is a late gear! Bereft of life it rests in peace!
0 2023/11/04 03:59:23 Peter_of_A
So this is what I ordered as future backup solution (Plan C)...
0 2023/11/04 04:25:11 Peter_of_A
...while I went ahead to cut off the protruding bit of the late gear. Note that using a saw would have made it very easy, BUT this would have cut off too much material! So I could not use a saw and I used a cutter knife (in a metal guide - import due to the heat), and heated it up again and again with a heat gun before I painfully pressed the bigger part of the late gear with my thumb onto a soft kitchen-rag while cutting the protruding bit off...
0 2023/11/04 04:25:16 Peter_of_A
Done. And then as in picture above I turned the protrusion around to re-attach it to the rest again. I used "Duramax 5 Minute Epoxy Fix", which is 2 component epoxy glue, which is totally hard after 16 hours and can be applied for 5 minutes after mixing. I used the OE pin to ensure that the parts will be connected in the correct angle. Avoid epoxy glue on the pin. But here is my cunning idea, which I incorporated:
0 2023/11/04 04:25:20 Peter_of_A
You can just spot 3 dark spots in the grooves before the epoxy starts below: These are each 1/3 of a pin (as used in sewing). I placed one into every second groove (except as you see on the right 2 next to each other, as this is a 11T gear). I positioned those 6 pin-bits with the fist thin layer of epoxy. This works exactly like reo (that is Aussie slang for steel-reinforcement in concrete). I let each layer dry for about 10 minutes and added a total of about 4 layers. Now this should be solid!
0 2023/11/04 04:25:23 Peter_of_A
First
Page
19 of 25
Last
Go To
Page
  • 1
  • ...
  • 17
  • 18
  • 19
  • 20
  • 21
  • ...
  • 25
19 of 25
Go To GO
Go to page of 25 pages
  • 1
  • ...
  • 17
  • 18
  • 19
  • 20
  • 21
  • ...
  • 25

Top
Jaguar Forums - Jaguar Enthusiasts Forum
  • Contact Us
  • FAQ
  • Archive
  • Advertising
  • Cookie Policy
  • Privacy Statement
  • Terms of Service
  • Your Privacy Choices
  • Manage Preferences

© 2026 MH Sub I, LLC dba Internet Brands

Follow Us        


When you click on links to various merchants on this site and make a purchase, this can result in this site earning a commission. Affiliate programs and affiliations include, but are not limited to, the eBay Partner Network.