Jaguar Forums - Jaguar Enthusiasts Forum
  • LOG IN
  • REGISTER
  • Forums
    • General Jaguar Forums
      • New Member Area - Intro a MUST
      • Jaguar Forums Feedback & Suggestion Center
      • General Tech Help
    • Jaguar Models ( Current )
      • XF (X260)
      • F-Type ( X152 )
      • XE ( X760 )
      • E-Pace
      • F-Pace (X761) / C-X17
      • I-Pace EV
    • Jaguar Models ( Modern )
      • XF and XFR ( X250 )
      • XJ ( X351 )
      • X-Type ( X400 )
      • S-Type / S type R Supercharged V8 ( X200 )
      • XJ XJ6 / XJ8 / XJR ( X350 & X358 )
      • XJ XJ8 / XJR ( X308 )
      • XJ XJ12 ( X305 )
      • XJ XJ6 / XJR6 ( X300 )
      • XK8 / XKR ( X100 )
      • XK / XKR ( X150 )
    • Jaguar Models ( Classics )
      • Mark V - X 420G
      • MKI / MKII S type 240 340 & Daimler
      • XK120 XK140 XK150
      • E type ( XK-E )
      • XJ6 & XJ12 Series I, II & III
      • XJS ( X27 )
      • XJ40 ( XJ81 )
      • XKSS
      • XJ220
    • Other Jaguars
      • Other Jaguar Models / Concepts / Replicas
    • Diesel variants
      • Diesel variants - All models
    • Non Jaguar vehicles
      • Non-Jaguar Vehicles
    • Brand Review
      • Jaguar Press release
      • Jaguar Customer Relationship Centre
      • Jaguar Engines & transmissions
      • Wheels / Tires, Suspension & handling
      • Interior
      • Exterior
      • Audio/Visual Electronics
      • Detailing / Car care
      • Motorsports
    • Jaguar Classifieds
      • Marketplace
      • PRIVATE For Sale / Trade or Buy Classifieds
      • VENDOR 'For Sale' Classifieds
    • Regional
      • US Northeast
      • US Central
      • US Southwest
      • US Western
      • US Northwest
      • US Midwest
      • US Mid Atlantic
      • US Lower Atlantic
      • US Southern Midwest
      • Canada
      • Mexico, South America
      • UK & Eire
      • Europe
      • Australia - Queensland
      • Australia - New South Wales / ACT
      • Australia - Victoria / Tasmania
      • Australia - Western
      • Australia - South / NT
      • New Zealand
      • Other Areas
    • Official Site Sponsors
      • VENDOR Threads
    • General Interest / History
      • Sights N Sounds
      • Photography
      • Forum announcement archives / Forum History
      • Jaguarforums Merchandise
      • Memorial Section
  • News
  • Marketplace
    • Vendor Directory
    • Become a Vendor
    • Member Marketplace
    • Vendor Marketplace
    • Site Store
  • New Posts
  • Tools
    • Car Payment Calculator
    • Tire Rim Calculator
    • Vin Decoder
    • Recalls
    • Technical Service Bulletins (TSBs)
    • Members List
    • Live Feed
  • Gallery
  • View Dark Mode
    • Please register or login to enable Dark Mode.
  • Log In
  • Register
Jaguar Forums - Jaguar Enthusiasts Forum
    • Threads
      • Advanced
Dark Mode

Please register or login to enable Dark Mode.

Log In

Forgot your Password?

By logging into your account, you agree to our Terms of Use and Privacy Policy, and to the use of cookies as described therein.
or
 
  • Recent
  • Commented
  • Albums
  • My Pictures

My Post Pictures

Peter_of_Australia
August 13, 2022
 965
 0
Sort:
Most Recent
  • Default
  • Most Recent
And this is a picture, where you see how NOT to install the drive belt later on. It is very tempting to do it that way, as it seems more logical, plus, you only note the difference when you see the right and wrong way next to each other. Doing it the wrong way results in less tension on the belt and rubs the belt against itself to the effect that your ears are being blown off...
0 2022/11/08 03:48:19 Peter_of_A
As it is not possible to take a picture of all the pulleys due to the space restriction, and as it really difficult to find a sketch on the net, I created a sketch myself - more a Picasso than a Rembrandt, but it does the trick. I removed the idler pulleys 2, 3 and 6.
0 2022/11/08 03:48:16 Peter_of_A
...but there is not much point in explaining exactly how I did that, because this was a pointless exercise: On the S-Type that DSC-module cannot be opened and I cannot access the PCB. Thus, I put it straight back in. I think what I saw on the net regarding that PCB must have been on the XJ8...
0 2022/11/05 04:36:48 Peter_of_A
ANNOYINGLY the ABS & Cruise faults were still there. In my extensive research on the net I saw that it is possible that the PCB of the ABS/DSC-module (the elk-test-module  ;) ) could have cold welds in need of rewelding. Thus, I actually managed the near impossible to remove the black-box DSC-module from the  "octopus", without actually removing any brake-lines...
ANNOYINGLY the ABS & Cruise faults were still there. In my extensive research on the net I saw that it is possible that the PCB of the ABS/DSC-module (the elk-test-module ;) ) could have cold welds in need of rewelding. Thus, I actually managed the near impossible to remove the black-box DSC-module from the "octopus", without actually removing any brake-lines...
0 2022/11/05 04:36:46 Peter_of_A
Here I measure 2.5 Mega Ohm on each of the brand new sensors. One old one measured 0.7MOhm and the other one started the measurement at that same level, but quickly went down to zero MOhm. I assume one or the other was broken. Anyway, I had now the new ones.
0 2022/11/05 04:36:43 Peter_of_A
And this is that connector. I measured (with ignition on) the full battery voltage between those 2 pins, which tells me that the wiring is OK.
0 2022/11/05 04:36:41 Peter_of_A
After that pin has been pushed thru it is extremlu easy to lift the connector off.
0 2022/11/05 04:36:39 Peter_of_A
This is being done with a screwdriver.
0 2022/11/05 04:36:38 Peter_of_A
Those connectors to the ABS speed sensors on the rear axle are a bit tricky to open. The connecots on the left and right are identical, i.e. on one side, the red "pin" need to be pushed outwards, on the other side inwards.
0 2022/11/05 04:36:36 Peter_of_A
0 2022/11/05 04:34:42 Peter_of_A
0 2022/11/05 04:34:40 Peter_of_A
0 2022/11/05 04:34:38 Peter_of_A
0 2022/11/05 04:34:36 Peter_of_A
0 2022/11/05 04:34:34 Peter_of_A
0 2022/11/05 04:34:32 Peter_of_A
0 2022/11/05 04:34:29 Peter_of_A
Everything is extremely tight in that area. Thus, I can't properly see it - that picture is from the internet: What is the function of that pulley in the red circle? What is powered via that pulley?
0 2022/10/27 17:33:59 Peter_of_A
I replaced the old fog lights with those fance LED fog lights with LED DTRL halo. Their cables end in the opposing connector to the one in the previous picture.
0 2022/10/24 00:00:20 Peter_of_A
And both cable end in this little connector.
0 2022/10/24 00:00:18 Peter_of_A
Here is the outgoing cable runing along the fat wiring loom, and in the middle of the bumber this cable gets company: A second cable that I fixed firmly to earth via the bolt to the horn assy.
0 2022/10/24 00:00:16 Peter_of_A
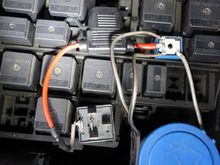
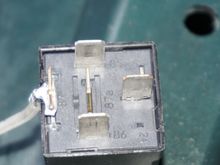
Those two cables will get connected to those 2 contacts of the coil of a 12V relay. Which cable goes to which side of the coil, does not matter. The ignition ON signal feeds into a fuse (I chose 10A), which goes to the "common" contact of the relay. And the outgoing cable from that relay leaves from the NC contact of the relay, i.e. the :normally closed" contact, so that the DTRL is on, when ignition is on. But if you then switch on low beam, the relay will move its contact over to the NO-contac
0 2022/10/24 00:00:14 Peter_of_A
Both cables need to be properly insulated again.
0 2022/10/24 00:00:11 Peter_of_A
...and this is the other.
0 2022/10/24 00:00:08 Peter_of_A
As described above, this is one signal spliced off from the headlight connector, which I need for the relay...
0 2022/10/24 00:00:06 Peter_of_A
This is where the ignition relay is at home.
0 2022/10/24 00:00:03 Peter_of_A
I need a strong "battery plus" (= 13.7V approx.) signal to power the DTRL LED lights. So contact 87 on the ignition relay was perfect. If you happen to only find a "weak" signal (I mean on any other car, e.g. a signal coming from the stalk switches), use that signal only to open a relay, which then switches thru a battery plus signal coming from the battery. But I am happy with contact 87, which makes things a bit easier.
0 2022/10/24 00:00:00 Peter_of_A
Only after I finished the job, I realized that I could have done one better: To get even the very last bit of oil and dirt out of the rear axle (despite Jaguar fairlure to provide a release plug), I could have done, what I have drawn above: attach my metal pipe (which you have seen in the pictures) to a hose, and that to a solid and airtight jar as in the sketch and connect the second pipe to an old vacuum cleaner... I;ll do that next time.
0 2022/10/23 21:44:02 Peter_of_A
The total amount of oil in the S-Type axle is 1.3L. Above I filled a water bottle for comparison purposes with 1.3L of water and next to it the bottle with the oil I removed from the axle - more than 1.2L. Not bad, I would say. Next I used the pump to fill in the new oil and fitted the filler plug again.
0 2022/10/23 21:20:32 Peter_of_A
And now I can direct the end of the pipe very precisely of there I want to have it.
0 2022/10/23 21:20:30 Peter_of_A
And I fed it into the opening. Very easy.
0 2022/10/23 21:20:28 Peter_of_A
I do not have access to a junkyard with old cars and surplus pipes, BUT I had an old surplus TV-antenna here: Perfect. I have cut out that bit, which you see above.
0 2022/10/23 21:20:27 Peter_of_A
But I should have known better: This was a pointless exercise, as it is simply not possible to direct that flexible hose inside the axle into the right position. I guess, I got only about 1/3 of the total oil in there out that way. Note: It is always a good idea to fixate the end of the hose with a ring-spanner - and then best place a weight onto that ring-spanner.
0 2022/10/23 21:20:24 Peter_of_A
Thus I tried that, and I even routed the suction pipe around that beam to be able to get the best access.
0 2022/10/23 21:20:22 Peter_of_A
I use my fluid pump to get the old fluid out of there. I checked youtube, etc. and some seem to suggest that you can simply poke the suction tube in there and remove the oil...
0 2022/10/23 21:20:19 Peter_of_A
Step one: Remove filler bolt with a 3/8" ratchet (without any socket attached). Better than a ratchet would be a "solid" ratchet, i.e. one without that fragile mechanism. I myself use a ratchet, which got damaged a long time ago and I welded the mechanism solid. To that ratchet I attach a long pipe to increase the lever-arm. The picture above is actually from when I tightened the filler bolt again, but to open it, you obviously have to turn it anti-clockwise.
0 2022/10/23 21:20:16 Peter_of_A
TO ensure the filler hose does not fall out I squeezed it in position with a tube-cut-off. Even though I had removed 5L of fluid (by letting it drip for 3 days), I initially was only able to refill 2.3L (until it came back out by the filler hole). To continue nnow with the full flush, I left the filler hose connected, and...
0 2022/10/23 05:37:05 Peter_of_A
Now you can refill the transmission fluid with a handy fluid pump (AU$10, ebay or this week at Aldi)
0 2022/10/23 05:37:02 Peter_of_A
...secured the hose with a weight (hammer) in a bowl to collect all the old transmission fluid. Letting the engine run, pumps the transmission fluid out by that pipe and hose. Obviously, let the engine run for brief moments only, then youn have to refill the reservoir again (which I had left pump and filler hose connected). The engine on briefly again, and so on until clean transmission fluid is being pumped out. I filled in a total of 14.4L, including the last liter , which I filled after reins
0 2022/10/23 05:37:00 Peter_of_A
...and I removed the upper transmission fluid metal-pipe from the radiator. This can be done without fear that anything would drip out after removing that pipe. I connected a clear tube to that pipe and...
0 2022/10/23 05:36:58 Peter_of_A
Here again my special tool with the filler plug removed.
0 2022/10/23 05:36:55 Peter_of_A
First
Page
22 of 25
Last
Go To
Page
  • 1
  • ...
  • 19
  • 20
  • 21
  • 22
  • 23
  • 24
  • 25
22 of 25
Go To GO
Go to page of 25 pages
  • 1
  • ...
  • 19
  • 20
  • 21
  • 22
  • 23
  • 24
  • 25

Top
Jaguar Forums - Jaguar Enthusiasts Forum
  • Contact Us
  • FAQ
  • Archive
  • Advertising
  • Cookie Policy
  • Privacy Statement
  • Terms of Service
  • Your Privacy Choices
  • Manage Preferences

© 2026 MH Sub I, LLC dba Internet Brands

Follow Us        


When you click on links to various merchants on this site and make a purchase, this can result in this site earning a commission. Affiliate programs and affiliations include, but are not limited to, the eBay Partner Network.