Changing Thermostat Housing Assy AJ811793 - Tips?
#1
 03-25-2014, 06:20 PM


Hey, 2006 XJ8 here. I was told awhile back that my Thermostat needing changing (I get code P050B) but that I could save a bundle of money doing it myself. Sure enough, I saved ~$130 just on the part itself.
But the thing freakin' looks like a heart valve transplant, I mean holy cow...

Anyone done this repair before and have any tips?
Also, I found this a few days ago:

My VIN falls in this range...any way I can tell if this repair was done to my car? I think so, because of the Feb. '06 date, but would like to be sure...don't want to go digging under the hood for nothing!
Thanks!
But the thing freakin' looks like a heart valve transplant, I mean holy cow...
Anyone done this repair before and have any tips?
Also, I found this a few days ago:
My VIN falls in this range...any way I can tell if this repair was done to my car? I think so, because of the Feb. '06 date, but would like to be sure...don't want to go digging under the hood for nothing!
Thanks!
The following users liked this post:
slownlo (01-31-2016)
#2
03-28-2014, 10:18 AM
Hello fellow Jaguar owner,
Having changed the housing and thermostat on my 350 last fall, I thought I could pass on a few words of encouragement.
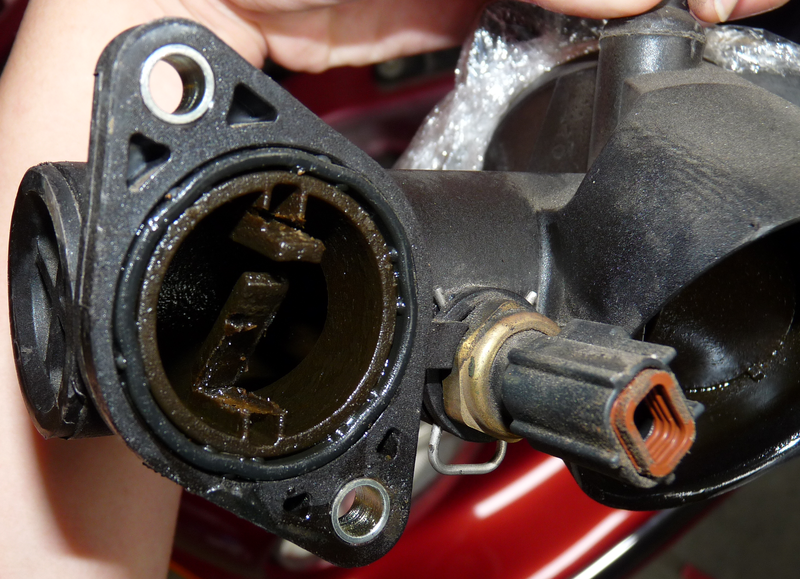
Firstly, don't let the design intimidate you. If you remove the yellow clip it is possible to slip off the nozzle which attaches to the head assembly. The yellow clip is only used to keep the pieces together until installation. The various other nozzles and such hold the device together after install.
This piece with the four bolt holes is the hardest piece to remove due to the proximity of the throttle body. Which brings me to what I think is key to making this project as painless as possible. That is, remove the throttle body. I know there are those who are much more experienced than I who might tell you it's unnecessary to do this, but, it was the only solution I found to reach the back two fasteners from the flange. It made the process so much easier, I can't believe it's done any other way. Be cautious when removing the TB Assembly so as to not damage the gasket, otherwise a trip to the parts supplier will be necessary.
Other than the obvious issues such as draining the coolant below the level of the assembly, and care when removing electrical connections, I would only suggest one other thing. Take pictures with your cell as you go. You might never need them but it's good insurance.
As for codes, mine wasn't throwing codes. I experienced the fans going into warp speed while pulling into the garage one evening.
It turns out the housing was falling apart internally.
Good luck! It's not as bad as you might think. And very profitable.
Also, nobody will treat your cat with more care than you!
Having changed the housing and thermostat on my 350 last fall, I thought I could pass on a few words of encouragement.
Firstly, don't let the design intimidate you. If you remove the yellow clip it is possible to slip off the nozzle which attaches to the head assembly. The yellow clip is only used to keep the pieces together until installation. The various other nozzles and such hold the device together after install.
This piece with the four bolt holes is the hardest piece to remove due to the proximity of the throttle body. Which brings me to what I think is key to making this project as painless as possible. That is, remove the throttle body. I know there are those who are much more experienced than I who might tell you it's unnecessary to do this, but, it was the only solution I found to reach the back two fasteners from the flange. It made the process so much easier, I can't believe it's done any other way. Be cautious when removing the TB Assembly so as to not damage the gasket, otherwise a trip to the parts supplier will be necessary.
Other than the obvious issues such as draining the coolant below the level of the assembly, and care when removing electrical connections, I would only suggest one other thing. Take pictures with your cell as you go. You might never need them but it's good insurance.
As for codes, mine wasn't throwing codes. I experienced the fans going into warp speed while pulling into the garage one evening.
It turns out the housing was falling apart internally.
Good luck! It's not as bad as you might think. And very profitable.
Also, nobody will treat your cat with more care than you!
#4
04-12-2014, 04:51 PM

I need to change my thermostat also but I have the super V8 and it doesnt look the same as the one in the picture. Mine is right up front and on top. I thought, wow how easy is this going to be! Wrong! I can not get a torque bit in on the bottom where the water outlet bends down. Does anyone have a tip or trick to get at this bottom bolt? I dont want to break any of that pretty cast aluminum. Anyone?
#5
04-12-2014, 05:55 PM

Just be very careful when you are undoing the bolts, if the car has never been apart then the bolts could be seized, and they aren't exactly the strongest bolts i've ever seen.
https://www.jaguarforums.com/forum/x...warned-105468/
The torx bolt on the bottom of the thermostat housing is the one where the head twisted straight off with the body of the bolt still in the housing.
If I had to do it again on a "new" vehicle i'd take the whole housing off, not just open the thermostat housing, because of that bottom bolt that broke...
The following users liked this post:
caperss (04-13-2014)
#6
04-13-2014, 06:58 PM
I'm having enormous difficulty getting any of the hoses off. Is there some trick to this? It feels like I'm trying to pry apart rocks.
I'm totally stalled right now, I can't get the throttle body off either because those 2 hoses won't come off either. There must be an easier way than grunt and brute force.
I'm totally stalled right now, I can't get the throttle body off either because those 2 hoses won't come off either. There must be an easier way than grunt and brute force.
#7
04-13-2014, 08:40 PM
Trending Topics
#8
04-14-2014, 05:10 PM
The bane of my existence isn't just those hoses, but those F#@%ING CLAMPS, they're a NIGHTMARE to deal with. It's like they were designed by Satan and installed by his minions, facing the tabs downwards so it's hugely difficult to get the pliers on them, and then it takes the strength of Hercules to hold them open while trying to maneuver them down the tube. 1 hose took me 3 hours of fighting yesterday..I ran off to Pepboys this morning to get a special tool ($25, no returns thank you very much), and it's still not easy.
Here's a picture of the tool (one end wrapped in masking tape for some cushion) and a hose, I've got the clamp off the nozzle but the hose is still stuck on.

The Pepboys attendant said he hates dealing with those clamps and changes them to screw types every chance he gets...I'm thinking of doing the same. Only thing is I don't know whether those would apply the right amount of force...these f#@%ers are TOUGH...
Here's a picture of the tool (one end wrapped in masking tape for some cushion) and a hose, I've got the clamp off the nozzle but the hose is still stuck on.
The Pepboys attendant said he hates dealing with those clamps and changes them to screw types every chance he gets...I'm thinking of doing the same. Only thing is I don't know whether those would apply the right amount of force...these f#@%ers are TOUGH...


#10
04-14-2014, 07:31 PM
Veteran Member
Join Date: Nov 2006
Location: Glasgow, Scotland UK
Posts: 47,303
Received 9,005 Likes
on
4,113 Posts
#11
04-17-2014, 04:14 AM
I had to travel for 2 days, so I had to leave the Jag in pieces...
I've gotten all the hoses off finally (there was much rejoicing), and I've removed all the forward facing screws on the thermostat housing. I've now gotten to the part Rrd623 advised about, removing the Throttle Body Assy, and I can see pretty plainly what he's talking about, there's just no way to reach those 4 screws on the back otherwise.
However, when I read his reply, it didn't click that I'd have to remove the whole shebang, I thought it'd be just the valve part...is there any precautions or extra steps I should be aware of, other than simply removing the 4 bolts? Is there an 'official' process to do this, in the handbook or wherever?
My slow progress kinda belies my inexperience at this kind of work.
Last edited by a4500435; 04-17-2014 at 04:17 AM.
#12
04-17-2014, 08:57 AM

Join Date: Feb 2014
Location: Crossroads of America
Posts: 19,393
Received 12,739 Likes
on
6,380 Posts
However, when I read his reply, it didn't click that I'd have to remove the whole shebang, I thought it'd be just the valve part...is there any precautions or extra steps I should be aware of, other than simply removing the 4 bolts? Is there an 'official' process to do this, in the handbook or wherever?
Hi a4500435,
I've been following your thread with interest since I'll no doubt need to do the same work on our '04 this summer.
The full X350 service manual is available in the download section of the "HOW TO" thread of this forum. Go to the link below and scroll down to "Special Thanks to those Workshop Files provided by DB6":
https://www.jaguarforums.com/forum/x...k-links-20085/
For service related to the thermostat, you need the Powertrain section:
http://www.mediafire.com/download/9b...Powertrain.pdf
For replacing the thermostat only, the non-supercharged instructions begin on pg. 1213. The supercharged instructions begin on pg. 1218.
Removing and installing the thermostat housing is described in several sections related to other operations - with a quick search I didn't find a self-contained unit. The first mention of removing the thermostat housing is on pg. 310, and you might need to go back a few steps to disconnect or remove other items before you get to the steps on that page.
You can search the pdf file by holding Cntrl or Cmd plus the "F" key. A small search window will appear (near the top of the screen on my version of Adobe Acrobat Reader). Type in a search term such as thermostat housing and click the right arrow to find the next occurrence of that term, click the left arrow to find the previous occurrence. This section of the manual is 3,594 pages, so searches can take a little time, depending on your computer speed and other programs you may have running.
Please keep us informed!
Cheers,
Don
#13
04-17-2014, 05:23 PM
I've been going through the handbook for weeks, I wouldn't have attempted this otherwise!
I haven't taken off the Throttle Body Assy yet, for a couple of reasons: 1. I can't find any official procedure or even the part name; 2. There's a whole host of hoses and connections I don't want to fight again.

Instead, I've twisted off the main part of the thermostat housing; the interior tabs are broken, I don't know if they were before I took the part off, but the plastic seems weakened anyhow.
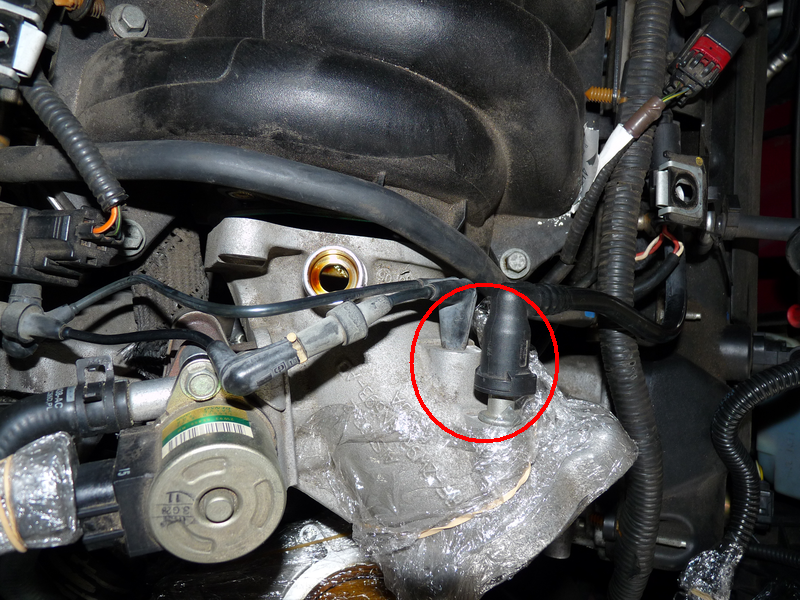
The work area:

Right now, I could just take apart my new housing and twist it onto the old pipe, but that seems lame after going this far. The only way I can see to remove the old pipe is as Rrd623 said, to remove the Throttle Body Assy completely. I can reach 3 of the 4 hex bolts with a socket wrench, the top left one (in blue) I can only get a hand wrench on.


I'd really like to know what exactly I should expect in taking off the whole TB Assy...this is not something I've really planned for.
I haven't taken off the Throttle Body Assy yet, for a couple of reasons: 1. I can't find any official procedure or even the part name; 2. There's a whole host of hoses and connections I don't want to fight again.
Instead, I've twisted off the main part of the thermostat housing; the interior tabs are broken, I don't know if they were before I took the part off, but the plastic seems weakened anyhow.
The work area:
Right now, I could just take apart my new housing and twist it onto the old pipe, but that seems lame after going this far. The only way I can see to remove the old pipe is as Rrd623 said, to remove the Throttle Body Assy completely. I can reach 3 of the 4 hex bolts with a socket wrench, the top left one (in blue) I can only get a hand wrench on.
I'd really like to know what exactly I should expect in taking off the whole TB Assy...this is not something I've really planned for.
#14
04-17-2014, 06:53 PM
#15
05-19-2014, 01:39 AM

It seems XF has the same crappy plastic thermostat assembly module. Would be nice to hear any tips from those who did the replacement. My topic -
https://www.jaguarforums.com/forum/x...eating-118038/
https://www.jaguarforums.com/forum/x...eating-118038/

#17
08-02-2014, 02:30 PM

A big tTHANK YOU to all on this thread for sound and detailed advice: from diagnostics to remove & replace. my 2006 XJ 4.2L had an unusual overheating issue - temp gauge stayed right in the middle all the time on the highway, but when I stopped and drove below 35 MPH, temp gauge would steadily climb. originally tried replacing the thermostat, but to no avail.
I read on this thread of 2 other members with very similar situations - they recommended replacement of Oultlet pipe assembly and recommended Jagbits.com for parts. All great advice and 2006Jag had a great photo depiction of his effort - helped tremendously and I'm proud to say we completed the repair over the past 2 nights and we're back on the road today.
thanks again to this great group for all your advice.
The following users liked this post:
woox4 (06-22-2017)
#18
08-21-2016, 09:52 PM

Junior Member
Join Date: Sep 2014
Location: AZ
Posts: 10
Likes: 0
Received 0 Likes
on
0 Posts
Is the yellow clip not needed? I just did new water pump, and serpentine belt & ordered the entire thermostat assembly! I left the OLD black pipe that connect to the thermostat housing under the TB to the block on there and am only installing the new housing! My question, the yellow clip is a pain to install back unless I take off TB it seems?? Do I even need it (yellow clip)???? Any help would be appreciated! Thinking of just installing with out yellow clip seems it should be held in place with the bolts and oring to not leak???
Thanks for your time, apprecitated!
03 Stype 4.2
Thanks for your time, apprecitated!
03 Stype 4.2
Hello fellow Jaguar owner,
Having changed the housing and thermostat on my 350 last fall, I thought I could pass on a few words of encouragement.
Firstly, don't let the design intimidate you. If you remove the yellow clip it is possible to slip off the nozzle which attaches to the head assembly. The yellow clip is only used to keep the pieces together until installation. The various other nozzles and such hold the device together after install.
This piece with the four bolt holes is the hardest piece to remove due to the proximity of the throttle body. Which brings me to what I think is key to making this project as painless as possible. That is, remove the throttle body. I know there are those who are much more experienced than I who might tell you it's unnecessary to do this, but, it was the only solution I found to reach the back two fasteners from the flange. It made the process so much easier, I can't believe it's done any other way. Be cautious when removing the TB Assembly so as to not damage the gasket, otherwise a trip to the parts supplier will be necessary.
Other than the obvious issues such as draining the coolant below the level of the assembly, and care when removing electrical connections, I would only suggest one other thing. Take pictures with your cell as you go. You might never need them but it's good insurance.
As for codes, mine wasn't throwing codes. I experienced the fans going into warp speed while pulling into the garage one evening.
It turns out the housing was falling apart internally.
Good luck! It's not as bad as you might think. And very profitable.
Also, nobody will treat your cat with more care than you!
#19
08-27-2016, 06:29 AM
Senior Member
The yellow clip is not needed at all. It is only used to hold the two pieces together at the factory, for shipping and for installing so the two parts do not slip apart. I removed it before installing the entire thermostat assembly and had no problem with installation with the two half's wanting to separate at all, they are pressed together rather tightly as there is a rubber ring the seals them together. The yellow clip is a throw away item.
#20
08-27-2016, 11:01 AM

Senior Member
Housing,
Just re-read all the post and here's my two cents.
The only reason to remove the TB is to get at the two rear bolts on the piece that is shown on the left side of the picture in post #1. You'll note it has 4 bolt holes. The yellow clip looks like it is there just to hold this piece to the main housing. Mine came without this clip. Don't know why it's there. That piece won't come off unless someone pulls it off. It is held in the main housing by an "O" ring.
Remove this part by just holding the main housing and twist, it will pull out.
Remove all the bolts that are holding the main housing to the engine and just twist it back and forth until it comes loose from this part--leaving the old one in place.
When your ready to replace the new housing, remove the new "O" ring off the new piece, and after you take the "O" ring off the old down spout (still attached to the engine) grease up the new "O" ring and slip it on this part that was left on the engine.
When replacing the new T housing, wiggle the new housing onto this and be sure the "new O" ring is well seated into the new housing.
I've replaced the new housing on both my cars and did each this way with excellent results.
PROS: You do not have to remove the Throttle Body and disturb its seal to the engine or remove any of it's hoses.
CONS: None really. You just have to be sure the new "O" ring that you put on the old part seats in the new housing. You may have to work the new housing around some what, but the "O" ring will go into the new housing. Use some Lithum (sp?)Grease.
Note: Use a very small about of this grease on the "O" rings on the housing that butt up against the engine and on all hose connection tubes on the new housing. Remember, just wet the tubes for the hoses. You don't need to over do it. Makes putting the hoses back on a snap........
Cheers
Last edited by Chuck Schexnayder; 08-27-2016 at 11:08 AM.
The following users liked this post:
NDW (03-19-2017)