When you click on links to various merchants on this site and make a purchase, this can result in this site earning a commission. Affiliate programs and affiliations include, but are not limited to, the eBay Partner Network.
Figured it was time to return the favor and help the forum in return for the years of assistance i have received. For those of you who haven't had any Injection failures, you will eventually. Some of the XK and XJ owners on here have reported 2-3 full sets of injectors within a 150k miles lifetime. Many horror stories on here and the interweb about the difficulties of changing out the GDI Injectors on our AJ motors. Job runs 2k-3k at normal dealer pricing (there are MANY things that can cause misfires, if your not 100% sure it is an injector do yourself a favor and give Mike a call at Scarborough Jaguar/Land Rover he will take care of you, worth the drive if your not local!) the JLR book says all 4 injectors and I believe 8 or 10 hrs labor (correct me if anyone knows exactly) replacing one whole bank. The entire procedure can be done in under 3hrs and for around $500 in parts/tools.
Jaguar 3.0 and 5.0 injector tool JLR9899 Injector Seal Tool $50 Req to resize the Teflon seals (tool isn't necessary if you buy 4 NEW injectors) TIME SAVER $10 Trust me on this, its worth the $10
Basic standard mechanic tools.
Parts: BOSCH C2D45736 Injector $95 x4 with a LIFETIME WARRENTY - Dont get them at JLR ($395ea) Teflon Seal only $10 will also need the top seal on the rail but that is a standard Viton o-ring JLR Seal/Clip KIT $30 Comes with everything needed. Teflon seal, Top o-ring and a new one time use clip
First off you will need to determine what bank (side) of you engine is misfiring, there are many ways to determine this but the easiest will be watching the misfire live data on any scanner or SDD. You can also usually tell just by the OBDII codes present, they will USUALLY correspond to one bank. ALSO, its usually only one injector malfunctioning but it is recommended while your in that far to do all 4 as they will all need to be removed requiring all new seals at $30 per injector (see above) your not replacing (plus the tool mentioned above $50), and as i will attest once one fails the rest are right behind it.
Once you have nailed down the side of the engine you are going to be replacing the injectors on the fun begins,
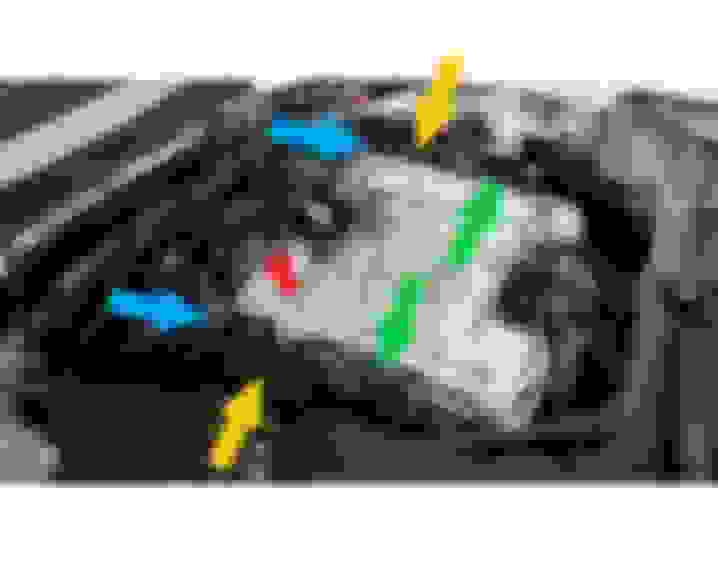
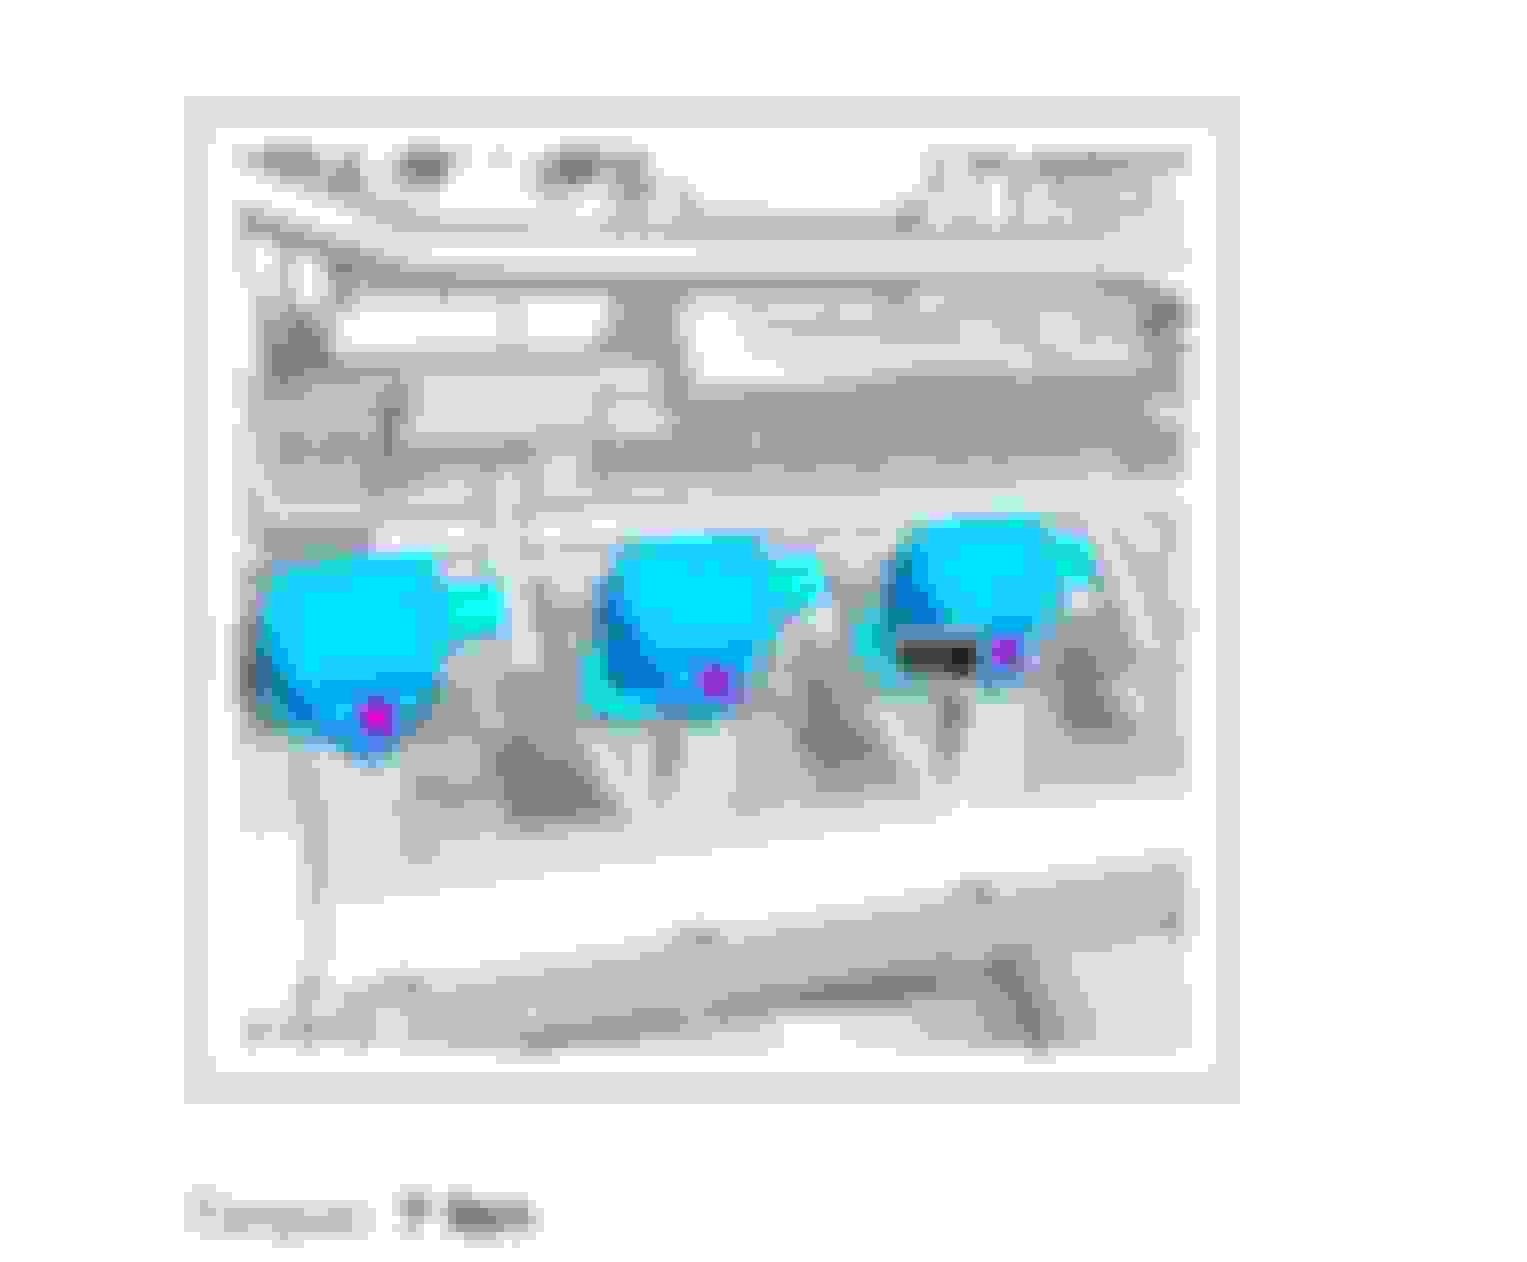
First remove the heat shielding (YELLOW ARROWS), that corresponds to the side of the engine your replacing injectors on, this piece of plastic is a pain to remove and will require you to unhook the inter cooler feed lines (BLUE ARROWS). Simple squeeze clips but have a rag ready to collect a little antifreeze that will run out, i suggest letting the car cool and remove the coolant reservoir cap to allow the pressure to release prior to unhooking these lines. If doing the drivers side, bank 2, also remove the oil filler cap. next will be some low pressure fuel lines (GREEN ARROWS) that are in the way but can be re-positioned and or unhooked (once you have released the pressure from the fuel rail or the vehicle has sat for a days), have a rag ready also. Unhook all wires from the coil packs/injectors,fuel lines.
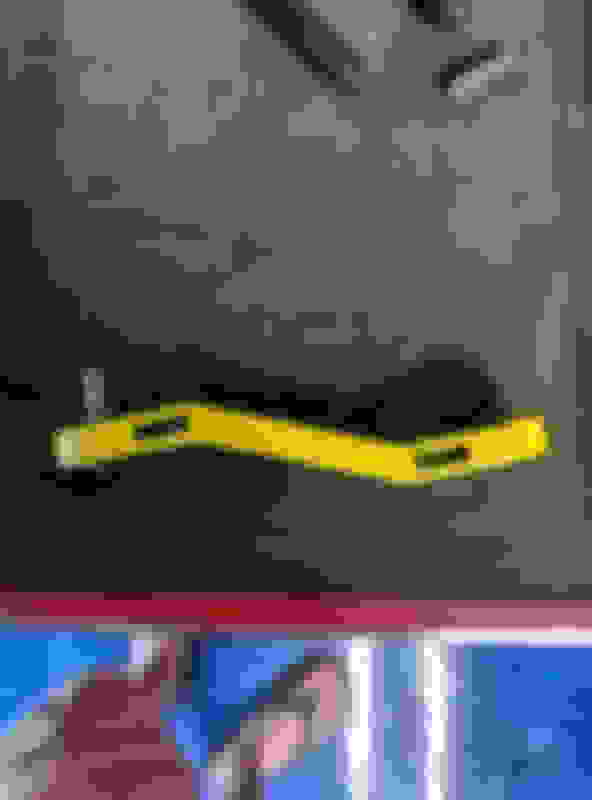
Ok, now with the heat shield out of the way you can see that its fairly wide open and easy to access the plugs and the high pressure fuel lines/rail. Next will be removing the coil packs, this is the hardest part of this of entire job IMO. The torx head bolts (T25 or T30 i believe) that hold the coils on are tight against the shock tower. This is where the $10 TIME SAVER comes into play, i have an entire shop of tools, 4 full toolboxes and this is the easiest method i have found. use the yellow tool from the kindergarten looking HF tool set 68834 fashion it like the picture below with the torx firmly held in the ratchet with some tape on the bit.
Next you will need to remove all 4 (or 3) torx from the coil packs, once complete work them out of the head and label them with a marker as to what cylinder they came from. Also at some point you will need to disconnect the entire (plastic) wiring tray that runs across the fuel rail area, 3 clips will release and allow the electrical conduit to be moved up and out of the way after some wrestling and unplugging various sensors on the front of the engine to allow more slack in the wiring. Cylinder and injector numbering reference below:
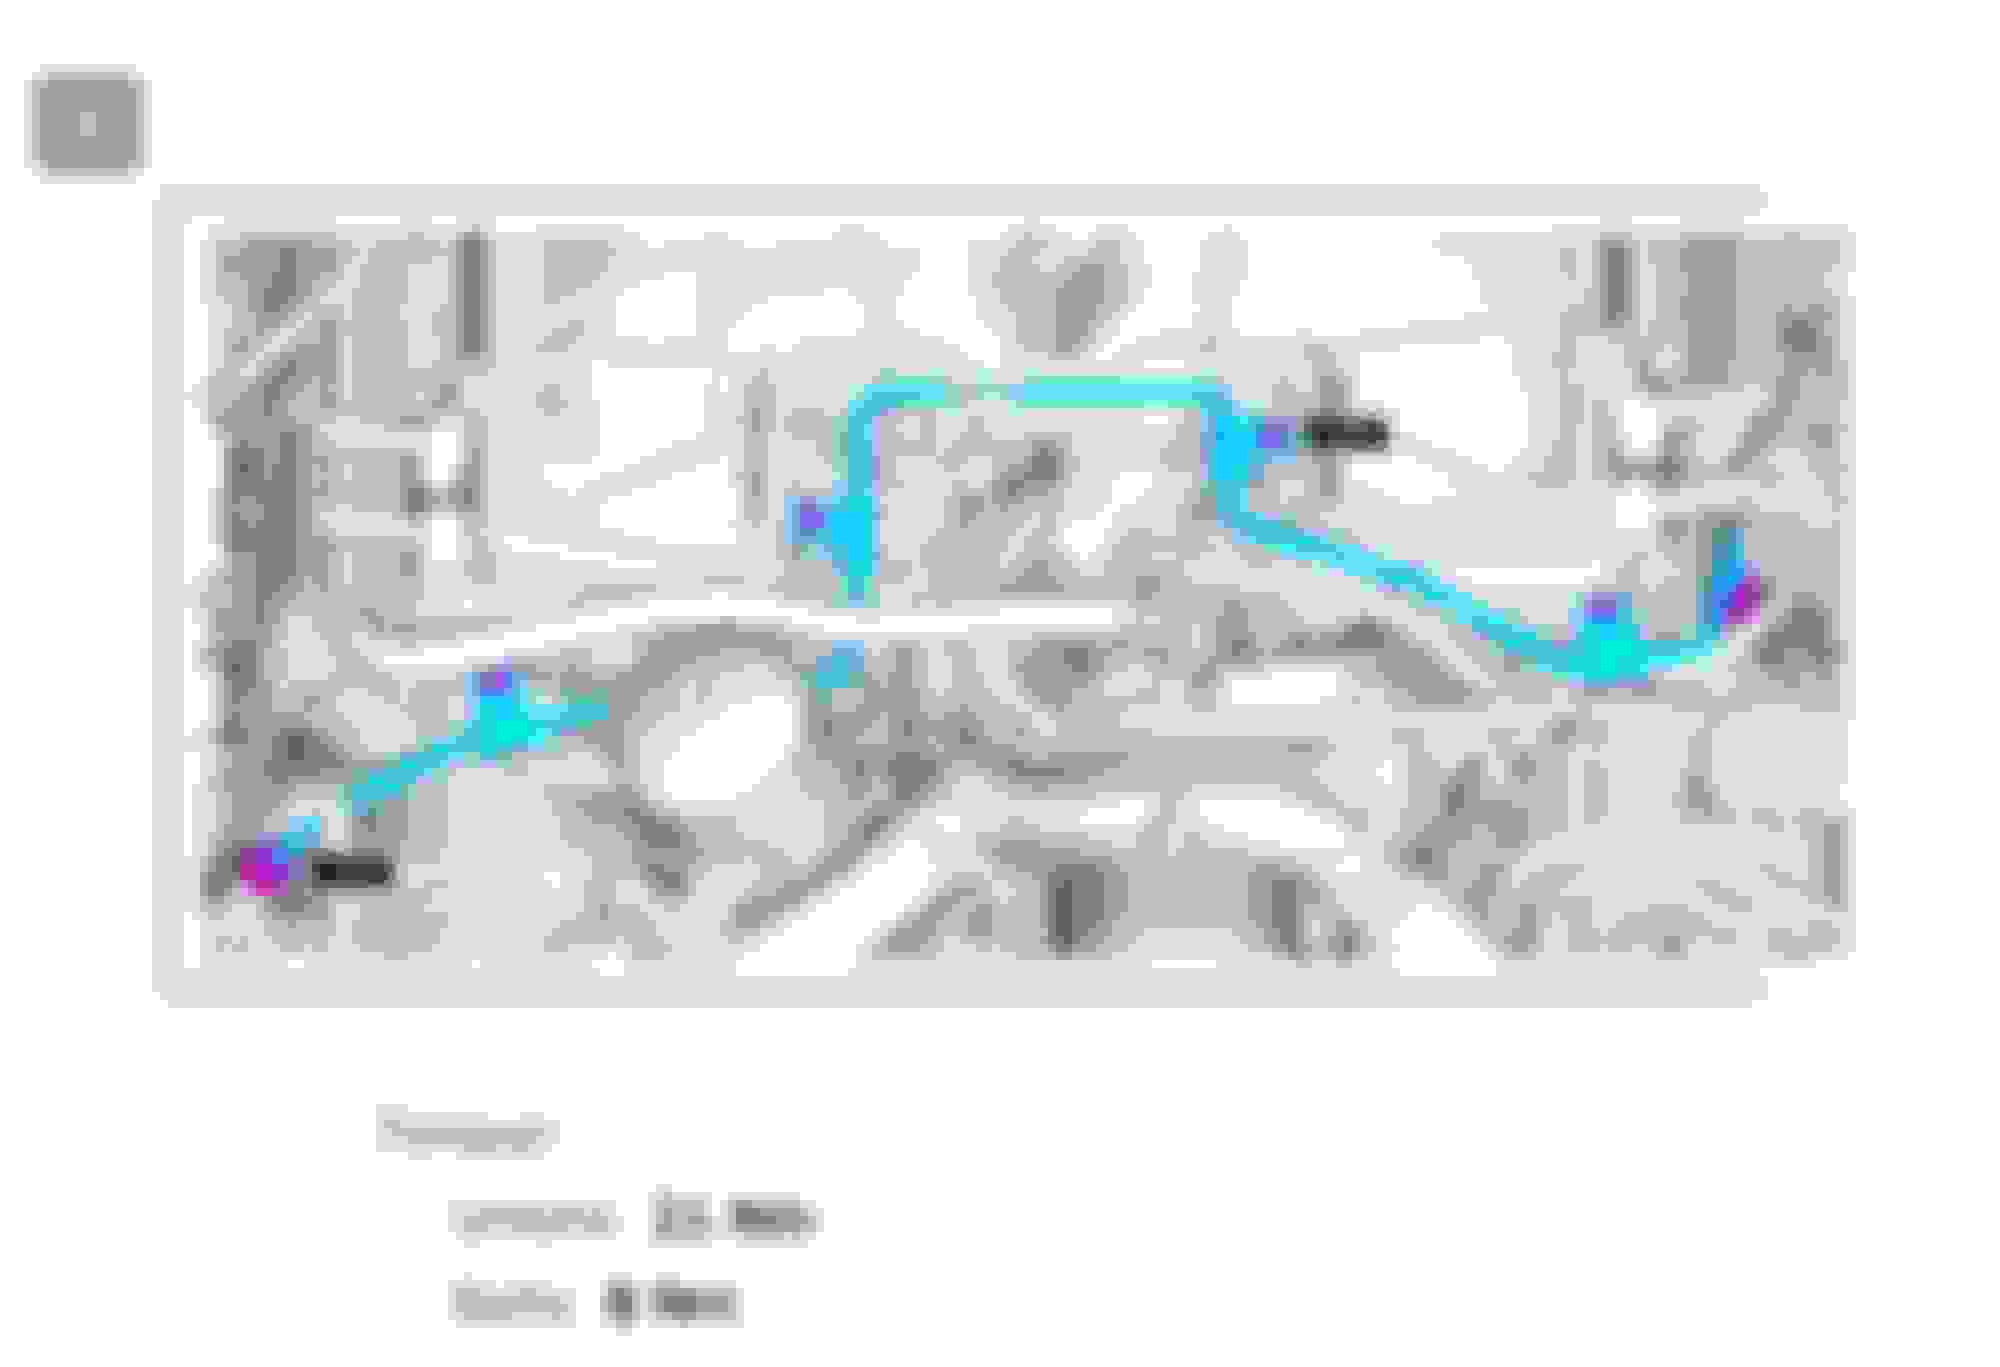
Next will be the HP fuel line that runs across the front of the engine (RED ARROW ABOVE), this is more T30 torx and its only necessary to remove the topside visible ones, as to allow enough room to remove the fuel rail. Now loosen the nut the on the HP fuel line (BROWN ARROW) that attaches to the fuel rail, slowly. There is a chance that this rail is still under 1000psi plus and could cause harm to your fingers, never seen this but i have read about it.
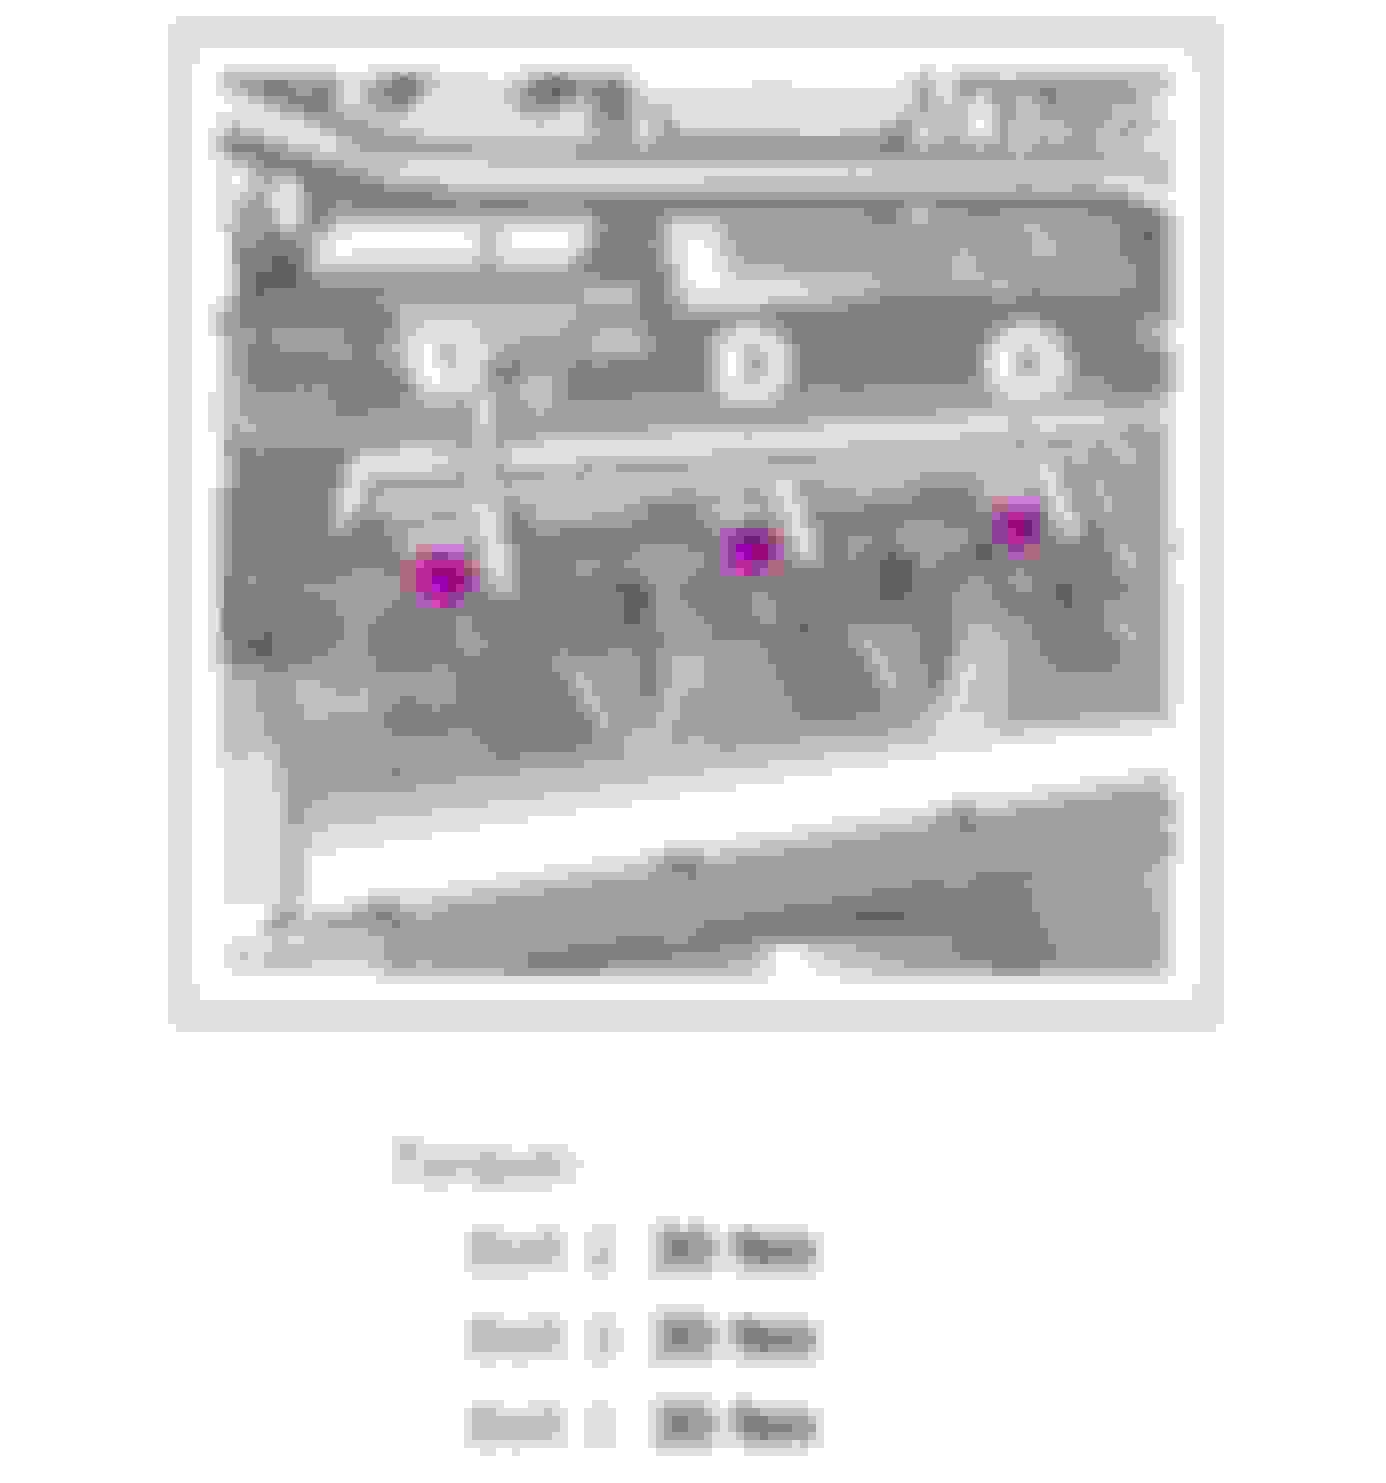
From here you will need to remove the 4 (or 3) fuel rail bolts (WHITE ARROWS) and carefully/evenly pull the fuel rail off the injectors.
THE PART WE HAVE ALL BEEN WAITING FOR!
Removing the injectors. Remove the clips from the tops of the injectors, and if your planning on reinstalling the injector each clip can only be reused on the same injector so don't mix them up. Firmly apply the injector tool around the top of each injector making sure its fully seated on the injector and the tool is locked on.
Now lightly slid the hammer on the tool against the nut increasing force as you hammer it out. ALL, every single injector in my engine has come out with 10-20 slides of the hammer. Some people have said they can't get them out and end up using bigger tools, DONT! i have spoken with a few JLR techs who all have said it may take 50-100 slides but they will come out. Also a forum member suggested a Liqiu Moly Product that will make this easier if they are stuck, i have no experience with this as i didn't need it. It has also been said that injectors on engines that are rev'd high often and under more load often (beat on lol) the injectors will come out easier.
Here is a pictures of my injector that had failed, notice the carbon build up. This is a real problem for this and any GDI engine, FOLKS GET A CAN OF BG44K! USE IT REGULARLY! there is carbon all over the interior of this engine, injectors, cylinders, intake valves(not that this will help here), ETC.
Installing the New injectors is simple, if you have bought new ones like below, then no need to worry about the teflon seals and replacing the top o-rings. If you didn't buy all 4 there are plenty of videos on how to install the seal with the tool listed above.
It is very important to remove all carbon buildup within the injector holes in the head, i used some carbon cleaning spray and a round wire brush, took some time but i got the holes spotless. it is hard to see the carbon buildup in the holes but use your camera phone or if you have an inspection scope. If not done correctly the new injectors will leak fuel, and it will fall on the hot manifolds causing fire. DONT PUT ANY LUBE/GREASE ON THE TEFLON SEALS! but do on the o-rings at the top of the injector.
Push the injectors down into the hole firmly until they bottom out, push all 4 (or 3) in and push the fuel rail lightly on top for now. This is where it gets tricky, you must align all the injectors strait and push down the rail all at once without "wiggling" it around as this will damage the teflon seals causing leaks. just go slow and be careful, if your unsure ford/jlr sells injector alignment pins (cheap cheap under $10) that will aid in installation.
Once the rail in down install the bolts into the hole and tight from the front of the engine back towards the fire wall.
Re-attach the HP fuel line and install the Torxs holding it to the front of the engine.
Install the coil packs, on the correct cylinders.
hook up the electrical connectors on the injectors and the coils reconnect fuel lines and test fire the engine. if all goes as planned it will clear up after a few seconds and run like it did before the injector failure. This looks like alot of work but its really not. Go slow and take pictures so you can get everything back in place when you re-assemble.
GOOD LUCK AND I HOPE THIS HELPS.
Last edited by Itismejoshy; Jul 3, 2019 at 01:57 PM.
Thanks for the great write up! With the right tools this seems like most moderately experienced shade tree mechanics can handle this. Once again, dealer pricing seems way out of line with the amount of effort involved.
Thanks for the great write up! With the right tools this seems like most moderately experienced shade tree mechanics can handle this. Once again, dealer pricing seems way out of line with the amount of effort involved.
Yes, honestly if you have done this before or like me had to to it twice (long story) it can be done in under 2hrs if your familiar with the steps. I would rate this at about a 4 out 10 for shade tree mechanic difficulty.
So the new injector are just installed using hand pressure? Also, are the clips self explanatory (just look at them and you know what to do? Great write up by the way. I'm sure many on the forum will appreciate the help this post provides.
So the new injector are just installed using hand pressure? Also, are the clips self explanatory (just look at them and you know what to do? Great write up by the way. I'm sure many on the forum will appreciate the help this post provides.
thanks! yes you push them in and the fuel rail pushes them in 100% when you tighten the bolt to spec. The clips only fit on one way like in the picture.
While you are in there and especially as you have removed the coil packs I reckon it would be a good time to also replace the spark plugs.
Definitely if you are doing all 6 or 8 injectors, not so sure if you are only doing one side.
Sorry you had to go through this, Josh, but thanks for sharing the knowledge. Ran my first can of BG44K through last month, just before the annual oil change.
Sorry you had to go through this, Josh, but thanks for sharing the knowledge. Ran my first can of BG44K through last month, just before the annual oil change.
My dealer adds a can of 44K to the gas and a can of MOA to the oil at every annual service. Extra cost, of course, but for not much more than I would have to pay for the BG cans myself.
Sooo jealous, simply impossible to get 44K or MOA here in Oz!
Edit - hold that thought - I may have found an Oz Fleabay seller and best of all they are only 10 miles down the road from me.
Maybe I can drop in and pick up a load of BG stuff and pay zero postage, win win!
Awesome write up!
-Regarding using BG44k - Is this similar to Techron Complete fuel system cleaner? have used that in my BMW's every oil change.
-is this included in the dealer-offered 'fuel system cleanse' services?
Awesome write up!
-Regarding using BG44k - Is this similar to Techron Complete fuel system cleaner? have used that in my BMW's every oil change.
-is this included in the dealer-offered 'fuel system cleanse' services?
From my research it's similar and better (the best), and I believe it is exactly what the dealers use for the "fuel system cleanse" service, I have seen posted on-line dealer invoices for a routine service showing they used BG 44K. And they also charge a packet for the pleasure, save yourself some cash and buy it / add it yourself.
I just recently replaced all 8 injectors. They were all seized to the head. No amount of slide hammering or letting them soak even budged them. The only thing that got them out was connecting my injector puller to my cherry picker and yanking them out. My car lifted off the jack stands a couple mm when I pulled each out, couldn't believe my eyes. Anyway, good writeup. Before I put them back in, I cleaned out the holes very thoroughly and put a little bit of high heat antisieze on the tips of the injectors for it to never happen again. And like someone else stated, it's a great time to change plugs as well.
Last edited by Terrance39; Jul 5, 2019 at 07:54 PM.
Sooo jealous, simply impossible to get 44K or MOA here in Oz!
Edit - hold that thought - I may have found an Oz Fleabay seller and best of all they are only 10 miles down the road from me.
Maybe I can drop in and pick up a load of BG stuff and pay zero postage, win win!
Success!!!
Dropped into the seller's place of business (tyre shop & BG distributor) and got two tins of MOA, two tins of 44K and a tin of EPR ("Engine Performance Restoration" - fancy name for oil flush) for cheap, around half the normal on-line price even if I could get them on-line.
All set now for an oil and filter change next week and I know where to go to get more of these goodies.
OzXFR I am also in AUS, would you be kind enough to post a link of the AUS EBay seller or a company name please. I can only find US sellers.
OzXFR I am also in AUS, would you be kind enough to post a link of the AUS EBay seller or a company name please. I can only find US sellers.
Here's the ad I found which led me to the seller: https://www.ebay.com.au/itm/BG-MOA-1...frcectupt=true
If you then go to their eBay shop (bgproductsales) you will see a handful of ads for a few BG products but not including 44K and nowhere near the whole range, but they do stock the whole range.
Send them a message on eBay via that ad (that's what I did) and see how you go.
They are at Churchill Tyres 424 Churchill Rd Kilburn (a suburb of Adelaide).