
1961 MK2 3.8 Sedan Project.


Thread Starter
|
Member
Joined: Sep 2012
Posts: 80
Likes: 10
From: Portland, Oregon
I drained the gas tank, which had more gas than I anticipated. Lots of brown material in there. I used a pressure washer to rinse out the gas tank, per Jose. I ran compressed air into it for an hour and let it dry overnight in a warm garage. I put a couple of gallons in, sloshed it by bouncing the rear bumper and drained it. A heavy orange-brown emulsion separated itself from the clean gas. I recycled the clean gas through a small paper filter and back into the tank. Tossed the brown stuff. Put clean gas in, sloshed and drained it. Very little emulsion this time.
I disconnected the fuel line at the fuel pump and at the glass bowl filter up front and blew compressed air through that. The rag at the engine end was barely damp as a result. Lots of air coming through.
With gas in the tank and the fuel line connected, I turned on the ignition. The fuel pump was working, but very little gas was arriving up front. The gas bowl wasn't filling.
I removed the fuel pump from its mount and disconnected the flexible line coming in from the tank. I put the flex line in a small jar of gas and it pumped it out clean.
The in-feed line from the bottom of the tank, that runs through the tank and up to the fuel pump was another story. Completely clogged. Wouldn't even let compressed air through. This line is built into the tank and not removable. On top of that it must have 2 90-degree bends. I straightened a wire coat hanger, cut the ends on a sharp bias and started working on the obstruction.
This line starts at the bottom of the tank in the center of the drain hole. The screen on the drain plug slips over it so gas from the tank must first pass through this screen before heading up to the fuel pump. I drained the tank again.
The bottom end of the fuel line was corroded but not weak. I worried that somewhere inside the tank, the crud causing the obstruction would have corroded the line to the point of breaking with all my probing using the coat hanger. I worked it from the top, but could only go so far. I worked it from the bottom, but only so far. I used compressed air and a shop vac to get the dirt and rust out. I remounted the fuel pump and hooked everything back up. Voila! plenty of gas to the front.
Just for the helluvit, I turned on the ignition and hit the starter button. The engine roared to life, quite a roar. Yes, it fired up for the first time in 15 years. It had been dormant in that dark old barn in Salem, Oregon that had been neglected since the old man died. It had shards of hay and leaves and cobwebs still, after it was in my garage.
I don't relate every detail about my work on the car, but a couple of Saturdays ago I pushed it outside and pressure-washed the undercarriage to get rid of all the spooky stuff, but as I worked on the fuel line and tank under the car, I could see there were still lots of spun spider homes in cubbies of the frame. I cleaned the exterior too and now the car is red as the devil's neck.
Last night when I pressed the starter button to pump gas to the filter upfront and prime the carburetors, its shuddering burst to life totally caught me by surprise. It growled a terrifying rumble as if suddenly I'd encountered, in the darkness of the jungle, a real jaguar, and then realized I was the prey. I was afraid to let it run because it's pointed the wrong way in the garage and it was too cold and dark outside.
But it was a brief reprieve. As the chill dissipated and the hairs on end relaxed, I decided that was enough for the night and put my tools away. I no sooner flipped off the garage lights and was closing the door to the garage than the interior of the car lit up casting eerie shadows across the garage wall. A life form took shape leaning casually against the driver's door with a grin so wide it made his eyes glow. It was the Devil Himself. He looked directly at me as the chill ran up my spine and the car roared to life again at the flick of his wrist, to his wicked pleasure. O my God!
There's more to this story about how he turned me into a werewolf and how I wrapped my first victim up like a mummy and how that victim returned to haunt me as a ghost that drove me to the insanity of being a car nut, but this is neither the time nor the place. I need to get to work. Happy Halloween.
More pix to come, and a video link.
Last edited by JoeSantana; Oct 29, 2012 at 09:16 AM.

Thread Starter
|
Member
Joined: Sep 2012
Posts: 80
Likes: 10
From: Portland, Oregon
I drained the crude oil that was in the engine after warming it up. I refilled with startup oil that I'd used to lubricate the Packard engine before starting it up. The oil was still honey colored, but not after it came out of the Jag. I then removed the oil filter canister. Everything is pretty grody, rusty on the outside. I stripped the paint and rust, primed and painted a mossy blue green, the color I found it. Installed a NAPA 1183 oil filter. Restarted the car and run it up to 1500 rpms, so smooth.
Last weekend, I pushe dit outside and flushed the radiator (drain, add radiator flush, fill, warm up, run for 10 min, do it all over again. Took about an hour for the whole process and added Prestone coolant go'round. No leaks. When I polled the overflow hose, the small copper tubing extension came off so put a flare on it and soldered it back on.
It takes all I've got to push it back in the garage. The brake discs are a mess, rusted. Just sitting a week and they were frozen again. I jacked up the car, sprayed WD40 on the discs and worked each wheel until it would turn.
I pushed it outside, thinking I could maneuver it around to point In. O, filled the power steering and it works. Was dry as a bone so I suspect a leak. But with the wheel turned tight, I couldn't budge the car. The brake and clutch pedals feel the same, like you've got your stepmaster set on 10. However, they do move. I started the car, depressed the clutch, put it in 1st gear, let off the clutch, and ever so slowly it moved back and the car moved forward.
The brakes don't work, so used the handbrake to stop. Put it in reverse the same way, like I had SAE 400 in the pedal, and back it went.
Pulling the knock offs for cleaning and spoke replacement. and spending some time with the brakes is next, then the transmission.
While I was waiting for the car to warm up and run, I cleaned up the windscreen washer apparatus. It had an aftermarket Trico pump on it and the guts to the original pump were gone so reinstalled the combination a little differently. And the lead hammer I found under the driver's cushion. I used PlastiDip and a 1" ID furniture leg foot to give it a handle.
Last edited by JoeSantana; Nov 4, 2012 at 01:04 AM.
Thread Starter
|
Member
Joined: Sep 2012
Posts: 80
Likes: 10
From: Portland, Oregon
Follow Up on the Gas Line: To play it safe, even tho the universal fuel pump has a screen inside it, I added a small 1/4" clear inline lawnmower fuel filter to the inlet line coming up from the tank in the trunk. NAPA #7-02357-1
Wire Wheels: I pulled the left front wire wheel. The disc brakes were rusted. Had to spray brake cleaner to get it to turn. I wire brushed everything and sanded both sides of the disc, which is scored. Used brake cleaner and wiped it down. Wheel turns with a one-hand tug. The shoes are/were new and barely used (15 years in there though). While I was doing this I soaked the wire wheel in spray wheel cleaner.
https://www.jaguarforums.com/forum/a...rntwheelaf-jpg
I tough-nylon-brushed the wire wheel and there were rust spots. I sprayed some WD40 on it and kept brushing. On the center section I sprayed Gunk engine degreaser. I used a no-scratch kitchen sponge and worked to loosen the dirt and rust and grease. I scrubbed the wheel with hot soapy water until it was fairly clean but stained in places. Repeated the process for the other side. Towel-dried it and brought it in to a work table.
I worked in Never Dull, the can of cotton soaked in metal cleaner, and then soaked the cotton in Meguier's chrome cleaner and worked it between the spokes with a wood skewer. I ripped some rag into 1-1/2-inch strips and fed them between the spokes, threading them with the skewer. I used a polishing wheel on my drill to get the hard stains off on large areas of the back side and the front row of spokes. I used a Dremel tool to clean the base of the spokes in the back row.
OK, guys, I know you're thinking What skill does that take? None, just four (4) hours of perseverance Per Wheel. Three wheels (the spare is the other I did some time ago) are done now.
As a break before starting the right front wheel, I polished the chrome on the left side. It came back like new except for some tiny pits on the upper surface of the door handles.
Brakes: The brake pedal went to the floor. I cleaned the brake reservoir earlier. I used a siphon to help suck the fluid to the nipple (everything in the system was brown) and a jack stand propped to hold the brake pedal after I pumped and siphoned out the brown stuff into a pan, refilling the reservoir as I proceeded. Then closed the nipple and remounted the wire wheels, which look spectacular now.
My objective is to get all four brakes in working order so I can move on to freeing up the clutch linkage so it pushes in easily and pops back. But of course, two rear wheels to go. I know those brakes work using the handbrake.
Last edited by JoeSantana; Nov 23, 2012 at 08:53 AM.
Thread Starter
|
Member
Joined: Sep 2012
Posts: 80
Likes: 10
From: Portland, Oregon
When I'm done with the rear brakes, perhaps over the Thanksgiving holiday, it's on to the tranny and overdrive. The service manual, parts book, and owners manual arrived, so it's much easier to reference instructions when working on the car. But, according to the service manual, to drain the OD, I need a Churchill Tool J3.
Available or Not Available?
Any suggestions for an alternative tool to remove the drain plug?
BTW, my lovely wife, Elaine, a Brit, now deceased, put together a complete Thanksgiving dinner menu recipe years ago so son Jamieson would not miss Thanksgiving while he was in London after graduation. Her sister, Valerie, Blackheath, prepared this American Thanksgiving.
Happy Turkey Day!
Veteran Member


Joined: Mar 2007
Posts: 9,141
Likes: 2,663
From: Florida
sorry to hear about your wife Joe. There is a UK site (can't remember the name now), which reproduces many obsolete tools and parts for Jaguar. I'm sure you'll find the clutch tool sooner or later. (the site has to do with E-types).

Sorry to hear about the loss of your wife Joe.
I've been looking at your restoration with interest and the pics look great too, but.....
why not post them into the body of the thread so they show up as larger pics which make it easier for all to see and appreciate?
Simply click on the thumbnail to see the pic, then right click & copy, then paste into your post....job done for this, as below
Check out the how to post pics in the help n suggestion centre for tips n tricks.
Thread Starter
|
Member
Joined: Sep 2012
Posts: 80
Likes: 10
From: Portland, Oregon
RIGHT REAR WIRE is the worst yet, for rust. About 5.5 hours in it, and more to go tonight.
I'm using strips of rag and wood skewers to remove the rust. Chrome is harder than wood. Wood is harder than rust. I can scrape with the skewer without scratching the chrome. And I use the skewer to put real pressure on the rag in the 'between' places. Still it's no picnic. Hope to finish this wheel tonight, then on to the last wheel.
BRAKE: With the bleeding of this, the third, brake, I now have solid brake pedal.
TRANSMISSION OD PLUG TOOL: I'm hesitant to pay $50 for a tool to remove the transmission plug. I wonder if there's an alternative. Will keep looking. Does everyone with a MK2 have one of these Churchill Jaguar J3 tools?
Edit: added photo of right rear wheel mounted.
Last edited by JoeSantana; Nov 28, 2012 at 09:04 AM.
Thread Starter
|
Member
Joined: Sep 2012
Posts: 80
Likes: 10
From: Portland, Oregon
I couldn't find any mention of these in the Service or Owner's Manuals. Must be something in a promotional brochure or ad? What is the correct nomenclature for those little tables and what was their purpose? Anyone know?
Veteran Member
Joined: Mar 2007
Posts: 9,141
Likes: 2,663
From: Florida
Thread Starter
|
Member
Joined: Sep 2012
Posts: 80
Likes: 10
From: Portland, Oregon
Now that the brakes are done and work well, plenty of pedal and plenty of pad, I'm ready to move on to the clutch and transmission. The clutch moves as if it is hydraulic, like pushing into molasses. Is the clutch power assisted?
I'm going to change the oil in the transmission and overdrive. Was sort of surprised that it calls for 30W instead of 85-140 gear oil like the Packard.
I push the clutch in, it move very slowly, let off, and the pedal moves ba ck up very slowly. I've used 1st and reverse, no grinding, engages as it should and the car moves accordingly.
Does anyone no what is going on here? Is it just greasy linkage?
Thanks for help.


Joined: Dec 2011
Posts: 120,439
Likes: 17,014
From: Durham, UK
Officially termed by Jaguar "Fold Down Tables", these were generally known as "PicNic Tables".
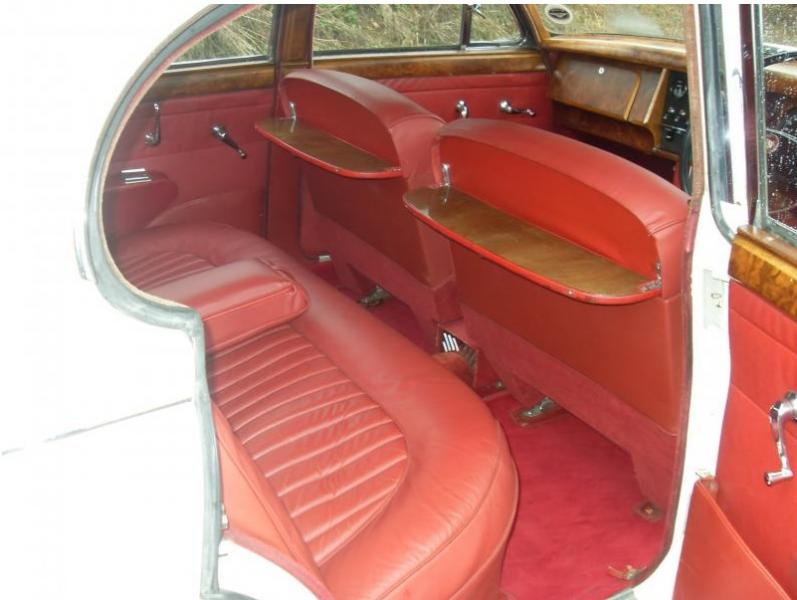

They were a standard feature of the UK specification MKII before being dropped with the Introduction of the S-Type.
As a regular rear seat passenger in a MKII in the 60's, I can recall how useless they were! More decoration than practical, they were only horizontal when the front seats were upright.
Graham
Thread Starter
|
Member
Joined: Sep 2012
Posts: 80
Likes: 10
From: Portland, Oregon
CLUTCH
Did some reading last night on the clutch. It needs to be bled of old fluid like the brakes because of being stored for years. The master cylinder looks very corroded. The service manual warns that everything should be kept clean so no dirt gets into the system. The fluid recommended is Castrol/Girling Crimson Brake/Clutch fluid or, if not available, a fluid that conforms to SAE 70 R3.
Did some reading last night on the clutch. It needs to be bled of old fluid like the brakes because of being stored for years. The master cylinder looks very corroded. The service manual warns that everything should be kept clean so no dirt gets into the system. The fluid recommended is Castrol/Girling Crimson Brake/Clutch fluid or, if not available, a fluid that conforms to SAE 70 R3.