

Vanity Mirror Cover Fix W/Pics FAQ

Thread Starter
|
Veteran Member


Joined: Feb 2009
Posts: 8,020
Likes: 1,731
From: Sunny South Carolina
Difficulty Level: novice
Tools Needed: Drill, 7/64" drill bit, medium flat blade screwdriver, epoxy, 3/8" long heavy duty coat hanger or paint can handle, masking tape (optional)
Time: less than an hour
This procedure was done to a 2005 S Type. Others MYs should be similiar.
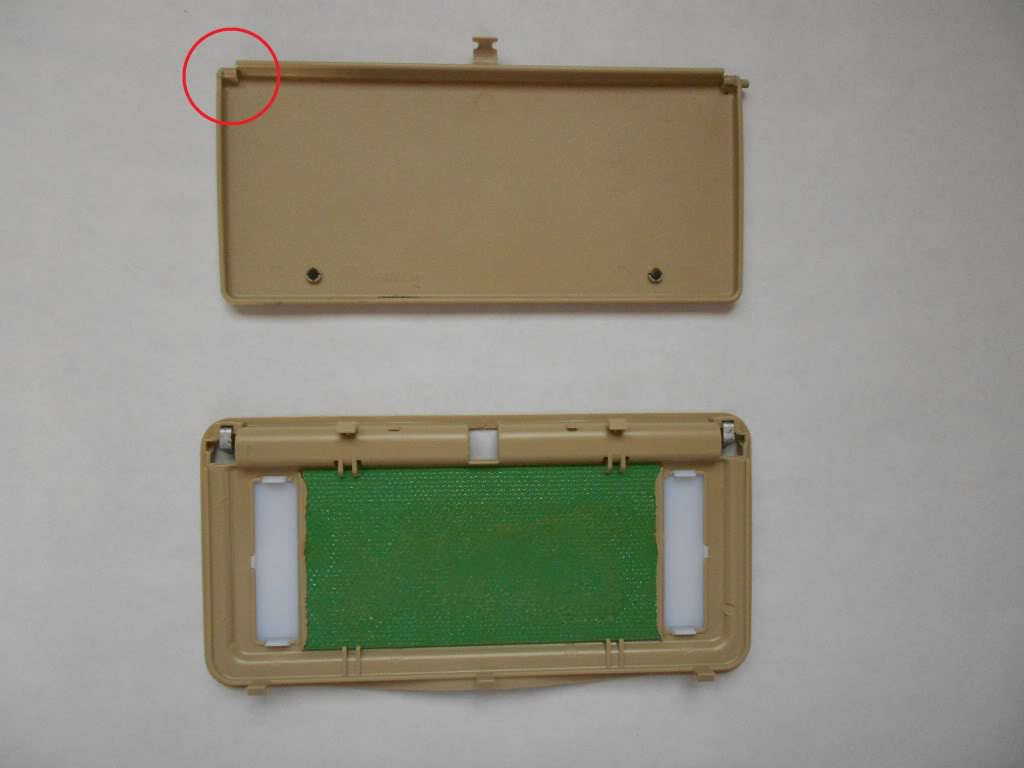
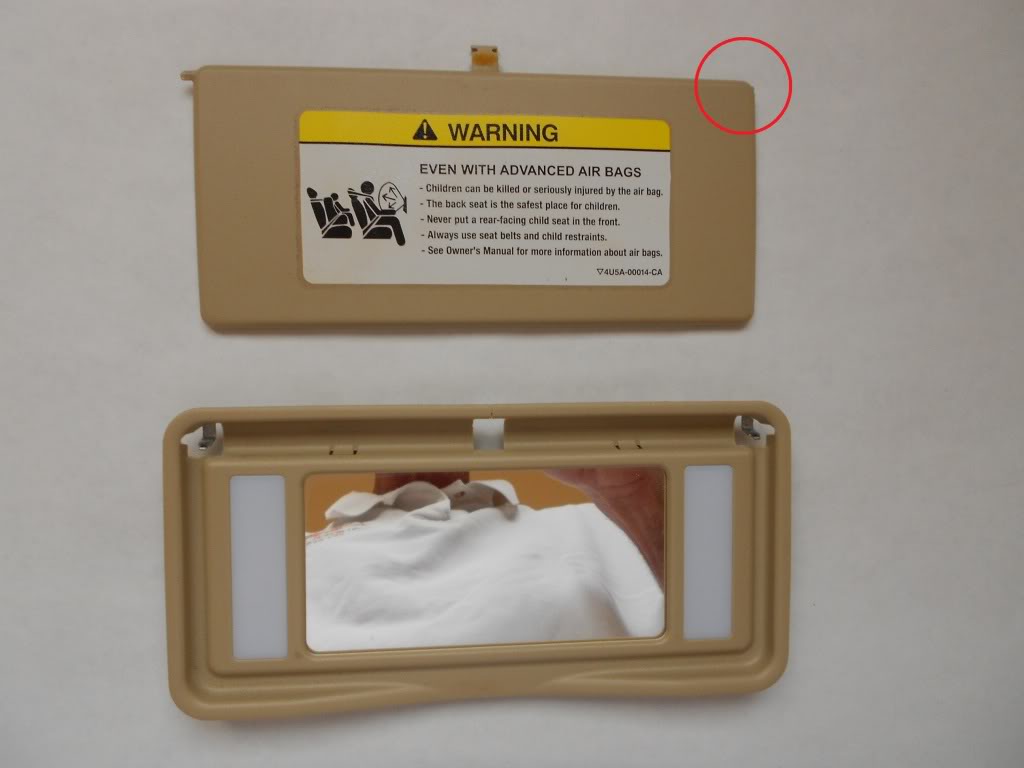
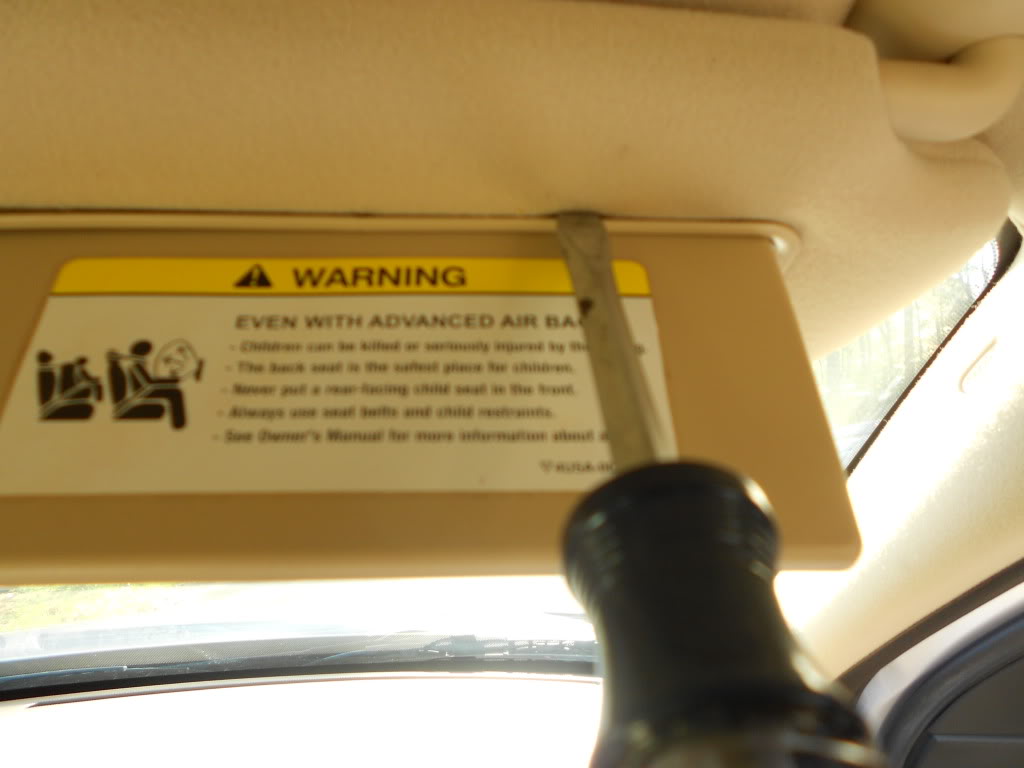
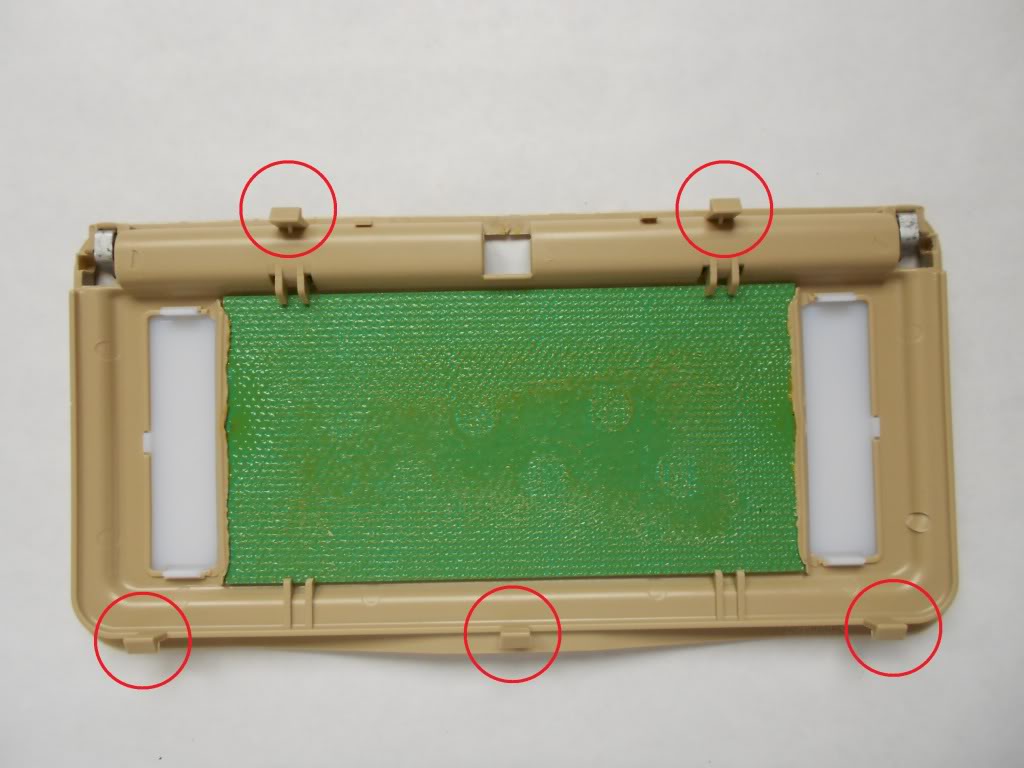
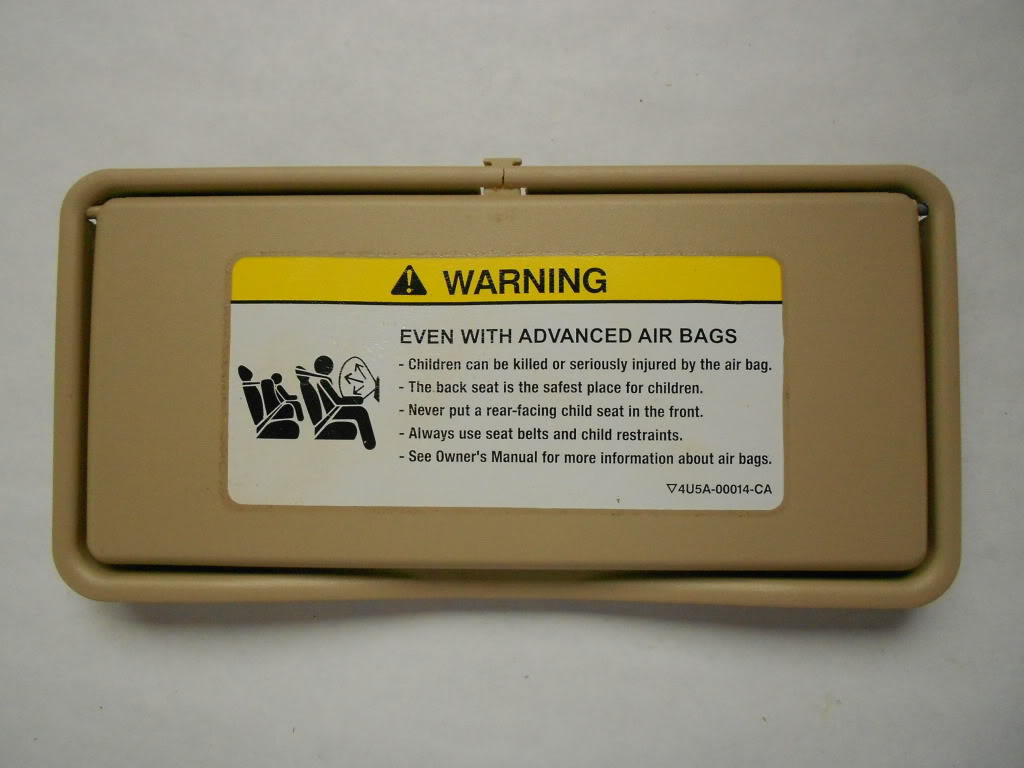
Start off with gently prying the vanity mirror off the sun visor. No need to remove sun visor from vehicle. In the following pictures notice that this is NOT a broken vanity cover (I replaced the drivers side cover with the passenger cover for aesthetics).
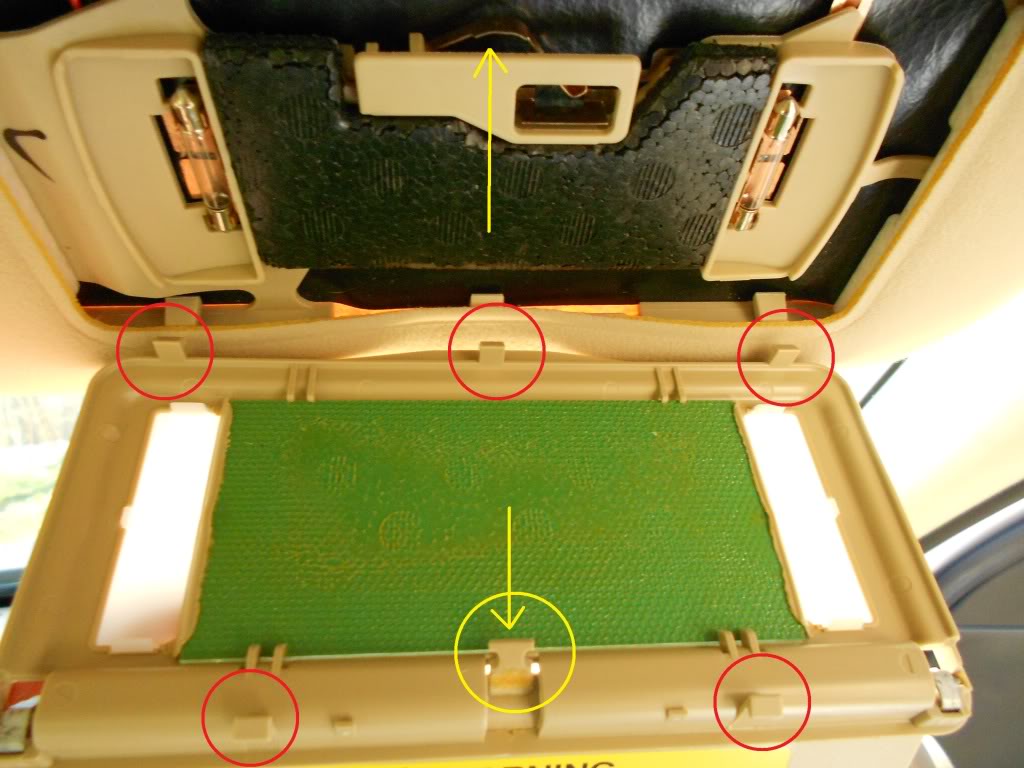
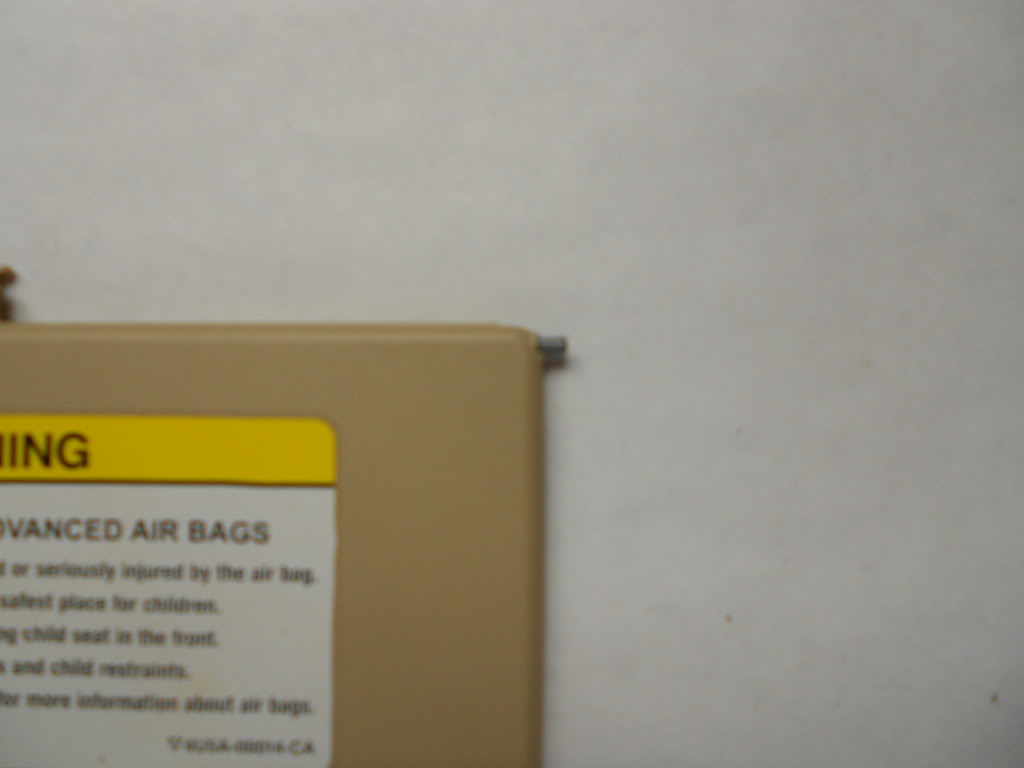
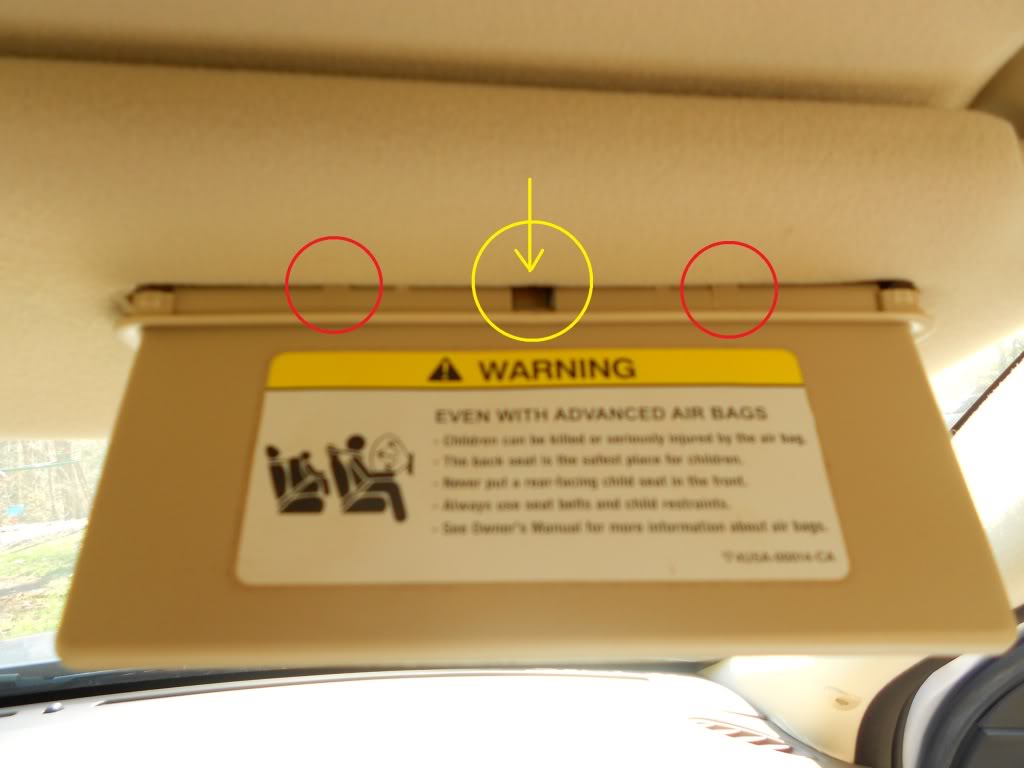
There are 2 tabs on the upper ("top") of vanity mirror and 3 on the lower portion. The yellow arrows will be explained in the end of this post.
Using the masking tape (optional) I measured 3/16" for depth of "new" flap pin on the 7/64" drill bit.
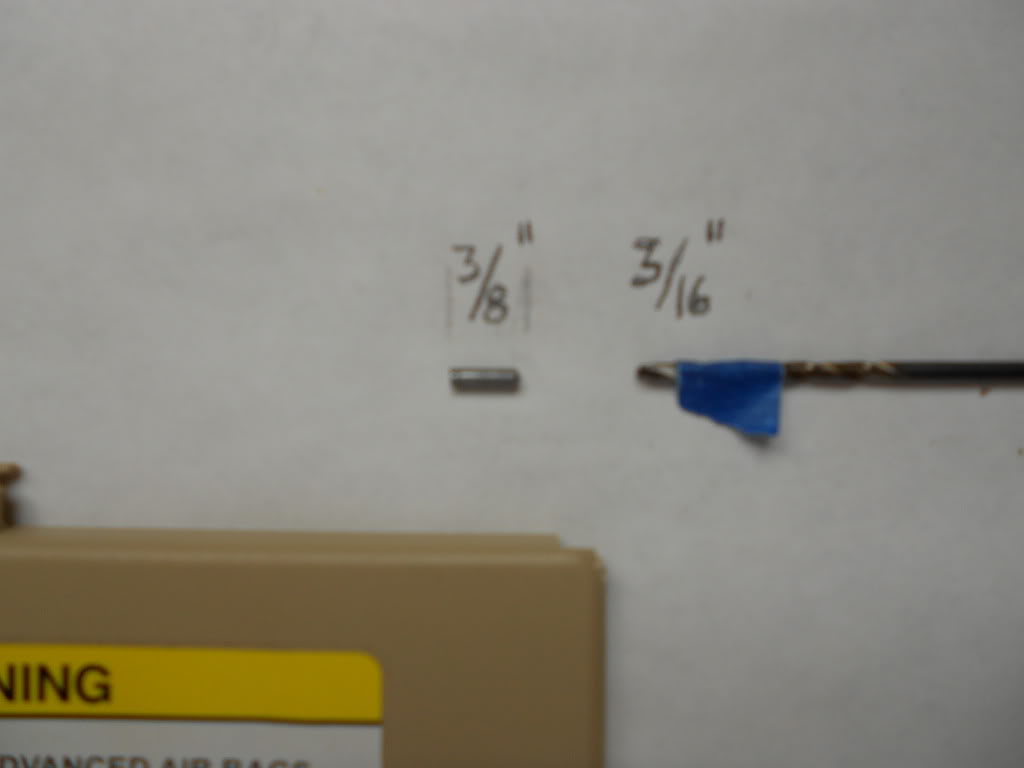
I just held the cover in my hand and used a 3/8 cordless drill to drill new hole.
Epoxy "new" 3/8" long pin in, wipe access off and let cure.
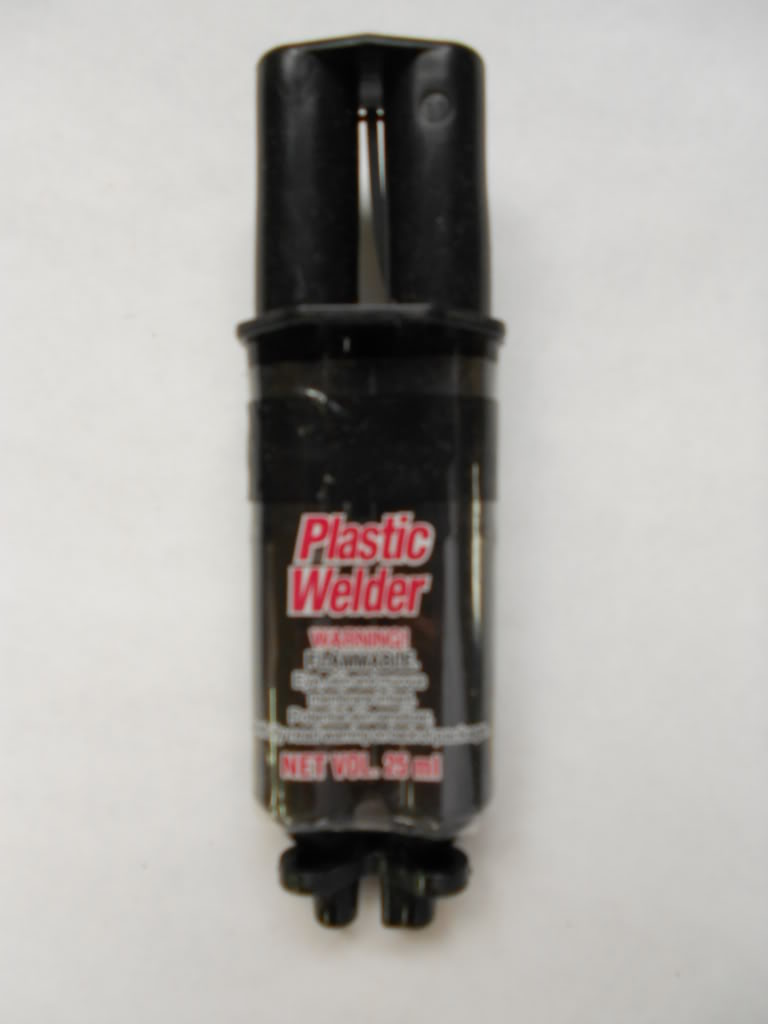
To help with the epoxy set, I placed cover in the sunlight which also made the cover pliable enough to slightly bend enough to slip cover plate into the vanity mirror assembly. The crack in the upper middle of the vanity assembly was already there prior to the "cover plate" fix.
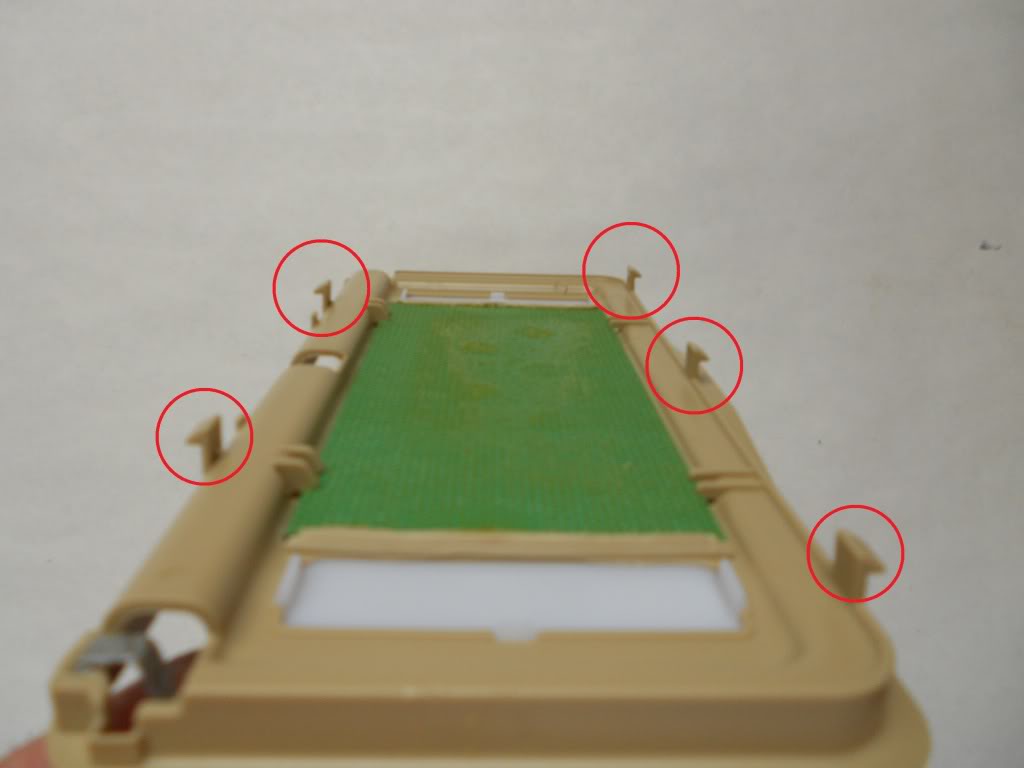
**NOTE: When placing the vanity assembly back into the visor. MAKE SURE THE COVER IS IN OPEN POSITION for proper alignment of the light tab indicated by the yellow arrows. Place lower portion of assembly in first then locking the upper tabs into visor.
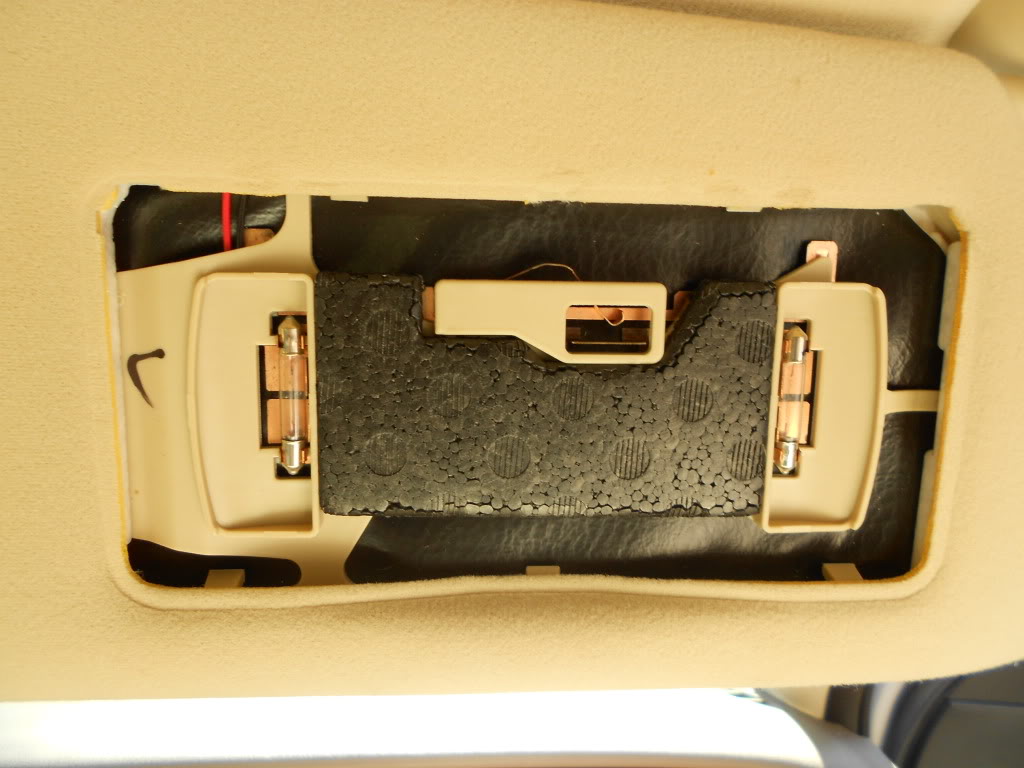
If you need to just change out a vanity light bulb. Gently pry out assembly from visor as shown to gain access to bulbs.
Tools Needed: Drill, 7/64" drill bit, medium flat blade screwdriver, epoxy, 3/8" long heavy duty coat hanger or paint can handle, masking tape (optional)
Time: less than an hour
This procedure was done to a 2005 S Type. Others MYs should be similiar.
Start off with gently prying the vanity mirror off the sun visor. No need to remove sun visor from vehicle. In the following pictures notice that this is NOT a broken vanity cover (I replaced the drivers side cover with the passenger cover for aesthetics).
There are 2 tabs on the upper ("top") of vanity mirror and 3 on the lower portion. The yellow arrows will be explained in the end of this post.
Using the masking tape (optional) I measured 3/16" for depth of "new" flap pin on the 7/64" drill bit.
I just held the cover in my hand and used a 3/8 cordless drill to drill new hole.
Epoxy "new" 3/8" long pin in, wipe access off and let cure.
To help with the epoxy set, I placed cover in the sunlight which also made the cover pliable enough to slightly bend enough to slip cover plate into the vanity mirror assembly. The crack in the upper middle of the vanity assembly was already there prior to the "cover plate" fix.
**NOTE: When placing the vanity assembly back into the visor. MAKE SURE THE COVER IS IN OPEN POSITION for proper alignment of the light tab indicated by the yellow arrows. Place lower portion of assembly in first then locking the upper tabs into visor.
If you need to just change out a vanity light bulb. Gently pry out assembly from visor as shown to gain access to bulbs.

Veteran Member

Joined: Jan 2009
Posts: 13,076
Likes: 4,724
From: Raleigh, NC
Great job as always, Rick. I did this fix a couple of years ago to our drivers sun visor using a small finishing nail inserted and epoxied into the hole as my new pivot bar. A metal pivot bar instead of the lousy plastic one fixes this problem permanently....
Any update on the door lock tab rechroming job? I still have the small piece of metal foil tape wrapped around ours for protection from finger cuts. It doesn't look great, but it does the job....
Any update on the door lock tab rechroming job? I still have the small piece of metal foil tape wrapped around ours for protection from finger cuts. It doesn't look great, but it does the job....

Thread Starter
|
Veteran Member
Joined: Feb 2009
Posts: 8,020
Likes: 1,731
From: Sunny South Carolina
Thanks for the thanks guys.
Zane take the easy way out just switch the 2, until you get the time. That only takes a minute !
!
Our broken one sat on my work bench for well lets say awhile........
Zane take the easy way out just switch the 2, until you get the time. That only takes a minute
!Our broken one sat on my work bench for well lets say awhile........
Don't really recall..but I think her broken one is pax side...just have it clipped with an approach-plate clip right now, I think. There's a thought! could swap her's with momma's...even so they are different colors......

Junior Member
Joined: May 2011
Posts: 26
Likes: 0
From: d.c.
hey guys, my vanity mirrors(both driver and passenger side) are missing the lids...this is how I got them when I bought the car, any place/site I can get either just the lids or the entire vanity mirror? I checked on eBay but they dont have any in the beige color 
Trending Topics

Senior Member
Joined: May 2010
Posts: 209
Likes: 19
From: San Antonio, TX
Thanks Rick for an awesome tutorial. My Passenger side is broken, I was planning to use Dowel Pins to fix it.
Amazon.com: Passivated 416 Stainless Steel Dowel Pin, 1/8" Diameter, 3/8" Length (Pack of 10): Industrial & Scientific
I was wondering if the one in the link above would be the correct length and diameter?
Thanks a lot.
Amazon.com: Passivated 416 Stainless Steel Dowel Pin, 1/8" Diameter, 3/8" Length (Pack of 10): Industrial & Scientific
I was wondering if the one in the link above would be the correct length and diameter?
Thanks a lot.

Junior Member
Joined: Feb 2013
Posts: 10
Likes: 0
From: Kentucky
Thanks Rick for an awesome tutorial. My Passenger side is broken, I was planning to use Dowel Pins to fix it.
Amazon.com: Passivated 416 Stainless Steel Dowel Pin, 1/8" Diameter, 3/8" Length (Pack of 10): Industrial & Scientific
I was wondering if the one in the link above would be the correct length and diameter?
Thanks a lot.
Amazon.com: Passivated 416 Stainless Steel Dowel Pin, 1/8" Diameter, 3/8" Length (Pack of 10): Industrial & Scientific
I was wondering if the one in the link above would be the correct length and diameter?
Thanks a lot.
Thanks in advance!

Veteran Member
Joined: Jun 2009
Posts: 3,899
Likes: 803
From: Home
Yes there is a small piece of spring steel on the hinge. You can lose it when the plastic pin breaks too.
Anybody fix loose visor fabric? I had to replace my driver�s side visor because the material got very loose and baggy. I think the glue bond decayed from heat and time so the material started to pull away from the thin foam it's glued to.
Sad to say it was $231 from Jaguar. I have torn down the old one but it looks completely un-repairable as everything appears to be molded together as one piece. I had a difficult time splitting the visor and the material has to be folded a certain way when it's glued back together.
All the repair instructions I can find on the internet are for different kinds of visor construction than what the S Type has.
.
.
.
Veteran Member
Joined: Jan 2009
Posts: 13,076
Likes: 4,724
From: Raleigh, NC
Rather than purchase an entirely new visor, I would consider making a couple of new visors out of a thin sheet of light hardwood, perhaps three-eighths of an inch in thickness. A two-foot by two-foot panel would be plenty to make both visors. Use your existing visors as your templates. Stain them to match, and you've got a very unique and attractive addition to your car....
I don't think I would attempt to carry over the mirror lighting, though. Mirrors on the back sides, possibly, but not the lighting....
I don't think I would attempt to carry over the mirror lighting, though. Mirrors on the back sides, possibly, but not the lighting....
Veteran Member
Joined: Mar 2013
Posts: 3,018
Likes: 182
From: Pawleys Island, SC USA (formerly from Tabernacle, NJ USA)
Thanks Rick for an awesome tutorial. My Passenger side is broken, I was planning to use Dowel Pins to fix it.
Amazon.com: Passivated 416 Stainless Steel Dowel Pin, 1/8" Diameter, 3/8" Length (Pack of 10): Industrial & Scientific
I was wondering if the one in the link above would be the correct length and diameter?
Thanks a lot.
Amazon.com: Passivated 416 Stainless Steel Dowel Pin, 1/8" Diameter, 3/8" Length (Pack of 10): Industrial & Scientific
I was wondering if the one in the link above would be the correct length and diameter?
Thanks a lot.
Veteran Member
Joined: Mar 2013
Posts: 3,018
Likes: 182
From: Pawleys Island, SC USA (formerly from Tabernacle, NJ USA)
And thanks again, Rick, for the great write up with pics. Truly invaluable! I had no idea how to solve this problem on my wife's S-Type until I read saw your fix. Made it look easy for a guy with all thumbs like me. Steve
Veteran Member
Joined: Mar 2013
Posts: 3,018
Likes: 182
From: Pawleys Island, SC USA (formerly from Tabernacle, NJ USA)
Old thread I know, but wondering if you tried those 1/8" x 3/8" stainless dowel pins for your visor fix and, if so, how did they work out? I'm about to do this fix on my '05 S-Type and these pins seem like a real time saver. Would like to hear your comments/suggestions. Thanks, Steve
The pins come in a pack of 10 for $8 inc shipping and they're the exact size needed for this job. True, I now have 9 spare dowel pins, but I own 3 S-types and another of them looks like it will need this fix sometime soon, so I don't think they'll go to waste.
I scuffed up one end of the pin with sand paper before gluing it into the hole I drilled where the broken pin had been. And I used the same Devcon epoxy that Rick used, which works on both metal and plastic, sets up quickly and completely cures in 24 hours.
While I had the mirror frame out of the car, I also took the opportunity to repair the crack it had in the same location as Rick's pic #10. Crazy Glue worked great here - I held the frame while my helper dropped a dab of glue in the crack, then I simply squeezed real hard to close the seam for about 2 minutes and...Voila! Crack is fixed.
Many thanks again to JoycesJag for posting the tutorial for this fix, and to Jon89 for his suggestions too. And thanks to RizwanSharp for the original link to the dowel pins on Amazon, which as of this date is still active. Best 8 bucks I ever spent, as my wife is a happy camper again
Here's the link again -
If you're lazy like me, these 1/8"x3/8" stainless dowel pins, sold on Amazon, are a good but slightly more expensive alternative to the other DIY options mentioned in this thread if you need to fix a broken vanity mirror lid hinge.
Last edited by Jumpin' Jag Flash; Jun 14, 2016 at 09:32 PM. Reason: Misspellings
Veteran Member
Joined: Jan 2009
Posts: 13,076
Likes: 4,724
From: Raleigh, NC
Well done. I always enjoy reading the various approaches that we all come up with to solve these nagging issues as they arise. So many of them involve the lousy plastics in our cars. Any time you can replace plastic with metal, you're one step ahead....
Veteran Member
Joined: Mar 2013
Posts: 3,018
Likes: 182
From: Pawleys Island, SC USA (formerly from Tabernacle, NJ USA)