When you click on links to various merchants on this site and make a purchase, this can result in this site earning a commission. Affiliate programs and affiliations include, but are not limited to, the eBay Partner Network.
For anyone with a 2006 S-Type, does your condenser fan run for a few minutes after the engine is cut off, especially if it�s a hot day.
Mine does not and I�m beginning to wonder if it�s operating efficiently at idle and low speeds. Still troubleshooting the poor AC cooling at low speeds issue.
For anyone with a 2006 S-Type, does your condenser fan run for a few minutes after the engine is cut off, especially if it�s a hot day.
Mine does not and I�m beginning to wonder if it�s operating efficiently at idle and low speeds. Still troubleshooting the poor AC cooling at low speeds issue.
Thanks for any insight.
Fans running after engine shut down is not a good sign. It's actually a sign that the engine is running hot and could be a contributor to your AC woes. (If the coolant temp is higher than normal your AC output will be adversely affected)
Dont rely on dash dummy gauge. The needle will stay dead center between 170 degrees and 230 degrees.
You should be around 195 - 205 degrees but your probably running hotter than that.
I'd advise to get to the bottom of it. Hook up an obd2 monitor that can tell you real time coolant temperatures. Anything above 210 is an issue for sure.
The higher, the worse.
Also, check the electric fan for proper operation.
Thanks for the information and the suggestions. I didn�t realize the dash gauge had such a wide range while the needle stays centered. In my opinion that�s not very helpful in diagnosing problems. I�ll certainly get a code reader for a more accurate reading and results.
The AC cools extremely well at freeway speeds, getting down to around 38 degrees. The only thing that has changed between city streets and the freeway is the increased air flow from higher speed and the speed of the compressor, Now both the fan and the compressor are suspect now in my troubleshooting.
I can can confirm the fan is operational as I can observe it spinning down to a complete stop when I stop the engine. But I wonder if it�s pulling enough air across the condenser at idle and low RPMs.
Take the grill off and the top plastic radiator cover and have a good look at the fins of the condenser and radiator.....if slightly plugged it can cause cooling and ac troubles from lack of airflow
If the radiator fan runs after the engine is shut off, the thermostat is suspect and should be replaced. Use an OEM thermostat as it's designed to allow the system to be bled once filled. Refer to the Workshop Manual for the correct cooling system bleeding procedure as they're different for the V6 and V8 cars.
My suspicion is you've been drawn into a troubleshooting trap. Your radiator (and condenser) fan seems to be working adequately. If the fan's performance was subpar, you'd also experience engine overheating. The fan also passed the rag test. Does this mean the fan is perfect? We mortals have no way to know. We'd need a specialized instrument ($$$) to read airflow and official specs for comparison. But from what we've observed, we can say the fan is not glaringly bad. I'd look elsewhere for now, as explained below.
Let's consider how the AC system would behave if operating at only 75% efficiency or so, for reasons still undiagnosed. Could be low refrigerant. Could be a glazed drive belt. Could be a slipping compressor clutch. Lots of other possibilities, too, not just those three. Maybe you've got a combination of several minor faults.
At freeway speeds, even at only 75% capability, the system can probably make more cold air than required. You've got the compressor spinning at a good clip. You've got a surplus of ram airflow through the condenser. This equation makes plenty of cold air. Just a guess, but maybe even at 50% capability, you'd still have plenty of cold air being produced under these ideal conditions.
This makes me think of my old pickup. One of the cylinders has low compression and the other 7 are marginal, but it still does just fine on level ground. This tired old engine still makes more power than is required when running empty on a flat road. Heck, change the equation to a downgrade and it feels like a hot rod.
Now let's change the equation with my truck. Let's say I fill a huge trailer with 3000 pounds of Beanie Babies to take to the dump. Boy, that's a lot of weight, plus the trailer itself. I no longer have much extra power and the speed drops. Throw in a steep hill to climb and I'm slowed to a crawl.
See the potential connection with your AC? That tired old engine only makes 75% of the power it should (just guessing on the percentage). Most of the time that reduced output is still adequate, such as under optimal conditions like running empty on flat ground. But when I need 100% to haul a heavy load uphill, the power just isn't there.
Your AC's 75% performance has no problem making enough cold air under optimal conditions, such as on the freeway. But let's take away that virtually unlimited ram airflow. Replace that with whatever the electric fan can muster, which is substantially less. This is what happens with reduced vehicle speed. Let's reduce refrigerant flow by reducing the compressor speed. This is what happens when the engine RPM drops to idle. Now you've set up a double whammy for the AC system. It needs everything at top efficiency to make cold air during stop and go traffic. Unfortunately, you're writing a big check without enough money in the bank to cover it. But instead of an overdraft notice, you're getting warm air.
So what to do?
1) Forget about the fan for now. It's already tested as "not glaringly bad". It's become a distraction keeping you from other more likely faults.
2) Make sure the cabin air filter is clean.
3) Do the paint mark test to make sure the compressor clutch is not slipping.
4) Check the serpentine belt condition and tension. Replace it if there's any evidence of glazing.
5) Make sure the refrigerant quantity is correct. This one is YUGE! If you ask how to correlate pressure to the required quantity, I shall fly to your city and smack you. To ensure the quantity is correct, the best method is a full evacuation and recharge. I would certainly recommend gambling a little time and money on this likely cause, versus spending several hundred dollars to replace what is probably a perfectly good electric fan.
1) Duplicate the lack of cooling, i.e. car stationary and engine at idle. If (big IF) lack of cooling airflow is the problem, the high side pressure will climb too high. The AC pressure sensor watches for this, and the compressor clutch will be commanded off. Watch the face of the compressor pulley. If spinning, this means the compressor has been commanded to run, which also means high pressure has NOT been detected. In other words, airflow from the fan is keeping the high side pressure within limits. The fan isn't the problem.
2) When was the last time the refrigerant was serviced? If pushing five years, you can just about guarantee the volume is low.
I think the OP needs to look at ensuring cooling is sufficient (radiator, fan, hoses, thermostat, water pump). If the engine temp is running high then AC will not operate to spec.
So I gets to thinking. Don't worry, it's just social thinking and I can stop anytime I want.
Rather than troubleshoot this poor car to death while you stick to the seats at every stop light, it may be time for a futile and stupid gesture or two. As I've previously suggested, I don't think your radiator fan is at fault. If it was, you'd also experience engine overheating under the same conditions, and I've heard no mention of that. And unfortunately, AC systems sometimes get treated as if they were voodoo, and you have to make exotic sacrifices to the R134a gods for cold air.
Before you go in search of the liver from an albino chicken and a vial of unicorn tears, just make sure the basic AC prerequisites are satisfied. This may save you a lot of time and money. After that, okay, put on your miner's uniform and dig deeper. Tie a rope around your waist so we can pull you back out if needed. But before you step foot in that hole, make sure the AC system has the basics covered. If you're missing any of these basics, the performance will be subpar.
Copied from my HVAC troubleshooting guide, post #4:
For an AC system to "make cold" at the evaporator in sufficient quantity, it must have four basic things, in no particular order:
1) Good airflow through the evaporator.
2) Good airflow through through the condenser (in front of the radiator) for proper heat transfer.
3) Good performance from the compressor
4) The correct amount of refrigerant in the system
It seems you've only been investigating #2, airflow through the condenser. But as I've previously mentioned, none of your tests so far have found any obvious faults there. Put that on the back burner for now and check all the other common things. If the condenser airflow really was the problem, you'll have a great "I told you so" moment. Either way, you can't lose! You'll either have good AC performance again or tremendous bragging rights if I was less correct than usual.
For #1, check that cabin air filter. If there's any doubt, just replace it.
For #2, resist the urge for the moment to continue troubleshooting down a possible dead end. Maybe stick your fingertips into the running fan blades so you associate condenser airflow with excruciating pain, and will look elsewhere.
For #3, check the serpentine belt for tension and glazing. Do the paint test of the compressor clutch. Make sure the compressor clutch is still engaged when the cooling performance drops off. And then finally, connect a test gauge set and monitor the low side pressure.
For #4, which in my horribly over-inflated opinion is the most likely, make sure the refrigerant quantity is correct. Two methods are given in the guide. If you take the car to a shop, they will only do the full evac and recharge, which is the preferred method anyway.
Thanks KR98864 and everyone else with advice. I imagine you�re getting tired of reading about my Jag troubles. Me too, but I haven�t thrown in the towel just yet, although the thought of finding another daily driver with a working AC has crossed my mind. Then the Jag can be lifted on jack stands for prolonged troubleshooting,
Here are the latest shenanigans:
On Sunday morning, the DCCV had a complete failure and presented me with the follow temps;
Top Radiator Hose: 190 degrees
Top Heater Hose: 178
Middle Heater Hose; 170
Bottom Return Hose: 161
Center Cabin Vents; A whopping 180 degrees
External Temp: 87
So, I believe the DCCV was fully open, although climate mode was LO and Manual. Needless to say, it was hot, hot, inside the car; barely made it home.
The AC compressor clutch was not engaged and would not engaged when commanded.
I grabbed my tools and got busy;
* Compressor Clutch Relay 8; Passed; clicks with applied voltage after being removed from fuse box.
* Fuses 32 and 38; Good
* Something interesting though. In checking the socket for Relay 8, as instructed by the �Climate Control Guide, I found high resistance. 5.8, where it should be 1.4. Not sure why.
After all my poking around, I started the car, turn on the AC and the compressor clutch �engaged� and the cabin vent temp got down to 60 degrees at idle. Much better than the 180 degrees recorded earlier. On the freeway into the office, I got 40 degrees. What gives.
I have no idea on WJTV the compressor clutch clunked out for a while, the DCCV opened to full heat and now everything is back to normal. Sounds like mixed signals from the CCM.or some other compress sensor.
I�ll see how the system acts on the way home this afternoon. Still need to perform the following tests;
* Check cabin air filter
* Mark compressor for possible slippage
* manifold gauges for hi:low side pressures.
Then the Jag can be lifted on jack stands for prolonged troubleshooting...
NO-O-O-O!!!
It's not very often I say this, but you're well beyond that point. It's time to start throwing parts at the car in hope of a fix. Okay, I'll walk that back slightly. Don't just throw any parts at it, but make some educated guesses. You've done plenty of troubleshooting, but as of late, it hasn't moved you any closer to a good repair. We may never know the exact cause why the AC performance is dropping off at idle. But would you be okay with just having reliable cold air again?
Now, on to your latest symptoms of hot air AND no compressor action, both at the same time. That is very unusual. A failure of the DCCV should not affect the compressor clutch, and visa versa. However, I did think of one scenario that could cause that. More details in a minute.
Remember, with the DCCV, a loss of power relaxes the two internal valves, and you get full heat no matter the temperature setting. This could be as simple as a loose or corroded connector at the DCCV. But at the same time as the loss of the compressor clutch?
The compressor clutch circuit has an automatic overtemp switch. If the compressor overheats, the switch opens and the clutch disengages. This temperature switch is right on the body of the compressor. One situation that can overheat the compressor is low refrigerant charge. I've mentioned this possibility before, and low refrigerant is VERY common. So before convincing yourself you've got some exotic fault, service the refrigerant to the proper level. This is a VERY basic step.
Off on a slight tangent, I would also recommend doing the compressor bypass piston modification at the same time. The system needs to be discharged for this, but the actual modification is very simple. After that, do a full evacuation and recharge. This piston mod helps with low speed cooling, which is exactly where your car needs the help. Details are in the troubleshooting guide.
You mentioned the compressor action returned to normal after testing relay #8. One possibility is the compressor cooled off enough, and the overtemp switch reset itself. The other possibility is the relay sockets may be loose, and reseating the relay was enough to make good contact again. Inspect the relay for signs of discoloration of all of the prongs. Then find a piece of scrap metal with the same thickness as the prongs. Cut the metal to the same width and test each socket individually. Make sure each socket grabs the test strip firmly. If only one socket was loose, you'd never notice while removing the relay.
Back to the DCCV, carefully inspect the connector and make sure it is clean and firmly locked in place. Test each of the three sockets individually with a metal test strip, just like with the relay.
My last theory that could knock out both components is fuse F32 under the hood. This powers the compressor clutch and the DCCV. Take an old fuse and break it in half to create a test strip. Make sure both sides of the fuse socket will grip the fuse prong securely. As with the relay, it's important to the test the grip separately for each side. A loose socket for F32 could take out both components. Reinstalling the fuse during troubleshooting may have been just enough to regain somewhat normal operation.
The other possibility is either the DCCV or compressor clutch is drawing too much power. Not high enough to blow the fuse, but enough to suck down the available voltage downstream from there. It's rare, but it can happen. We'd have to come back to that idea later. I'll have to think of the easiest method to test for this condition. I think we can get an amperage reading directly at F32.
The other possibility is either the DCCV or compressor clutch is drawing too much power. Not high enough to blow the fuse, but enough to suck down the available voltage downstream from there. It's rare, but it can happen. We'd have to come back to that idea later. I'll have to think of the easiest method to test for this condition. I think we can get an amperage reading directly at F32.
Okay, got it, this test is a piece of cake. I should also elaborate on the condition of a load drawing down the circuit voltage, but not drawing enough current to blow the fuse. This usually involves some extra resistance in the circuit, such as a loose or dirty fuse socket. Anything downstream of that unwanted restriction might only see 10v instead of the nominal 12V. This often goes unnoticed, as it's not a huge difference. In this circuit, maybe the compressor clutch doesn't clamp down quite as tightly as it should, but it still gets by. (That's why I want you to run the paint mark test.)
Now throw in a second fault, in addition to the loose/dirty fuse socket. Let's say the DCCV is drawing a little more current than normal. Thanks to that first restriction, current flow drops enough that now you do notice something amiss. But that first restriction also limits the overall current enough to stay within the fuse rating. Well, if the fuse hasn't blown, the problem can't be a component drawing too much current, can it? See how confusing that can be? If combined with a fault that limits current, it sure can. In this example, the DCCV and compressor clutch might only see 8V now, and that's enough to make the clutch slip. Your only noticeable symptom is the AC performance drops somewhat.
So here's the uber easy method to check for current flow in this circuit. I used my '02 as a guinea pig. No whining that this test will take too long. It took me all of ten minutes, if even that. On my '02, I tested at fuse #1 under the hood. For your later model, test at fuse #32 up front.
There are actually two methods you can use:
1) You can remove the fuse and connect an ammeter between the two sockets. Make sure the ammeter can safely handle up to 10 amps.
2) You can leave the fuse installed and take a millivolt reading across the two little test ports on the head of the fuse. I don't have time to go into all the details right now, but by design any fuse will have a teensy voltage drop when the circuit is in use. The difference in millivolts is proportional to the amperage flow. Sounds like voodoo, but trust me this is HIGHLY accurate.
Most guides to doing this test talk about measuring tiny parasitic drains, the type that can slowly run down a battery. The test is also fully appropriate (and accurate) for higher current loads, such as the DCCV and compressor clutch. You have to determine the body size of the fuse (Mini in our case) and the fuse's amperage rating (10A for F32), and then plug these values into a chart. That part gets a little confusing so I'm going to gloss over it for now (more details in the video) and just give you the millivolt readings you should expect to see. You don't really have to understand how this concept works, just know that it does.
Test results on my '02, your car should be similar. Please note I measured the DCCV as one unit, even though technically it is two solenoids in a common housing. There's no point trying to break out the readings from side to side, because if the total amp draw is out of whack due to a failure on one side, you have to replace the entire unit:
Compressor off, DCCV off: Panel set to HI, AC switch OFF 0 amps, 0 mv
Compressor on, DCCV off: Panel set to HI, AC switch ON 3.4 amps, 25 mv
Compressor off, DCCV on: Panel set to LO, AC switch OFF 1.4 amps, 10 mv
Compressor on, DCCV on: Panel set to LO, AC switch ON 4.8 amps, 35 mv
Please try this quick test and report back. Feel free to use an ammeter in place of the fuse, or take a millivolt reading across the fuse test ports, whichever version is more comfortable to you. If this takes you more than 15 minutes, I shall hop the next flight to your fair city and slap you around with your meter leads. The test may sound complicated, but is really very simple.
While you're done with this, make plans to run the paint mark test, too. Another simple test, with the only difficult part reaching under the car to make the marks. If the belly pan is in the way, you may be able to snake in there from the top. Make it as simple as possible. Tape a paint marker on the end of stick or something like that if it makes the process quicker.
Don't forget to check or replace the cabin air filter, and make sure the serpentine belt is not loose or glazed. After that, make plans to do the compressor piston modification and then evacuate/refill the refrigerant. Remember, we may never know the exact cause of the low AC performance. We don't need to know. I've listed a plan that covers the basics and should get the system back in commission with minimum expense. If the electrical tests listed above pass, don't you dare waste any more time putting the car up on jackstands for more troubleshooting... Start fixing, not digging deeper.
Wow Karl, this is an interesting approach and something I would have never thought off or actually known about. Now for the stupid question; is an ammeter the same as a multimeter? I have the latter on hand and get around to this test in the next couple of days.
I did did a couple of troubleshooting tasks tonight with these results:
Regarding the possibility of a loose socket, I used half of an old fuse to probe the two sockets of Fuse 32 and one of them felt more loose than the other. Used a micro flat blade screwdriver to press the prongs closer together and reinstalled. Felt tighter to me.
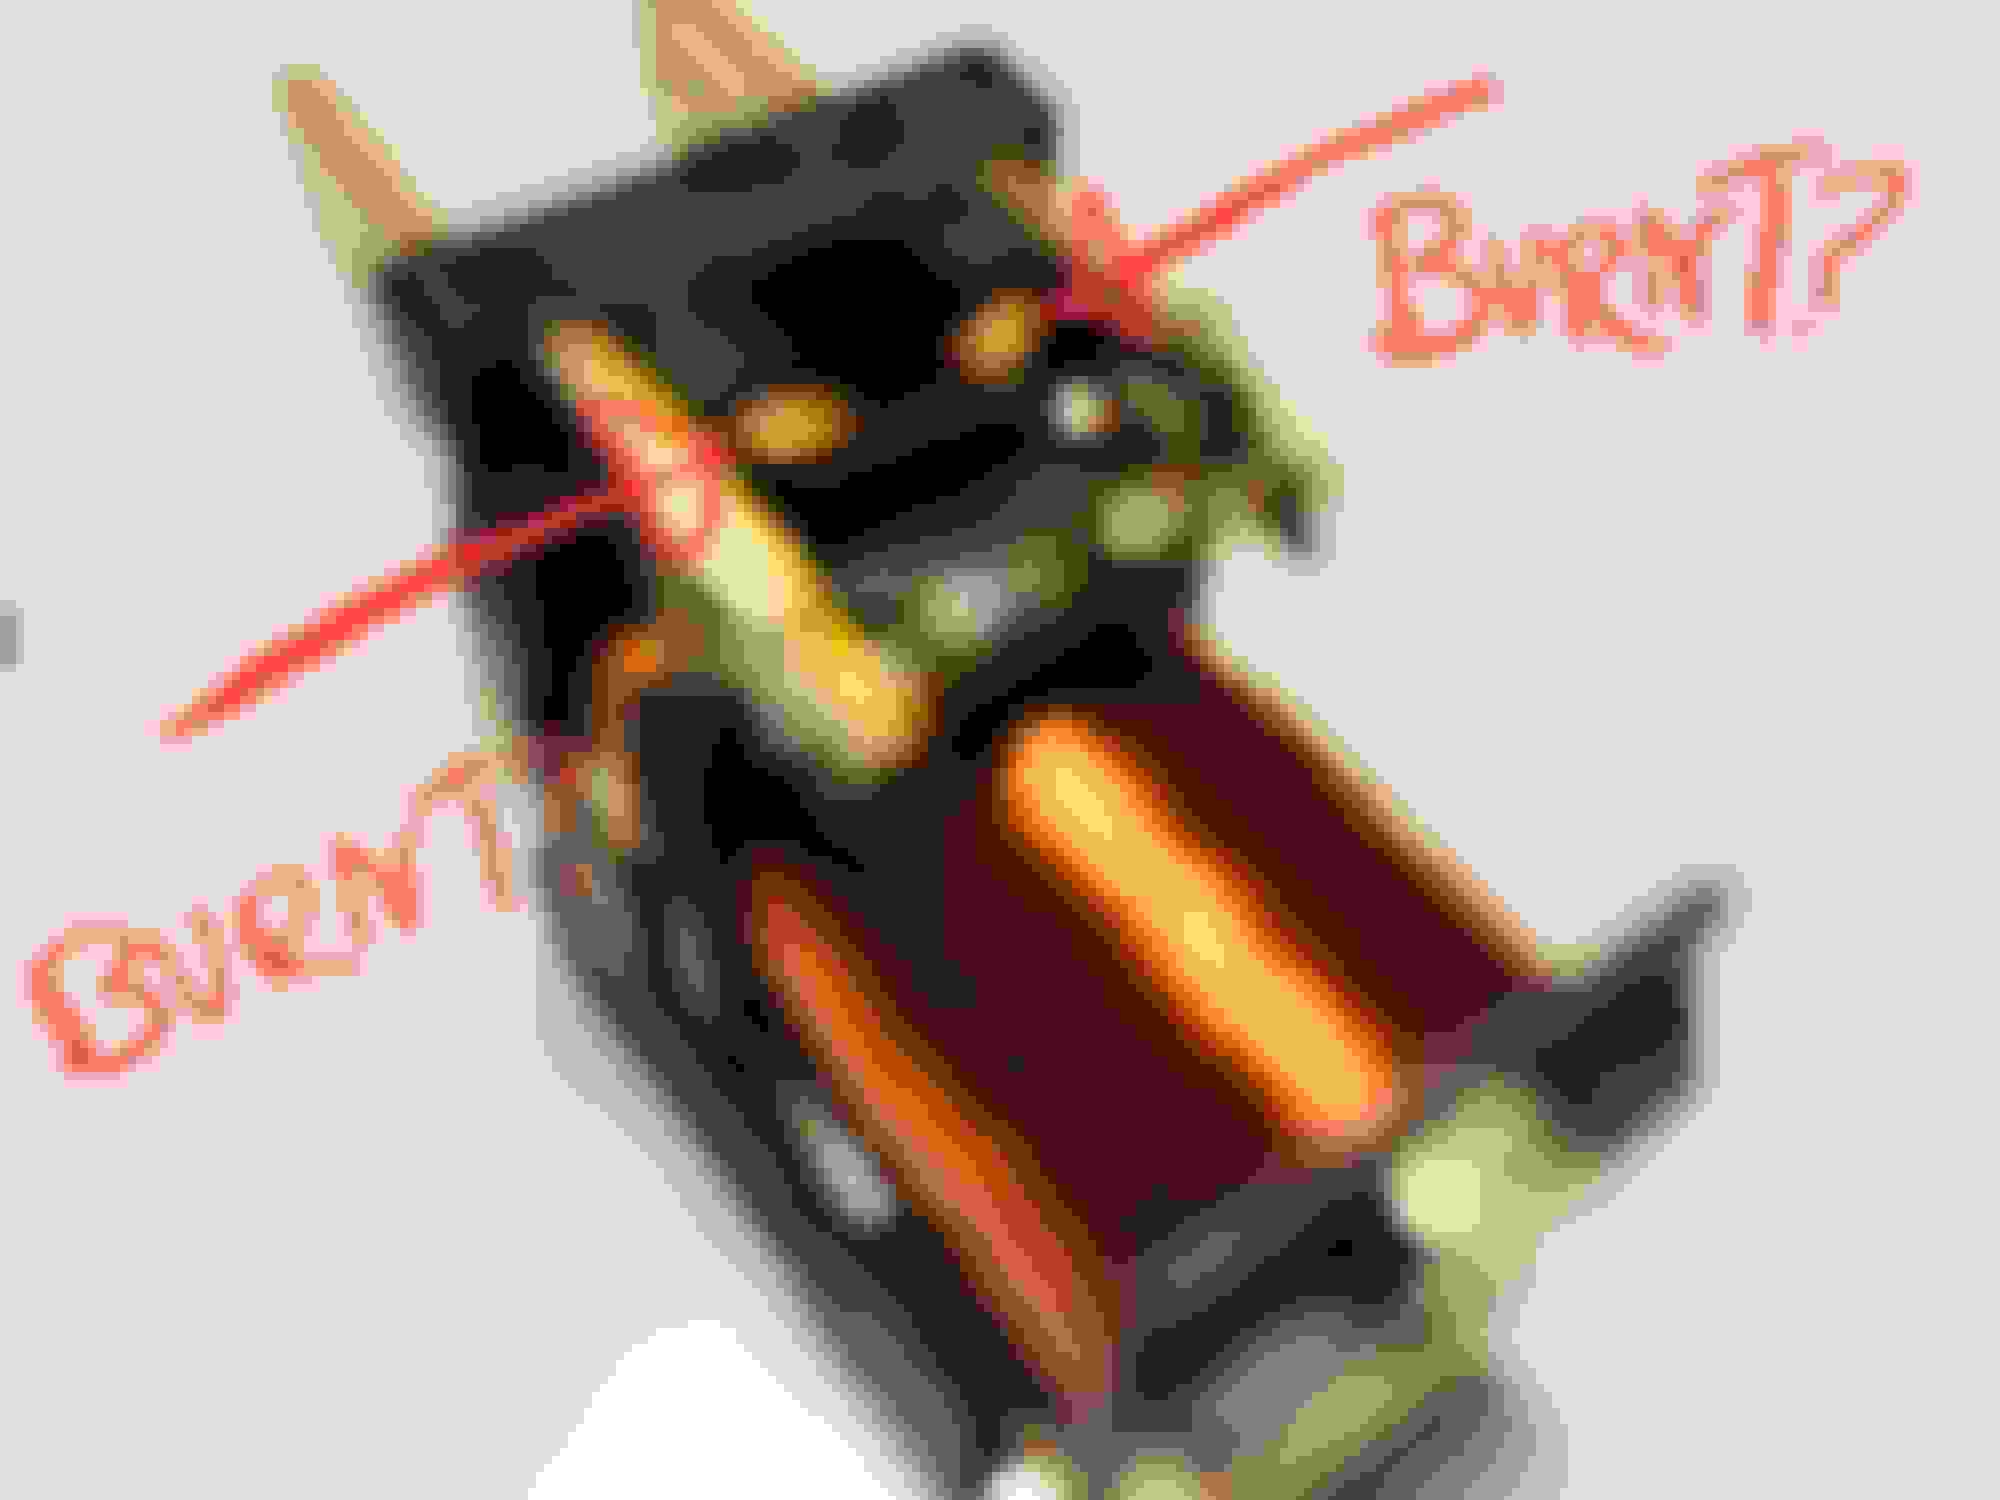
Here�s the biggie. In a fit of rage, I removed the infamous Relay No. 8 for the umpteeth time for inspection of the prongs and didn�t see any scorching or discoloring. Then I went a step further and pried off the casing to expose the innards. Now I�m not sure what a good relay is supposed to look like inside, but one area looks burnt. And if you look inside the casing, there is a scorched area that corresponds to the damaged area on the relay innards. These areas are associated with the silver prongs (positive and negative) on the relay. But somehow, the Compressor clutch was still engaging today, but maybe not at 100%.
Relay No. 8, Compressor Clutch. Possibly burned connector. Casing for Relay No. 8. Scorched area corresponds to Relay burned area.
So maybe I�ve discovered a relay that looks good on the outside and passes all the tests, but is going bad! Since we�re almost to the point of replacing �parts� anyway, I�ll try to find a compatible relay at a local parts house to see if that helps with any of the problems. The specs:
H8QTB
4FIT-14F192-AA
FoMoCo PBT-GF20
But I did swap in the Fog Lamp for Rela 8 early in the troubleshooting process with no solution, unless it�s bad internally as well.
I did swap in the Fog Lamp for Rela 8 early in the troubleshooting process with no solution, unless it�s bad internally as well.
Could be. In my guide, I suggested swapping relays to save a little money, versus just springing for new. Pop the cover off the other relay. Maybe it was bad, too, but it wasn't so apparent with the fog lamps.
Here's a known-bad relay from my car. The AC performance had dropped off and this was the only thing I replaced to restore normal operation:
Any parts store should have a replacement in stock. These are very universal items. Make sure to get a quality name brand. Stay away from no-name or discount store brands.
The ammeter: That is a typical function of virtually any multimeter. As long as it goes up to 10 amps you should be fine. Or just do the millivolt test across the fuse.
Karl, your Relay pictures are much better than mine; I needed a micro-lens on my iPhone.
But after closer inspection of the clutch relay with a magnifying glass, I could clearly see arcing around the contacts area. The fog lamps relay looked a lot better, with no arcing marks inside the cover or discoloration on the pins (for lack of use, if nothing else), so I swapped it with the clutch relay, for now, to see if anything improves. I'll still get a new clutch relay soon, but no rush.
Hopefully, I'll try the current draw test over the holiday with my multimeter on Fuse 32. And also test for the amount of voltage on the center pin of the DCCV connector harness. If nothing found of significance, it'll be time to get on my back and get under the car for the compressor clutch marks and the maybe the harness connector at the compressor for voltage rating.
I think I'll remove the belly pan for now, as I also need to change my oil and filter anyhow, and it'll make easier to access the compressor area for marks and electrical connections.
As for the compressor piston modification and refrigerant charging, I might tackle the mod myself and then take it to a shop for charing the system with the correct amount of refrigerant.
But before I finish on the topside, how do I check the belt tension. Seems really tight by feel; by that's not scientific.
Karl, your Relay pictures are much better than mine; I needed a micro-lens on my iPhone.
I don't have any special lenses. I took the picture from about 18 inches away, the closest the iPhone could focus. Then I cropped the picture. Perfect? No. Adequate? Yep.
Originally Posted by Earnest
But before I finish on the topside, how do I check the belt tension. Seems really tight by feel; by that's not scientific.
Here's how to read the marks on the early V6 tensioner. The later models should have something similar:
The only thing I don't like about that video is how he explains inserting the ammeter into a circuit. He cut the wires for the demonstration, which is kind of extreme. In a typical fused circuit, you just remove the fuse and connect the two leads to the fuse sockets. This accomplishes the same thing.
With these mini fuses, it can be difficult to get the probe tips into the fuse sockets. I've saved a blown fuse just for this purpose, to act as an extender. Insert the blown fuse into the fuse panel. Now you can easily access the two little test ports on the head of the fuse.
As Karl mentions getting the meter into the circuit to measure amps can be a real problem.
I have traced very small current draws and it's hard to do!
I just want to mention a meter I got that works well but it's about $160. It is rated down to 1 ma DC. With a clamp on meter there is no chance of burning your meter up which is a real danger if all the electrical load is routed thru the meter. Most of the better meters will be fused but you still need to swap fuses and start over.
But here are some cheaper ones that should work too.
With a clamp on meter there is no chance of burning your meter up which is a real danger if all the electrical load is routed thru the meter. Most of the better meters will be fused but you still need to swap fuses and start over.
Thanks for chiming in. The extra perspective is good. I'm hoping I haven't overlooked something obvious in this epic quest for cold AC.
Had to laugh about your fuse comment. Yesterday I found the main fuse blown in my Fluke, and can't remember doing that. Dang things aren't cheap, about $5 each... I don't directly measure amperage very often, so was scratching my head why the circuit seemed to be dead.
I've spent a career chasing sparks, but only learned about my new favorite amp test about two years ago. (Who'd have thunk, me not knowing something. I was as shocked as the next guy...) I'm very partial to reading the millivolt drop across fuse, and then converting that to amperage. No danger of blowing up your meter. Nothing in the circuit has to be disturbed. Dead nuts accurate, too. The only cumbersome part is using the charts. Cal-Van makes a special meter that does the chart work internally. You enter the fuse type and rating, and then connect the special dual-prong test leads to the fuse head. It measures the millivolts and automatically converts it to display as amperage. Slick concept, but unfortunately I've found the user interface a bit clunky.
Ok guys, I finally got enough nerve to perform the current draw test. Wasn't that bad, once I got rolling. Thanks Karl, for the vote of confidence.
My method was a direct "amps" test by using an old 10 Amp fuse (from my faulty indicator light saga) and cut in half in order to use the two halves inserted into the socket. Then use the convenient test ports on top of the two halves for the fuse socket. Luckily, my multimeter had a fused 10A port, so no worries there.
Here are the results. No. 4. is very interesting.:
1. Compressor off, DCCV off, Climate Control Setting on Hi, AC off = 0.000
2. Compressor on, DCCV off, Climate Control setting on Hi, AC on = 3.443
3. Compressor off, DCCV on, panel on LO, AC off = 1.485
4. Compressor on, DCCV on, panel on LO, AC on = 04.82 (checked it twice)
I'm not sure how to interpret the results, especially my amps on No. 4 are so different than Karl's test on his 2002 S-type. so I'll defer to him for an for explanation.


 Start fixing, not digging deeper.