
What did you do to or buy for your XJ-S/XJS today?

Thread Starter
|
Veteran Member
Joined: May 2014
Posts: 5,906
Likes: 2,182
From: Bremen, Germany
Picked up some more galvanized parts... They look nice and flashy... Should make the V look nice and tidy when fitted. Just need to assemble them and then the next step can come...

Veteran Member


Joined: Sep 2015
Posts: 1,148
Likes: 746
From: Northern Alabama
After having some very erratic and somewhat scary temperature readings, I changed both thermostats on my '87 with original Jaguar parts. The right one wasn't fully closing, and the left not fully opening, not exactly ideal. Now my temps run rock steady at the bottom of the "N". Thanks to Grant Francis for his excellent write-ups on thermostats and bleeding the cooling system.
Now I'm in the midst of changing my cracked yellow fan for a new OEM black one. What a fun job that is!
Now I'm in the midst of changing my cracked yellow fan for a new OEM black one. What a fun job that is!
Veteran Member
Joined: Feb 2013
Posts: 17,809
Likes: 3,945
Today
I made another Video to try and find out just how smooth an XJS V12 Engine runs.
This was even more Challenging than the first one, as I attempted to Balance a 2p Coin on its edge on the Smooth part of the Inlet Manifold.
This was shot in real time as it happened with no cuts in just One Take.
You can see it here: https://www.jaguarforums.com/forum/xjs-x27-32/cherry-blossom-restoration-1990-xjs-v12-122634/page41/
Thread Starter
|
Veteran Member
Joined: May 2014
Posts: 5,906
Likes: 2,182
From: Bremen, Germany
I cleaned up my front main pulley, cut the hoses off of my fuel injection piping and have prepared again many little bits and bobs for galvansiation... 'tis all going to look pwetty 
Veteran Member
Joined: Aug 2014
Posts: 1,858
Likes: 366
From: Pensacola Florida USA
After having some very erratic and somewhat scary temperature readings, I changed both thermostats on my '87 with original Jaguar parts. The right one wasn't fully closing, and the left not fully opening, not exactly ideal. Now my temps run rock steady at the bottom of the "N". Thanks to Grant Francis for his excellent write-ups on thermostats and bleeding the cooling system.
Now I'm in the midst of changing my cracked yellow fan for a new OEM black one. What a fun job that is!
Now I'm in the midst of changing my cracked yellow fan for a new OEM black one. What a fun job that is!
I made the mistake of taking off the fan belt first and had to come up with a way to keep the fan from rotating while undoing the fan clutch....
ahhhh!
Veteran Member
Joined: Aug 2014
Posts: 1,858
Likes: 366
From: Pensacola Florida USA

pulled this out of XJS
Alternator belt 86ed on me on the way home from work
bought a 2 ton trolley jack ($24.95) could not squeeze under the XJS to get the two lower fan shroud nuts loose ( of course 5 new nylock nuts to replace the removed ones)
\
bought new Alternator belt
\

correctly bled result
in fact the coolant streamed out the little what I thought was a vapor pipe when I undid the little hoses to the line...
Last edited by Jonathan-W; Feb 22, 2017 at 10:09 AM.
Thread Starter
|
Veteran Member
Joined: May 2014
Posts: 5,906
Likes: 2,182
From: Bremen, Germany
Been a little "busy bee" today...
Cleaned up the entire V area with brake cleaner and a tooth brush (needed a new one anyhow). That all looks tidier. I can't get it spotless, as the oil has really burnt in. I might get someone to give it a CO2 clean when the engine is back in again (the only part that needs this treatment).
V-plate was removed, new gasket (I didn't trust the silicone only stuff) with a dab of RTV inplace, V-plate/-cover back in place again. At the same time I refitted the dizzy and timed the engine PURRfectly
Then I reinstalled the throttle pedastal and ignition coils, to get them back in there as a nice little job
Refitted the brackets to hold the Harrison A6 compressor (after they had been sandblasted, rustproofed and painted matte black).
Just taken the valve covers off to give them some better paint job. The last paint started to "crumble" off in a few spots. I guess this is due to the lack of aluminium etch/primer. I did a good coat as I painted them the first time, but I thought I'd just put more on to make sure the aluminium is fine. Just drying now. Once dried, on they go again with new Jaguar badges, gaskets (Goretex) and halfmoons (with RTV).
New oil cap/lid is ready. High gloss red. I think the red paint just looks right, even though mine was originally black. Red just seems to be the icing on the cake
I also recut the threads on the tensioners for the belt drives. They were all rusty so now shine again. Also fitted new nuts and spring washers to make sure they stay pretty. Though I might yet have them galvanised... Seems to tempting and it looks good AND it is more durable...
Cleaned up the entire V area with brake cleaner and a tooth brush (needed a new one anyhow
). That all looks tidier. I can't get it spotless, as the oil has really burnt in. I might get someone to give it a CO2 clean when the engine is back in again (the only part that needs this treatment). V-plate was removed, new gasket (I didn't trust the silicone only stuff) with a dab of RTV inplace, V-plate/-cover back in place again. At the same time I refitted the dizzy and timed the engine PURRfectly
Then I reinstalled the throttle pedastal and ignition coils, to get them back in there as a nice little job
Refitted the brackets to hold the Harrison A6 compressor (after they had been sandblasted, rustproofed and painted matte black).
Just taken the valve covers off to give them some better paint job. The last paint started to "crumble" off in a few spots. I guess this is due to the lack of aluminium etch/primer. I did a good coat as I painted them the first time, but I thought I'd just put more on to make sure the aluminium is fine. Just drying now. Once dried, on they go again with new Jaguar badges, gaskets (Goretex) and halfmoons (with RTV).
New oil cap/lid is ready. High gloss red. I think the red paint just looks right, even though mine was originally black. Red just seems to be the icing on the cake
I also recut the threads on the tensioners for the belt drives. They were all rusty so now shine again. Also fitted new nuts and spring washers to make sure they stay pretty. Though I might yet have them galvanised... Seems to tempting and it looks good AND it is more durable...
Last edited by Daim; Feb 27, 2017 at 08:54 AM.

Senior Member
Joined: May 2016
Posts: 351
Likes: 142
From: Dalton, GA
Ha! I did it!
Shock, upper ball joint, bushings:
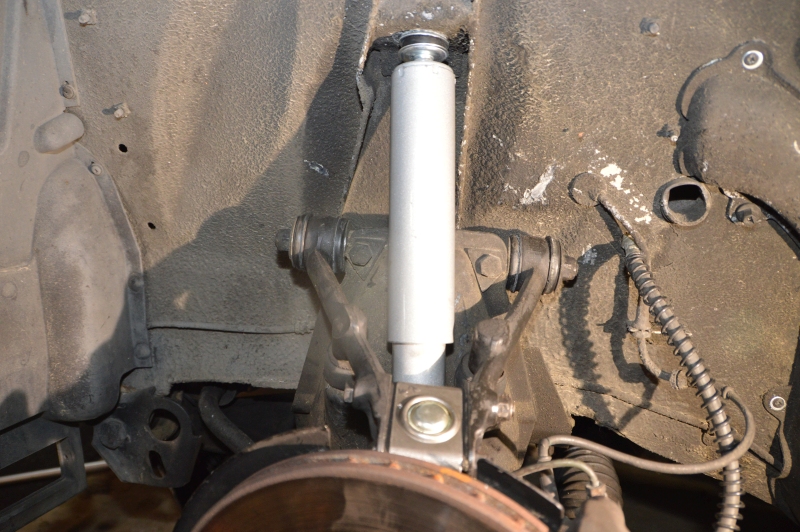
Lower ball joint:
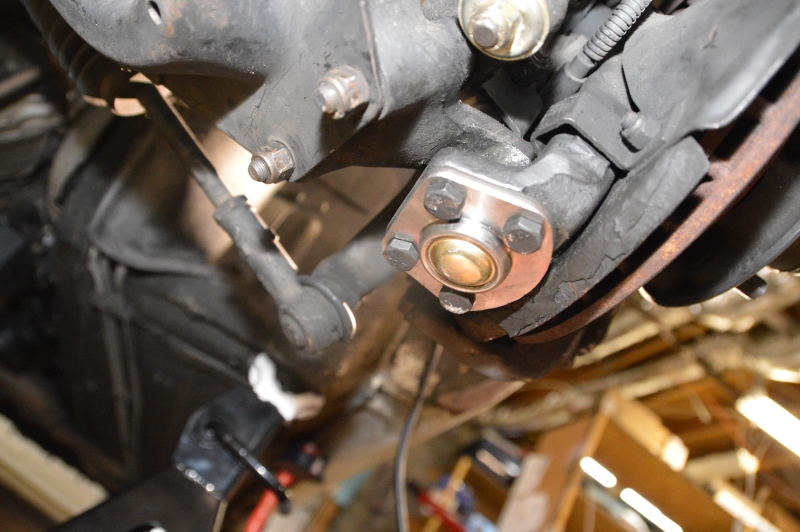
I think I learned all the lessons you need to when working on the front suspension: how to compress the coils without the Jaguar tool, seized shock top nut, seized lower ball joint nut, the extra things that have to come off to get your pitman tools in place, and I've forgotten all the other lessons.
Whew.
Now all I gotta do is the passenger side.
See you in three weeks.
Hehe. Maybe it will be easier.Padre


Veteran Member
Joined: Aug 2014
Posts: 1,858
Likes: 366
From: Pensacola Florida USA

easy peasy!


Senior Member
Joined: Aug 2016
Posts: 210
Likes: 79
From: Granby CT
Took mine to a local Jag club tech session to find out what I need to do to fix my emergency brake. We put it on the lift and it appears that all I will need to do is remove the front seat and make an adjustment at the brake lever. The cables looked OK. While on the lift we noticed that there was a bit of leakage in the power steering system. There are two high pressure lines that bolt into the rack and pinion unit that were not quite tight. Tightened them up. Everything else looked good. Sure was nice to go for a ride after winter storage. Now I just need good weather.