When you click on links to various merchants on this site and make a purchase, this can result in this site earning a commission. Affiliate programs and affiliations include, but are not limited to, the eBay Partner Network.
So far I have managed to get to the EGR assembly and have removed the two bolts, dropping one down the back somewhere. However the very thick inflexible wiring harness encased with a rigid plastic "holder" prevents me
from raising the EGR up and out.
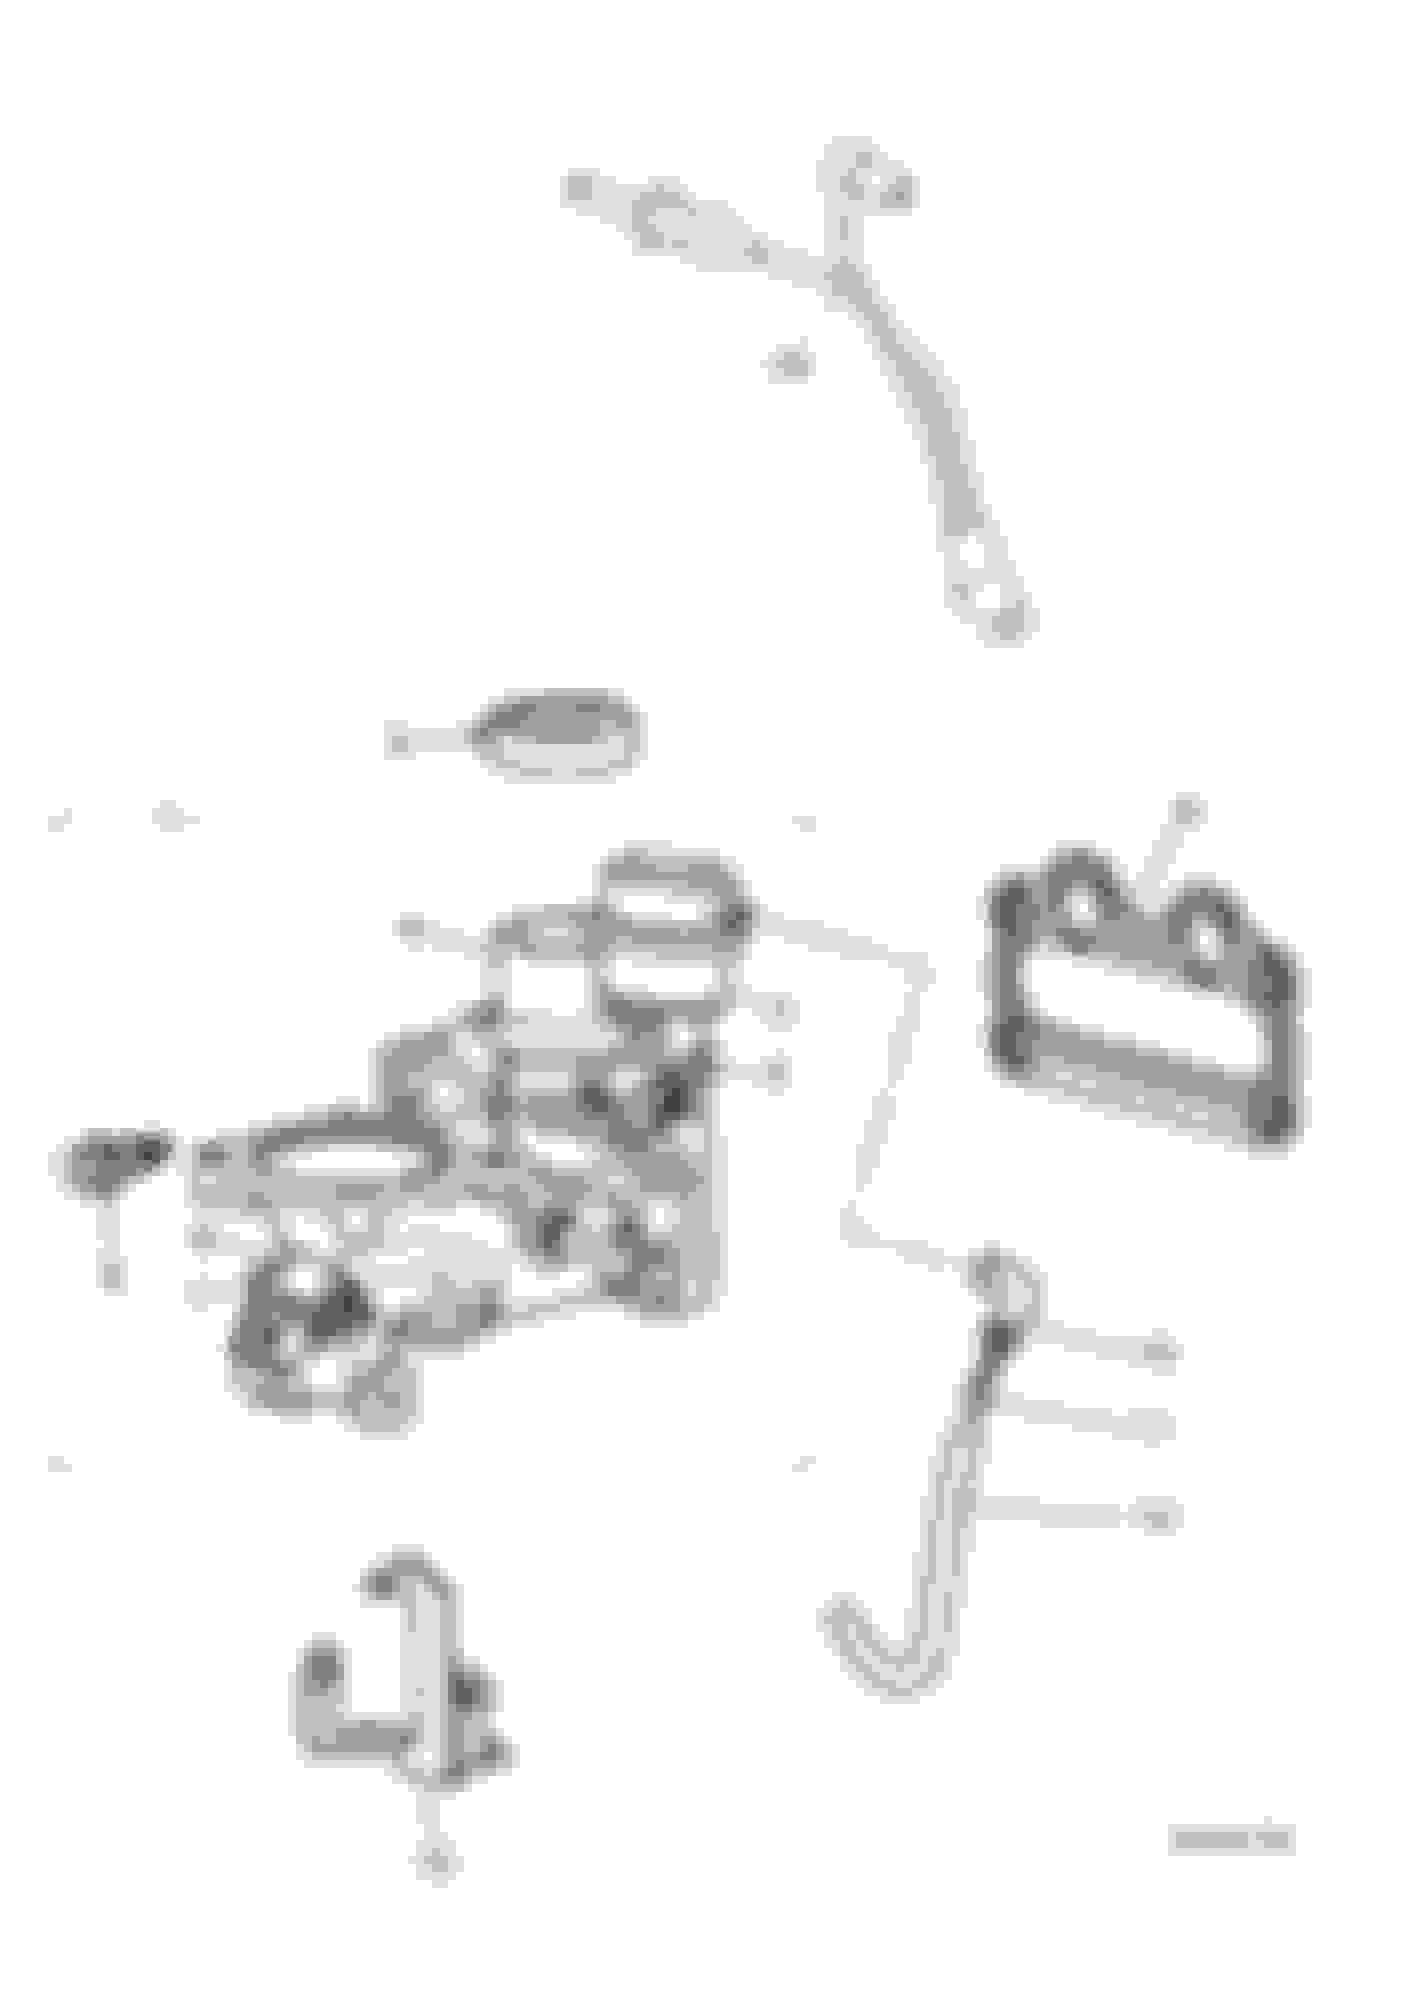
The diagram from the JTIS shows ample room but have a look at the picture of my set up where the rigid plastic "holder" actually rests on the top of the assembly.
Despite dislodging and cutting harness ties I can only move the harness about 1/2". Not enough to get the EGR out.
Another question. I broke the collar on the air intake elbow pipe. Its the top pipe in the top diagram. No way could I compress both sides of the collar to slide it off.
So broke off the plastic tab and cut tape off so that I could lever the wiring harness back enough to lift up the EGR assembly. Only issue is that it will not lift out all the way. I am thinking that it may be the electrical connector.
Problem there is that I cannot access the connector to release it in its current position. I was hoping to pull the whole thing out a bit so that I could release it.
Also in the diagram below showing the EGR valve tube retaining nuts where are these located and how do you access them?
Continuing with the saga. I did get the EGR electrical connector off using two long screw drivers one to press in the clip and the other to lever the connector off.
Now the EGR unit will lift up about 1/4" or so and rotate 360 degrees easily but will not lift out. Something obviously is catching underneath inside the housing.
JTIS seems to indicate that it will come out.
I can now see the two coolant pipes attached to the housing and again access is the issue. Releasing the hose clips with the EGR unit in place looks impossible without doing some brute force damage.
Ok after searching on EGR removal I found what I needed to know.
After removing the cabin filter box I an see the EGR pipe and where it attaches to the
air intake housing. 2 bolts/nuts at the top attach it to the housing and 2 at the bottom to the exhaust manifold. I sprayed all 4 with penetrating oil and will let soak overnight.
They look slightly rusty but I am sure they are locked tight with heat over the years.
Will also use a 6 point socket to loosen the two top nuts/bolts tomorrow. Learned this lesson the hard way over the years.
It sounds as if I simply push the EGR pipe to the side to expose a bolt holding down
the air intake elbow housing with a risk of braking it. We will see. The other bolts should be relatively easy to get at.
I never had to remove my EGR completely You need to remove inlet from supercharger and EGE hookup, vacuum lines...Then remove inlet. Once you get the inlet out of the way its pretty much straightforward.
Another question. I broke the collar on the air intake elbow pipe. Its the top pipe in the top diagram. No way could I compress both sides of the collar to slide it off.
I never had to remove my EGR completely You need to remove inlet from supercharger and EGE hookup, vacuum lines...Then remove inlet. Once you get the inlet out of the way its pretty much straightforward.
I realize that now especially since I can actually see it from the side.
So I dropped a bolt for nothing as I need not have taken the bolts holding down the EGR solenoid. I may still find it.
I also intend on cleaning out the intercoolers when I get them off. From what I have seen in other threads they could be filthy.
Cannot see the elbow bolts as indicated in post #2 bottom diagram.
I removed the EGR tube bolts/nuts and was able to push it out of the way.
I removed the 4 bolts that go thru the elbow into the back of the SC.
When I look directly down and around the opening to the elbow I do not see any bolts at all just empty space going down to the engine block.
I cannot feel any bolts either but I know something is holding the elbow in place! I do feel the MAP plug at the back.
Where are the two bolts indicated in the JTIS diagram one at the passenger side of the elbow and one at the back and under by the look of it.?
Oh I was able to unscrew the nut on the back of the elbow that holds the wire harness plastic "shroud" so was able to push the harness back quite a bit.
So just had another look and I was able to get the EGR solenoid out of the way so can push the EGR tube further away. Way down at an angle on the passenger side of the elbow I see a torque screw. If that has to be removed it will be problematic because of the angle.
Also on the back side of the elbow there is a hard plastic casing that goes several inches from left to right and would seem to be in the way of accessing any rear torque screw or bolt?
I studied Dsetter your pics and cannot quite see where the elbow attaches to the block.
Reread Dsetter's comment "Looking with a remote camera, I am not even seeing the center rear SC mounting bolt called out on the STR. There does seem to be one on each side on a bracket that is attached to the SC inlet."
I have to find those bolts somehow. I have a remote camera but left the power cord up in MA !
Also quote from Simonxj "I removed the EGR valve then removed the 4 T40 Torx bolts that hold the induction elbow on to the back of the supercharger and then the 2 bolts 10mm on the sides of the induction elbow. I take it you have removed the throttle body and the induction duct ( the bit that bolts to the top of the charger and outlets into the intercoolers. ) The 4 torx bolts are a massive pain to get to but removal of the induction elbow is the only way to get to the 10mm bolt under it. Once you have done this and removed all other necessary coolant bits the charger will lift out. Showing you the 2 hoses running under it!"
I think I know what I am looking for now.
Hopefully that helps you. I would suggest taking off the 2 13mm nuts that hold the EGR pipe to the manifold, it's really awkward but if you have a 72 tooth 1/4" ratchet, a bit easier. To remove the spring clips from the hoses it helps if you have a long reach tool similar to:
Which is long and thin enough to engage square on the bolt. I couldn't see a way to get the 10mm bolts off without removing the elbow, to remove the brake booster pipe the sleeve has to be pushed in whilst the pipe is withdrawn, bit fiddly but not too bad. There are also the 2 obvious bolts at the front of the charger, but that's all that hold it on.
I've taken some pictures when I was doing it but it was in December and outside so I wasn't hanging about with it.
SimonXJ thank you. I did move the EGR pipe out of the way and was able to see the elbow retaining bolt , 10mm, on the right side and remove it.
I can feel a bolt on the left side and get a 10mm socket on it but cannot fit the wrench on the socket because of a rigid plastic "sheet" at the immediate back. I am fiddling with an angle adapter but cannot connect the sections by feel so far.
I have taken out the 4 T40 bolts going thru to the SC.
So really I am one bolt away from getting the elbow off and then the MAP plug.
I removed the plastic insulator sheet and the windscreen cowl which gave some more room, really awkward to get in and out though, if you have the workshop manual Jaguar call it the " Secondary bulkhead center panel" they have a long procedure for removal but it can be removed from the car by removing the top brace and the brake booster hose, and then the bolts fixing it to the car.
I removed that before trying to take the EGR valve out, might be worth a shot if you can't get the bolt removed with it in place.
One thing I'd mention is to replace the hose linking the TB with EGR, that was what had failed on mine, by rubbing on the plug for the fuel temperature sensor. P/N: AJ811758 is the updated version, in my earlier link there's some pictures comparing the two.
It took a "cluged" tool to get that one remaining bolt out of the left side of the elbow. I could only rotate it about 1/4 turn at a time and ofcourse even tho it was loose I could not turn it with my fingers. So it took a very long time!
I moved the elbow intake back and undid the last SC rear bolt into the engine block and lifted the SC out.
Need to unplug the elbow MAP plug and get it out of the way for cleaning and then I will
take the SC coolers off for cleaning which I guess from what I have read could take a lot of soaking etc.
I have most parts for replacement but if I cannot find an EGR pipe bolt and one other that I dropped I will have to get those.
SimonXJ if you could send me that spreadsheet of part numbers I will cross check with what I have ordered.
I notice a rubber pipe that runs across the front left to right under the SC that I want to replace
and need that part number.
I am replacing both belts as well as the water pump and I have an upgraded intercooler pump. Also replacing most of the rubber hoses. So many!!!!
Once cleaned up I will sell the SC on Ebay as soon as I get the one back from PSE that they rebuilt along with adding a smaller pulley and other things.
Glad you are getting it but if you had read up a bit it would have saved you a bunch of work.
In case others read this; BEFORE doing anything else get access!
1. Remove the brace across the back of the engine completely. Be aware the mounting bolt threads stick out inside the fender wells. This means they will be rusty even if the heads are clean. Very easy to shear the attaching bolts off. So use lube and I try to wire brush the threads some. But careful back and forth on the bolts is the key to getting them out without breaking them.
2. Remove the cabin air filter and box completely. You are almost 1/2 way there anyway after you have removed the brace.
3. Remove and tie back the 3 heater hoses that run into the firewall.
Now you can see behind the engine a bit to get at those two "evil" EGR bolts.
I would also do my repair for the PB booster hose. Check to see if this connection is leaking or not.
I plan on replacing that PB booster repair parts are ordered.
I did read up quite a bit before starting this project. The problem is that pertinent information is somewhat scattered across multiple threads/posts.
Some threads list everything that needs doing but do not go into enough detail such as
"next remove the EGR" and "now remove the throttle body" etc etc.
I was late in removing the airbox/cabin filter so that wasted some time. But the real issue was the bolts that hold down the elbow air intake.
The JTIS manual, if I read the correct page for my car, shows one bolt at the rear of the elbow and yet both are either side of it.
SimonXJ's info, which did not come up in my earlier searches for whatever reason, was what turned the tide for me.
Hopefully that has you sorted now, there's a bit of a difference in the LHD and RHD cars in that the brake booster is beside the EGR valve on my car (RHD) I imagine the bulky cabin air filter box takes up more space when on the other side.
I also changed the supercharger pump, and the oil and coolant. My car is a 2008 MY for info ( with secondary air injection )
The hose which runs between the banks, is a fuel line, and I can't see it separately listed, only the complete fuel rail, otherwise I would have changed that too. There are also the 2 knock sensors under the supercharger, may be worth changing them although I didn't for what it's worth.
Depending on VIN there are 2 P/N for the knock sensors.
This is a picture of the harness sheath behind the hose connector. Its pushed back as far as I can get it but it makes access to that LHS Elbow bolt extremely difficult.
The connector to the MAP sensor would not budge even using a thin blade under the "tang" ,that clips over the small protrusion that keeps it in place, while pressing down on the tab and pulling very hard. Needless to say I broke it. Even then it was extremely difficult to get the lead off without damaging the lead male part.
I am electing not to replace the knock sensors or that fuel rail crossover pipe. With the exception of those components I am replacing all of
the difficult to get at hoses including valley hose,coolant pump, both belts, intercooler pump, thermostat and more.
I am now into cleaning mode and hose replacement etc while waiting for delivery of the rebuilt SC next week sometime.
Good to hear you have it all dismantled, I had to do it 3 times,, don't ask!! I washed all the intake components in a parts washer @ 40C for an hour, they all came out like new, the amount of gunk in the intercoolers was surprisingly bad, @ 89K miles though. Hopefully will last another 89K.
What have you had done to your rebuilt charger? I changed the snout bearings and regreased the needle bearings at the rear, when fitting the smaller pulley.
 04-19-2016, 11:51 AM