
A journey into the valley

My document and images and parts list available here
I am not able to upload the pdf file
I will update this based on any feedback I possibly receive.
Official Jaguar process here
While all the steps are there, how access is gained is not listed.
As more systems are getting older, I expect there will be more cases of this failure and I hope this helps some others as others helped me.
The story of my Valley hose replacement.
It started on an Autumn evening after a drive home, that smell of coolant. Checking under the hood, and easy enough, the expansion tank outlet nipple pipe had cracked and was leaking.
A new tank was fitted and operations were returned, or so it seemed.
A week before Christmas, after driving to work, that smell of hot coolant again. Looking underneath and there it was, that dripping from the back of the engine. I had read about it but hoped it would never happen to me. I suspected that the under supercharger coolant pipe had given way. I blamed the new expansion tank that had 140 kPa cap rather than the previous 120kPa.
As I was 40 miles from home, I got a couple of gallons of water, and left the pressure cap loose, and on the wettest night in the SF bay area for 10 years, I drove cautiously home. I found I got 20 miles per gallon of water as I stopped to fill up twice on the way home, prompted by the low coolant alert. I was also continually monitoring the temperature via my ‘Torque’ app on my phone.
What follows is how I replaced not only the valley hose, but almost all other rubber hoses in the coolant system as if one is going to the valley once, you do not want to go twice.
My ‘05 XJR had done 150k miles.
I did not initially do all the steps in this order, but would if I had to do it again as I learnt along the way.
I would allow 5 hours to tear down to the point where you would start reassembly.
Summary here, more in the links above.
PARTS LIST
The following items were changed as I was in there. The SC inlet and outlet seals are rubber and looked and felt OK, but it is recommended to change them if it is in your budget.
I am not able to upload the pdf file
I will update this based on any feedback I possibly receive.
Official Jaguar process here
While all the steps are there, how access is gained is not listed.
As more systems are getting older, I expect there will be more cases of this failure and I hope this helps some others as others helped me.
The story of my Valley hose replacement.
It started on an Autumn evening after a drive home, that smell of coolant. Checking under the hood, and easy enough, the expansion tank outlet nipple pipe had cracked and was leaking.
A new tank was fitted and operations were returned, or so it seemed.
A week before Christmas, after driving to work, that smell of hot coolant again. Looking underneath and there it was, that dripping from the back of the engine. I had read about it but hoped it would never happen to me. I suspected that the under supercharger coolant pipe had given way. I blamed the new expansion tank that had 140 kPa cap rather than the previous 120kPa.
As I was 40 miles from home, I got a couple of gallons of water, and left the pressure cap loose, and on the wettest night in the SF bay area for 10 years, I drove cautiously home. I found I got 20 miles per gallon of water as I stopped to fill up twice on the way home, prompted by the low coolant alert. I was also continually monitoring the temperature via my ‘Torque’ app on my phone.
What follows is how I replaced not only the valley hose, but almost all other rubber hoses in the coolant system as if one is going to the valley once, you do not want to go twice.
My ‘05 XJR had done 150k miles.
I did not initially do all the steps in this order, but would if I had to do it again as I learnt along the way.
I would allow 5 hours to tear down to the point where you would start reassembly.
Summary here, more in the links above.
- Disconnect battery
- Remove Wipers and spray feeds
- Remove wind screen lower rain shield
- Remove shock tower braces on at least RHS
- Remove plastic false bulkhead at rear of engine
- Remove cabin filter and surrounding plastic case
- Remove cover over headlights and radiator grill
- Blow down engine and area to remove dirt and dust
- Drain any remaining coolant from radiator. Drain is on lower LHS of Radiator
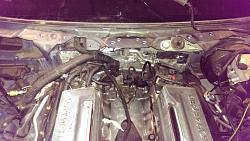
- Disconnect crankcase vent tube and remove intake pipe from inlet duct and air filter box
- Remove coolant expansion tank
- Remove SC belt with �” drive breaker bar
- Remove cast intake duct to throttle body
- Remove coolant hoses and temperature sensor plug on thermostat tower
- Remove thermostat tower
- Remove SC outlet coupling to Intercoolers 2x 10mm nuts and 2x 10mm bolts
- Remove SC outlet from SC
- Loosen electrical harness assembly from back of throttle body
- Remove coolant pipes on EGR valve
- Remove 13mm nuts on EGR pipe to exhaust Manifold
- Remove 8mm bolts on EGR valve to throttle body
- Remove coolant pipes on throttle body
- Remove throttle body
- Remove EGR assembly
- Remove SC inlet
- Remove SC retaining bolts
- Remove SC assembly
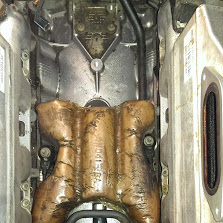
- Remove Insulating pad
- Remove the offending coolant hose and wonder if this was the only location it could have been located.
- Clean it all down, and reassemble at leisure after replacing any pipes or parts desired.
PARTS LIST
- AJ89746 Cooling hose to TB
The following items were changed as I was in there. The SC inlet and outlet seals are rubber and looked and felt OK, but it is recommended to change them if it is in your budget.
- AJ88507 EGR to TB cooling Hose
- AJ811758 Coolant hose EGR to throttle body
- C2C18160 Intercooler inlet cooling hose
- C2C18181 Intercooler return hose
- C2C11477 Thermostat tower O-ring seal Qty 2
- AJ86892 SC to IC duct seal Qty 2
- NCC7735BA SC outlet seal
- AJ83292 Induction body to SC Gasket
- AJ83445 Throttle Body Gasket
- AJ82340 EGR tube to manifold gasket
- AJ88560 EGR Valve gasket to throttle body
- C2S15816 Brake Kit to reseal brake vacuum pipe

Last edited by dsetter; Jan 4, 2015 at 12:00 AM. Reason: minor updates
Veteran Member


Joined: Dec 2009
Posts: 9,553
Likes: 2,553
From: Crewe, England
You do have to wonder why a better hose material couldn't have been used, or even a metal pipe. After all the hose cannot be all that expensive, yet one must spend hours if DIYing it, or a shedload of cash to pay somebody to do it.
I agree. I have noticed that the URO equivalent part number is a one piece molded assembly. I have not always had great success with Uro bits so went with OEM. Still, I think 11 years and a lot of heat over 150k miles is not bad. I expect only one change per lifetime is acceptable.

Veteran Member
Joined: Dec 2009
Posts: 9,553
Likes: 2,553
From: Crewe, England
I agree. I have noticed that the URO equivalent part number is a one piece molded assembly. I have not always had great success with Uro bits so went with OEM. Still, I think 11 years and a lot of heat over 150k miles is not bad. I expect only one change per lifetime is acceptable.
Trending Topics

Junior Member
Joined: Feb 2015
Posts: 2
Likes: 4
From: Manchester England
I have just finished the valley pipe job took me about 12hours in total and I am no mechanic . The parts came to about �150 including antifreeze , so I saved about �450 in labour and I would definitely recommend it to anyone with a half decent toolset and a lot of patience. Big thanks to dsetter and everyone else who put photos and instructions on here I'd have been up the creek without a paddle without them , cheers.


Joined: Feb 2014
Posts: 20,530
Likes: 15,301
From: Crossroads of America
Hi Vitamanchris,
Welcome to the Jaguar Forums! It's great to have you with us.
You can add your car model and model year to your signature so other members will always have those details when responding to your posts. Hover your cursor over your username at the upper right of this page, and in the dropdown menu click User CP. In your Control Panel, click on Edit Signature in the left column under Settings & Options. Add your car details and save your signature.
Also, since we're a friendly bunch, please visit the New Member Area - Intro a MUST - Jaguar Forums - Jaguar Enthusiasts Forum and post an introduction so we can give you a proper welcome and learn something about you and your car.
Cheers,
Don

Veteran Member
Joined: May 2009
Posts: 27,540
Likes: 4,921
From: Yorkshire, England
I have just finished the valley pipe job took me about 12hours in total and I am no mechanic . The parts came to about �150 including antifreeze , so I saved about �450 in labour and I would definitely recommend it to anyone with a half decent toolset and a lot of patience. Big thanks to dsetter and everyone else who put photos and instructions on here I'd have been up the creek without a paddle without them , cheers.

Junior Member
Joined: Feb 2014
Posts: 27
Likes: 1
From: Budapest
First of all, thanks for this fantastic post. I just got the offer from the dealer for this work, and I think it would be more cost efficient to do it myself. However, my car is a 2006 XJR, and I'm not sure that these part numbers would fit my car, as its VIN is H9xxx, and after the G4xxxx where usually part numbers change.
Is anybody here who could translate these to the newer part numbers, or comfirm that using these numbers will fit?
Btw, you might be right about the new filler cap causing the problem, mine came out after changing ther reservoir as well...
Is anybody here who could translate these to the newer part numbers, or comfirm that using these numbers will fit?
Btw, you might be right about the new filler cap causing the problem, mine came out after changing ther reservoir as well...
Joined: Feb 2014
Posts: 20,530
Likes: 15,301
From: Crossroads of America
The parts service of the Jaguar Diamler Heritage Trust has recently added X350 parts diagrams so it's a great place to answer these sorts of questions yourself without having to download and install the Electronic Parts Catalog (EPC).
You can view exploded diagrams, part names and part numbers at this link:
jaguarclassicparts.com
Cheers,
Don

Junior Member
Joined: Oct 2016
Posts: 3
Likes: 3
From: Linlithgow, Scotland
Great description of what is required.
There is a slight error in the part numbers you gave. The return hose part number should be C2C18161 not C2C18181.
The part numbers for this hose and the Intercooler inlet hose also changed later. My car is a 2007 VIN H13709 and I noticed that the part numbers for that VIN were :
Intercooler inlet cooling hose - C2C28145
Intercooler return hose - C2C28125
I will be doing this job over the next couple of weeks. Your thread will be invaluable.


Junior Member
Joined: Apr 2012
Posts: 24
Likes: 24
From: Calgary, AB
Just had mine done by my mechanic after the hose failed rather catastrophically. The local dealership couldn't supply the right hose, so he used stock hose; he charged 4.5 hours. Also found one intercooler was plugged with gelled coolant-maybe the cause of a litany of engine issues :-(
Back on the road...with an air suspension fault (suspected worn out compressor) and an airbag light (side impact airbag, cannot be found as a spare). Ugh.
Back on the road...with an air suspension fault (suspected worn out compressor) and an airbag light (side impact airbag, cannot be found as a spare). Ugh.

Senior Member
Joined: Nov 2015
Posts: 793
Likes: 247
From: CT
I am having a similar problem Looking like the Valley Hose may be bad. Here's the weird thing though it would leak a quart of fluid every day or two when it was cold now that is warmed up I have no leaks whatsoever level stays full with no issues. Anybody have a take on this?
Joined: Feb 2014
Posts: 20,530
Likes: 15,301
From: Crossroads of America
I am having a similar problem Looking like the Valley Hose may be bad. Here's the weird thing though it would leak a quart of fluid every day or two when it was cold now that is warmed up I have no leaks whatsoever level stays full with no issues. Anybody have a take on this?
I would recommend that you have your system pressure-tested to see if that helps identify the point of the leak. You don't mention the year and model of your Jag, but from your description my first guess would be a leak in a heater hose or the heater core, since your leakage has declined since you are presumably not using as much heat in the passenger compartment with the onset of warmer ambient temperatures.
Cheers,
Don

Senior Member
Joined: Sep 2017
Posts: 207
Likes: 62
From: Clermont, FL
Gents;
I find myself in the position of needing to replace the valley hose on my 07 SV8. As dsetter mentions in the OP, I also plan to replace other hoses while I'm in there. it is not uncommon for some x350 pn's to differ from those of an "x356." I'm having difficulty cross referencing several x350 pn's dsetter documents above with the correct "x356" pn.
I've tried multiple online Jaguar parts catalogs and multiple Jaguar parts suppliers.
Any assistance cross referencing the following x350 pn to the correct "x356" pn would be greatly appreciated:
AJ811758 coolant hose, EGR to TB
C2C18160 Intercooler inlet cooling hose
C2C18161 Intercooler return hose
Thank you and Best Regards, William
Last edited by wwr; Apr 1, 2020 at 05:19 PM. Reason: formatting