When you click on links to various merchants on this site and make a purchase, this can result in this site earning a commission. Affiliate programs and affiliations include, but are not limited to, the eBay Partner Network.
When the ZF 6HP26 was introduced in 2000 as the world's first passenger-vehicle 6-speed automatic transmission, ZF, Jaguar and the several other automakers who used it claimed that the transmission was "Sealed for Life" and did not require fluid or filter changes.
Subsequently, ZF revised its position as follows:
"ZF automatic transmissions are filled with specially developed semi-synthetic oils. At very high operating temperatures, the oil ages faster than under normal conditions.
Examples:
* Many trips at high speeds
* Many trips with a trailer in tow
* Sporty driving
Depending on the driving style, ZF therefore recommends a transmission oil change every 80,000 to 120,000 km (50,000 to 75,000 miles), or after 8 years at the latest."
Given that vehicles with 6HP26s include Jaguars, BMWs, Audis, Bentleys, Aston Martins and Maseratis, it's a safe bet that many, many of these transmissions were subjected to "sporty driving" and "many trips at high speeds."
A Note on Fluids
ZF specifies its own Lifeguard 6 fluid, meeting Shell specification M1375.4. But through the research of forum members including Partick the Cat, Box, myself and others, along with a Blackstone Labs analysis by bimmerfest member fun2drive, we know that aside from color, Ford Motorcraft Mercon SP and Shell Spirax S4 ATF MSP are identical to Lifeguard 6.
Many third-party fluid makers claim that one or more of their fluids meets Shell M1375.4, yet the fluid's published physical characteristics are significantly different from those of Lifeguard 6. As an example, Pentosin ATF 1 is claimed to meet Shell M1375.4, yet its kinematic viscosity at 40 degrees Fahrenheit (KV40) is 38.0 mm2/s, compared to 26.8 mm2/s for Lifeguard 6. Another example is Valvoline MaxLife Multi-Vehicle ATF, which is claimed to meet M1375.4 and to be equivalent to Mercon SP, Mercon LV, and ZF Lifeguard 8. Yet ZF clearly deliniates between transmissions that require Lifeguard 6 and Lifeguard 8, with no overlap, and Ford specifically states that Mercon SP must never be used in a vehicle for which Mercon LV is specified, and vice versa. Valvoline must compromise the fluid formulation so it is "good enough" to function in all of these diverse transmissions, but we must wonder if these compromises lead to sub-optimal performance. We simply cannot trust the claims of third-party fluid makers without doing our due diligence.
Drain and Fill or Flush?
Since ZF now agrees with all common sense that the fluid should be changed, options include draining the fluid via the oil pan drain plug and refilling via the transmission fill plug, or flushing the fluid via the cooler lines, pump intake, or conceivably, via the pressure tap on the case just above the cooler lines (labeled "AUF WK").
Draining and refilling once will only replace some of the fluid, since nearly half remains in the torque converter, valve body and other areas of the gearbox. So if you drain and fill, it's prudent to do so at least three times to replace as much of the old fluid as possible.
Flushing via the cooler lines or pipes has traditionally been the province of commercial transmission service shops, but since it has the potential to replace all or nearly all of the old fluid more quickly than multiple drains and fills, I wanted to devise a method of flushing the 6HP26 at home with commonly-available, inexpensive materials. Disconnecting the cooler lines at the radiator is one option, but there is a risk of damaging the radiator or causing leaks that are difficult to resolve. So my approach is to do the flush via the cooler-line ports at the transmission end.
To Flush or to Flush?
In another thread, our resident guru Karl (kr98664) raised a valid concern regarding the use of the term "flush." The forums are full of anecdotal reports of transmissions failing after being flushed by a commercial transmission service shop that used a power machine, solvents and high pressure to clean the transmission internals and then fill with new fluid. We could consider using alternate terminology for the procedure I am about to describe, such as "fluid replacement" or "fluid exchange." A retired transmission rebuilder I know uses the term "transfusion," which may be the best term yet. But I think the term "flush" describes this DIY method well, since we use the power of the transmission's own pump to exhale old, dirty fluid and a pressure pump of some sort to inject new, fresh fluid. So until someone suggests an equally short, sweet and accurate term for this process, I'm going to use the term flush.
What follows are instructions for making and using an apparatus for flushing the fluid via the cooler lines
Applicable Vehicles
I have successfully used this method on XJs, S-Types and XKs with the 6HP26, and XKs, XFs, BMWs and Range Rovers with the 6HP28, so the photos below are not all of the same car. I selected the best photos for illustration purposes regardless of the car.
Commercial Fluid Flush Adapters
Commercial transmission shops use special-purpose adapters to connect to various transmissions. After I developed my own "adapters," I discovered that the commercial adapters in the photo below had become available. They are specifically designed for 6HP transmissions and can be purchased from vendors like Summit Racing. To connect these adapters to lengths of hose, additional flare-to-hose-barb fittings are required. I found them at McMaster-Carr (mcmaster.com).
The problem with special-purpose adapters like these is that they are not inexpensive (USD $65.00 or more per pair), and while one end plugs into the cooler line port on the transmission, the other end is a flare fitting that requires an additional adapter to connect to standard rubber or vinyl hose, so additional research and purchases would be required to adapt to whatever DIY equipment you came up with.
DIY Fluid Flush Adapters
My goal was to devise a less-expensive means of forming leak-free connections to the cooler line ports to facilitate flushing the fluid with the help of the transmission's own pump. What follows is the apparatus I came up with after measuring the cooler line fittings and pondering the challenge for awhile. Note that I use the terms cooler "lines" and "pipes" interchangeably.
From our local hardware store, I purchased several inexpensive items:
1. Approximately twelve (12) to fifteen (15) feet of clear vinyl hose with an inside diameter (I.D.) of 3/8 inch (9.5 mm);
2. One (1) foot of clear vinyl hose with an I.D. of 1/2 inch (12.7 mm) and an outside diameter (O.D.) of approximately 5/8 inch (16 mm);
3. Two (2) barbed plastic hose connectors to adapt 3/8 in. (9.5 mm) I.D. hose to 1/2 in. (12.7 mm) I.D. hose;
4. Two (2) metal fender washers with an I.D. of 9/16 inch (14.5 mm) and an O.D. of 1-1/4 inch (31.5 mm). You do not want washers with a 1/2 inch I.D. More on that later.
Here's a closeup of the hose adapter fittings and washers:
In addition to the parts above, required items include a suitable catch container for old fluid such as a 5-gallon bucket, and some means of injecting new fluid into the transmission via the fill hose (more on these options later).
To assemble the adapter hoses, first cut two sections of 1/2 inch I.D. hose just over 1/2 inch (14 mm) long. I use the special hose-cutting tool specified by Jaguar for trimming air suspension hoses. Whatever tool you use, try to make the cuts at 90 degrees for good square ends, but minor variations won't cause any problems.
Cut your 3/8 inch I.D. hose into two approximately equal lengths so you now have two hoses six (6) or more feet long.
Insert the smaller end of a plastic hose adapter into one metal washer, then into the end of one of your long hoses, seating the fitting into the hose as far as possible.
Now push the short section of 1/2 in. I.D. hose onto the larger end of the plastic fitting, so the hose covers 2 barbs on the fitting but extends about 1/8 inch past the end of the fitting. The short section of hose will now have a generally tapered shape that will fit nicely into the cooler line port on the transmission.
Repeat the above on the other long hose and you will now have two long hoses with business ends that look like this:
And here are the completed hoses:
Installing the Adapter Hoses on the Transmission
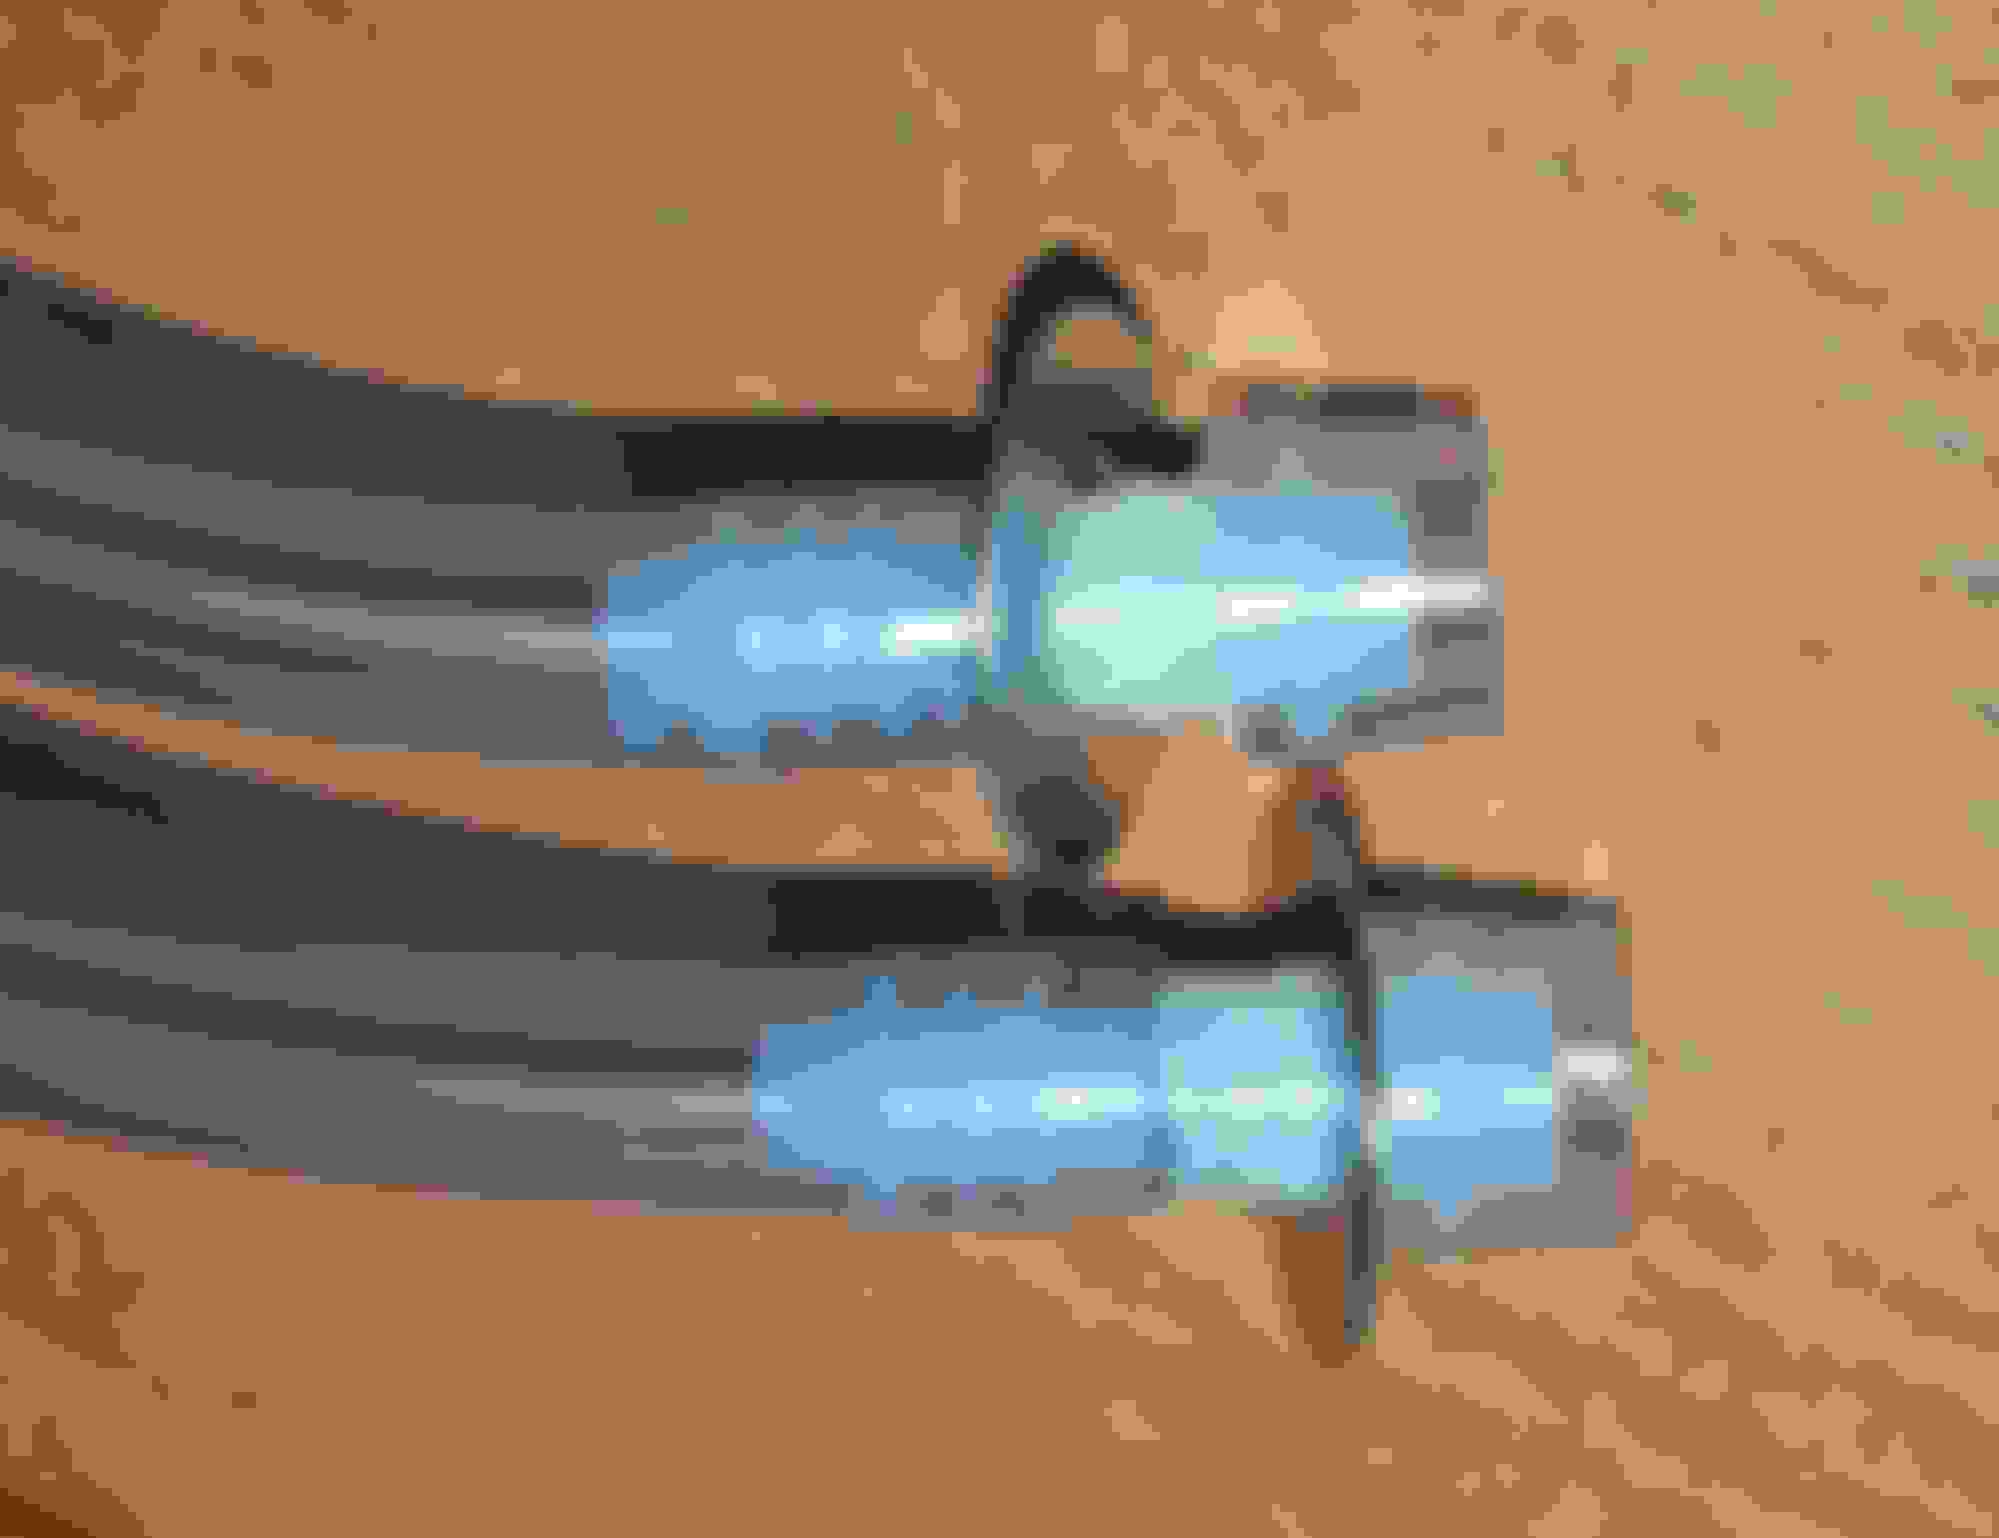
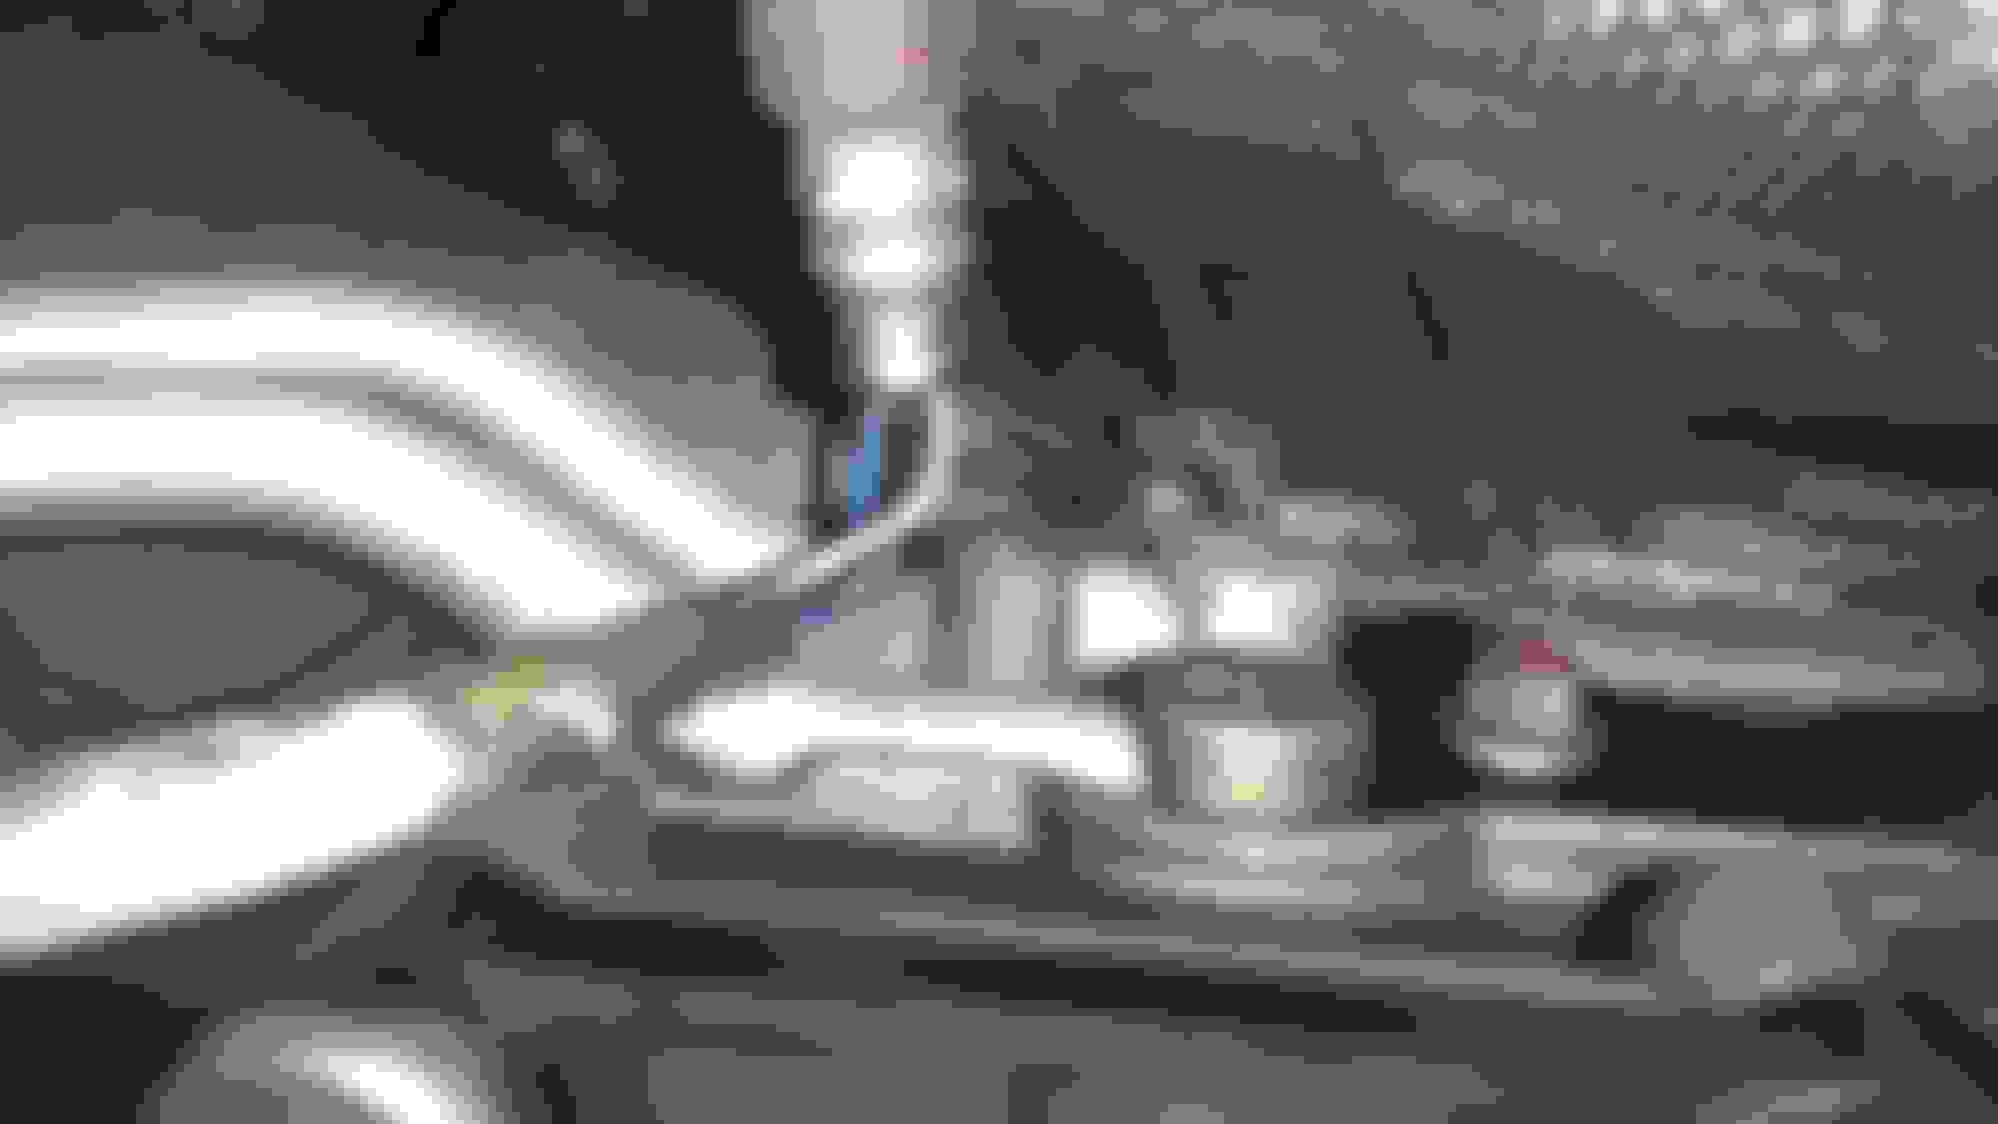
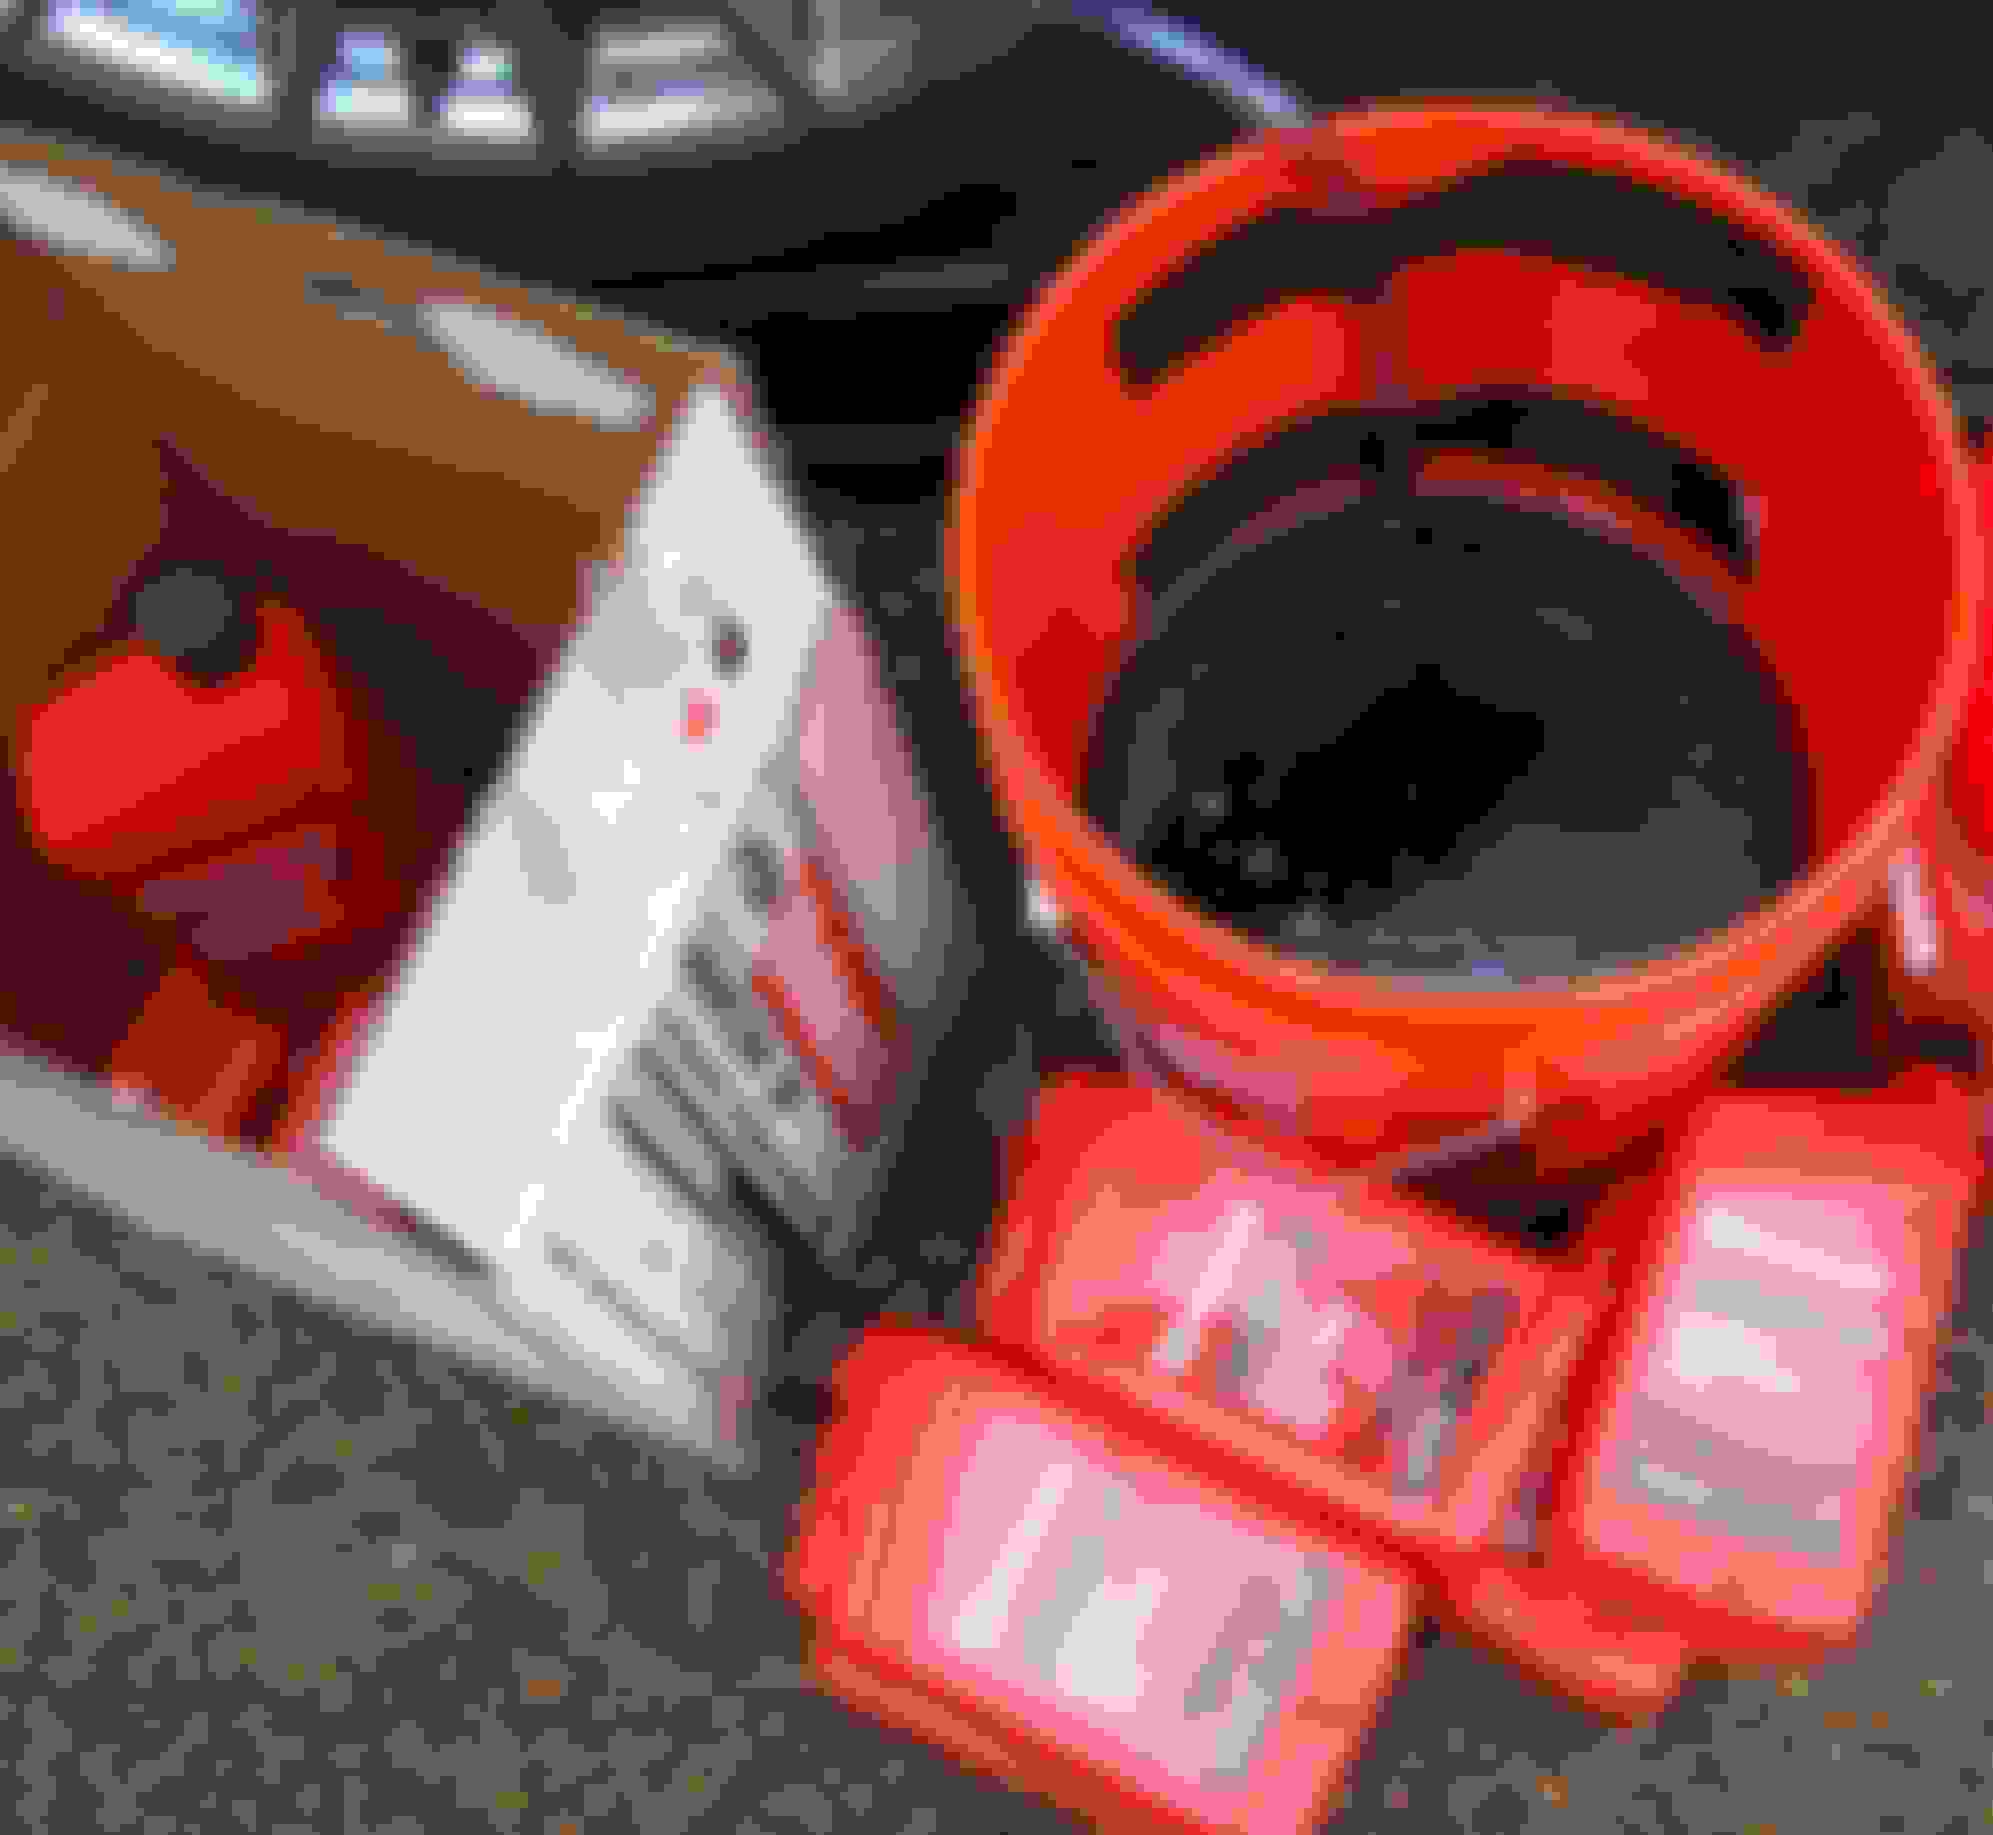
The cooler lines attach to the left side of the gearbox as shown below. They are held in place by a semi-triangular metal retaining plate secured by one hex screw with a 10 mm head (see red paint dot in photo):
Here's another view of the cooler pipes:
Before disconnecting the cooler lines from the transmission, first detach the metal clip that secures the O2 sensor harness to the edge of the transmission oil pan. It simply pulls down and off of the lip of the pan. On some cars, the O2 sensor is so close to the cooler lines that it is best to temporarily remove it from the exhaust and hang it out of the way.
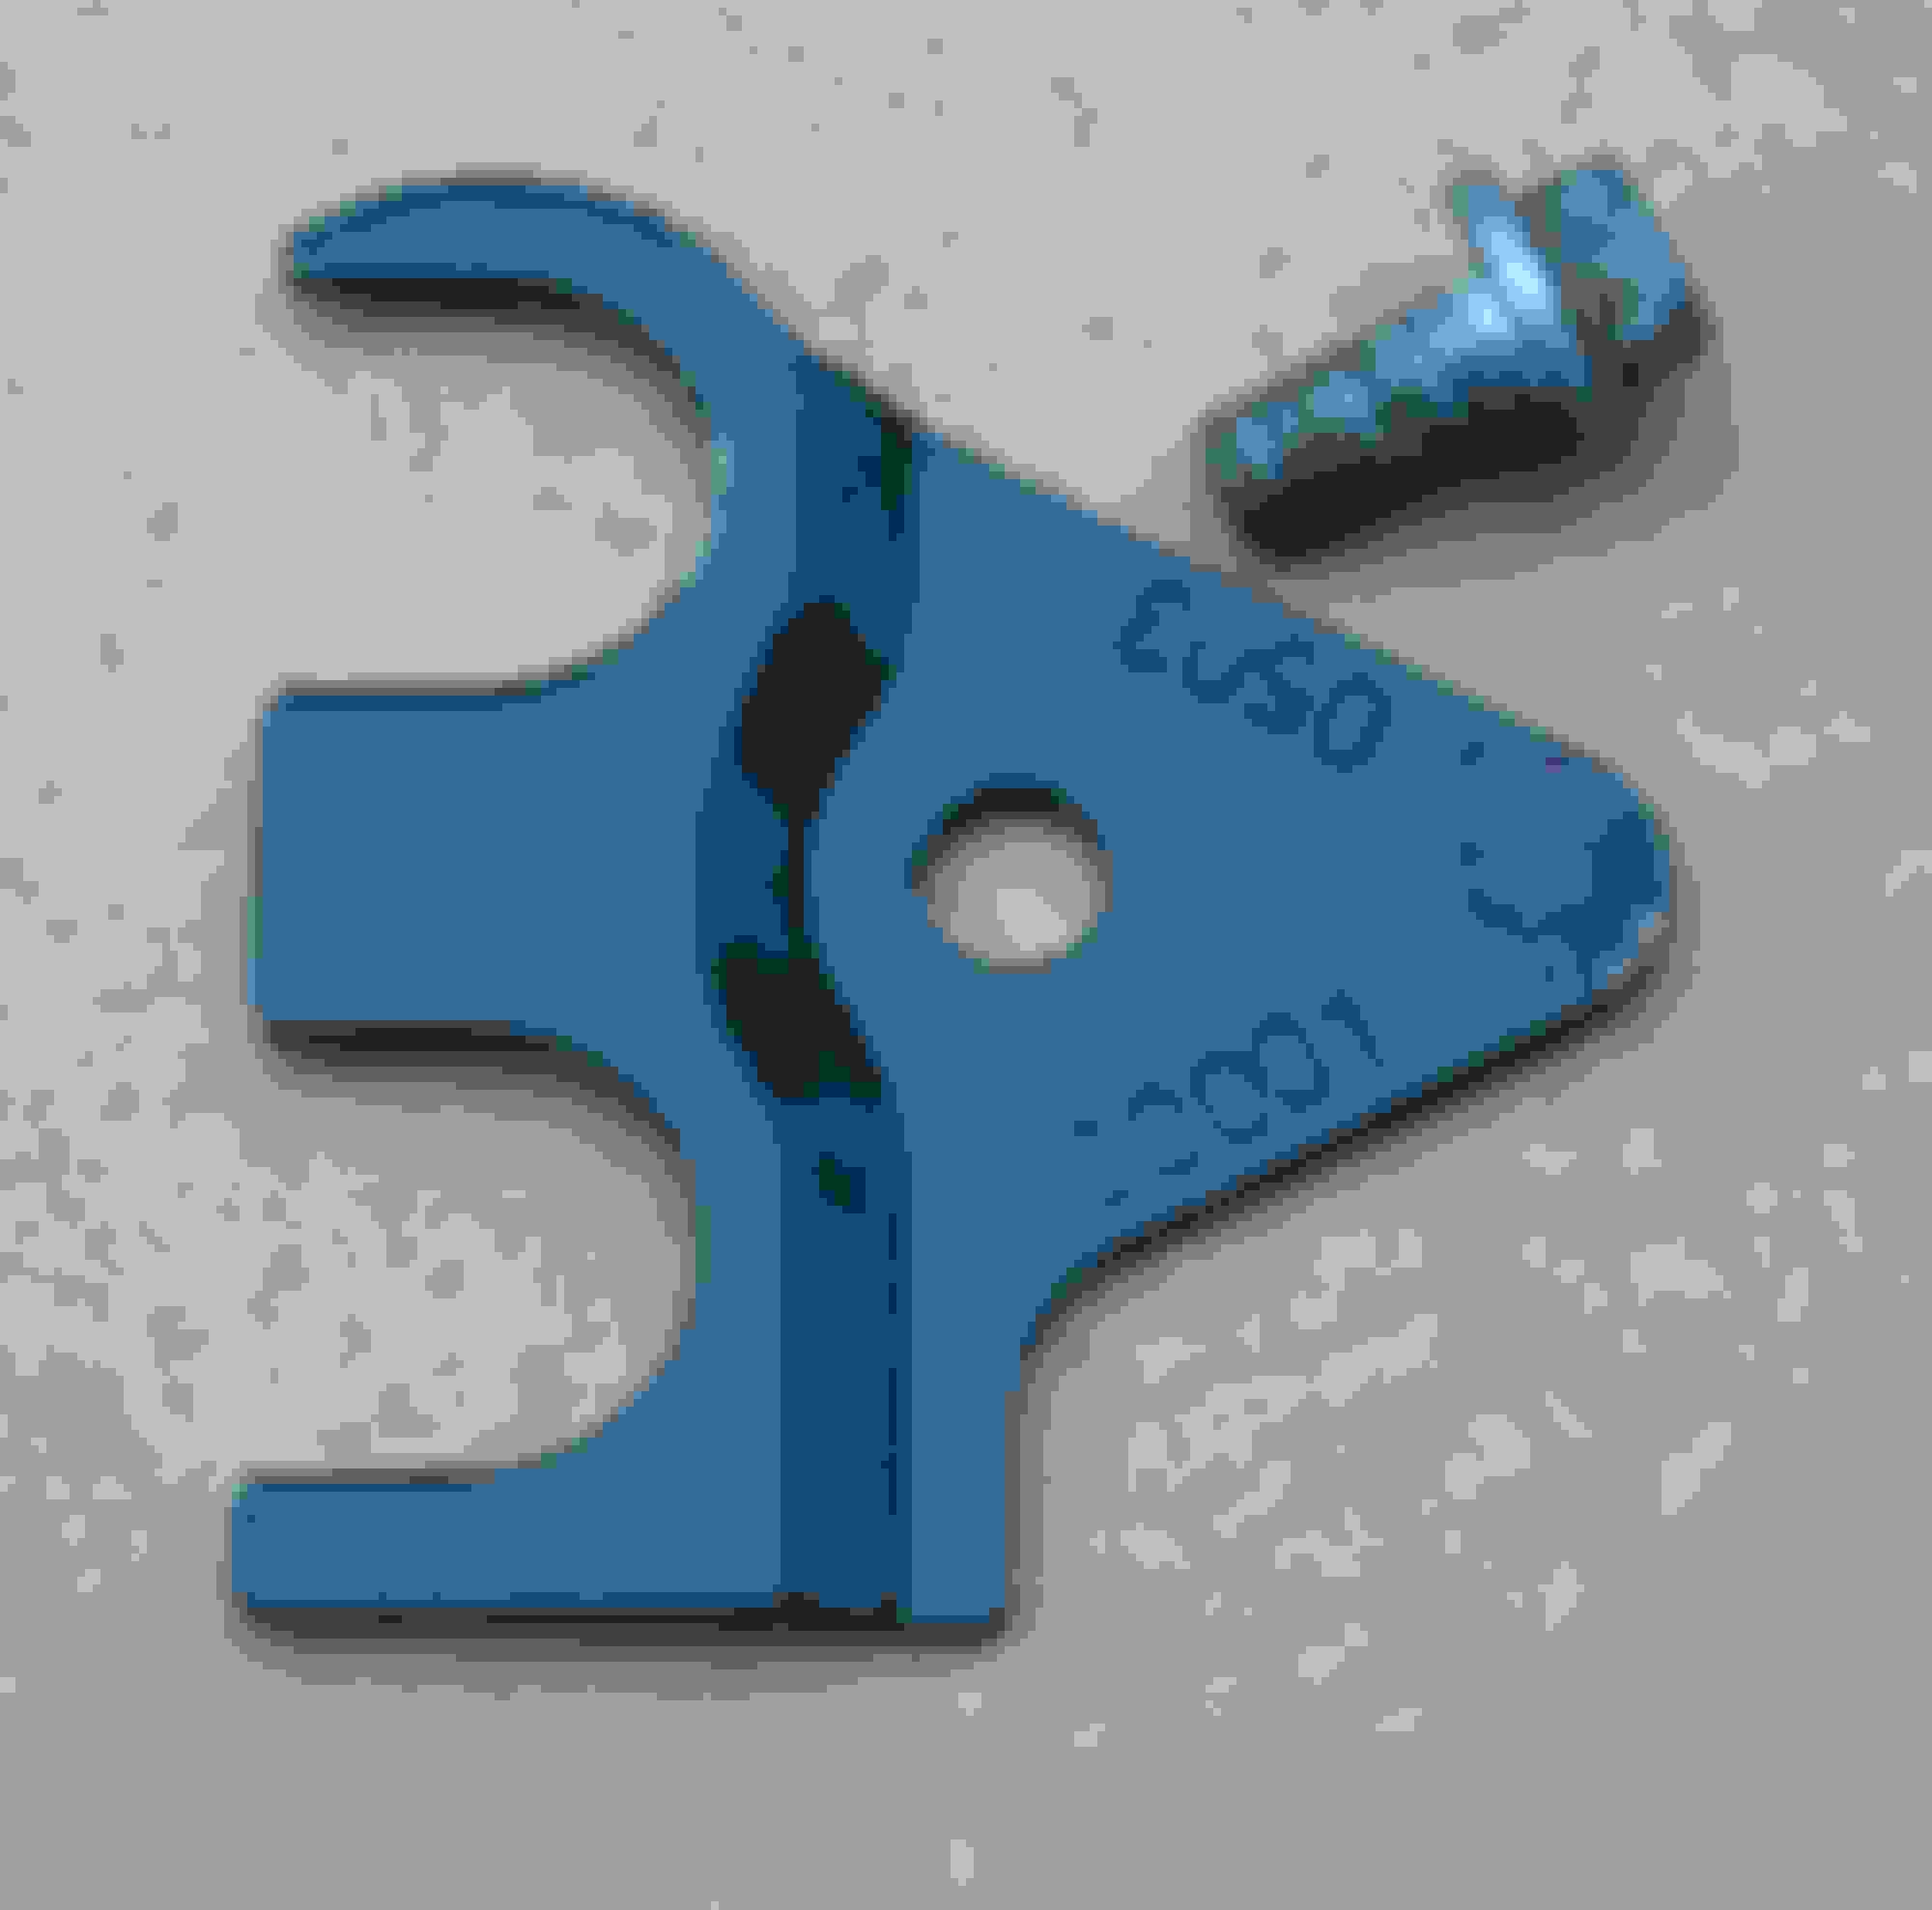
Remove the single 10 mm hex-head screw that secures the cooler line retaining plate to the transmission. You will then be able to lift the retaining plate away.
Here's a better view of the retaining plate and screw. Note how the plate is stamped so the half with the circular cutouts is raised relative to the half with the screw hole. This allows the plate to fit securely over the flanges around the ends of the cooler line fittings. When you refit the plate you will need to observe the proper orientation.
For those applying this method to the 6HP28, you may discover that the cooler line retaining plate has a continuous ring around one line and cannot be removed at the transmission end. The photo below is from a 2012 Range Rover HSE LUX. Note that the cooler lines only have one O-ring each, as opposed to those for the 6HP26 which have two O-rings each:
Since you cannot remove this plate to use it on your flush hoses, the simple solution is to purchase a 6HP26 cooler line retainer plate. The Jaguar part number is C2D38697 and it is relatively inexpensive:
Depending on the model, you may need to disconnect the cooler lines from one or two plastic clips to allow the pipes to be moved out of the way. Here's an example:
To release the lines, first use a wide, flat tool to carefully pry the cover away. It is hinged at one end and clips into place at the other end.
With the cover released, carefully pry the cooler pipes out of the clip.
Once the pipes are free, carefully pull the fittings out of the transmission. You may need to use a pry tool of some sort, but take care not to damage the pipes. A small amount of transmission fluid will drip out of the pipes, so have a catch container ready.
I pull the pipes down slightly and hook them under the lower edge of the oil pan to keep them out of the way for the next steps. If you can't do this on your car, tie the pipes out of the way.
To attach the adapter hoses to the transmission you will use the retainer plate and screw, with the washers positioned so they will be pinched between the retainer plate and transmission. The retainer plate presses on the washers, which press on the short sections of 1/2 in. I.D. hose, which forms the seal. The reason it is important to use washers with an I.D. of 9/16 in. is that you want the washers to press on the short sections of 1/2 I.D. hose. If you use 1/2 in. I.D. washers, they may catch on the first large barb on the hose adapter and tend to push the adapter through the 1/2 in. hose and cause the hose to back out of the cooler line port. You want the washers to press on the short sections of tubing to keep them forced into the ports. The barbs on the hose fittings hold everything together and keep the hoses from blowing off.
Tighten the retainer plate screw by feel until the hoses seem to form a good seal in the cooler line ports. Don't overtighten the screw - it may or may not thread all the way down before you sense a good seal is formed. Here's a view of the adapter hoses installed on the transmission.
Order of Operations
The sequence of operations will vary depending on the work you intend to perform:
If you intend to replace the pan/filter and electrical connector sleeve, either due to existing leaks or preemptively, the following order may make the most sense:
1. Loosen the fluid fill plug;
2. Remove the pan drain plug and allow the fluid to drain into an empty catch pan.
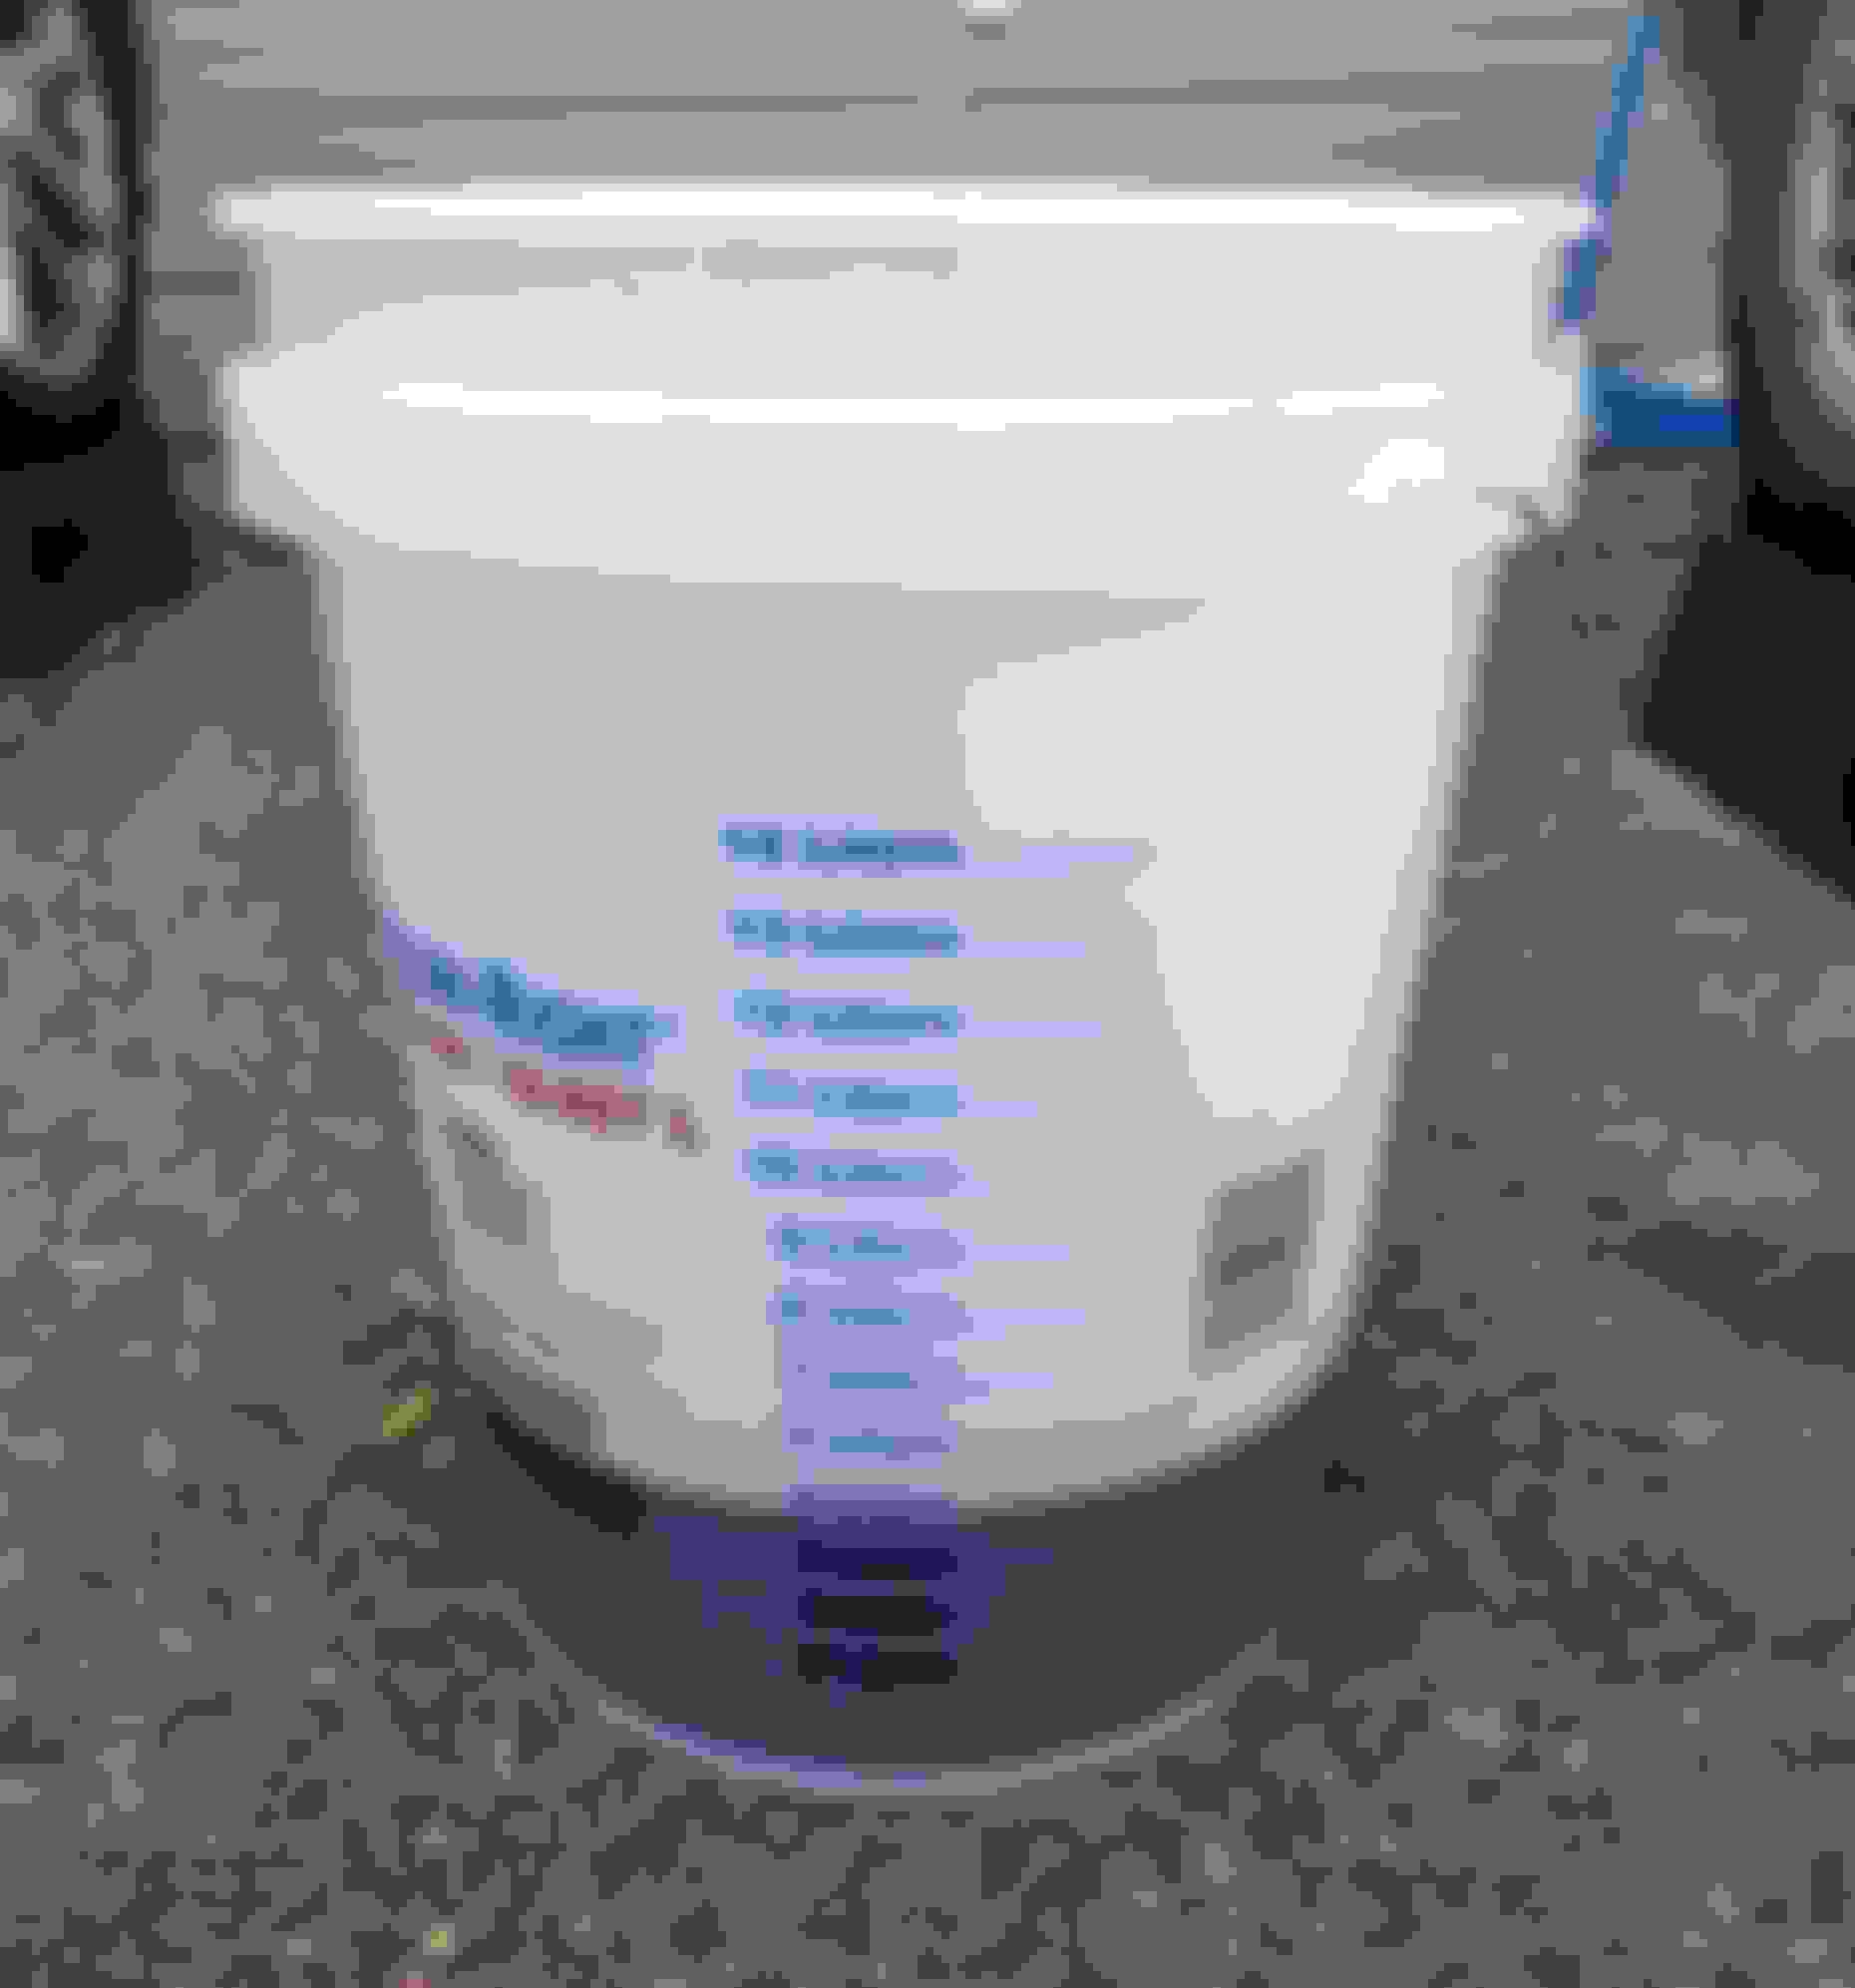
3. Measure the volume of the fluid drained. I pour the fluid into a graduated bucket as shown below.
4. Remove the pan/filter. Check to make sure the filter O-ring did not remain in the transmission intake port and if so, remove it, taking care not to scratch the bore.
5. Release the connector sleeve latch, remove the connector observing the orientation of the locating tab at the bottom; spray the connector pins with zero-residue electronic cleaner, wipe a little dielectric grease on the O-rings of the new sleeve and install it, then push the latch handle up to lock the connector in place.
6. Clean the gasket mating surface.
7. Install the new pan/filter and torque the screws per the Workshop Manual instructions.
8. Via the inlet cooler pipe fitting, add the same volume of new fluid as was drained from the pan.
9. Proceed with the rest of the flush procedure as described below.
Fluid Flush Only
In certain circumstances you may wish to flush the fluid without first replacing the pan/filter. For example, if a transmission is suffering from harsh shifts, I have typically flushed the fluid first, before going to the time and expense of replacing the pan/filter and sleeve, to see if new fluid will improve the shift quality. If an improvement is noted, I will then clear the Mechatronic adaptations and update the firmware (if it has not already been updated). If these procedures restore the transmission to proper operation, the owner can then decide whether to replace the pan/filter and sleeve or to postpone that service. If, on the other hand, the transmission continues to suffer from poor shifts or other malfunctions, the owner may opt to seek an assessment from a transmission specialist before spending the time and money on the pan/filter and sleeve.
Drain First?
Datasports raised the excellent point that when new fluid is added via the cooler pipe inlet port, it essentially spills on top of the old fluid in the oil pan. His suggestion is to begin by draining the fluid from the pan, reinstalling the drain plug, then adding the same volume of new fluid via the cooler pipe inlet port prior to commencing with the rest of the flush. Given that the new fluid may not have much time to mix with the old fluid, and that the old fluid in the bottom of the pan will probably be drawn up into the pump intake ahead of most of the new fluid, I can't say how much difference this method may make in practical terms, but I do like the idea in theory. Datasports wondered if this method might require more fluid but I'm not sure, since less old fluid will have to be ejected via the outlet cooler pipe port.
Performing the Fluid Flush
The LOWER cooler line port on the side of the transmission is the outlet port. When the engine is running, transmission fluid is expelled from this port under pressure. I tape or otherwise restrain the hose attached to the lower port to the side of a 5-gallon catch bucket so the hose cannot sling around from the pressure and spray fluid everywhere.
I later realized it would have been prudent to use one of my graduated buckets so I could more accurately monitor how much fluid was being expelled from the transmission. These graduated 5-gallon / 19 liter buckets are available in the paint department of our local home stores.
The UPPER cooler line port on the side of the transmission is the inlet. Fluid from the cooler in the radiator returns to the transmission via this port, so this is where we add the new fluid. You will need some convenient method of adding fluid to the hose connected to the upper port. One method is to attach a funnel to the hose. My first attempt was this funnel, but it was far too small and required too many refills.
I then tried a larger funnel, which reduced the number of times I had to refill it. However, I discovered that there is little or no suction at the upper cooler line port, so the fluid must find its way into the transmission via gravity. Holding the funnel became quite tiresome, so I taped it to a camera tripod. By this method, I would run the engine until approximately one liter of fluid was expelled into the catch bucket, then shut the engine off and add one liter of new fluid via the funnel.
Still, this method was painfully slow. The transmission fluid is sufficiently viscous to require long periods of time for even one liter to drain into the transmission.
I pondered a means of pressurizing the new fluid and thought of the old garden sprayers in our garage. I determined that the next time I flushed a 6HP26 I would have a new method.
At the hardware store I purchased a plastic shutoff valve and two barbed hose fittings to adapt the valve to my 3/8 inch I.D. fill hose. I also purchased a variety of small spring clamps to clamp the hose to the barbed fittings.
I removed the original spray wand and hose from the sprayer bottle outlet tube and attached the shutoff valve and a section of 3/8 inch hose. It just so happened that the 3/8 inch hose fit the sprayer outlet tube perfectly.
I carefully cleaned out the bottle with soap and water followed by brake cleaning solvent and compressed air.
In use, the sprayer bottle is filled to about the halfway point with new fluid and the pump/lid secured. The shutoff valve is turned to the off position. The hand pump is then used to pressurize the bottle. When the valve is opened, the fluid is moved into the transmission under force, which dramatically speeds up the process. Here's the sprayer in use.
I thought I was being clever turning a garden sprayer into a transmission filler, until I ran across an old post from motorcarman and learned that he had done the same thing years ago. You're still the master, Bob!
Subsequently, I acquired an inexpensive but professional-grade filler-evacuator pump, the Mityvac MV7201, which is designed for jobs exactly like this and is even faster than the converted sprayer due to its more advanced hand pump. Here's the Mityvac in action:
Once clear fluid is emerging from the outlet tube, I shut off the engine and add new fluid to replace whatever volume has just been expelled, plus another 1 liter extra or so to allow for refilling the cooler, plus another 1 liter if the transmission had any leaks. When establishing the correct fluid level per ZF's instructions, I find it far easier to drain excess fluid than to have to add more via the fill plug, so adding the extra fluid now is a matter of convenience, and rarely is all of it wasted.
If your oil pan has been leaking, you may need to add even more extra liters of fluid, so pay attention to how much old fluid is flushed out before the emerging fluid is clear. The published transmission capacity for the normally-aspirated models is 9.5 liters / 10 quarts, and for the supercharged models is 10.05 liters / 10.6 quarts. It generally takes 10-12 liters for a flush, but if your pan or connector sleeve was leaking you may need more. On a 2006 XJ8 I flushed recently it took 14 liters to expel all of the old fluid and get the transmission full again.
See the attached document from ZF for instructions on setting the correct fluid level.
Flushing the Cooler
The first time I flushed a 6HP26, I tried to disconnect only one cooler pipe so I could include the cooler in the flushing process. But the pipes are clipped rigidly together well toward the engine bay, so to be able to disconnect only one pipe would require unlatching all of the pipe clips, some of which are difficult to access, depending on the model.
I decided it was easier to simply blow the old fluid out of the cooler with compressed air. To reduce the mess, I attached a section of standard 5/8 inch I.D. heater hose to the upper pipe, the other end of which I aimed into the catch bucket. I then used a right-angle air gun connected to my compressor to blow compressed air into the lower cooler pipe. This flushes the old fluid out of the cooler. You do want to hold the heater hose onto the upper fitting with your left hand while operating the air nozzle with your right, otherwise the hose may blow off of the upper cooler line and make a mess. Clearing the cooler and lines only takes a few seconds, so there's no point taking the time to put a clamp on the hose - just hold it in place with your hand. See the setup below:
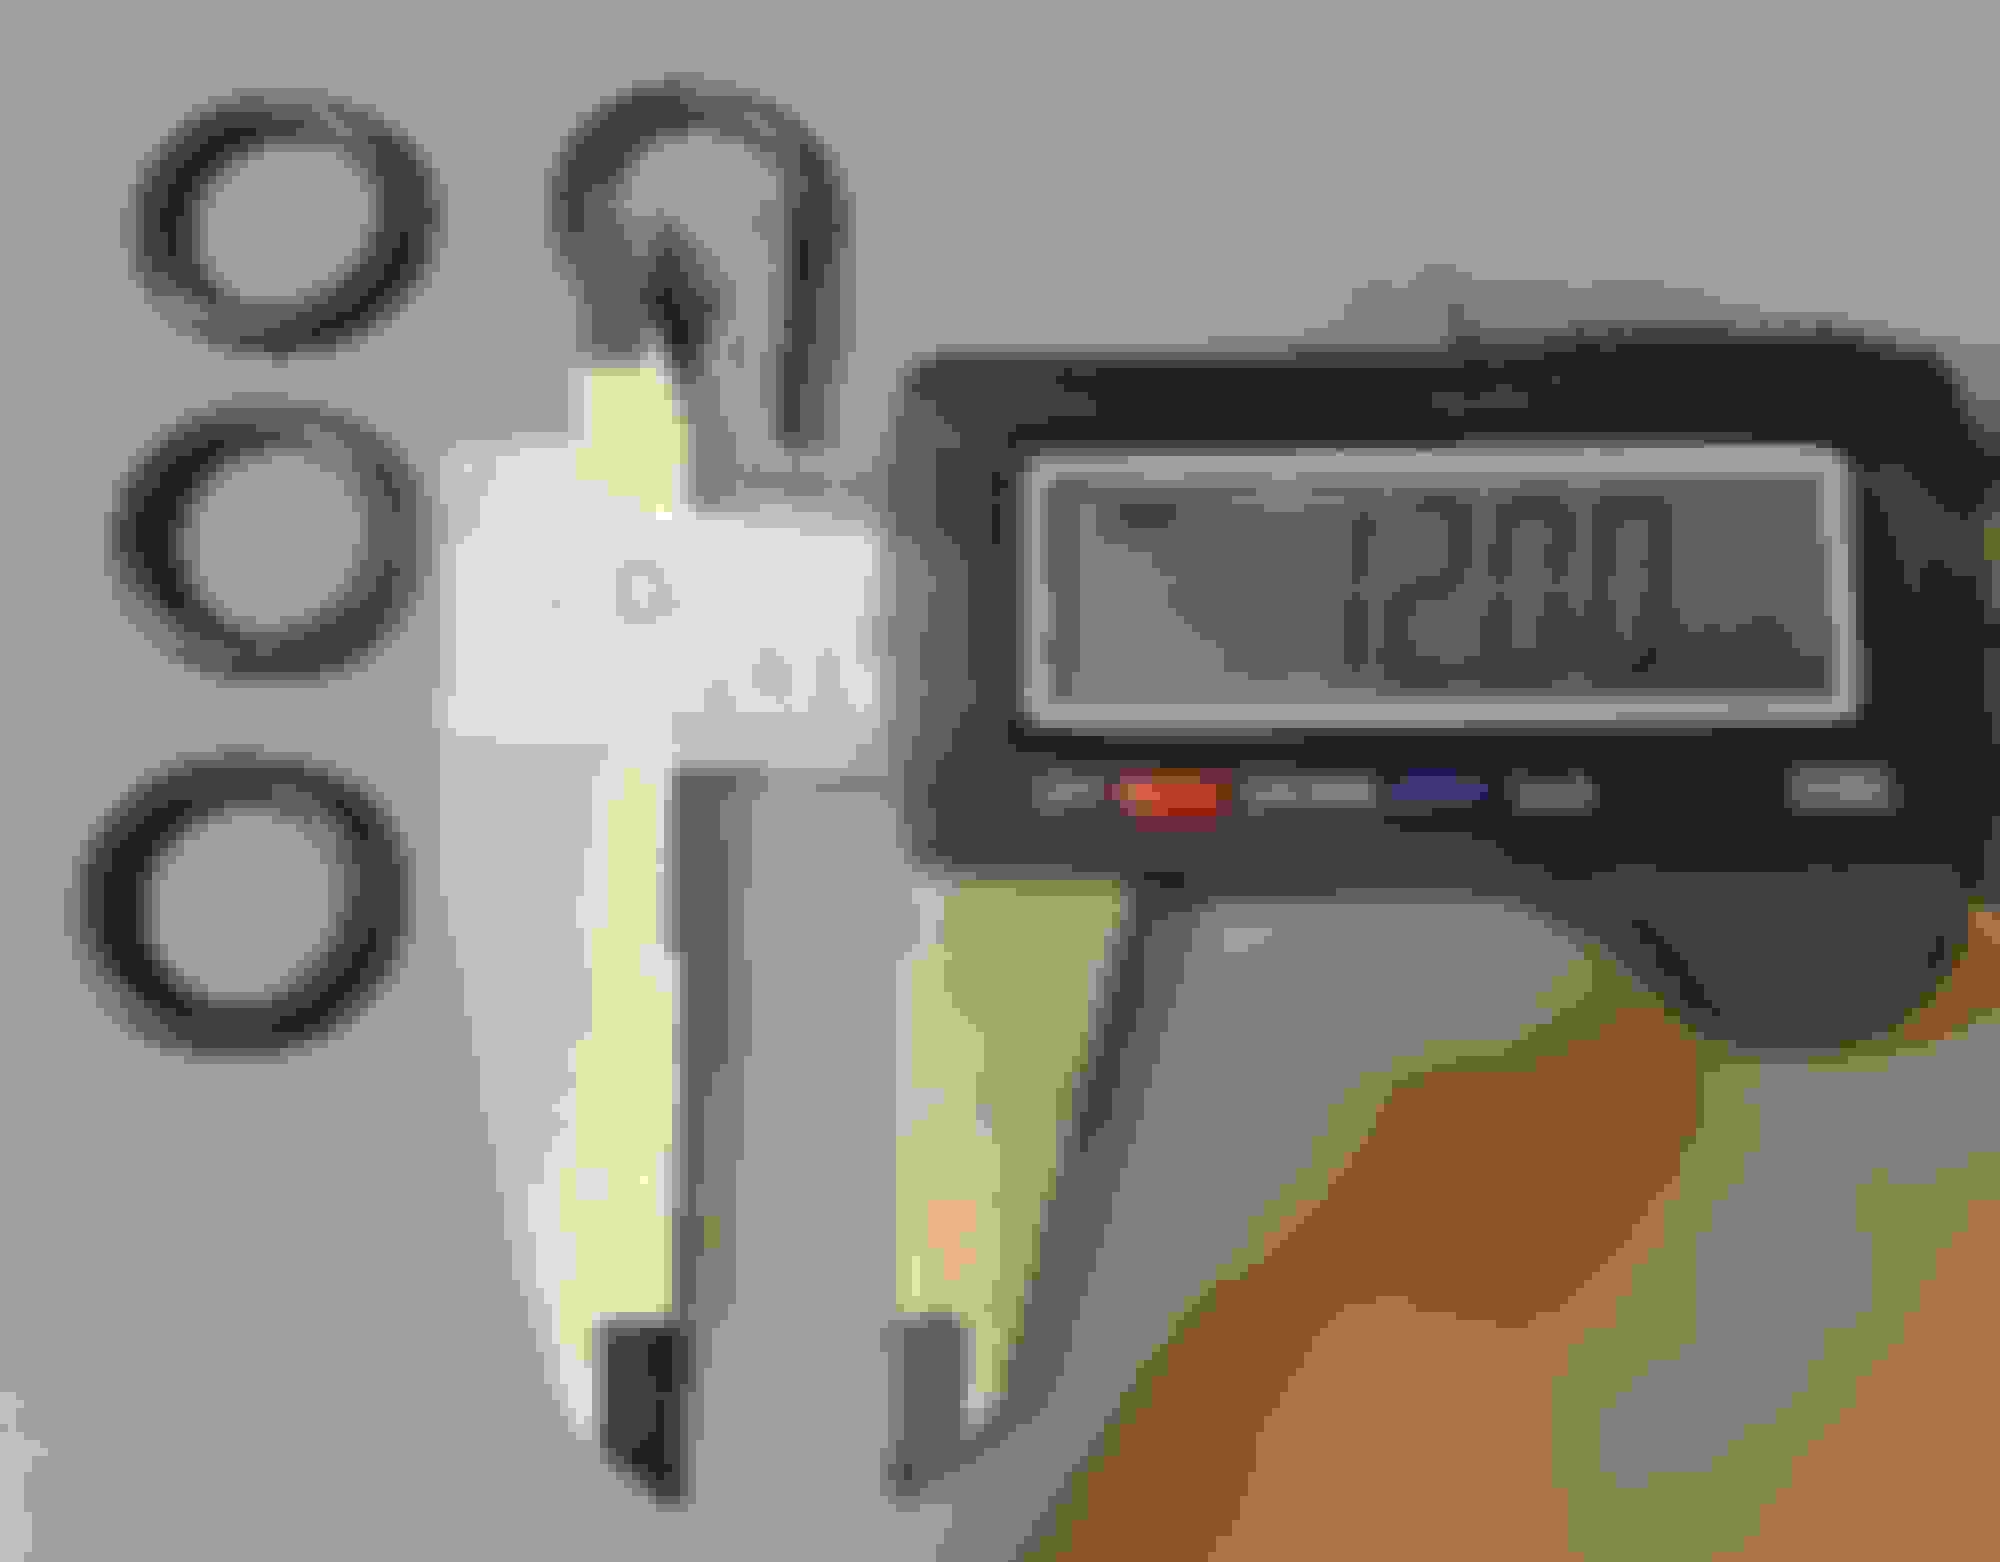
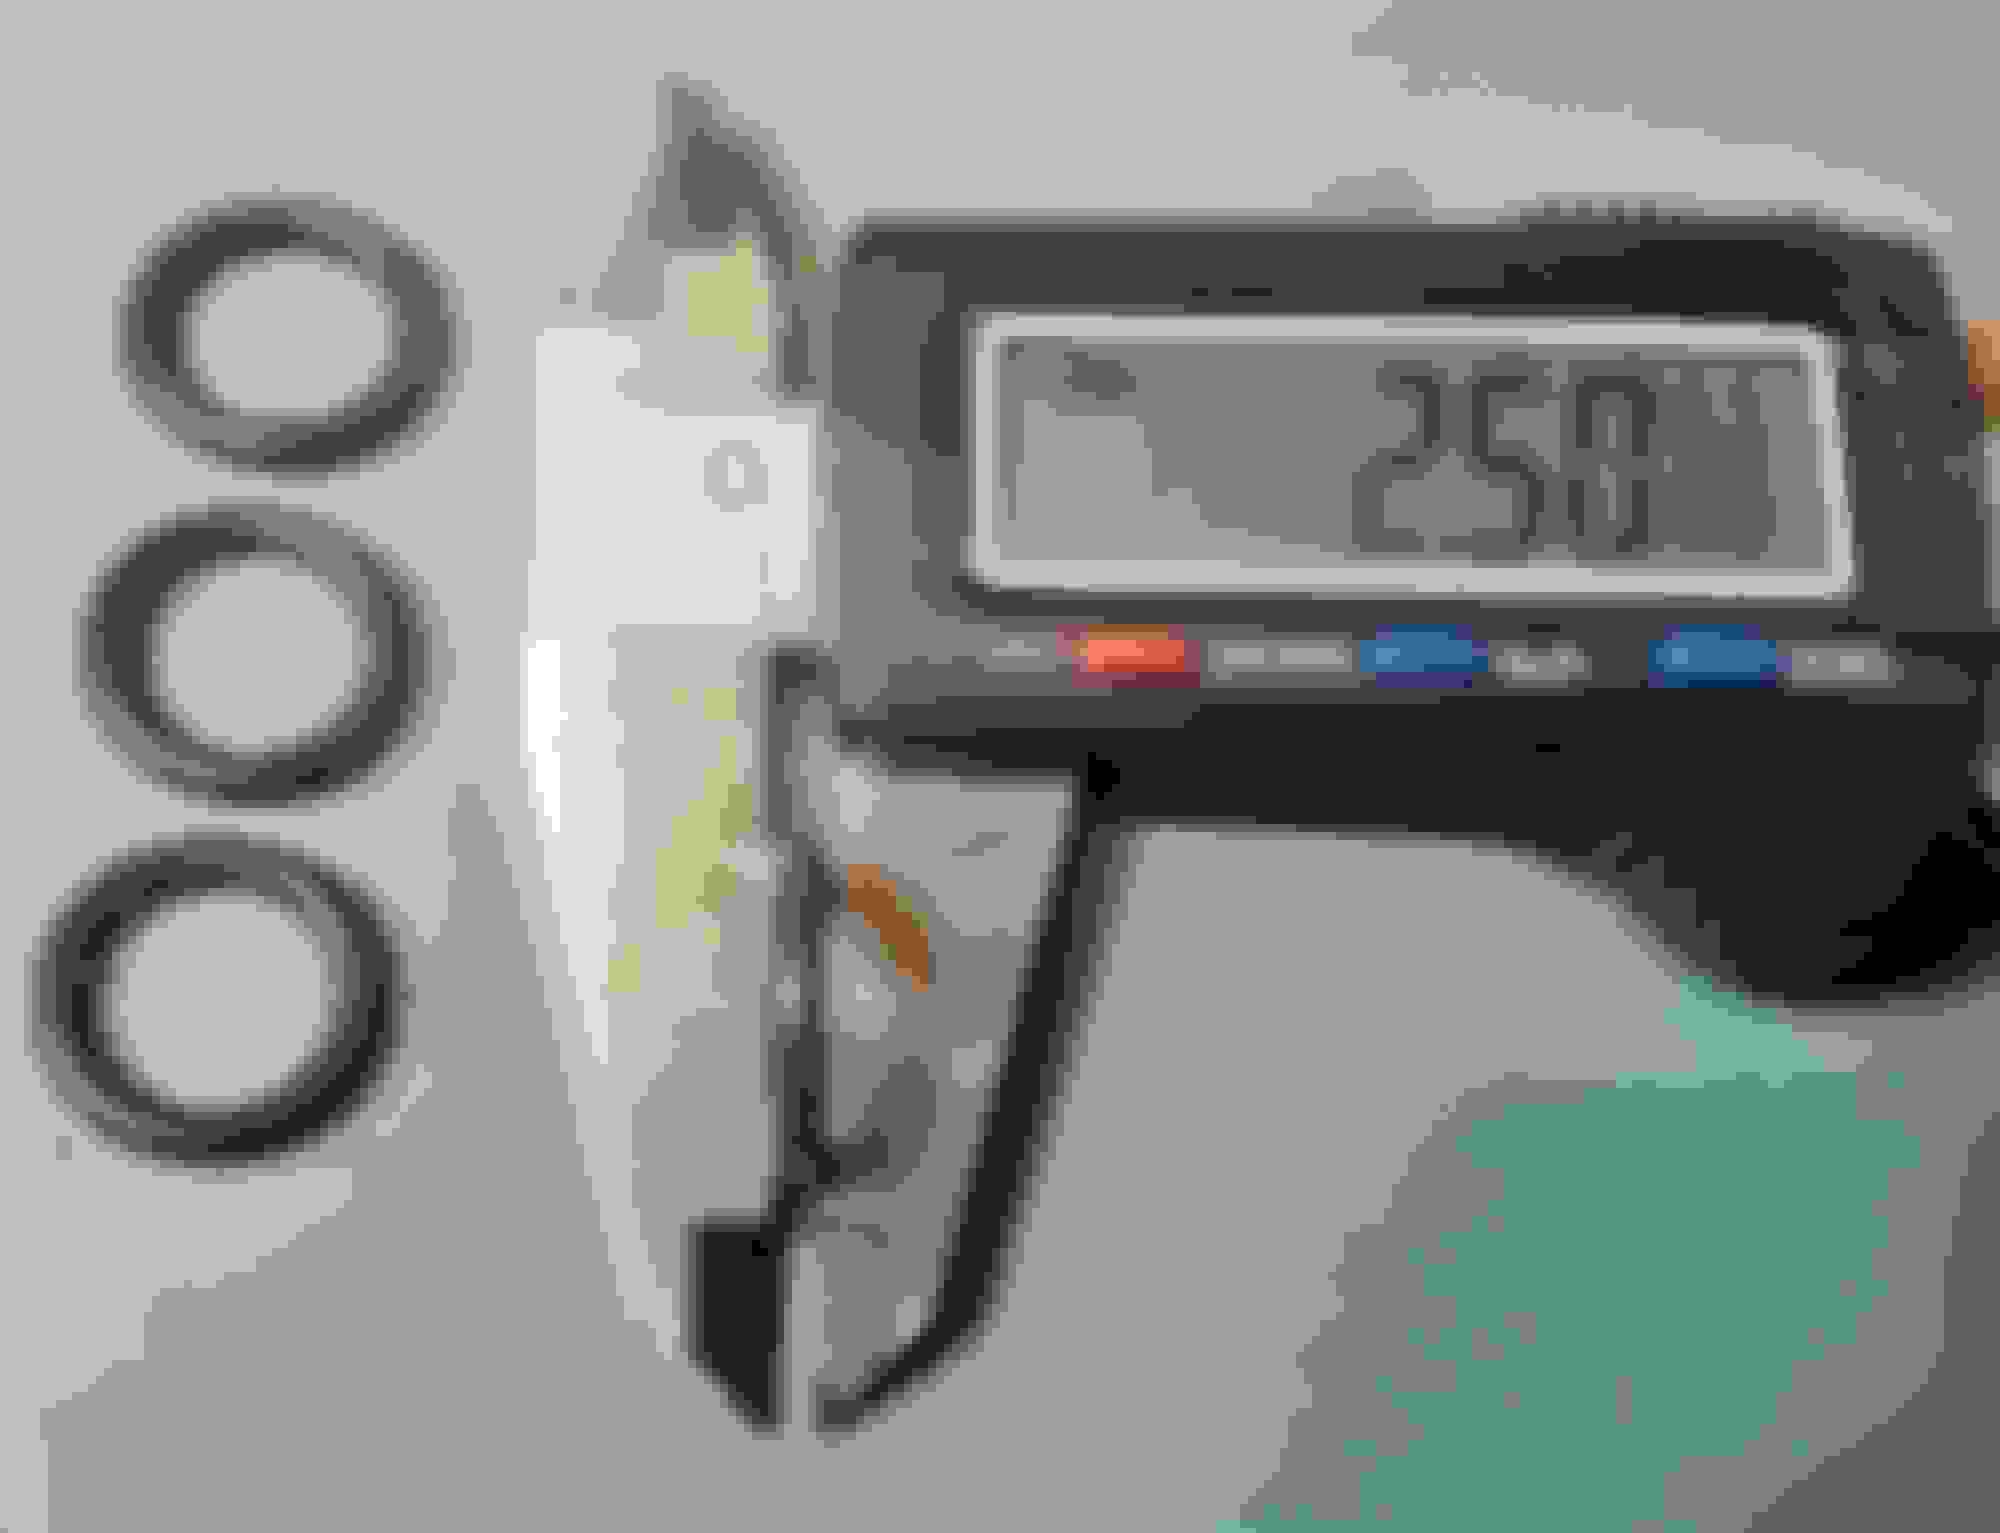
Before you reconnect the cooler lines, it's the perfect time to replace the O-rings. The Jaguar part number is C2C6712 to VIN G49700, but if you have access to O-rings by dimension, these are 12mm inside diameter and 2.5mm cross-section:
Cheers,
Don
Last edited by Don B; Mar 2, 2024 at 08:12 AM.
Reason: Added more photos and descriptions.
Really nice innovation Don! The use of the OEM clamp to hold the washer on barb, and the tapered hose on barb seal are ingenious.
I've only ever done this the brute force way; dropping the transmission pan. What are your thoughts on leaving the 'out' line connected to the transmission in order to include the cooler in the flush? I was thinking if the transmission cooler gravity drains when the lines are disconnected from the transmission, there is probably no need to be concerned about flushing it also. Maybe I'm just over-thinking it.
Thanks again for documenting and sharing. Best Regards, William
Really nice innovation Don! The use of the OEM clamp to hold the washer on barb, and the tapered hose on barb seal are ingenious.
I've only ever done this the brute force way; dropping the transmission pan. What are your thoughts on leaving the 'out' line connected to the transmission in order to include the cooler in the flush? I was thinking if the transmission cooler gravity drains when the lines are disconnected from the transmission, there is probably no need to be concerned about flushing it also. Maybe I'm just over-thinking it.
Hi William,
That is a really great question. I actually tried the idea of leaving the outlet pipe attached, connecting an hose to the return pipe from the cooler, and flushing the cooler that way. The problem is that the two pipes are secured together by clips well forward into the engine bay, nearly to the radiator, so to separate the pipes so you can pull away the top pipe while leaving the lower pipe attached requires unclipping all of the plastic clips, some of which are very difficult to access, depending on the vehicle.
So instead, I've opted to attach a hose to one pipe and use compressed air to flush the cooler. Sorry I haven't included a photo of that yet - I can't remember where I've saved the photos so I'll add them when I find them. I've added a note to the post to remind me.
VERY NICE WORK!!!!!!!!!!!
Mityvac is a nice device, used their brake bleeder kit for years, but at $170.
My garden sprayer will just have to suffice for long a while.
Does the sprayer keep up with the discharge rate?
Another great question! No, neither the sprayer nor the Mityvac can keep up with the flow rate of the transmission's pump. That's why I don't try to do the flush all in one continuous action. I run the engine just long enough for about 1 liter of fluid to be ejected (watching the graduations on the catch bucket), shut off the engine and add 1 liter of new fluid. Slower than a continuous action, but reduces the risk of the transmission ever running more than 1 liter low.
I have done this myself with the help of my wife, start stop the engine, while I pump a quart at a time into the transmission. I used air to push fluid out of
the cooler and lines.
Your method you outline looks a lot simpler. I am at the "thinking about doing" stage to do my 2013 Range Rover and will try your method for sure.
Mityvac is a nice device, used their brake bleeder kit for years, but at $170.
The Mityvac MV7201 is generally available on eBay for just over USD $100, and is sometimes available for less. I've used it so much now that I consider it to be one of the great tool bargains. It's bi-directional, so it can be used both as a filler and evacuator.
Good way to do things just as you said, keeping close watch on amounts out & in.
Wonder if you could get a piece of trans line, the end with O'rings intact, thread it, & put a metal valve on it.
Clamp it i place, O'rings, should still seal it from leaking.
You could leave the car run, valve open, then valve closed.
Making things faster, & easier.
Thanks Don and I just bought The Mityvac MV7201 on eBay for $100.00 plus change shipped. This will make things easier.
Hey Don if I do this I don't have to do the drain and fill 3 times right ? Just keep feeding new fluid into it until the exit fluid is as new ? Also I will blow out the cooler lines also so those will be clear but given the cooler will be cleared out will I need to add even more extra fluid to make sure there is enough in the cooler ?
Hi John,
Yes, the flush does a more complete job of replacing all of the old fluid so a traditional drain & fill procedure is not required. And yes, you do need to add a little more to refill the cooler, though it's not as much as you may expect. Maybe 1/2 liter or so.
Just a tip on the Mityvac MV7201: when not in use, loosen the fill plug clamp and pull the plug about halfway out. Otherwise, the lower end of the rubber plug tends to swell, which makes the plug difficult to remove from the fill port.
Very nice tutorial . nice & easy to follow . with excellent pictures helps a lot.
and not to knock this method , i think this is ingenious! especially the port fitting.
regarding this though ->
the flush does a more complete job of replacing all of the old fluid so a traditional drain & fill procedure is not required.
after seeing inside this trans (6HP26) , it is evident that the return port directly dumps into the sump .
with this flush method you are instantly contaminating your new fluid during refill with around 4.5 liters of old fluid .
if you were to do 1 single sump drain refill ,prior to this flush method . sure, you will use more fluid ,
but i believe you will achieve a faster and more comprehensive fluid swap .
i have used my friends professional vacuum / pump trans flush machine on many cars .
it uses 4liters over and above the volume of the trans to complete a flush. so a pre drain and fill will only bring this method more in line with the fluid used during a pro machine flush .
and i also believe if the fluid is due and you can see the difference between the old and new fluid . then the pan pick up filter is due for replacement also .
so a perfect time to do a pre flush drain and fill/ fluid swap is before Don's ingenuitive/cunning/clever flush method.
Last edited by Datsports; May 4, 2019 at 01:34 AM.
Well done, very informative. While I will probably stick to ATF drain-and-fills on my wife's 2006 XK8 (three of them thus far since we purchased the car in February 2012 with the car now approaching 119,000 miles), it is good to have this reference in the event I decide to give it a go....
...after seeing inside this trans (6HP26) , it is evident that the return port directly dumps into the sump .
with this flush method you are instantly contaminating your new fluid during refill with around 4.5 liters of old fluid .
if you were to do 1 single sump drain refill ,prior to this flush method . sure, you will use more fluid ,
but i believe you will achieve a faster and more comprehensive fluid swap .
i have used my friends professional vacuum / pump trans flush machine on many cars .
it uses 4liters over and above the volume of the trans to complete a flush. so a pre drain and fill will only bring this method more in line with the fluid used during a pro machine flush .
and i also believe if the fluid is due and you can see the difference between the old and new fluid . then the pan pick up filter is due for replacement also .
so a perfect time to do a pre flush drain and fill/ fluid swap is before Don's ingenuitive/cunning/clever flush method.
A really great point, Datasports!
Your suggestion makes complete sense. To avoid the inconvenience of having to add fluid via the fill plug, you could drain the pan via the drain plug, then add the same volume of new fluid via the upper cooler pipe port and then continue the flush from there.
The situation isn't quite as bad as it sounds, though, because whenever the engine is run to expel a liter of fluid, the transmission pump sucks a liter of mostly old fluid from the bottom of the sump via the filter, so the new fluid, which spills on top of the old fluid already in the sump, doesn't get much of a chance to mix with the old fluid before the old fluid is inhaled by the pump.
One of the issues I grappled with while preparing the descriptions of this procedure was if, and if so when, to suggest the pan/filter swap be done. The reason I have grappled with it is that thus far, except for servicing my own XJR preemptively, I have otherwise carried out this procedure only on cars that were exhibiting harsh shifts. The owners had been told by one or more local shops that they needed either a new Mechatronic, a transmission rebuild, or a new transmission. They were either existing friends or were referred to me by mutual friends in the local British Car Club to see if I might be able to help.
My goal has been to determine, as quickly and inexpensively as possible, whether all they really needed was new fluid and an update to the latest firmware. There wouldn't seem to be any point in beginning with a pan swap if the transmission was damaged internally. And also, I don't like passing old fluid through a new filter, so that's another consideration.
So far, flushing the fluid, clearing the adaptations, updating the firmware and completing the adaptation drive cycle has worked every time, most recently on an XK8 at 69K miles and an XJ8 at just 55K. I don't want to jinx myself, but so far not a single Mechatronic or transmission has required any additional service.
Once we've demonstrated that this procedure restored proper performance, the owner has decided whether to have me replace the pan/filter and connector sleeve. So far, only the owners whose pans or sleeves were leaking have opted to do so, and in those cases I drained the new fluid into a clean catch container and reused it after the new parts were installed.
There are plenty of other considerations that I didn't mention because I was trying to get the post up quickly for one of our members who is in the midst of making fluid change decisions, but your point is so important that I'll try to add a discussion of these issues to the original post so it is a more complete DIY reference.
Very nice work! I like how you duplicated the fittings on the line ends.
One quick thought: Should you mention the difference between a genteel DIY flush as you've described, versus the potentially harmful power flush some shops might do? Even though the process is relatively easy, the occasional reader might just have a shop do it. "I'd like a transmission flush, please..."
Our recent discussion on the subject, see post #43
For the benefit of readers of this thread, and to remind me to add a proviso to my original DIY post, I am quoting a post from Karl in the S-Type forum above. In another recent thread Karl raised valid concerns about the multiple meanings of the expression "Transmission Flush," and he was reminding me that my terminology could be misunderstood when compared to the process some commercial transmission shops employ which can involve chemical solvents, high pressures, etc. that have, at least anecdotally, been associated with causing more problems than they cure, especially when conducted by less-than-expert practitioners.
I will add a disclaimer to the original DIY post to help clarify my use of the term "flush."
Thanks, Karl, for your insightful and entertaining input!
Not one of my better ideas, the metal line & valve on discharge line side
I'll try not to repeat posting bad ideas in the future.
Nothing to apologize for, Wingrider!
One of the great things about this forum is that we're less likely to be flamed by gleeful trolls whenever we post an idea we haven't thought through completely. Not the case on many other forums. I appreciate the fact that most members of this forum are serious about constructive discussion and learning from our collective experiences how to best maintain these machines we love so much.
No, neither the sprayer nor the Mityvac can keep up with the flow rate of the transmission's pump. That's why I don't try to do the flush all in one continuous action. I run the engine just long enough for about 1 liter of fluid to be ejected (watching the graduations on the catch bucket), shut off the engine and add 1 liter of new fluid.
Great post. Thank you for the time and effort to create it and answer questions. I'm especially happy that the Mercon SP fluid works - that will save a lot of $$. I have several as I try to understand all the steps you've laid out:
1. When you say in the quote above that you "add 1 liter of new fluid", are you saying you add that by pushing it into the system via the hose and the Mityvac or sprayer while the engine is off, or are you saying you add a liter through the filler hole on the side of the transmission?
2. My transmission shifts REALLY hard at times, enough to go into the limp home mode and I have to shut it off and reset the system. I am considering doing the flush you suggest, but it seems prudent to go ahead and change out the pan/filter at the same time. If I do that, what is the sequence to get the job done? Does this sound right?
a. Drain transmission / replace pan.
b. Replace fluid from drained from pan via filler hole (writer above says that will be about 4.5 quarts)
c. Do the flush as you suggest above.
3. Can you help me understand better how the fluid in the external cooler gets replaced? Do you use air from a compressor to blow it out into a pan, and then it just gets refilled from the transmission once reconnected? Is that why you suggest filling it with an extra liter or so after completing flush?
4. How do you measure temperature to decide if transmission is warm enough? I have a computer with IDS loaded, but can't figure out how to get it to show me that data. Do you just use an thermometer of some sort?
Thanks again!
PS - any pics of how you get oil into the filler hole without making a mess?