
Need help Please

Thread Starter
|
Senior Member
Joined: Jan 2010
Posts: 150
Likes: 2
From: New Haven, CT
I'm looking to replace my old and worn out fog light light bulbs. I have bought some replacement ones and thought this would be easier. I did a search for 'fog light replacement' on the forum but only found out that there are 2 clips on either side that you need to depress. Can anybody be more specific like where the clips are, because there is a rubber seal around it so you can't see anything and I'd rather not start scratching up the paint...
Senior Member
Joined: Nov 2008
Posts: 279
Likes: 6
From: Columbia, SC
I'll assume you removed the undertray already.
-Disconnect the plug going to the fog light assembly.
-on either side of the assembly, feel around the side edges of the entire housing, you'll feel the clips. They should feel pretty stiff if you try to depress them. those are the two that need to be pushed, and the entire housing pushes out from the back.
I'd leave that rubber seal on there until you get the lamp housings out of the bumper.
But basically, it's all attack from the rear of the housings.
&then the rubber water seal comes off, and there you have the bulbs, of the H3 variety.
It's not absolutely necessary to remove the fog lamps entirely to replace the bulbs, but I enjoy the convenience and the look on peoples faces at the parts store when I pop my fog lamps out and take them inside with me like I'm worried someone will try and steal them.
Senior Member
Joined: Nov 2008
Posts: 279
Likes: 6
From: Columbia, SC
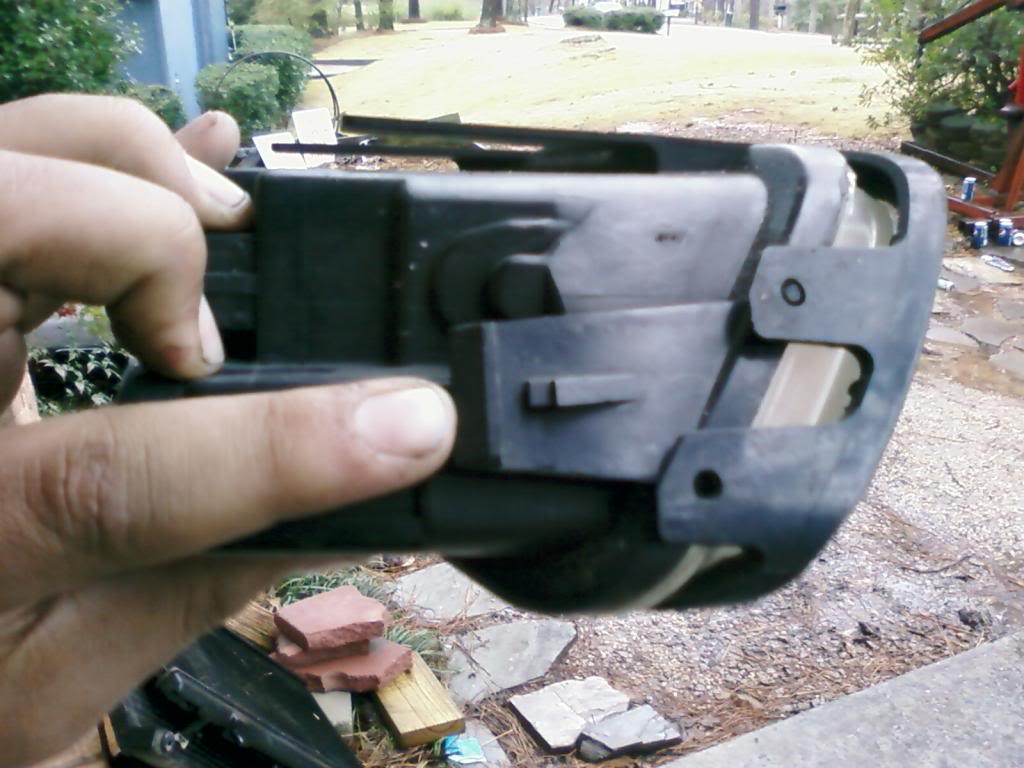
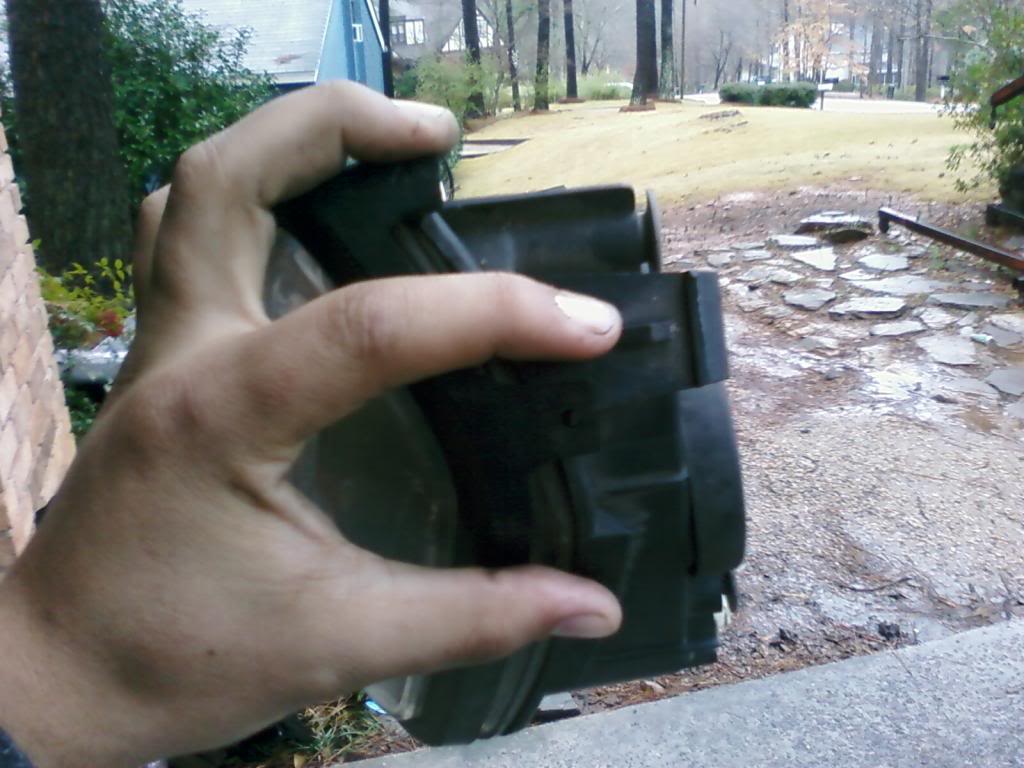
like so:
it's the two fat stubby clips my index finger is indicating in the images below.
p.s. lol @ my engine lift in the background, I just noticed all the soda cans accumulating on it
it's the two fat stubby clips my index finger is indicating in the images below.
p.s. lol @ my engine lift in the background, I just noticed all the soda cans accumulating on it
Last edited by panchostatus; Feb 5, 2010 at 03:07 PM.
Thread Starter
|
Senior Member
Joined: Jan 2010
Posts: 150
Likes: 2
From: New Haven, CT
OK I found the undertray that you're talking about and have it removed. Now you say to disconnect the plug going into the fog light assembly. I tried, but that sucker is in there HARD. Do I just pull or are there clips on the side of that also that I need to depress?
Thread Starter
|
Senior Member
Joined: Jan 2010
Posts: 150
Likes: 2
From: New Haven, CT
OK, I finally got the cable unplugged. Now I'm having trouble depressing the tabs. I can only find the tab closest to the side of the car, the inner one seems to be gone? I've been trying for over 2 hours and can't seem to find the darn thing. Is there ANY other way to do this?????
Trending Topics
Thread Starter
|
Senior Member
Joined: Jan 2010
Posts: 150
Likes: 2
From: New Haven, CT
Ok I've finally installed the new fog lights....phew! I'll do a short write up for anyone else that's planning on doing this. After spending nearly 4 hours doing this, I think I'd be able to do it in about 15 minutes this way:
-Remove the undertray by unscrewing the screws from the clips (you do not need to remove the part directly in front of the wheel but you can if you want more room)
-Turn the tires of the car the opposite direction of the side you are working on
-Use a jack to hold up one side of the front (the side you ware working on, obviously
-Unplug the black wire going into the assembly bu depressing the small button on the top and pulling out at the same time
-There are 2 clips, 1 on each side of the fog light assembly. The one closest to the middle of the car is a real pain to depress so you'll probably need a second person for this next part. Have one person use a flat head screwdriver to depress the clip closest to the center of the car while you depress the clip closer to the side of the car. Once you feel the clip go all the way in, you need to use your other hand and push the the entire fog light out from the back to the front of the car.
-Now that the fog light is out, you need to remove the black circular disc from the back and the plastic frame surrounding the assembly. Unplug the white headed cord from the small black prong and the other cord from the little metal piece sticking up. Using a pair of needle nose pliers grab the back of the bulb and carefully remove the bulb.
-Now, take the new bulb and place it directly into the center of the "socket" (make sure you hear it click in)
-Plug the cord from the new bulb into the small black prong and the oter cord into teh same little metal piece you unplugged it from before and put the circular rubber disc and black plastic frame back on the assembly
-Now that the fog light is all ready to go, spray some silicone spray or WD-40 into the empty hole where the fog light used to be as well as the plastic clips on the fog light assembly (this allows for easier insertion and access to it in the future)
-Take the fog light assembly and line it up evenly in the slot that it was taken out of (make sure it is right side up!)
-With one smooth motion, push the assembly back evenly and it will click right in
-Crawl back underneath the car and plug the black cord back
-Turn on your car and make sure it works!
-Do this same procedure for the next light and you'll be all finished
P.S. the second fog light will take 1/4 the amount of time to do because you'll know exactly how to do it, so don't get discouraged if it's taking you a little longer.
Good luck!
-
Senior Member
Joined: Nov 2008
Posts: 279
Likes: 6
From: Columbia, SC
I guess now that you've done it it should be exponentially easier next go round, but I dont remember near as much combat with my foglights the first time.
I s'pose they get sticky if you leave them in there for a while.
but good written instructions!
I never put my undertray back on for fear of the lady in my life (love her to death) parking too close to a concrete bump-stop and getting it caught & ripping it off. again.
not to mention easier access to the stuff underneath all the time.
owner +1 !


Senior Member


Joined: Nov 2013
Posts: 563
Likes: 90
From: Worcester UK
The instructions are very good but I managed to do this by partially dropping the under tray and reaching in from behind to release the fogs as described. No wheel removal etc. With the instructions it took about 20 minutes for the first one and rather less for the second. Key to it is realising how to release those clips. I also got the H3 bulbs stupidly cheaply off eBay.
Basically don't be daunted by the detailed instructions just get stuck in.
I do rather wonder why both bulbs had failed and how it passed its MOT with blown fogs. It's first MOT with me is due next week so I'll probably find out what else was 'overlooked'.
Mike
Basically don't be daunted by the detailed instructions just get stuck in.
I do rather wonder why both bulbs had failed and how it passed its MOT with blown fogs. It's first MOT with me is due next week so I'll probably find out what else was 'overlooked'.
Mike

Senior Member
Joined: Oct 2009
Posts: 328
Likes: 92
From: Niagara Region, ON Canada
From what I recall, and perhaps this is just North American specific, it's OK if both bulbs are working or non working, the issue is when one of the two are not working - then it's a fail.

great description, I recently installed a new undertray and took the opportunity to replace a fog light globe that had been blown for a while (I don't use my fog lights much).
Although I didn't try it and as an after thought, Could you not remove the fog lights in the same way you pull out the front indicators. i.e gently push in a small straight edge from the front and press the clips to release them?
Although I didn't try it and as an after thought, Could you not remove the fog lights in the same way you pull out the front indicators. i.e gently push in a small straight edge from the front and press the clips to release them?
Last edited by MikeyB10; Jun 30, 2017 at 07:25 PM.

If it helps to have pictures: https://www.jaguarforums.com/forum/x...renewal-49540/
FWIW, I see no need to remove the undertray, let alone the bumper!
FWIW, I see no need to remove the undertray, let alone the bumper!