XJ XJ8 / XJR ( X308 ) 1997 - 2003

Headliner DIY

Thread Tools
 
Search this Thread
 
  #1  
Old 05-07-2014, 07:14 AM
69merccougar's Avatar
Member
Thread Starter
Join Date: Apr 2014
Location: Tuckahoe, NY
Posts: 66
Received 37 Likes on 15 Posts
Default Headliner DIY

Hey guys the material for my headliner came in yesterday so I will be tackling the job soon and posting up the results. I was wondering if anyone had any advice for the sunroof panel trimboard. I'd rather not drop the sunroof out of the car. It works perfectly and I wouldn't want to mess it up. Thanks
 
  #2  
Old 05-07-2014, 07:19 AM
69merccougar's Avatar
Member
Thread Starter
Join Date: Apr 2014
Location: Tuckahoe, NY
Posts: 66
Received 37 Likes on 15 Posts
Default

https://www.jaguarforums.com/forum/x...sagging-36245/

Post 8 here makes me believe I can remove both panels without dropping the sunroof. Is this accurate?
 
  #3  
Old 05-07-2014, 01:14 PM
69merccougar's Avatar
Member
Thread Starter
Join Date: Apr 2014
Location: Tuckahoe, NY
Posts: 66
Received 37 Likes on 15 Posts
Default

Alright I answered my own question. you can replace the main sunroof panel without removing the sunroof. I'm just finishing it up and I'll post pics of the whole job later including how I got the headliner out.
 
The following 2 users liked this post by 69merccougar:
avt007 (05-07-2014), Forcedair1 (05-10-2014)
  #4  
Old 05-07-2014, 01:37 PM
gabrielbecheanu's Avatar
Senior Member
Join Date: Jul 2013
Location: Romania Constanta
Posts: 162
Received 39 Likes on 25 Posts
Default

I have problem with headline also, I want to take it out and also to glue an insulating material on the metal.
Will help me because my car is black, in the summer this material will keep the heat at a lower level also when will rain i will not hear all the drops on the roof.
Look at this video

Check also this video
 

Last edited by gabrielbecheanu; 05-07-2014 at 01:44 PM.
The following 3 users liked this post by gabrielbecheanu:
Don B (05-07-2014), fredd60 (05-10-2014), Rlover (05-15-2014)
  #5  
Old 05-07-2014, 03:24 PM
69merccougar's Avatar
Member
Thread Starter
Join Date: Apr 2014
Location: Tuckahoe, NY
Posts: 66
Received 37 Likes on 15 Posts
Default

That's pretty awesome! I wish I saw that before I finished
 
  #6  
Old 05-07-2014, 03:36 PM
69merccougar's Avatar
Member
Thread Starter
Join Date: Apr 2014
Location: Tuckahoe, NY
Posts: 66
Received 37 Likes on 15 Posts
Default

Ok here it is.

Before:


After the handles and side trim were removed I dropped it and moved it forward.


One seat forward one seat back. This maximizes space.


You can use the opening in the front to get more room:

 
Attached Thumbnails Headliner DIY-img_20140507_093111_429_zps1c7275ad.jpg   Headliner DIY-img_20140507_093122_413_zps2778fdc3.jpg   Headliner DIY-img_20140507_093129_857_zpsc2b81d30.jpg   Headliner DIY-img_20140507_100550_305_zps71af162c.jpg   Headliner DIY-img_20140507_100557_887_zps434dc746.jpg  

Headliner DIY-img_20140507_100823_354_zps8a32ffea.jpg   Headliner DIY-img_20140507_101308_524_zps5195eedd.jpg  
The following 4 users liked this post by 69merccougar:
Badbenz94 (05-19-2014), Don B (05-07-2014), fredd60 (05-10-2014), ragman1171 (05-08-2014)
  #7  
Old 05-07-2014, 03:42 PM
69merccougar's Avatar
Member
Thread Starter
Join Date: Apr 2014
Location: Tuckahoe, NY
Posts: 66
Received 37 Likes on 15 Posts
Default

Putting the front by the door post allows you to turn it


Squeesing it through with the door card removed. I measured all possible options and this gave me the greatest width.


Go through slowly to make sure nothing catches. Take your time and be patient.


Got it out without damage:


If you want it to look good spend a lot of time on prep. I used a stiff brush and this spackle tool.


Got a weird depression near the rear, but I'll deal with it. For under 100 dollars its still a huge improvement.

 
Attached Thumbnails Headliner DIY-img_20140507_101646_835_zpse1f025ed.jpg   Headliner DIY-img_20140507_103701_650_zpsf02e24c7.jpg   Headliner DIY-img_20140507_103706_820_zps02656094.jpg   Headliner DIY-img_20140507_103910_105_zps9a4aadd8.jpg   Headliner DIY-img_20140507_104504_401_zps5d019045.jpg  

Headliner DIY-img_20140507_120238_399_zpsfadb7c96.jpg   Headliner DIY-img_20140507_124425_948_zps25cf3165.jpg   Headliner DIY-img_20140507_142354_418_zps200fffcc.jpg  
The following 4 users liked this post by 69merccougar:
Badbenz94 (05-07-2014), Don B (05-07-2014), hailcesarz (06-15-2014), ragman1171 (05-08-2014)
  #8  
Old 05-07-2014, 03:45 PM
69merccougar's Avatar
Member
Thread Starter
Join Date: Apr 2014
Location: Tuckahoe, NY
Posts: 66
Received 37 Likes on 15 Posts
Default

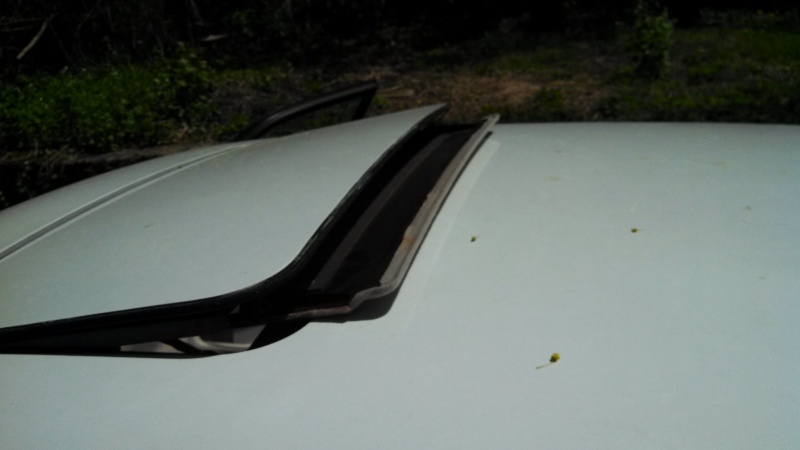
Here's the sunroof. To remove it push up and back from the inside in tilt position.


Put it back in by going halfway into the car, then push up and forward.


I left the smaller sunroof piece alone. It was in good shape and I didn't want to push my luck.
 
Attached Thumbnails Headliner DIY-img_20140507_125341_547_zps48203b66.jpg   Headliner DIY-img_20140507_125415_286_zps2bd2c93d.jpg   Headliner DIY-img_20140507_154642_938_zps519d4458.jpg  
The following 5 users liked this post by 69merccougar:
Badbenz94 (05-07-2014), Cabezagrande (05-09-2014), Don B (05-07-2014), hailcesarz (06-15-2014), ragman1171 (05-08-2014)
  #9  
Old 05-07-2014, 07:23 PM
69cougarconvert's Avatar
Junior Member
Join Date: Jan 2014
Location: Tuckahoe NY
Posts: 5
Likes: 0
Received 4 Likes on 2 Posts
Default

Finished
 
Attached Thumbnails Headliner DIY-img_20140507_194749_721_zps46a8f6fb.jpg  
The following 3 users liked this post by 69cougarconvert:
deancantrell (07-24-2016), georgekale (05-27-2014), ragman1171 (05-08-2014)
  #10  
Old 05-07-2014, 08:12 PM
avt007's Avatar
Veteran Member
Join Date: Sep 2010
Location: Langley BC
Posts: 2,206
Received 536 Likes on 415 Posts
Default

Very nice! How'd you match the material and colour?

And what glue did you use?
 
  #11  
Old 05-07-2014, 08:28 PM
69cougarconvert's Avatar
Junior Member
Join Date: Jan 2014
Location: Tuckahoe NY
Posts: 5
Likes: 0
Received 4 Likes on 2 Posts
Default

Thanks! I got samples from Yourautotrim. This color is sand grey ph1784. The glue was 3m 90. I used 2 and 1/2 cans.
 
  #12  
Old 05-07-2014, 08:58 PM
MidwestJag's Avatar
Veteran member
Join Date: Jun 2010
Location: Wisconsin, United States
Posts: 1,444
Received 329 Likes on 258 Posts
Default

Good stuff! Thanks for posting. I'll be doing the same job later this summer.

Scott
 
  #13  
Old 05-07-2014, 09:01 PM
69merccougar's Avatar
Member
Thread Starter
Join Date: Apr 2014
Location: Tuckahoe, NY
Posts: 66
Received 37 Likes on 15 Posts
Default

Anytime! Didn't see too many threads showing how to remove the board with pictures. Feel free to pm me if you have any questions when you do it.
 
The following 3 users liked this post by 69merccougar:
Dan Hiatt (05-14-2014), gabrielbecheanu (05-07-2014), Graham Royls (05-09-2014)
  #14  
Old 05-07-2014, 11:56 PM
gabrielbecheanu's Avatar
Senior Member
Join Date: Jul 2013
Location: Romania Constanta
Posts: 162
Received 39 Likes on 25 Posts
Default

Thanks 69merccougar for the pictures, very useful.
My only problem is to chose the material, i want to use Alcantara or natural leather. My car inside it is oatmel, same say that nimbus gray will look good also.
Best regards
 
  #15  
Old 05-08-2014, 07:24 AM
69merccougar's Avatar
Member
Thread Starter
Join Date: Apr 2014
Location: Tuckahoe, NY
Posts: 66
Received 37 Likes on 15 Posts
Default

For the leather I would definitely use contact cement instead of the spray due to the weight of leather. That would look awesome though. Definitely post it here when you do it!
 
  #16  
Old 05-08-2014, 12:17 PM
MidwestJag's Avatar
Veteran member
Join Date: Jun 2010
Location: Wisconsin, United States
Posts: 1,444
Received 329 Likes on 258 Posts
Default

This may be a really dumb question, but… Is your VDP also a LWB? (Aren't all VDPs???) Thing is, my '98 is the shorter wheel base and I'm not sure the geometry is going to work out to remove the card the way you did. When I did the headliner on my '91, I had to bend it in half - which actually still turned out pretty darned good. I'm thinking I may need to do the same on this one.

Thanks again for sharing!
Scott
 
  #17  
Old 05-08-2014, 02:39 PM
gabrielbecheanu's Avatar
Senior Member
Join Date: Jul 2013
Location: Romania Constanta
Posts: 162
Received 39 Likes on 25 Posts
Default

Hi
Saturday i will start to fix my headliner to. I found today the most important material, glue spray made by tesa tesaŽ Spray glue EXTRA STRONG - Glues & Glue Sticks - tesa SE it is good for temperature until 80 degrees Celsius.
The fabric will be something like Alcantara at touch and i chose Nimbus Gray color, i have Oatmeal inside. I make a visual test and i like the contrast between original an new one. I will try to make some photos. Hope to not forget the camera at home, i do not like to take photo with my phone.
 
  #18  
Old 05-08-2014, 09:32 PM
69merccougar's Avatar
Member
Thread Starter
Join Date: Apr 2014
Location: Tuckahoe, NY
Posts: 66
Received 37 Likes on 15 Posts
Default

Hey Scott, No problem at all!! This car is a long wheel base. Believe it or not they did make a very limited amount of short wheel base VDPs but this is not one of them. I read somewhere that the front door opening is the better option for the SWB and maybe someone can comment on that.

Gabriel that sounds awesome, let me know if you have any questions during it and be sure to post up the photos if you take them. Good luck!
 
The following users liked this post:
MidwestJag (05-09-2014)
  #19  
Old 05-08-2014, 10:07 PM
plums's Avatar
Veteran Member
Join Date: Feb 2011
Location: on-the-edge
Posts: 9,733
Received 2,167 Likes on 1,611 Posts
Default

From the picture sequence, it seesm as if you reversed the seat positions during the removal.

Is that the case?
 
  #20  
Old 05-08-2014, 10:36 PM
69merccougar's Avatar
Member
Thread Starter
Join Date: Apr 2014
Location: Tuckahoe, NY
Posts: 66
Received 37 Likes on 15 Posts
Default

Yes I did. I forgot to mention that I ended up putting both down flat and then reversing the positions while I was problem solving. Thanks for pointing that out!
 
The following users liked this post:
georgekale (05-27-2014)


Quick Reply: Headliner DIY


All times are GMT -5. The time now is 06:15 PM.