
Remove ball joint boots?


Thread Starter
|
Senior Member
Joined: Jun 2009
Posts: 754
Likes: 71
From: San Antonio, TX
I have ordered top and bottom ball joints for the 2000 XJ8.
I am planning to press them out and back in with an Autozone ball joint press loaner.
Do I have to remove the ball joint boots to prevent them getting torn during pressing?
Any other tips would be welcome!
Thanks,
Dan
I am planning to press them out and back in with an Autozone ball joint press loaner.
Do I have to remove the ball joint boots to prevent them getting torn during pressing?
Any other tips would be welcome!
Thanks,
Dan
Last edited by Dan R; Jul 23, 2010 at 01:43 PM. Reason: omission

Senior Member


Joined: Nov 2009
Posts: 753
Likes: 220
From: New York state
You don't need to remove the boots as long as the cups or sleaves you use fit cleanly over them. I hope the loaner press is very heavy duty as a crazy amount of force is needed to remove them.
I bought a heavy duty C clamp ball joint press that weighs about 15 lbs. and is 2 " thick and I was barely able to get a long enough wrench on it to apply enough torque
to break them free. When they first release they make one heck of a bang
Good luck - this is a tough job
__________
2001 VDP S/C
I bought a heavy duty C clamp ball joint press that weighs about 15 lbs. and is 2 " thick and I was barely able to get a long enough wrench on it to apply enough torque
to break them free. When they first release they make one heck of a bang
Good luck - this is a tough job
__________
2001 VDP S/C
Thread Starter
|
Senior Member
Joined: Jun 2009
Posts: 754
Likes: 71
From: San Antonio, TX
You don't need to remove the boots as long as the cups or sleaves you use fit cleanly over them. I hope the loaner press is very heavy duty as a crazy amount of force is needed to remove them.
I bought a heavy duty C clamp ball joint press that weighs about 15 lbs. and is 2 " thick and I was barely able to get a long enough wrench on it to apply enough torque
to break them free. When they first release they make one heck of a bang
Good luck - this is a tough job
__________
2001 VDP S/C
I bought a heavy duty C clamp ball joint press that weighs about 15 lbs. and is 2 " thick and I was barely able to get a long enough wrench on it to apply enough torque
to break them free. When they first release they make one heck of a bang
Good luck - this is a tough job
__________
2001 VDP S/C
The press cup size seems to be crucial. When pushing out the lower ball joint, there seems to be very little of the control arm around the ball joint flange to push against. I was thinking of cutting off some of the ball joint flange to get a better purchase on the control arm?
When pushing the lower ball joint in, what part of the ball joint does the press push against? Is it the threaded spindle?
Thread Starter
|
Senior Member
Joined: Jun 2009
Posts: 754
Likes: 71
From: San Antonio, TX
Dan
Senior Member
Joined: Nov 2009
Posts: 753
Likes: 220
From: New York state
I had to cut away parts of the outer rim of the ball joints in order to for the cups to sit on the flanges. I used a grinder carefully to not touch the control arms. When I had almost cut thru I used a chisel to bend the remaining metal up and then sanp it off.
Do not press against the spindles when installing - you will need a cup deep enough to go over the spindle cleanly and seat on the ball joint flange.
Do not press against the spindles when installing - you will need a cup deep enough to go over the spindle cleanly and seat on the ball joint flange.
Veteran Member
Joined: Dec 2009
Posts: 9,555
Likes: 2,553
From: Crewe, England
I believe heating up the arms with boiling water before applying the press makes them easier to extract, (this advice came from a UK Jaguar dealer !!). This is because they are aluminium with a high thermal expansion factor.
Trending Topics

Junior Member
Joined: Dec 2009
Posts: 10
Likes: 1
From: Pittsburgh
I have just finished replacing the lower ball joint on my 98 XJ8, the biggest puller i could find wouldnt touch it, I tried heat and gently applying increasing force, the C clamp part of the tool was bending. In the end i had to cut out pieces from the ball joint from the top using a dremel and around 10 metal discs, once i had enough removed i was able to break the seal with a large chisel and hammer from above. This is why jaguar only sells the balll joint with a complete control arm. Next time (i might sell the car before i have to do this again) i will take off the control arm and take it somewhere to use a large fly press to do this. My control arm is no pretty beat up as you have to grind the flange of the ball joint to get enough surface to rest the hold the metal cup when you try to press this out.
Pressing it back in was easier but again the metal cup did not fit over the top and i had to use a number of bits and pieces to build it up and allow enough room for the top of the new ball joint to poke through the control arm.
It is a DIY job as long as you are creative and dont mind a bit of metal trimming!!!!
Thread Starter
|
Senior Member
Joined: Jun 2009
Posts: 754
Likes: 71
From: San Antonio, TX
I have just finished replacing the lower ball joint on my 98 XJ8, the biggest puller i could find wouldnt touch it, I tried heat and gently applying increasing force, the C clamp part of the tool was bending. In the end i had to cut out pieces from the ball joint from the top using a dremel and around 10 metal discs, once i had enough removed i was able to break the seal with a large chisel and hammer from above. This is why jaguar only sells the balll joint with a complete control arm. Next time (i might sell the car before i have to do this again) i will take off the control arm and take it somewhere to use a large fly press to do this. My control arm is no pretty beat up as you have to grind the flange of the ball joint to get enough surface to rest the hold the metal cup when you try to press this out.
Pressing it back in was easier but again the metal cup did not fit over the top and i had to use a number of bits and pieces to build it up and allow enough room for the top of the new ball joint to poke through the control arm.
It is a DIY job as long as you are creative and dont mind a bit of metal trimming!!!!
Pressing it back in was easier but again the metal cup did not fit over the top and i had to use a number of bits and pieces to build it up and allow enough room for the top of the new ball joint to poke through the control arm.
It is a DIY job as long as you are creative and dont mind a bit of metal trimming!!!!
If it becomes that hard I will buy the arms with the ball joint and bushing preinstalled.
If it makes any difference, this weekend, I will put penetrating oil on the ball joint body/control arm hole and let it soak for a week.
I will be going to the hardware store tomorrow to get some steel plumbing pieces. I will grind off a section so that it fits on the top of the control arm without fouling the control arm molding.
What a job.

Senior Member
Joined: Nov 2009
Posts: 394
Likes: 60
From: Boston Mass
I had to have a jig made to hold the ball joints in place as it is quite difficult to get the proper angle. I don't think you will get them out by hand, we use a 20 ton press & when they break loose it sounds like a gun shot. They usually go in a lot easier. 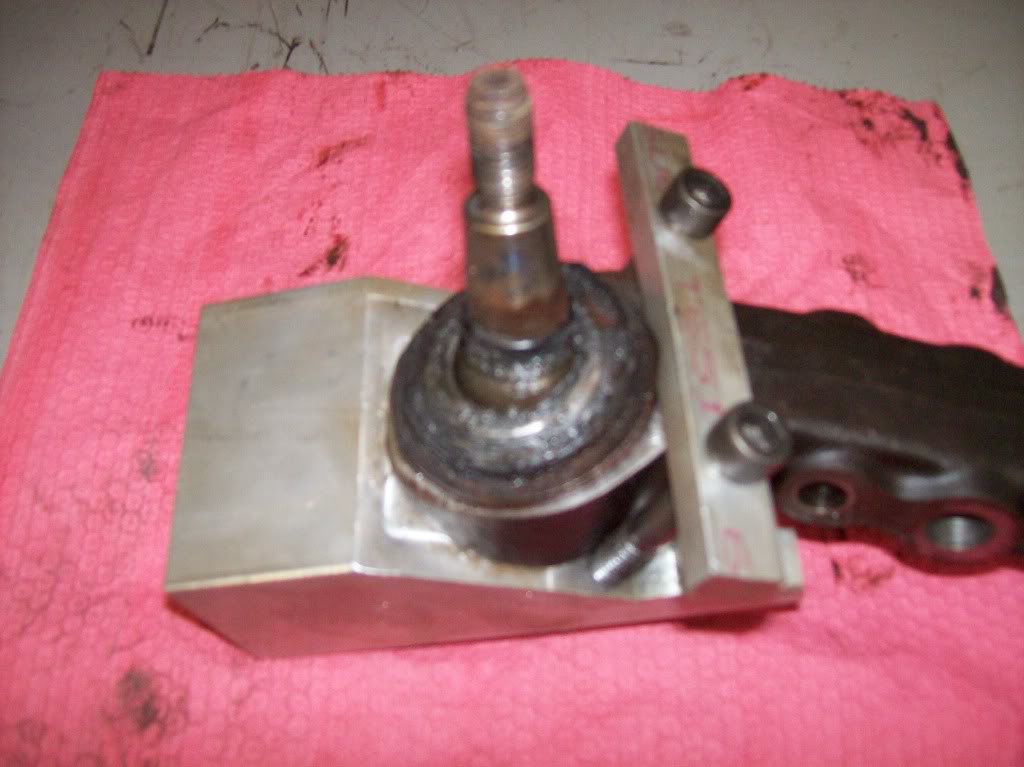

Member
Joined: Jun 2008
Posts: 90
Likes: 1
From: manhattan beach
Replaced ball joints last year. Right ball joint was a pain the ***. Had to use a torch to expand the arm. Popped out fairly easy after with very large c-clamp. Other side popped out easier with proper fitting. Cut part of pipe fitting instead of lip of ball joint. Total job, with replacing of tie end rods took about 3 hours.
Senior Member
Joined: Nov 2009
Posts: 753
Likes: 220
From: New York state
I replaced my lower ones with the control arms on the car to avoid removing the death springs. The ball joint press I bought came with a bunch of cup sizes that helped remove and press the new ones in. I didn't use a torch but now I think it would have been easier if I had.
as is always the case, when I did the other side it took 1/2 the time and 90% less bandaids
___________
01 VDP SC
as is always the case, when I did the other side it took 1/2 the time and 90% less bandaids
___________
01 VDP SC

Thread
Thread Starter
Forum
Replies
Last Post
aholbro1
XJ XJ6 / XJR6 ( X300 )
18
Dec 29, 2024 06:46 PM
Dickie_L_J_O
XJ XJ8 / XJR ( X308 )
8
Sep 13, 2015 07:44 AM
chatmanx
S-Type / S type R Supercharged V8 ( X200 )
0
Sep 11, 2015 07:17 PM
Currently Active Users Viewing This Thread: 1 (0 members and 1 guests)