
When you lose the capability to gradually renew the autobox fluid...


Shortly after purchasing my X300, I purchased a 5 gal pail of ATF that met both DEXRON II/III and Mercon specs. The Excursion requires Mercon (NOT Mercon V...the Ford book is emphatic) and the X300 specifies Dexron. I engaged in the popular practice of draining the autobox at each engine oil change and replacing a like amount of fluid with new.
According to my records, I last performed such an operation in April, 2013 at 132,000 miles. Ever since, I've been unable to remove the transmission drain plug, due to the internal allen-head being stripped out. I guess I may have tried a selection of ill-fitting allens and torx bits until I had it well and properly stripped. I attribute this to my over-50 eyesight and the close quarters even with the front end on ramps.
So probably well over a year ago, I ordered a replacement transmission drain plug. I think it was biting winter cold when it arrived and I decided that can wait until summer. Sometime in the interim, I determined that I may well have to pull the pan to get the drain plug out and ordered a filter and gasket.
After much grunting and swearing under the car with various channel-locks, vise-grips, and even a basin wrench, I accepted that I'd have to pull the pan. How I'd remove the plug once I had the pan off, I hadn't quite worked out, but I could at least renew the fluid and filter even if I had to re-install the pan with the stripped plug.
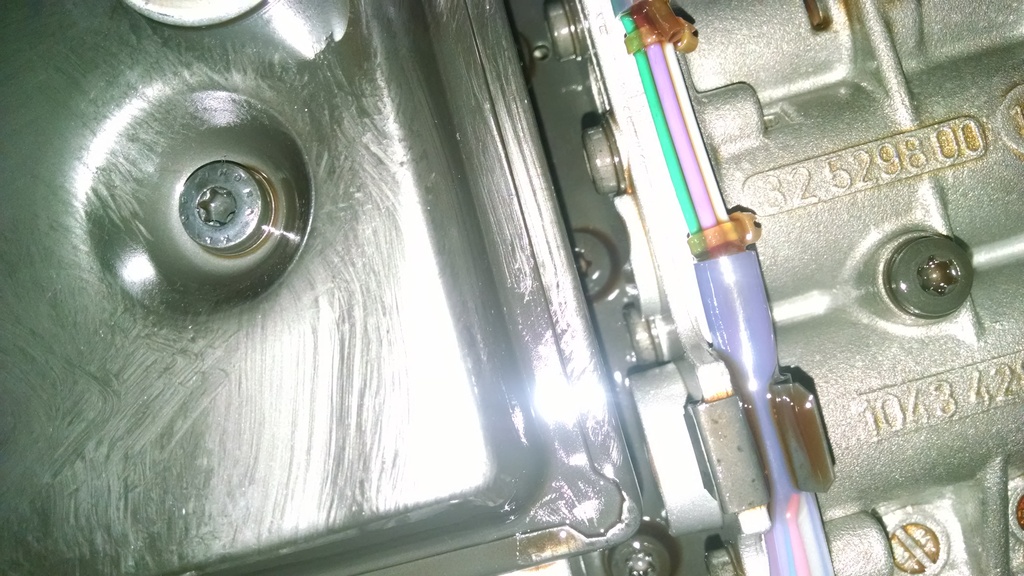
Pretty straight-forward procedure excepting the fact that I needed an alternate drain path. I did notice that the copy of JTIS I have had "To be determined" for all the relevant torque-tightening specs. I fished out an X300 CD I got with the car and fortunately, the gearbox manual on it had the torque specs. I chose to drain through the dipstick connection. That has a very large hex-nut of unknown size - I used a large adjustable wrench I bought for use on the tractor - it was bigger than any metric or SAE combo wrench in my inventory. The torque spec on this joint is 90 nm. Since I only had a short distance between the end of the wrench handle and the floor, I used a 4lb sledge on the end of the adjustable for breakaway torque.
Next step is to remove the rotary switch protection cover - a deepwell 10 mm socket and ratchet is fine for the bolt along the side of the fluid pan, though I noted the breakaway torque gave a clue that the last person to fit this fixing maybe didn't follow the manufacturer's recommended torque tightening of 15-18 nm. I couldn't budge the other bolt, on the front of the fluid pan, with a 10mm combo wrench, nor could I find a suitable cheater pipe to help it along. With the dipstick tube disconnected, I did manage to fit a shallow 10 mm socket with 6" wobble extension and managed to remove it. Still, both were "hellatight!"
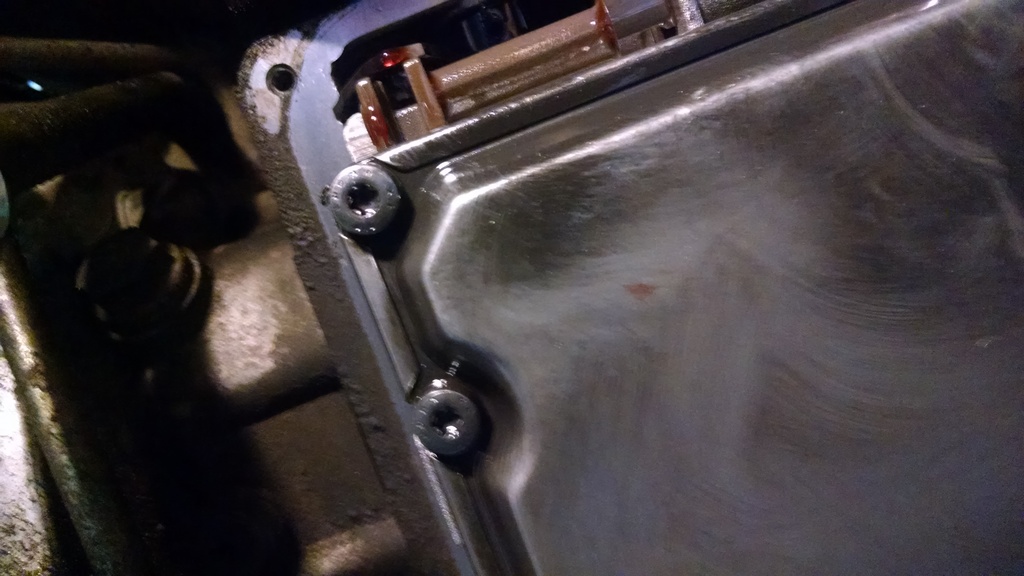
There are 6 fluid pan fixing bolts and clips. A deepwell 10mm will get them all, but a 3" extension helps greatly along the left side where the exhaust pipe makes a close pass. I loosened all 6, then removed the fronts, then the middles, so as to complete the drain evolution through the dipstick connection port. Lastly, the aft fixings and the fluid pan was free. The gearbox will drip for an eternity, it seems, so leave your catch-basin in situ.
The filter has 3 fairly long fixing bolts actuated by a T25 Torx. It holds a fair amount of fluid itself, which it is happy to regurgitate as you remove it. The O-ring came out attached to the old filter, which helped identify where the new one in the Ziploc baggie should be installed on the new filter. When installing the new filter, the fixing bolt torque tightening spec is 8 nm.
I struggled to remove the stripped drain plug. With a better access, greater range of movement, and much better visibility, I found the channel-locks that seemed to grip the best underneath the car but slipped off before breaking it loose, were also the most-promising tool upright in the sunlight. However, they were still inadequate. I decided I had enough of a round head to bring a pipe-wrench to bear, but alas, no joy. I remembered I had a 3-pack of screw extractors from some unknown source a number of years ago, and managed to locate them. What I discovered is that they are excellent drills for drilling through material in an anti-clockwise direction. I stopped short of going all the way through the plug (or so I thought) as I didn't want to create a leak in case I had to re-install it as-is. I had clamped the pan to the work table in order to use these extractor bits. It occurred to me that having the pan fixed, stable and facing up, rather than down, made for better removal conditions. I retrieved the basin wrench, again, from the pegboard, used the channel-locks to clamp the jaws of the basin-wrench around the head of the plug, and applied some torque. At first it seemed like the head was moving without the threads, as I could see a stationary bit as I moved it. I continued unscrewing and finally removed the old plug. My extractor/drill had breached the radius between the threaded part and the head.
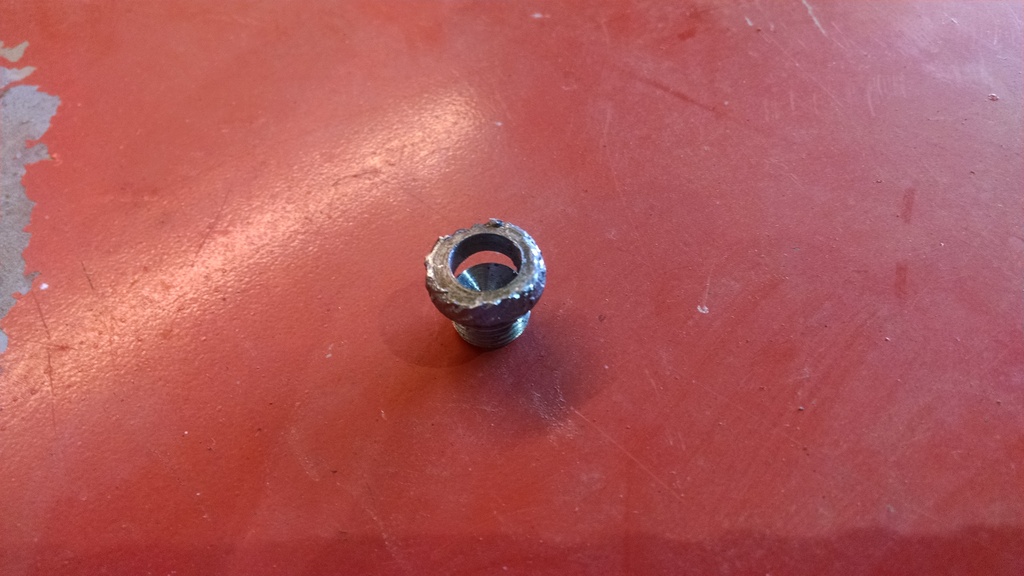

So I was lucky to get it off as I reckon I'd have had a leak if I'd reinstalled it as-was. The manual instructs you to fit a new washer under the drain plug and torque it to 15 nm. The old plug didn't have a washer, nor did any come with the new, and the plugs were radiused as if to seal to the boss fitted to the pan. I put 15nm on it and noted that now and forever more, it takes the "H5" from my set of 3/8" drive allens.
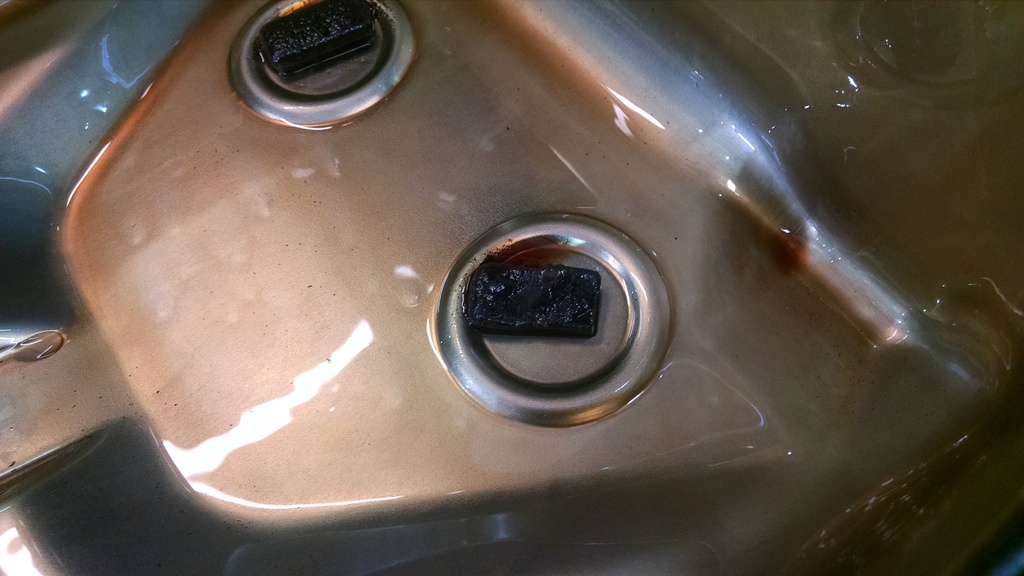
I found both magnets to be pretty-well loaded with sludge. Also, traces of the sludge on the exterior of the filter, though I haven't cut it open to have a look at the screen mesh.
If you look closely at the one on the right, you can see where I took a "finger swipe" which will give you an estimate of the depth of build up:
I acquired the car at 63K miles, and not sure, but I reckon I started the drain & refill procedure at each oil change by about 80K - thru 132K as mentioned above, then put 50K more on unmolested. Given the sludge noted, I'd say it may be useful to pull the pan, clean the magnets and change the filter every 120k even if you are periodically renewing the fluid through the drain/refill method.
I extracted, then replaced, the better portion of a gallon of fluid. My recollection from 2 yrs ago is that I'd routinely get 3 qts when I drained it through the plug. No leaks, shifted fine in normal and sport on an approximate 5 mile round-trip down US 380 and back. I didn't feel like putting on a 20 mile trip to perform the hot-idle fluid level check proscribed by the manual. I'll perform that one tomorrow for final top-up.
According to my records, I last performed such an operation in April, 2013 at 132,000 miles. Ever since, I've been unable to remove the transmission drain plug, due to the internal allen-head being stripped out. I guess I may have tried a selection of ill-fitting allens and torx bits until I had it well and properly stripped. I attribute this to my over-50 eyesight and the close quarters even with the front end on ramps.
So probably well over a year ago, I ordered a replacement transmission drain plug. I think it was biting winter cold when it arrived and I decided that can wait until summer. Sometime in the interim, I determined that I may well have to pull the pan to get the drain plug out and ordered a filter and gasket.
After much grunting and swearing under the car with various channel-locks, vise-grips, and even a basin wrench, I accepted that I'd have to pull the pan. How I'd remove the plug once I had the pan off, I hadn't quite worked out, but I could at least renew the fluid and filter even if I had to re-install the pan with the stripped plug.
Pretty straight-forward procedure excepting the fact that I needed an alternate drain path. I did notice that the copy of JTIS I have had "To be determined" for all the relevant torque-tightening specs. I fished out an X300 CD I got with the car and fortunately, the gearbox manual on it had the torque specs. I chose to drain through the dipstick connection. That has a very large hex-nut of unknown size - I used a large adjustable wrench I bought for use on the tractor - it was bigger than any metric or SAE combo wrench in my inventory. The torque spec on this joint is 90 nm. Since I only had a short distance between the end of the wrench handle and the floor, I used a 4lb sledge on the end of the adjustable for breakaway torque.
Next step is to remove the rotary switch protection cover - a deepwell 10 mm socket and ratchet is fine for the bolt along the side of the fluid pan, though I noted the breakaway torque gave a clue that the last person to fit this fixing maybe didn't follow the manufacturer's recommended torque tightening of 15-18 nm. I couldn't budge the other bolt, on the front of the fluid pan, with a 10mm combo wrench, nor could I find a suitable cheater pipe to help it along. With the dipstick tube disconnected, I did manage to fit a shallow 10 mm socket with 6" wobble extension and managed to remove it. Still, both were "hellatight!"
There are 6 fluid pan fixing bolts and clips. A deepwell 10mm will get them all, but a 3" extension helps greatly along the left side where the exhaust pipe makes a close pass. I loosened all 6, then removed the fronts, then the middles, so as to complete the drain evolution through the dipstick connection port. Lastly, the aft fixings and the fluid pan was free. The gearbox will drip for an eternity, it seems, so leave your catch-basin in situ.
The filter has 3 fairly long fixing bolts actuated by a T25 Torx. It holds a fair amount of fluid itself, which it is happy to regurgitate as you remove it. The O-ring came out attached to the old filter, which helped identify where the new one in the Ziploc baggie should be installed on the new filter. When installing the new filter, the fixing bolt torque tightening spec is 8 nm.


I struggled to remove the stripped drain plug. With a better access, greater range of movement, and much better visibility, I found the channel-locks that seemed to grip the best underneath the car but slipped off before breaking it loose, were also the most-promising tool upright in the sunlight. However, they were still inadequate. I decided I had enough of a round head to bring a pipe-wrench to bear, but alas, no joy. I remembered I had a 3-pack of screw extractors from some unknown source a number of years ago, and managed to locate them. What I discovered is that they are excellent drills for drilling through material in an anti-clockwise direction. I stopped short of going all the way through the plug (or so I thought) as I didn't want to create a leak in case I had to re-install it as-is. I had clamped the pan to the work table in order to use these extractor bits. It occurred to me that having the pan fixed, stable and facing up, rather than down, made for better removal conditions. I retrieved the basin wrench, again, from the pegboard, used the channel-locks to clamp the jaws of the basin-wrench around the head of the plug, and applied some torque. At first it seemed like the head was moving without the threads, as I could see a stationary bit as I moved it. I continued unscrewing and finally removed the old plug. My extractor/drill had breached the radius between the threaded part and the head.


So I was lucky to get it off as I reckon I'd have had a leak if I'd reinstalled it as-was. The manual instructs you to fit a new washer under the drain plug and torque it to 15 nm. The old plug didn't have a washer, nor did any come with the new, and the plugs were radiused as if to seal to the boss fitted to the pan. I put 15nm on it and noted that now and forever more, it takes the "H5" from my set of 3/8" drive allens.

I found both magnets to be pretty-well loaded with sludge. Also, traces of the sludge on the exterior of the filter, though I haven't cut it open to have a look at the screen mesh.
If you look closely at the one on the right, you can see where I took a "finger swipe" which will give you an estimate of the depth of build up:

I acquired the car at 63K miles, and not sure, but I reckon I started the drain & refill procedure at each oil change by about 80K - thru 132K as mentioned above, then put 50K more on unmolested. Given the sludge noted, I'd say it may be useful to pull the pan, clean the magnets and change the filter every 120k even if you are periodically renewing the fluid through the drain/refill method.
I extracted, then replaced, the better portion of a gallon of fluid. My recollection from 2 yrs ago is that I'd routinely get 3 qts when I drained it through the plug. No leaks, shifted fine in normal and sport on an approximate 5 mile round-trip down US 380 and back. I didn't feel like putting on a 20 mile trip to perform the hot-idle fluid level check proscribed by the manual. I'll perform that one tomorrow for final top-up.
Last edited by aholbro1; Sep 7, 2015 at 08:52 AM.

B-nut on the dipstick tube requires 30 mm hex per Bob's post here:
https://www.jaguarforums.com/forum/x...-light-150788/
https://www.jaguarforums.com/forum/x...-light-150788/
Veteran Member
Joined: Mar 2014
Posts: 3,750
Likes: 688
From: Sanford, NC
If one is just refreshing the fluid, it is IMHO easier to pull out the fluid from transmissions through the dipstick tube via a pump and refill. It's a lot less mess and no risk of stripping a plug.
Clearly if one is also going to replace the filter, the pan needs to be dropped.
.
Clearly if one is also going to replace the filter, the pan needs to be dropped.
.
A lil late in seeing this useful suggestion from Dutch-Cat; but the answer is: "No."
Having not yet added a welder to my shop, let alone having acquired the skillset, although a brilliant time-saver, for me to consider welding anything onto anything else would be, well, as my former German colleagues put it, "Wunchdenken."
I have since discovered a nest of fatigue and stress engineers down the hall from me at work that are amateur welding enthusiasts, who have coached me up on what welder to buy and offered tips on technique, but, although I have a clear use, even "need" for a welder, its turn in the barrel of financial priorities hasn't yet come up. In the meantime, when presented with a broken weld-stud on a door-check-arm, I explained the issue to one of them and inquired if he wanted a practice-piece for next time he had the welder fired up? I already had a replacement from Everyday XJ so told him no worries if he bung it up, and no worries as to timing. Got back a perfectly serviceable check-arm with a new bolt welded in-place of the broken one after a single weekend had passed!
So yeah, I need one, so I can consider such things....
Last edited by aholbro1; May 8, 2019 at 10:10 AM.


Joined: Dec 2009
Posts: 13,706
Likes: 9,649
From: Wise County,TX
If you need something welded, let me know.
I have wire-feed, MIG, TIG, 'stick-welder', oxy-acetylene.
No spot-welder but maybe someday?
bob
I have wire-feed, MIG, TIG, 'stick-welder', oxy-acetylene.
No spot-welder but maybe someday?
bob
Trending Topics
Changing the filter on the gold car and came here to look up the torque values for the sump fixing bolts. I see in my former write up I found them, but didn't share. It's 8 nm for the filter fixings, and also 8 nm for the sump fixings. As stated above, 15-18 nm for the rotary switch cover. No drain plug on this one, but 15 nm if you have one. 90 nm for the flare fitting at the dipstick/sump interface.
Joined: Dec 2009
Posts: 13,706
Likes: 9,649
From: Wise County,TX
Thanks for the reminder of the torque value.
Just because the nut is 30mm does not mean it needs to have 'macho-muscle' torque applied.
It seals on a flared flange and 'snug' is good so the next guy does not need to do 'pull-ups' to loosen.(or round the nut)
Just because the nut is 30mm does not mean it needs to have 'macho-muscle' torque applied.
It seals on a flared flange and 'snug' is good so the next guy does not need to do 'pull-ups' to loosen.(or round the nut)

Joined: Dec 2009
Posts: 13,706
Likes: 9,649
From: Wise County,TX
The 4.0 XJS uses the same gearbox but the dipstick tube is different. (welded 90 degree elbow instead of the gradual bend upward)
I have actually 'snapped' the weld on the XJS because the nut was TOO TIGHT during removal.
I had to remove the tube, reweld the pipe and reinstall the dipstick tube.
The X300 has a one-piece tube so it is much stronger.
Thanks for the torque table.
I have actually 'snapped' the weld on the XJS because the nut was TOO TIGHT during removal.
I had to remove the tube, reweld the pipe and reinstall the dipstick tube.
The X300 has a one-piece tube so it is much stronger.
Thanks for the torque table.
Well, I"m obviously not doing it right! Drained nearly 2 gallons out, which surprised me, But on re-filling, as I was putting the last pint or so in, heard a gurgling/dripping noise and, looking underneath, yep! several steady streams of bright red liquid. Must have misplaced the gasket on reinstall - I refuse to believe dropping the pan and replacing the filter created a leak in the tailshaft seal....but looks like all the drips are coming of the xmsn iso-mount aft of the pan. It was late, despite that, hellahot, so I just placed the catch basin and wrapped up for the night I'll try to sort it out today, as the mercury climbs toward 108......ah well..at least it's humid, too, so there's that!

Junior Member
Joined: Sep 2020
Posts: 19
Likes: 3
From: Raleigh
I know this is an old topic but I just had my vanity mirror break in exactly this manner. Rather than messing with repairing the tiny plastic part I bought an entire sun visor for $20 that was in terrible condition but where the mirror worked. Pried out the mirror and installed it in the car. Works great - good as new.
Welcome to the forum, JamT! You'll find a wealth of useful information, here. And thanks for the reminder!
Meanwhile, make sure you stop by the new members forum and make a short introduction so the mods can take note of your presence and upgrade you to full member status once you achieve the proper pre-requisites.
All of you old hands, take note: check your makeup in the vanity mirror before attempting to renew the autobox fluid, whether you drain from the drain--plug, the dipstick elbow, or suck it out of the dipstick tube!


Senior Member
Joined: Aug 2012
Posts: 193
Likes: 38
From: Jhb
Dear Forumisters
I know this thread is old but hope forumisters would be able to guide me still.
I recently invested in an ODB II scanner and a 2021 Windows 10 laptop and went through step by step guidelines of installing JEPC.
Question is, how can I get Adobe flash images to display considering Adobe discontinued support and the downloading of flash since December and January 2021 respectively?
At first, there were no pictures to display because my anti virus wanted nothing to do with themm even when I disabled it temporarily. But by extracting the JEPC to an external drive, I was able to see the images stored in JEPC\applications\JEPC\images and not those for parts. After some searching, I found the parts ones hidden under the external drive's flash subdirectory. I then copied them to my laptop succesfully, but on actiation of JEPC, those parts images couldn't be loaded still. Which then suggested the absence of flash was the reason for their not displaying.
I even tried installing JITS as an alternative, it rashes everytime I try to open it and it complains also of some setup.exe not suitable for my version of the workstation. So, I abandoned JITS and reverted to JEPC. How can I then get flash images of the parts to display in JEPC?
Looking forward to hearing from you.
https://www.jaguarforums.com/forum/g...-241868/page3/
You guys rock!

Junior Member
Joined: Mar 2013
Posts: 5
Likes: 0
From: netherlands
Soaking the nozzle and plastic casing in anti calc liquid used to de-calc coffee machines worked for me. The tricky thing was removing the nozzles. First, I pulled the rubber hose off then I discovered the plastic casing and pipe has a lip to it at the front (headlight side) of the nozzle. With the bonnet open, from underneath, I used a thin blunt chizel and pushed that lip towards the windscreen, as it were and the the lip became free of the bonnet and I could push the nozzle and plastic up and out.
I then soaked the nozzle and casing in the anti-calc solution and at the same time used a pin to try to remove the calc mechanically. I knew it was fixed when the pin got through one of the nozzles easily. The other nozzle was less lucky. Trying to force the pin through the nozzle and the tip of the nozzle broke off. Strangely the hole that was left was free of calc and it works, I just can't direct it now the tip of the nozzle broke. I should've been more patient.
I then soaked the nozzle and casing in the anti-calc solution and at the same time used a pin to try to remove the calc mechanically. I knew it was fixed when the pin got through one of the nozzles easily. The other nozzle was less lucky. Trying to force the pin through the nozzle and the tip of the nozzle broke off. Strangely the hole that was left was free of calc and it works, I just can't direct it now the tip of the nozzle broke. I should've been more patient.

Member
Joined: Dec 2024
Posts: 32
Likes: 0
From: San Francisco
[QUOTE=aholbro1;1303164] No leaks, shifted fine in normal and sport on an approximate 5 mile round-trip down US 380 and back..[\QUOTE]
Superlative write up ole chap. Absolutely brilliant..Valuable ancillary notes also!. 380 is a mile from me. We should connect one day.
Superlative write up ole chap. Absolutely brilliant..Valuable ancillary notes also!. 380 is a mile from me. We should connect one day.
Last edited by BillSF9c; Dec 29, 2024 at 06:50 PM.

Thread
Thread Starter
Forum
Replies
Last Post
JayJagJay
XK8 / XKR ( X100 )
18
Sep 27, 2019 04:34 AM
slmskrs
XJ XJ6 / XJ8 / XJR ( X350 & X358 )
23
Apr 15, 2016 09:28 PM
TreVoRTasmin
XJ XJ8 / XJR ( X308 )
17
Apr 4, 2016 02:19 PM
steadicam
S-Type / S type R Supercharged V8 ( X200 )
18
Jan 13, 2012 04:49 AM
Currently Active Users Viewing This Thread: 3 (0 members and 3 guests)