When you click on links to various merchants on this site and make a purchase, this can result in this site earning a commission. Affiliate programs and affiliations include, but are not limited to, the eBay Partner Network.
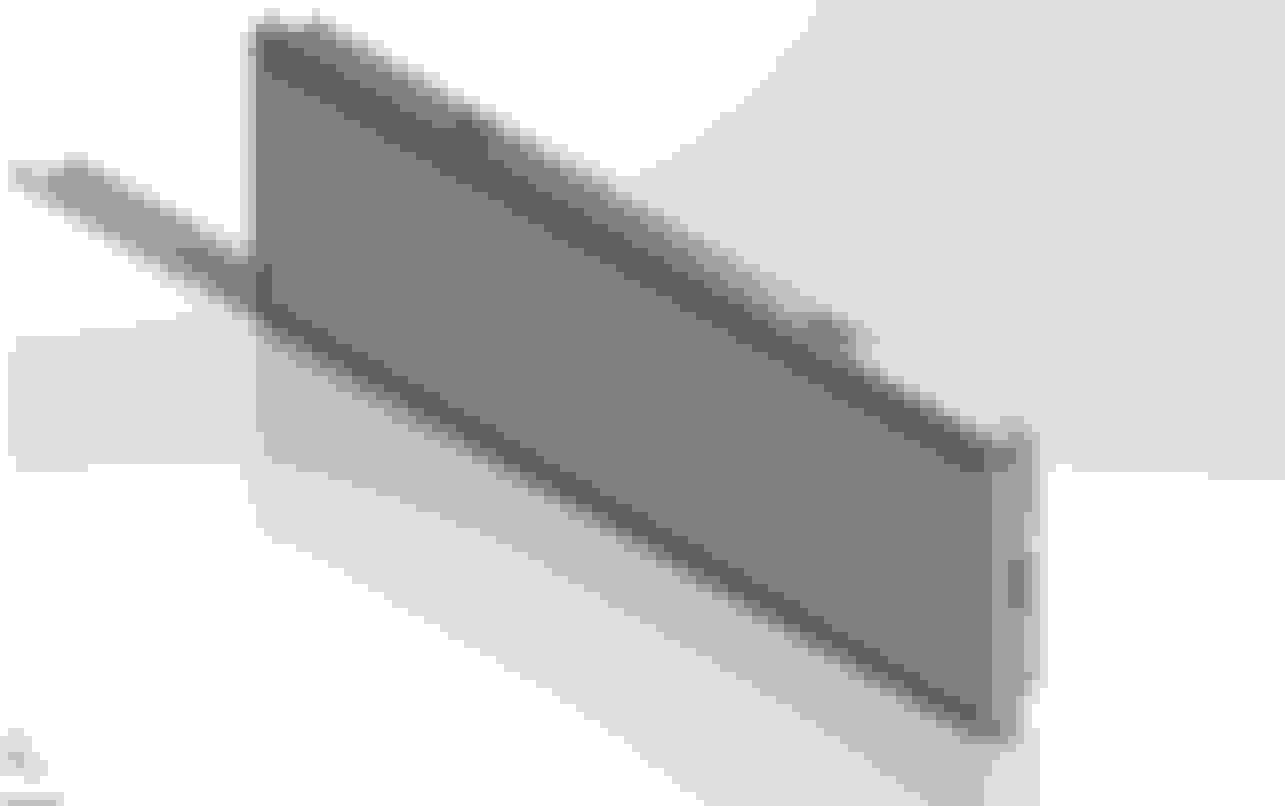
When I first got our XJ6C there were a few plastic interior bits that were very brittle and weathered with time. One of the items was a side vent for the center console. I know that I could have purchased one on the world wide web, but where's the fun in that? Plus I'd saving around $50. That's a decent bottle a whiskey there. So I designed one in Solidworks and 3D printed it a home. My car is far from being concourse quality, so I wasn't concerned with it being completely original. The vent angles are slightly off, but I'm fine with it.
If anyone would like the file for it, just let me know.
That is awesome. I have wanted to do this forever but do not know how to use Solidworks. Please post the file here because the harder the old parts get to find the more this kind of thing will come in handy. I have an idea to replace the non-functional trip computer with a 3D Printed blank with a socket for a small battery powered craft clock like this. If you feel like designing it you'd have alot of new best friends I'll bet. With sanding I understand that you can get this finish smooth.
Thanks muttony! The defroster vent was going to be my next project, mine are just sitting/floating in their dash openings. The clock design is very interesting. I would need some dimensions to work off of though as my 1975 does not have a trip computer.
Thanks and saved. You ought to take requests, Design the part and put the file up on ebay or the forum classifieds and ell them for $5.00 a piece. Tons cheaper and easier than chasing down unobtainium plastic bits for lots of money, particularly when your local public library has a 3D printer that you can use for cost!
Printing our own parts is fantastic. Many trip computers don't work, how about a black plastic panel that replaces the stock trip computer then we would have a nice spot to mount toggle switches, USB ports, any clock we prefer, etc etc.
I see that 3D silicone printing is coming. Then we will all be able to replace the rubber cylinder that drains the air intake grill with duckbill. Also that brown rubber cap that covers the master cylinder lid.
Printing our own parts is fantastic. Many trip computers don't work, how about a black plastic panel that replaces the stock trip computer then we would have a nice spot to mount toggle switches, USB ports, any clock we prefer, etc etc.
That's what I was originally thinking over a year ago. It would be dead easy to mount a switch there for the power antenna!
I don't know if anyone got back to you regarding the dimensions of the trip computer. Fortunately, I am replacing my woodwork and have a trip computer panel apart. The trip computer fits into the panel much like our car's switches. They slide back into a rectangular hole with metal fingers holding it in place on either side and the flange or lip on the front keeps it from going on through. The outside dimensions need to be at least those shown below so the fading of the wood doesn't show - it could be a tad larger, though.
Hole in the panel
6-1/2" wide x 2-1/16" high
Flange or outside dimensions from the front:
6-5/8" x 2-1/4" high
Since I have the panel out I would be happy to test your prototype and post photos. Just let me know.
Jeff
Thanks Jeff! I�ll try these dimensions out when I get home tonight. Would you happen to have pictures of the trip computer itself?
Below are screencaps of what I designed so far. Being that a filler plate would occupy that space instead of the trip computer, having that long tab would not be ideal. So I made little tabs instead. Please let me know what should be changed.
Can you put a rim around the edge? I was thinking one could inlay something in the depression and jazz it up. If there was a raised socket for the clock with a hole you could take advantage of the print texture and maybe paint the depression silver or something and then sand the rim down to 2000 grit and get a very smooth finish.