
XJ6 S1 restore


Thread Starter
|
Senior Member
Joined: Oct 2016
Posts: 184
Likes: 49
From: Brisbane
Hi All,
My dear jag is parked up for the time being for a future project. I will be restoring some bits and pieces and thought i would create a thread to share the fun. I want this to be a really nice car, not top class but well sorted so feel free to chime in with advice or ideas.
I've removed the engine. for future reference, removing the headers and engine mounts (rather than undoing the engine) would have been much easier to get it out. It was a 350 chev that had a variety of oil leaks and power steering leak.
So much dirt and oil accumulated under the engine, amazing! You can see it all in the bag, plus a small contribution from my domestic cat. I will be clearing out the engine bay of wires and bits to repaint it.
Any ideas for how to identify what the relays do and where all these wires go i would be grateful
Glenn

Veteran Member
Joined: Jul 2012
Posts: 6,796
Likes: 2,403
From: Walnut Creek, California
Whew, that bag should not be looked at before a meal, yuk...
That is an interesting adaptation for an air cleaner. Kinda neat...
But, I think it is too small and restricts the incoming charge. Not to mention hot air as it is over the right exhaust manifold.
SBC's are likely to leak oil in two places. Not too hard to fix.
1. Rocker arm covers. Tin can deform at the attachment points. A few taps with a hammer and dolly fixes that. GM came up with little bridges to spread the load. They work.
2. Each end of the intake manifold to the block. Fitting the end gaskets are a "fit". Many use RTV in lieu of.
Well a Jaguar schematic isn't going to solve the relay ID question.
repurposed to serve the GM engine. Whatever the installer did is an
open question.
Two at least.
1. Starter relay.
2. Fuel pump relay.
3. Ignition switch to coil. mebbe so, mebbe not.
Sure hope you made pictures or made notes as you disconnected wire???
How many relays are on the fire wall rack?
Carl
Thread Starter
|
Senior Member
Joined: Oct 2016
Posts: 184
Likes: 49
From: Brisbane
There are two relays on the RH side of engine bay, three on the left hand side near the alternator. One or two on the fire wall plus whatever is inside the car.
I'm tracing the wires in the hope they tell me what the relay was for but some have several wires going to/ from them and disappearing back into the wiring harness, its hard to work out. I think i should plug the battery in, turn the car on and start unplugging wires to see what turns off!
I've labelled EVERY wire i've unplugged, if it doesnt have a label, it wasnt unplugged by me or was never actually plugged in to anything.
Today i spent some time removing excess wires, the first photo is what greeted me under the steering wheel. eek!
It wasnt too bad in the end, the second photos is all the extra wires that never went anywhere/ did anything. There are half as much again still in the car but with wires that disappear into the firewall or under the carpet that i will just have to leave for now.
Two questions;
Anyone tell me how to remove the brake booster/ servo thing? The manual seems a little vague; 'undo the four bolts and remove the booster'. I've undone lots and it wont budge. There are four bolts that go into the firewall but short of cutting apart the dash i dont know how to reach the bolts on the other side.
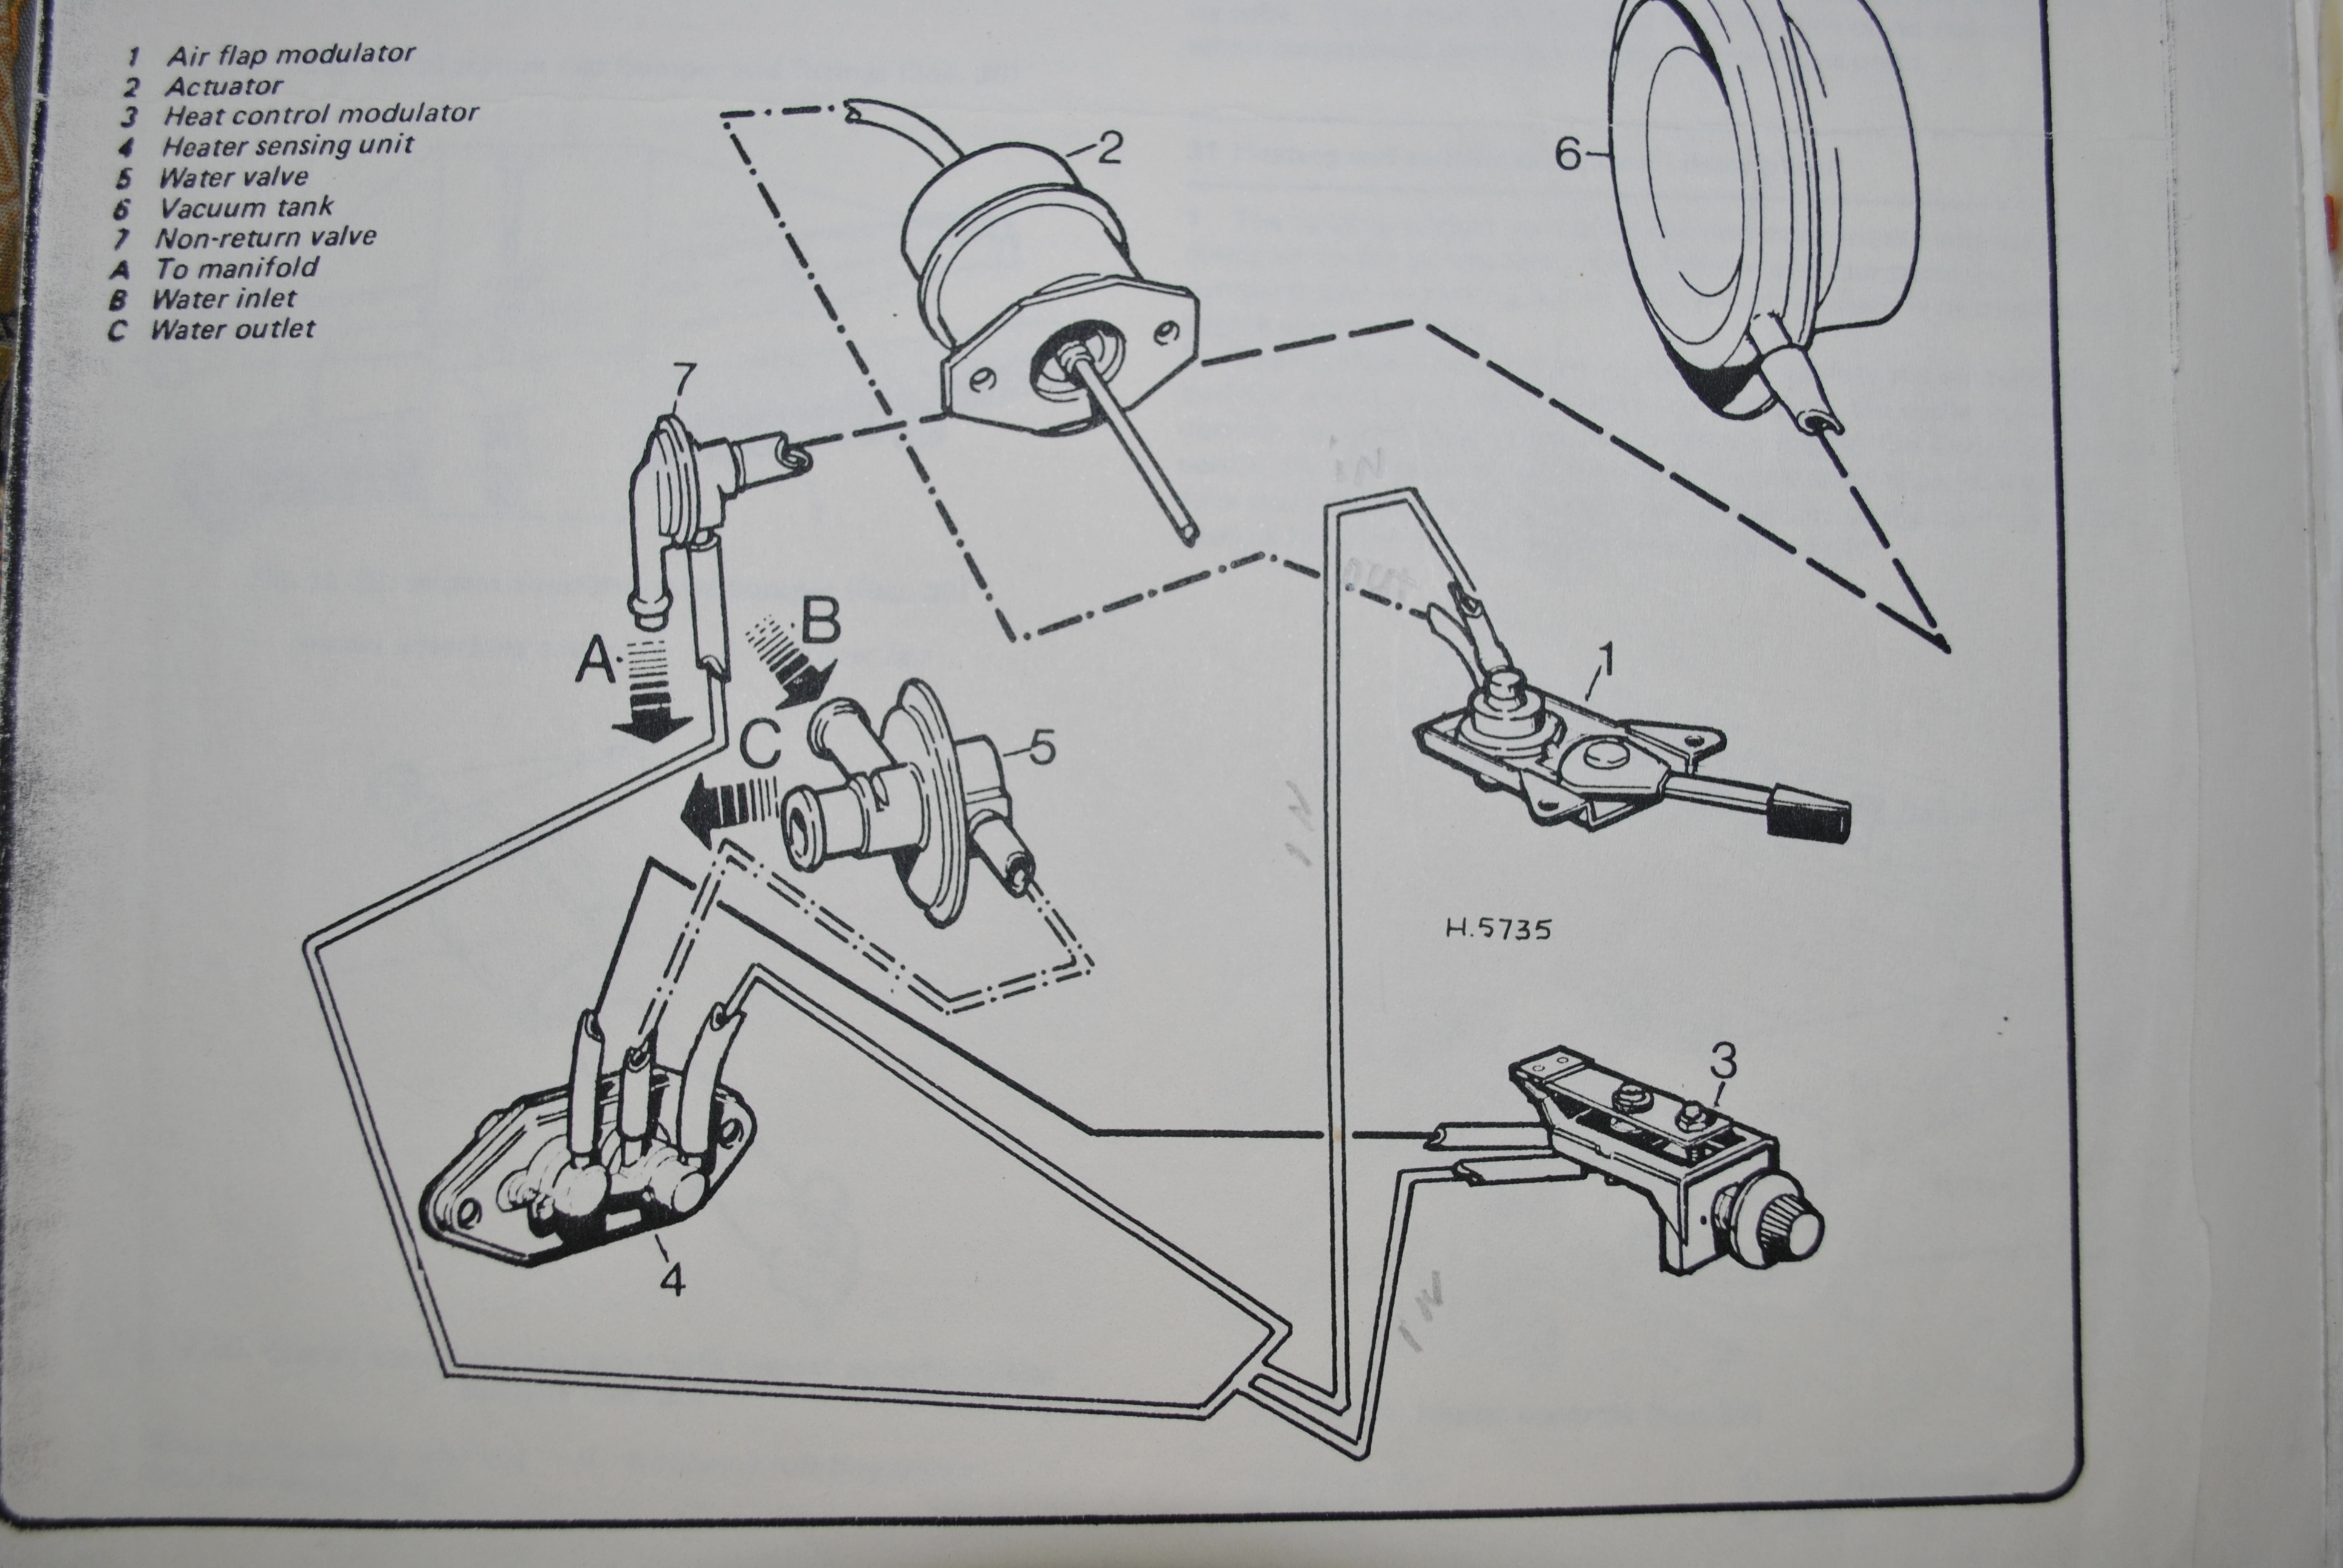
Also, behind the radio is this valve lookin thing. It has 2-3 tubes runnin from it that in my case were cut or stop after leaving the cabin through the firewall on the passenger side footwell. Any ideas what this thing was for?
Cheers
I'm tracing the wires in the hope they tell me what the relay was for but some have several wires going to/ from them and disappearing back into the wiring harness, its hard to work out. I think i should plug the battery in, turn the car on and start unplugging wires to see what turns off!
I've labelled EVERY wire i've unplugged, if it doesnt have a label, it wasnt unplugged by me or was never actually plugged in to anything.
Today i spent some time removing excess wires, the first photo is what greeted me under the steering wheel. eek!
It wasnt too bad in the end, the second photos is all the extra wires that never went anywhere/ did anything. There are half as much again still in the car but with wires that disappear into the firewall or under the carpet that i will just have to leave for now.
Two questions;
Anyone tell me how to remove the brake booster/ servo thing? The manual seems a little vague; 'undo the four bolts and remove the booster'. I've undone lots and it wont budge. There are four bolts that go into the firewall but short of cutting apart the dash i dont know how to reach the bolts on the other side.
Also, behind the radio is this valve lookin thing. It has 2-3 tubes runnin from it that in my case were cut or stop after leaving the cabin through the firewall on the passenger side footwell. Any ideas what this thing was for?
Cheers


Member
Joined: Apr 2015
Posts: 81
Likes: 20
From: Poland
Anyone tell me how to remove the brake booster/ servo thing? The manual seems a little vague; 'undo the four bolts and remove the booster'. I've undone lots and it wont budge. There are four bolts that go into the firewall but short of cutting apart the dash i dont know how to reach the bolts on the other side.
Thread Starter
|
Senior Member
Joined: Oct 2016
Posts: 184
Likes: 49
From: Brisbane
Thanks for the tip Japawels, i had looked at those but they didnt seem in the right spot. sure enough, undid them and it popped right out! felt good, It was the near final task in the emptying of the engine bay.
Today i have to share some painting. I said i wanted to do a really good job and i hope this meets that. At least it does to the best of my knowledge. I painted the inside of the petrol tank covers and some sort of drainage channel from under the rear window plus some other small bits.
I went over the loose rust/ pain with a wire wheel and sand paper. Then degreased all the parts then coated with rust converter the appropriate bits. Then i painted the lot with etch primer and then matt black top coat (Picture 1 and 3). Theyre rarely seen bits/ mostly for rust inhibition. They werent too bad to begin and what i've done was more than was ever done so i hope its good for another 40+ years. Anyone who knows better feel free to chime in with suggestions.
The drainage channel has a rubber tube exiting to the wheel arch from either end, although mine had been thoughtfully blocked off by the previous owner! It had some leaves and some strange bits of metal( picture 2); four large rectangles of plate steel (unsecured/ loose in the channel) I thought to match the four holes but they were different shapes and some skinny bits pop riveted on top but with no clear purpose (photos attached). It appeared as if they had been there since the factory but who knows. I removed the lot and kept them aside, if their purpose becomes clear i will reinstall them.
At the recent trip to the mechanic he said only one number plate light was working. One obvious issue i found was that the wire had been broken. The next obvious problem you can see from the photos (Picture 4 and 5).
I'm 80% happy with the outcome (picture 6) but I keep wondering about trying to grind down with a dremel the bits pitted from rust. However, im not convinced i will get it to look much betterI fear it will still show grinding/ sanding marks. After a clean up everything worked just fine. I also remade the rubber gasket from some rubber i had laying around but i traced the old gasket which was warped, so I will do it again when i get some more.
Cheers
Trending Topics
Thread Starter
|
Senior Member
Joined: Oct 2016
Posts: 184
Likes: 49
From: Brisbane
I spent some today today repairing holes in the engine bay. The old engine was removed and replaced with a 350chev so there was plenty of extra holes. Now i'll be fiddling around in there i felt better starting from scratch. (photos 1 and 2)
I have welded before but I've never repaired panels before and was quite intimidated. I thought for sure i'd just blow through and make bigger holes. After watching some youtube how to videos though i started. things were pretty rough to start but i got better by the end (photo 3). most holes i had to go over again with the welder after grinding down my welds but i got there. very happy with the results. (photo 4 and 5)
Unfortunately the battery tray area was rusted to death so i had to cut it out. I have to buy some replacement metal to fix that hole. (photo 6)
While in the wheel well welding holes i noticed a rusty panel at the rear of the wheel well. I unbolted and found a nasty rust farm filled with dirt behind it!, i'll dig up another of those panels from somewhere, i think it should be taller but may have been cut at some point. (photo 7)
I'm also nearly finished installing keyless entry! so nice
I've been keeping an eye out for a series 3 xj6 to steal the front brakes from because i thought they were an upgrade but mine already has 4pot brakes on the front, are these standard or has someone already upgraded them?
there is text on the side M20J and B4322278. (photo 8-10)
Thread Starter
|
Senior Member
Joined: Oct 2016
Posts: 184
Likes: 49
From: Brisbane
oh, in photo number 5 above you can see two large bolts through the chassis rail just above the front suspension assembly. they bolt through to a thick piece of 'L' section inside the wheel well (about 30cm long)
Any idea why its there?
I'd like to remove it but i suspect it has a purpose, maybe the car has had an accident and its there to strengthen the area?
Any idea why its there?
I'd like to remove it but i suspect it has a purpose, maybe the car has had an accident and its there to strengthen the area?
Thread Starter
|
Senior Member
Joined: Oct 2016
Posts: 184
Likes: 49
From: Brisbane
Today i spent some time painting some smalls as well as replacing the exterior window rubbers.
The front is pretty easy but the back i near enough had to pull the door apart to get to it!
Tip for the front, remove the bump stop in the bottom of the door, it lowers the window an extra few mm's so you can get to the screws.
The rear, the manual isnt very helpful, i dont think it clearly mentions removing the chrome trim carefully with a flathead screw driver. It does say to wind the window to the top and pull it out. I again found it easier to remove the bump stop, lower the window to the very bottom and i could pull the window mechanism out then lift the glass out. All went back together easy enough though.
Bonus news is that while jiggling around the window i was able to get out the No Draft Ventilator gearbox. the part where the *** attaches is quite worn but being aluminium its not that easy for me at this stage to repair it. I'll look at it again later. I took the mechanism apart because it was very difficult to turn. I had to drill out some pop rivets and inside where a half cog and worm gear. I cleaned out the old grease and put in some fresh stuff and now its very easy to turn. I'm glad i went to the effort!
I'm also installing central locking but just when i had it sorted i broke one of those tiny clips that hold all the wires and bars together that operate the locks, always the way now i have to wait a few weeks for it to arrive before i can put the door back together.
I want to install some electric windows. I have an aftermarket mechanism but really would like something original. Does anyone know anyone who has something? I just need the door mechanisms for the rear and drivers side. I have the passenger side front and drivers side front (doesnt work though).
Does anyone know if a series 2 electric window motor would fit a series one? theres a wrecking one in brisbane.
The front is pretty easy but the back i near enough had to pull the door apart to get to it!
Tip for the front, remove the bump stop in the bottom of the door, it lowers the window an extra few mm's so you can get to the screws.
The rear, the manual isnt very helpful, i dont think it clearly mentions removing the chrome trim carefully with a flathead screw driver. It does say to wind the window to the top and pull it out. I again found it easier to remove the bump stop, lower the window to the very bottom and i could pull the window mechanism out then lift the glass out. All went back together easy enough though.
Bonus news is that while jiggling around the window i was able to get out the No Draft Ventilator gearbox. the part where the *** attaches is quite worn but being aluminium its not that easy for me at this stage to repair it. I'll look at it again later. I took the mechanism apart because it was very difficult to turn. I had to drill out some pop rivets and inside where a half cog and worm gear. I cleaned out the old grease and put in some fresh stuff and now its very easy to turn. I'm glad i went to the effort!
I'm also installing central locking but just when i had it sorted i broke one of those tiny clips that hold all the wires and bars together that operate the locks, always the way
now i have to wait a few weeks for it to arrive before i can put the door back together. I want to install some electric windows. I have an aftermarket mechanism but really would like something original. Does anyone know anyone who has something? I just need the door mechanisms for the rear and drivers side. I have the passenger side front and drivers side front (doesnt work though).
Does anyone know if a series 2 electric window motor would fit a series one? theres a wrecking one in brisbane.

Junior Member
Joined: Mar 2017
Posts: 1
Likes: 1
From: Ventura, Ca
I have a wiring diagram, so I matched up the various wire color combinations that attach to each relay. That will give you the name of the relay on the diagram. Sometimes it's difficult to distinguish the wire colors.
Thread Starter
|
Senior Member
Joined: Oct 2016
Posts: 184
Likes: 49
From: Brisbane
Some great progress today and some little projects ive enjoyed.
I've not really enjoyed repairing rust holes but i'm surprised and happy by the results. This repair is relatively hidden so i started with it even though it was the most complex, the others i have to do are just flat. If i messed this one up, its relatively hidden.
I removed the front suspension today. I'll be replacing all the bushes with polyurethane (those that have polyurethane replacements) i'll also replace the ball joints. I thought they would be in worse repair because the shock absorbers look really really old but was pleasantly surprised to find that most probably didn't need replacing. I will anyway, A) i already bought them and B) i want the car to have a more sporty feel and will be upgrading the power so want it to be ready to handle that. all the parts were covered in thick layers of grease and dirt. I washed them up and will paint them.
Can i get some opinions on whether they should be powder coated? I was thinking of just priming them and then painting with either acrylic paint of spray cans.
The bit i'm most happy with is that i made my own number plate light cover. mine was broken and replacements were expensive. I made an original unmolested mould and then made this one just for flare. The text is the jaguar badge from the back of the car. this is a test run because the clear plastic is as expensive as poison. I'll show you the clear version when i do it. Ive also carved a jaguar face based on the face on the front grill of the car and will mould some brake lights with that in it. Its quite garish i know but i did it just for the experience.

Veteran Member


Joined: Mar 2014
Posts: 26,759
Likes: 10,309
From: Tehama County, California, USA
That rust repair looks *Very* nice! Very nice indeed!
Did you know all that grease serves an important purpose?
My neighbor calls it Automatic Rust Prevention.
Although it IS much more pleasant to work on clean parts.
(';')
Did you know all that grease serves an important purpose?
My neighbor calls it Automatic Rust Prevention.
Although it IS much more pleasant to work on clean parts.
(';')

Junior Member
Joined: Apr 2017
Posts: 24
Likes: 4
From: Missoula, Mt
The bit i'm most happy with is that i made my own number plate light cover. mine was broken and replacements were expensive. I made an original unmolested mould and then made this one just for flare. The text is the jaguar badge from the back of the car. this is a test run because the clear plastic is as expensive as poison. I'll show you the clear version when i do it. Ive also carved a jaguar face based on the face on the front grill of the car and will mould some brake lights with that in it. Its quite garish i know but i did it just for the experience.
Thread Starter
|
Senior Member
Joined: Oct 2016
Posts: 184
Likes: 49
From: Brisbane
Good call on the automatic rust prevention (must have a part number lol) 
Neuro,
The pink mould is a product called Pinkysil, a two part silicone, very easy to use and it picked up every detail in the original part, mould marks, tiny text etc.
I make a box out of perspex, a bit bigger than the part and stick it together with gaffer tape. I put Plasticine in the bottom and seat the part into that. it has to be some special Plasticine, its '*** free' but i forget what *** is, no more expensive, just different.
pour over some pinkysil, wait twenty minutes for it to dry. remove the plastecine and flip over the dried silicone with the part in it and put it back in the box. baste the silicone with vaseline to create two halves of the mould, otherwise the silicone just sticks together with your part lost inside forever. Also make a little pouring tube with a straw. Wait twenty minutes for it to dry. take it apart, remove the original, put it back together and you have a mould.
Use tape of rubber bands to hold the two halves of the mould together, (i put wood each side as well to help keep the mould rigid given its shape). The plastic was a two part mix again, 50/50 of each, very easy. and quite strong. mix and pour in the mould, wait twenty minutes and cha cha, ready.
I've also made a power window switch button, worked very well for the complex shape.


Veteran Member
Joined: Mar 2008
Posts: 25,529
Likes: 11,724
From: Pacific Northwest USA
IMHO......
I consider powder coating as something for show quality cars. If that's what you have in mind, and if your budget allows for it, then go for it! Personally, I'd rather spend the money elsewhere.
OTOH, nowadays we have some high quality, specific-purpose spray paints that work well and look good. Vastly superior to the crummy 'rattle can' paints of years ago. "SEMS" is one brand that sticks out in my mind.
POR15 (or equivalent) is another good choice for under-body parts. Tough, long-lasting protection. Looks good. Not expensive.
Cheers
DD
Powder coating can be pretty cost effective, and with sandblasting as the first step, most bits are brought free of rust unlike sanding or wire brushing. You can take a box full of parts to a powdercoater and get them back nice for less than the cost of real paint (sorry but I don't consider spray cans of any type real paint) and I have a shop full of spray cans.
Here is the thing with me ...if you spend the time to get a piece or a project really clean and prepped for paint, why put paint on it that will wash off the first time it's hit with brake or carb cleaner, or fuel for that matter, not to mention brake fluid (talking spray cans not MCU's like por15, KBS etc...). That said, one of the few spray cans I only sometimes use is Blacktop by KBS. Even though they say it's their "Blacktop" (mcu) in a can, it's certainly not. It's a bit more solvent resistant than your everyday spray cans, it will still soften quickly and come off with solvents. They have a true MCU "blacktop" that's impervious to solvents but you can't have a true mcu in a spray bomb, the can would only work once. Also, powder is NOT solvent resistant, but it's miles better than a spray bomb.
I use powder when I have lots of small parts that's gonna take a lot of time to prep, when I could be doing something else more productive. Many times a box of parts can be coated for 30 bucks when it would take me too much time to clean, prep and paint.
For places where it would be tough to go back and repaint, like frame sections or under hood bits I use 2k epoxy primer and AG111 urethane, it's truly solvent resistant and does not disappoint.
Most MCU's are great for preserving a nice piece with a good finish and you won't screw it up when stray brake cleaner hits it.
Last edited by slofut; Apr 30, 2017 at 11:35 AM.
Thread Starter
|
Senior Member
Joined: Oct 2016
Posts: 184
Likes: 49
From: Brisbane
Thanks Slofut, air conditioning is a must. THe car originally came with an under dash unit that looks hideous and took up most of the passenger footwell. I've removed it and hope to install something else, the universal underdash unit on that website looks perfect! and for $1000us i think its a reasonable price.
Thanks for the feedback on paint, I dont want a show finish, primarily durable given its location and proneness to rusting.
Thanks for the feedback on paint, I dont want a show finish, primarily durable given its location and proneness to rusting.
