
How do I take out the Aerial? (XJS V12)

Thread Starter
|
Veteran Member
Joined: Feb 2013
Posts: 17,809
Likes: 3,945
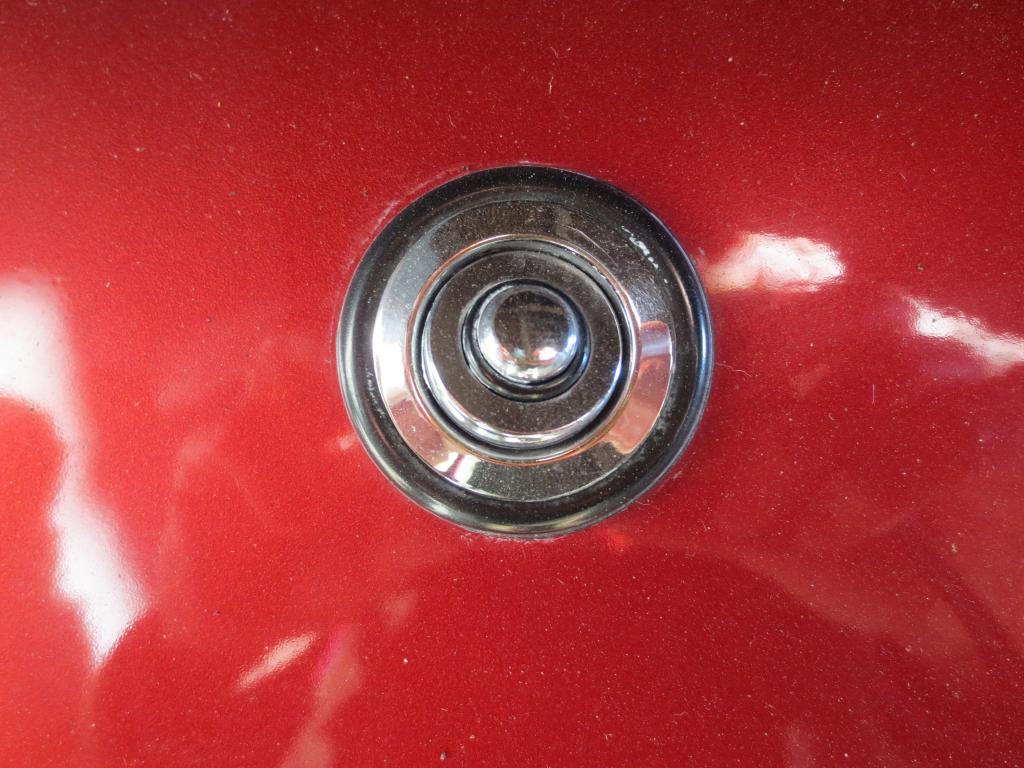
The Plastic surround of the (OEM electric Aerial) fitted to my XJS V12 had started to break up and fall apart.
This is the Plastic/Rubber surround that goes between the metal part of the Aerial and the Bodywork.
So I took a new surround off another aerial, that I had laying around.
But when I started to undo the nut that clamps the Aerial into the Bodywork, (on the outside) the 'Dome shaped piece' on the very top of the Aerial, is too big to let the nut pass over it.
I've never come across anything like this before.
What the hell am I doing wrong? This is usually a very easy job!

Last edited by orangeblossom; Feb 8, 2015 at 12:27 PM.

Senior Member


Joined: Mar 2008
Posts: 821
Likes: 502
From: Gloucester UK
put the nut back , as that is for removing the inner mast ,
open the boot , remove the carpet trim , then remove the nuts holding the aerial bracket to the motor, and drop down
replace the rubber seal , and install the aerial back in place
i found that a smear of grease not only helps the mast bulb go into the seal rubber, but it also helps seal the hole stopping the weather getting in
BB
Last edited by Brake buster; Feb 8, 2015 at 12:22 PM.
Thread Starter
|
Veteran Member
Joined: Feb 2013
Posts: 17,809
Likes: 3,945
put the nut back , as that is for removing the inner mast ,
open the boot , remove the carpet trim , then remove the nuts holding the aerial bracket to the motor, and drop down
replace the rubber seal , and install the aerial back in place
i found that a smear of grease not only helps the mast bulb go into the seal rubber, but it also helps seal the hole stopping the weather getting in
BB
open the boot , remove the carpet trim , then remove the nuts holding the aerial bracket to the motor, and drop down
replace the rubber seal , and install the aerial back in place
i found that a smear of grease not only helps the mast bulb go into the seal rubber, but it also helps seal the hole stopping the weather getting in
BB
I've just changed the Photo for a different one, that hopefully shows what the problem is a bit better.
What I still don't get is, how I replace the rubber surround on the 'Outside' of the bodywork, because if I don't get that nut off then I don't see how I would have anything, to clamp the new rubber surround in place.
Thread Starter
|
Veteran Member
Joined: Feb 2013
Posts: 17,809
Likes: 3,945
If I've understood you correctly?
It looks as though both the Seal and the Aerial are inserted from inside the Boot/Trunk Wing.
Where the Aerial is also clamped in place inside the Boot/Trunk Wing.
On almost every other Car, the Rubber Seal and Chrome finisher are clamped onto the Top of the Wing with a lock nut, that has the effect of squeezing the whole lot together.
If that's the case, then that was why I didn't understand it first time round.
Senior Member
Joined: May 2010
Posts: 670
Likes: 163
From: Mississippi
With the setup you have, it looks like the only possibility is to actually remove the antenna mast from the antenna motor.
First, extend the antenna partially to allow room to unscrew the nut
Unscrew the chrome nut above the grommet.
Turn the radio on to activate the antenna extension. While the antenna motor is operating, withdraw the antenna mast with its toothed plastic whip (and the chrome nut) entirely from the housing.
Disconnect and unbolt the power antenna housing from inside the trunk.
Drop the housing downward, allowing room to change the grommet.
Reassemble in reverse order. (See link below.)
Be aware that it can sometimes require considerable force to pull the antenna mast from the housing.
Here is a link to an old thread on the subject. A lot of the photos are no longer visible, but it still will give you a good idea of what's going on.
https://www.jaguarforums.com/forum/x...ent-faq-48388/
Regards and good luck,
Retro
Last edited by retromotors; Feb 9, 2015 at 08:58 AM. Reason: left out some important info
Trending Topics
Senior Member
Joined: Mar 2008
Posts: 821
Likes: 502
From: Gloucester UK
With the setup you have, it looks like the only possibility is to actually remove the antenna mast from the antenna motor.
First, extend the antenna partially to allow room to unscrew the nut
Unscrew the chrome nut above the grommet.
Turn the radio on to activate the antenna extension. While the antenna motor is operating, withdraw the antenna mast with its toothed plastic whip (and the chrome nut) entirely from the housing.
Disconnect and unbolt the power antenna housing from inside the trunk.
Drop the housing downward, allowing room to change the grommet.
Reassemble in reverse order. (See link below.)
Be aware that it can sometimes require considerable force to pull the antenna mast from the housing.
Here is a link to an old thread on the subject. A lot of the photos are no longer visible, but it still will give you a good idea of what's going on.
https://www.jaguarforums.com/forum/x...ent-faq-48388/
Regards and good luck,
Retro
First, extend the antenna partially to allow room to unscrew the nut
Unscrew the chrome nut above the grommet.
Turn the radio on to activate the antenna extension. While the antenna motor is operating, withdraw the antenna mast with its toothed plastic whip (and the chrome nut) entirely from the housing.
Disconnect and unbolt the power antenna housing from inside the trunk.
Drop the housing downward, allowing room to change the grommet.
Reassemble in reverse order. (See link below.)
Be aware that it can sometimes require considerable force to pull the antenna mast from the housing.
Here is a link to an old thread on the subject. A lot of the photos are no longer visible, but it still will give you a good idea of what's going on.
https://www.jaguarforums.com/forum/x...ent-faq-48388/
Regards and good luck,
Retro
the mast does not have to come out at all , the mast can stay inside the tube , so the top nut can stay
go into the boot, undo the bracket and the aerial will drop out of the grommet , replace grommet and re install aerial
simples....
BB
Senior Member
Joined: Mar 2008
Posts: 821
Likes: 502
From: Gloucester UK
If I've understood you correctly?
It looks as though both the Seal and the Aerial are inserted from inside the Boot/Trunk Wing.
Where the Aerial is also clamped in place inside the Boot/Trunk Wing.
On almost every other Car, the Rubber Seal and Chrome finisher are clamped onto the Top of the Wing with a lock nut, that has the effect of squeezing the whole lot together.
If that's the case, then that was why I didn't understand it first time round.
It looks as though both the Seal and the Aerial are inserted from inside the Boot/Trunk Wing.
Where the Aerial is also clamped in place inside the Boot/Trunk Wing.
On almost every other Car, the Rubber Seal and Chrome finisher are clamped onto the Top of the Wing with a lock nut, that has the effect of squeezing the whole lot together.
If that's the case, then that was why I didn't understand it first time round.
BB
Thread Starter
|
Veteran Member
Joined: Feb 2013
Posts: 17,809
Likes: 3,945
Hi BB
I've finally got my head around it now!
Every Aerial that I've ever had to replace in the past, has been the type where you clamp it through the bodywork using a lock nut.
So I mistakenly thought that the one on the XJS would be the same and as such I took a Gromit off from another Aerial that I had laying around.
Except that on further inspection, the OEM Gromit is different, to that which you would find on almost any other Car.
Where in this case the Gromit is pushed up from underneath and held in place by the Aerial clamped underneath it.
What was even more surprising, is that the Gromits are available on their own, without the need to have to buy a new Aerial.
So I have ordered one for �10
Thanks for your help.
Thread Starter
|
Veteran Member
Joined: Feb 2013
Posts: 17,809
Likes: 3,945
With the setup you have, it looks like the only possibility is to actually remove the antenna mast from the antenna motor.
First, extend the antenna partially to allow room to unscrew the nut
Unscrew the chrome nut above the grommet.
Turn the radio on to activate the antenna extension. While the antenna motor is operating, withdraw the antenna mast with its toothed plastic whip (and the chrome nut) entirely from the housing.
Disconnect and unbolt the power antenna housing from inside the trunk.
Drop the housing downward, allowing room to change the grommet.
Reassemble in reverse order. (See link below.)
Be aware that it can sometimes require considerable force to pull the antenna mast from the housing.
Here is a link to an old thread on the subject. A lot of the photos are no longer visible, but it still will give you a good idea of what's going on.
https://www.jaguarforums.com/forum/x...ent-faq-48388/
Regards and good luck,
Retro
First, extend the antenna partially to allow room to unscrew the nut
Unscrew the chrome nut above the grommet.
Turn the radio on to activate the antenna extension. While the antenna motor is operating, withdraw the antenna mast with its toothed plastic whip (and the chrome nut) entirely from the housing.
Disconnect and unbolt the power antenna housing from inside the trunk.
Drop the housing downward, allowing room to change the grommet.
Reassemble in reverse order. (See link below.)
Be aware that it can sometimes require considerable force to pull the antenna mast from the housing.
Here is a link to an old thread on the subject. A lot of the photos are no longer visible, but it still will give you a good idea of what's going on.
https://www.jaguarforums.com/forum/x...ent-faq-48388/
Regards and good luck,
Retro
Undo the bolts in the Boot/Trunk that are holding the Aerial in place, lower it down, take off the old Gromit, then push a new one up into the hole which must be an OEM one.
Then simply bolt the Aerial back in place.
Though not so easy to figure out, if like me you have been used to dealing with the Standard clamp type Aerials in the past.
Thread Starter
|
Veteran Member
Joined: Feb 2013
Posts: 17,809
Likes: 3,945
Hi Greg
My Aerial is an OEM one, which I found out the hard way, is totally different to the type that clamp either side of the wing, as fitted to what appears to be almost every other Car on the road.
I've ordered a new one for �10
Cannot believe you can buy this part on its own!
My Aerial is an OEM one, which I found out the hard way, is totally different to the type that clamp either side of the wing, as fitted to what appears to be almost every other Car on the road.
I've ordered a new one for �10
Cannot believe you can buy this part on its own!
Senior Member
Joined: May 2010
Posts: 670
Likes: 163
From: Mississippi
The method you describe will work IF the top nut can be slid through the grommet. I assumed that the nut helped clamp the grommet in place so I figured it wouldn't fit through.
Now that I think about it, the grommet probably has enough flexibility or "give" for the nut to pass through, particularly before the grommet is inserted in the body.
All's well that ends well!
Retro
Last edited by retromotors; Feb 9, 2015 at 06:17 PM.
Senior Member
Joined: Apr 2014
Posts: 816
Likes: 222
From: Comox Valley, British Columbia
Jaguar builds cars their own way.
Its like they have never seen or driven a car before. Strike that. The car drives great.
I usually think what is the stupidest way of doing this and thats the way they did it.
Buffels the mind.
Its like they have never seen or driven a car before. Strike that. The car drives great.
I usually think what is the stupidest way of doing this and thats the way they did it.
Buffels the mind.

Veteran Member

Joined: Jun 2013
Posts: 2,120
Likes: 1,377
From: Australia
jaguar seems to be getting bagged out here for the design of the aerial. I for one think the design is better and a lot more user friendly than the alternative.
You just need to be aware of the design.
You just need to be aware of the design.

Veteran Member
Joined: Jan 2012
Posts: 14,587
Likes: 10,783
From: France
OB Here are a couple of shots of my original factory-fitted OEM aerial, still remarkably working after all these years: 
 As you can see, I suppose that at some point between your car build date and mine Jaguar went to a cheaper rubber grommet alternative! Greg

 As you can see, I suppose that at some point between your car build date and mine Jaguar went to a cheaper rubber grommet alternative! Greg
Thread Starter
|
Veteran Member
Joined: Feb 2013
Posts: 17,809
Likes: 3,945
Hi Greg
Yeah!
My el-cheapo looking rubber version, seems to leave a lot to be desired when compared to your classy looking Chrome one.
What gets me is the 'Gromit' costs less than �2 to buy but then they charge you �8 just to post it!
In case anyone is interested the Part Number is: DAC3588
And if you can find one for less than �10 inc pp. Please let us all know, as I have one or two XJS's that may in time be needing to be re-grommitised.
Senior Member
Joined: Mar 2008
Posts: 821
Likes: 502
From: Gloucester UK
where did you buy the new grommet/seal from .
if jaguar , then you can pick it up from your nearest dealership for free ( as in no postage cost on top ),
and I seem to recall the ones on ebay are not that expensive ??
but its been a few years since I bought mine
BB
if jaguar , then you can pick it up from your nearest dealership for free ( as in no postage cost on top ),
and I seem to recall the ones on ebay are not that expensive ??
but its been a few years since I bought mine
BB
Thread Starter
|
Veteran Member
Joined: Feb 2013
Posts: 17,809
Likes: 3,945
�10 for an Aerial Gromit seems to be the norm, which considering the vast amount of money I've spent on Spares, in the Scheme of things amounts to Peanuts.
Veteran Member
Joined: May 2014
Posts: 5,906
Likes: 2,183
From: Bremen, Germany
OB, you can get it from SNG for �3,21 incl. VAT
SNG Barratt - The Ultimate Jaguar Parts Specialist
Just so you know
Oh, and the arieal is quite easily removed on an XJ6 The nut on top has nothing to do with the fixture. Coming from Volvo, the nut always creates the seal between top section (outside) and arieal (inside) and clamps it together. So I tried straight away by turning the nut. No results so I removed the side cover/trim, undid the one securing screw and it popped downwards nicely.
So it can't be that hard on the XJ-S/XJS as the X300 has the same arieal as the XJ40 had and that would be about the same (daft) British Leyland design as the XJ-S has
SNG Barratt - The Ultimate Jaguar Parts Specialist
Just so you know
Oh, and the arieal is quite easily removed on an XJ6
The nut on top has nothing to do with the fixture. Coming from Volvo, the nut always creates the seal between top section (outside) and arieal (inside) and clamps it together. So I tried straight away by turning the nut. No results so I removed the side cover/trim, undid the one securing screw and it popped downwards nicely. So it can't be that hard on the XJ-S/XJS as the X300 has the same arieal as the XJ40 had and that would be about the same (daft) British Leyland design as the XJ-S has