
XJS Bi-xenon Projector Retrofit/Underhood Battery Connection?

I am moving further toward getting my XJS back on the road, and one of the problems that I am addressing is the lighting on the car, specifically the headlights. (I have the Cibie H4 oblong lamps) Both headlight bowls are rusted to the point where enough of the silver paint inside is gone so that they don't reflect like they should. The left lamp doesn't put any light on the ground at all. I've decided to retrofit a set of aftermarket projectors. They're street legal and the light output is second to none, I retroed a set on my Olds a while back. The great part is that due to the fluting on the lens on the XJS, you wont really be able to see that it has projectors when the lights are off. A new set of headlights isn't cheap, more so than just buying a set of projectors, ballasts, bulbs, harness, etc. That will have better light output anyway.
An issue that I already can see is that while the harness is completely plug and play, they assumed that you had a battery up front to attach to. Rather than draw from your factory lights' power it has a separate feed and uses your factory lighting as signal wires only. A good thing, since the 50w ballasts I went with draw quite a few amps. A bad thing when trying to find a battery feed with a trunk mounted battery.
I'm hoping there is some sort of feed that goes back to the battery that I can tie into under the hood somewhere. In my Olds there is a jumper point that I used when I put projectors in, and it worked quite well. I know that may be asking a lot for an XJS but nothing ventured, nothing gained right? I would be more upset if I ran a wire back to the battery and then found that there was a feed that I could have tapped into. I got to know the engine bay pretty well when redoing my ignition harness and don't think there is anything obvious at least, but I have to ask.
If anyone could help me find a battery feed under the hood (hopefully!) I would greatly appreciate it. I'll keep this thread updated with retrofit progress as well, for anyone interested.
Thanks in advance, as always!
Last edited by xjsman89; Jul 6, 2015 at 08:30 PM.

Veteran Member


Joined: Jun 2013
Posts: 2,120
Likes: 1,377
From: Australia
I am moving further toward getting my XJS back on the road, and one of the problems that I am addressing is the lighting on the car, specifically the headlights. (I have the Cibie H4 oblong lamps) Both headlight bowls are rusted to the point where enough of the silver paint inside is gone so that they don't reflect like they should. The left lamp doesn't put any light on the ground at all. I've decided to retrofit a set of aftermarket projectors. They're street legal and the light output is second to none, I retroed a set on my Olds a while back. The great part is that due to the fluting on the lens on the XJS, you wont really be able to see that it has projectors when the lights are off. A new set of headlights isn't cheap, more so than just buying a set of projectors, ballasts, bulbs, harness, etc. That will have better light output anyway.
An issue that I already can see is that while the harness is completely plug and play, they assumed that you had a battery up front to attach to. Rather than draw from your factory lights' power it has a separate feed and uses your factory lighting as signal wires only. A good thing, since the 50w ballasts I went with draw quite a few amps. A bad thing when trying to find a battery feed with a trunk mounted battery.
I'm hoping there is some sort of feed that goes back to the battery that I can tie into under the hood somewhere. In my Olds there is a jumper point that I used when I put projectors in, and it worked quite well. I know that may be asking a lot for an XJS but nothing ventured, nothing gained right? I would be more upset if I ran a wire back to the battery and then found that there was a feed that I could have tapped into. I got to know the engine bay pretty well when redoing my ignition harness and don't think there is anything obvious at least, but I have to ask.
If anyone could help me find a battery feed under the hood (hopefully!) I would greatly appreciate it. I'll keep this thread updated with retrofit progress as well, for anyone interested.
Thanks in advance, as always!
An issue that I already can see is that while the harness is completely plug and play, they assumed that you had a battery up front to attach to. Rather than draw from your factory lights' power it has a separate feed and uses your factory lighting as signal wires only. A good thing, since the 50w ballasts I went with draw quite a few amps. A bad thing when trying to find a battery feed with a trunk mounted battery.
I'm hoping there is some sort of feed that goes back to the battery that I can tie into under the hood somewhere. In my Olds there is a jumper point that I used when I put projectors in, and it worked quite well. I know that may be asking a lot for an XJS but nothing ventured, nothing gained right? I would be more upset if I ran a wire back to the battery and then found that there was a feed that I could have tapped into. I got to know the engine bay pretty well when redoing my ignition harness and don't think there is anything obvious at least, but I have to ask.
If anyone could help me find a battery feed under the hood (hopefully!) I would greatly appreciate it. I'll keep this thread updated with retrofit progress as well, for anyone interested.
Thanks in advance, as always!
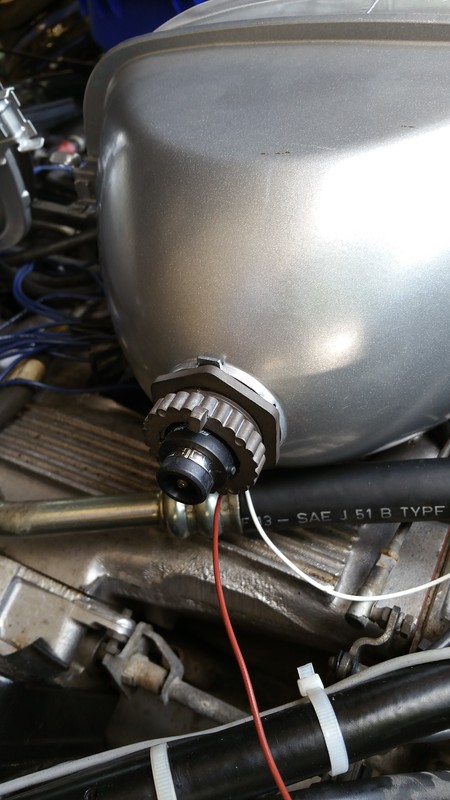
I found the positive battery post, thanks! I measured 13 volts to ground with the key off. I'm thankful that's there. It isn't the easiest to get to, but that will sure be better than running it to the trunk.
I'll update more as I go along, this will definitely be one of the few XJS's out there sporting projector headlamps.
I'll update more as I go along, this will definitely be one of the few XJS's out there sporting projector headlamps.
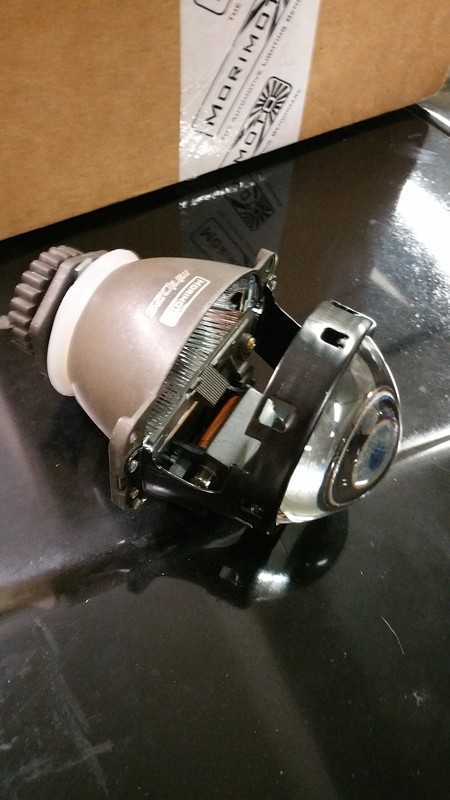
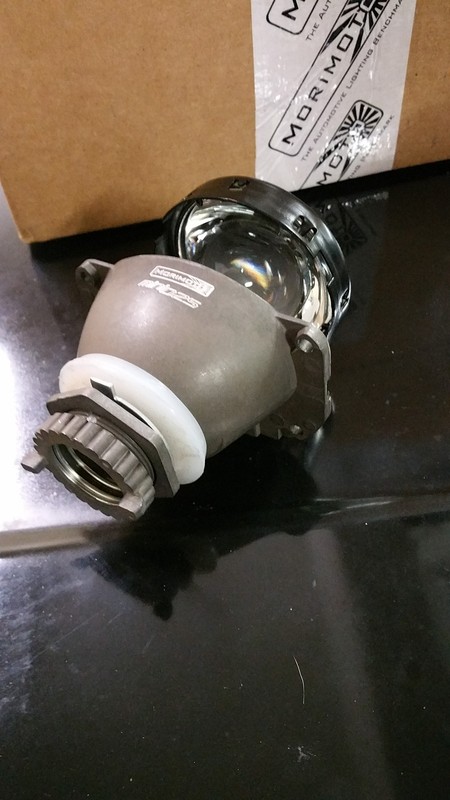
I got the goodies from The Retrofit Source in yesterday evening. I'm really pleased with how this projector looks. There aren't any size restrictions with this headlamp like I had in the olds, so I get to have a little more fun with it.

The entire package includes projectors, shrouds, 6K bulbs, 50w igniters, 50w ballasts, the harness, and some butyl to seal it back up with. (and a lead for test firing)

Don't worry, I'm going to coat the inside of the bowls before I install them in the car.
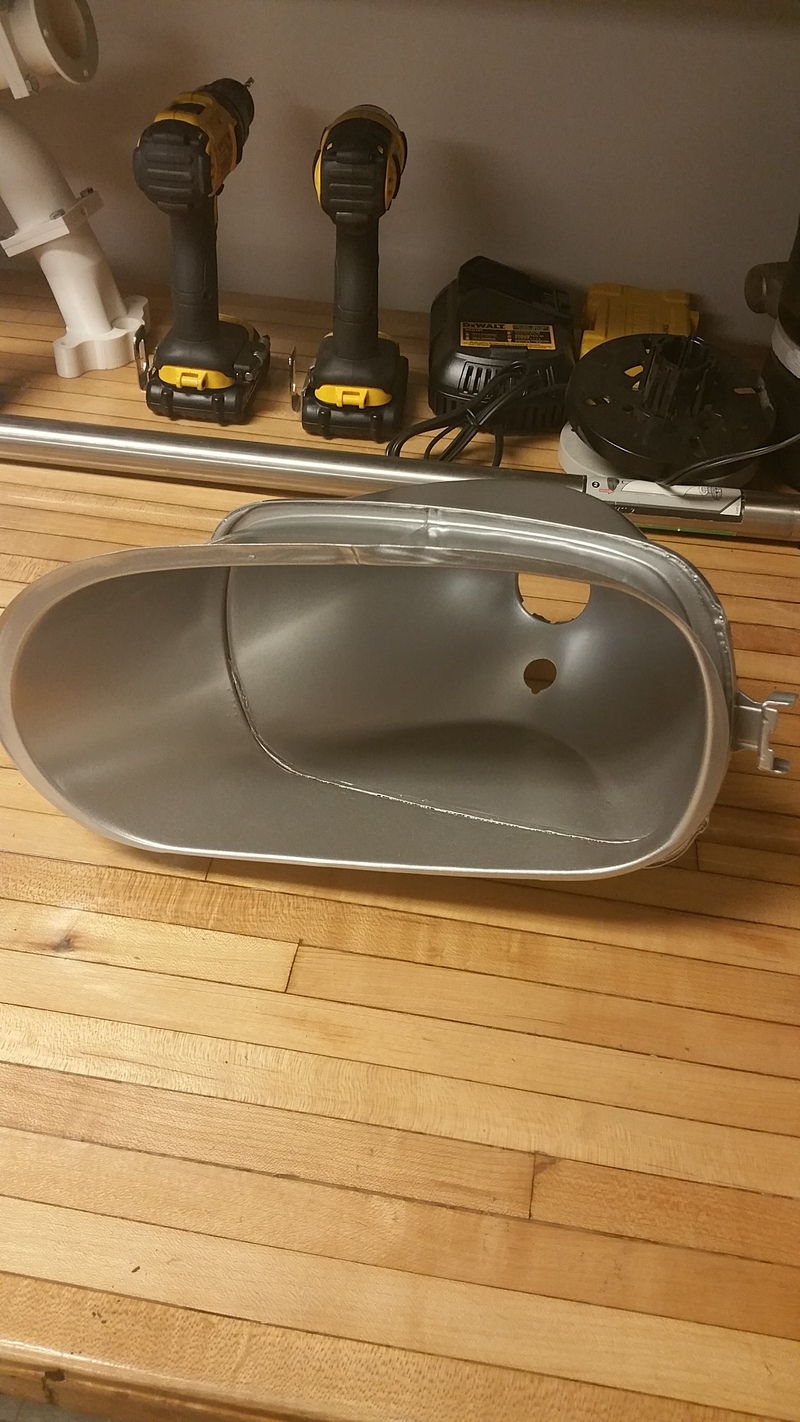
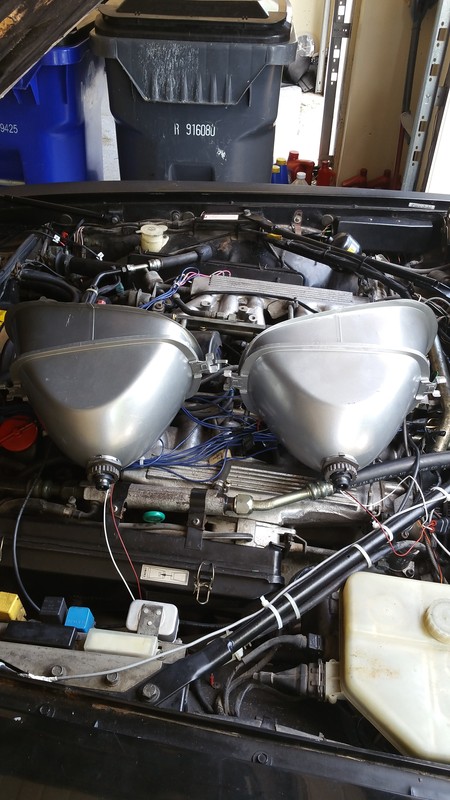
To get the projectors to fit I actually had to remove the factory bulb holder. It just popped right out. Before I did that I marked the factory H4 mounting cutouts with a diamond scribe on the little lip that sticks out on the back of the bowl. I then used a file to make those same cutouts that are in the bulb holder in the back of the headlight bowl itself. The threads on the back of the projector aren't long enough to tighten down to the factory bulb holder. I made the cutouts because (with an H4 bulb/holder) they include a locating ring to help orient the projector precisely and accurately. This works great, and I still can go back to halogen quite easily if desired.
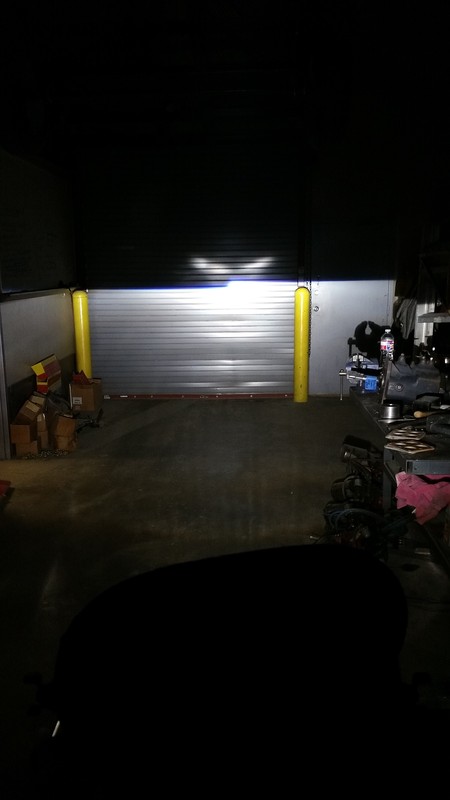
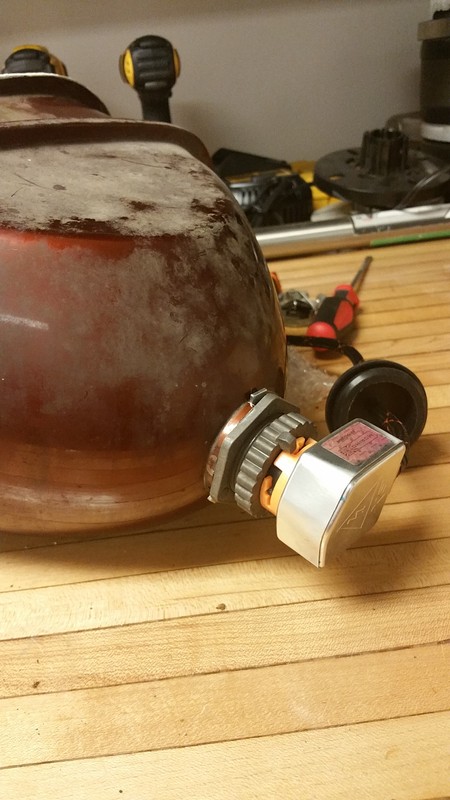
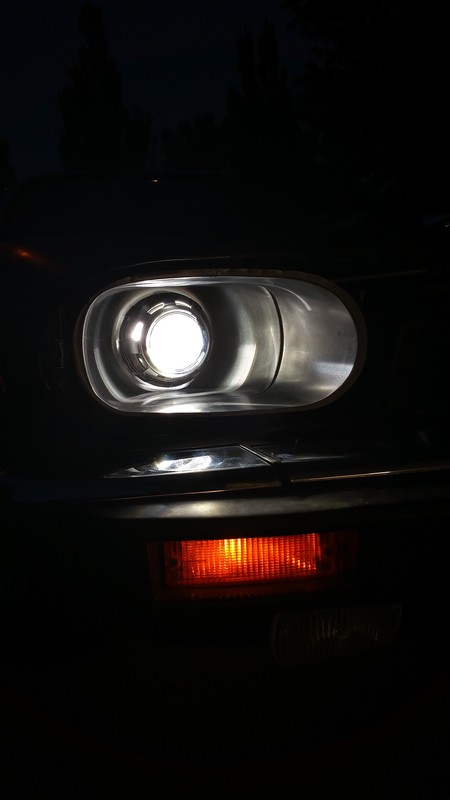
The glare above the cutoff is the light from the top of the projector bouncing off the reflective paint that remains in the bowl itself. It appears I'll have to coat the bowls black so that they don't throw a reflection above the cutoff. I was going back and forth on whether to coat them black or silver, it appears that decision was made for me! The crisp line you see is because of a metal "shield" in the projector that created the cutoff. Since these are "bi-xenon" projectors there is a solenoid that triggers when you activate your high beams and flips that shield out of the way, allowing the beam to project up completely and serving as a high beam.
It's actually a lot brighter than this in person, I just focused in on the cutoff so that you all can see it. You'll see something similar on a lot of higher end cars. I'm sure most of you are familiar with them. Even my xB has a basic set of projectors, but nothing near this clarity. Neat to see them in an XJS headlamp, though.
I'm excited to see how this turns out. Since the output looks good (I was worried about the angle of output with respect to how back the projector actually sits. Since the bowl is angled with respect to the front of the car, I wasn't sure if the deeper bowl on the inboard side would cut off the output at all. it appears to be just fine!
The next step is to take the passenger light out, open it up, and get them burned off, blasted, and powder coated. Then the fun can resume!

The entire package includes projectors, shrouds, 6K bulbs, 50w igniters, 50w ballasts, the harness, and some butyl to seal it back up with. (and a lead for test firing)


Don't worry, I'm going to coat the inside of the bowls before I install them in the car.

To get the projectors to fit I actually had to remove the factory bulb holder. It just popped right out. Before I did that I marked the factory H4 mounting cutouts with a diamond scribe on the little lip that sticks out on the back of the bowl. I then used a file to make those same cutouts that are in the bulb holder in the back of the headlight bowl itself. The threads on the back of the projector aren't long enough to tighten down to the factory bulb holder. I made the cutouts because (with an H4 bulb/holder) they include a locating ring to help orient the projector precisely and accurately. This works great, and I still can go back to halogen quite easily if desired.


The glare above the cutoff is the light from the top of the projector bouncing off the reflective paint that remains in the bowl itself. It appears I'll have to coat the bowls black so that they don't throw a reflection above the cutoff. I was going back and forth on whether to coat them black or silver, it appears that decision was made for me! The crisp line you see is because of a metal "shield" in the projector that created the cutoff. Since these are "bi-xenon" projectors there is a solenoid that triggers when you activate your high beams and flips that shield out of the way, allowing the beam to project up completely and serving as a high beam.
It's actually a lot brighter than this in person, I just focused in on the cutoff so that you all can see it. You'll see something similar on a lot of higher end cars. I'm sure most of you are familiar with them. Even my xB has a basic set of projectors, but nothing near this clarity. Neat to see them in an XJS headlamp, though.
I'm excited to see how this turns out. Since the output looks good (I was worried about the angle of output with respect to how back the projector actually sits. Since the bowl is angled with respect to the front of the car, I wasn't sure if the deeper bowl on the inboard side would cut off the output at all. it appears to be just fine!
The next step is to take the passenger light out, open it up, and get them burned off, blasted, and powder coated. Then the fun can resume!
Last edited by xjsman89; Jul 10, 2015 at 11:44 AM.
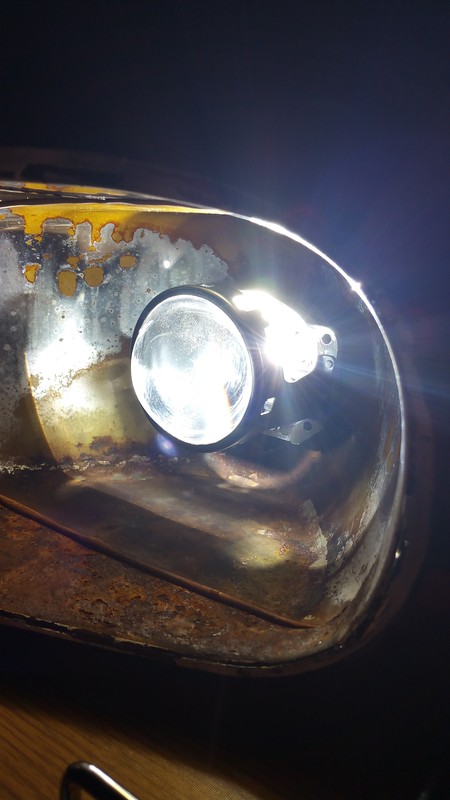
I have finished the retrofit, and I am more than pleased with the results.
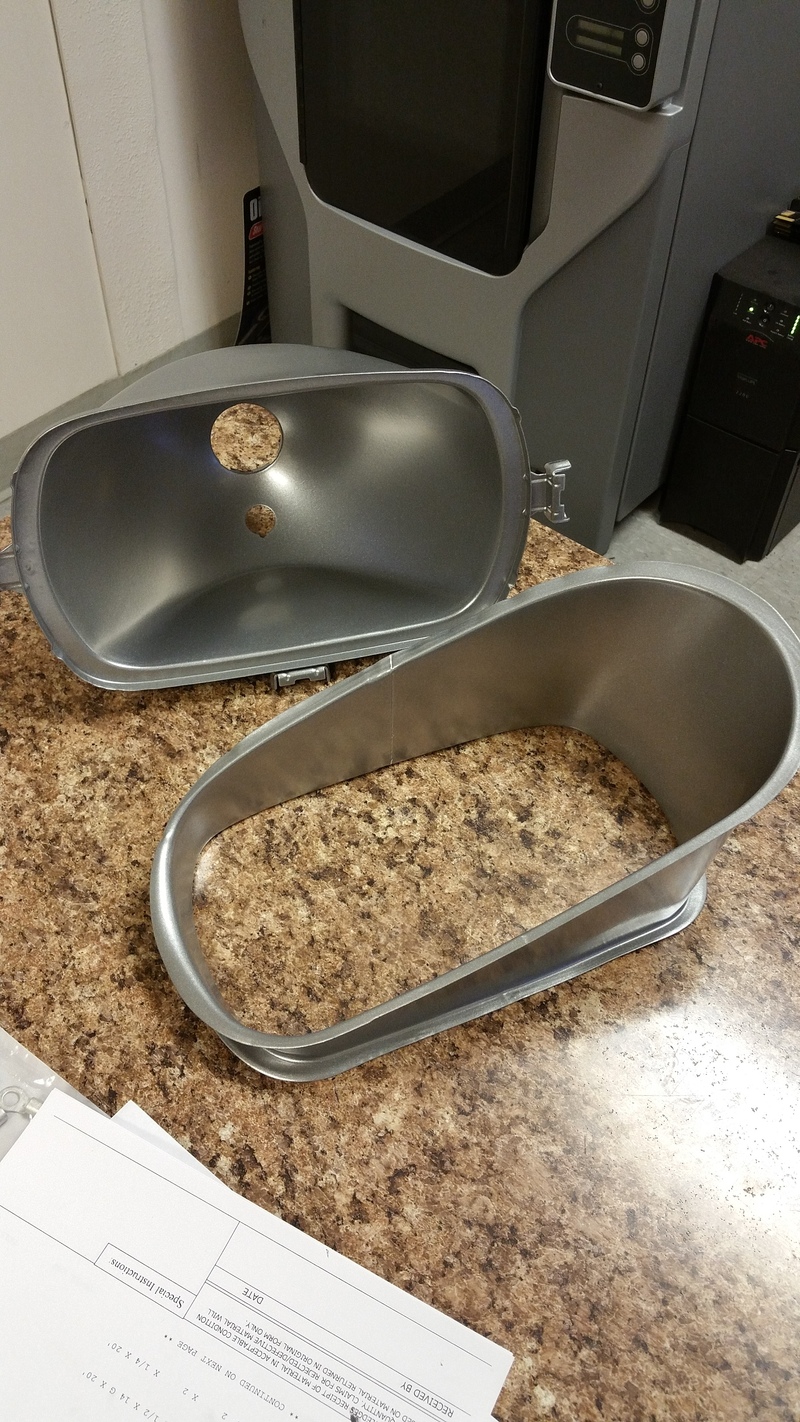
I had the bowls coated in a silver powder coat. We tested the driver's light and the seal between the front and back half of the lens survived oven temps, so we went ahead and blasted/coated both lenses. The passenger side lens didn't survive, so I ended up having to JB Weld both halves back together. It still worked out great.
The passenger side lamp that came apart, ended up burning it off, re-sandblasting it, and recoating it to give the JB Weld a nice, clean surface to bond to.
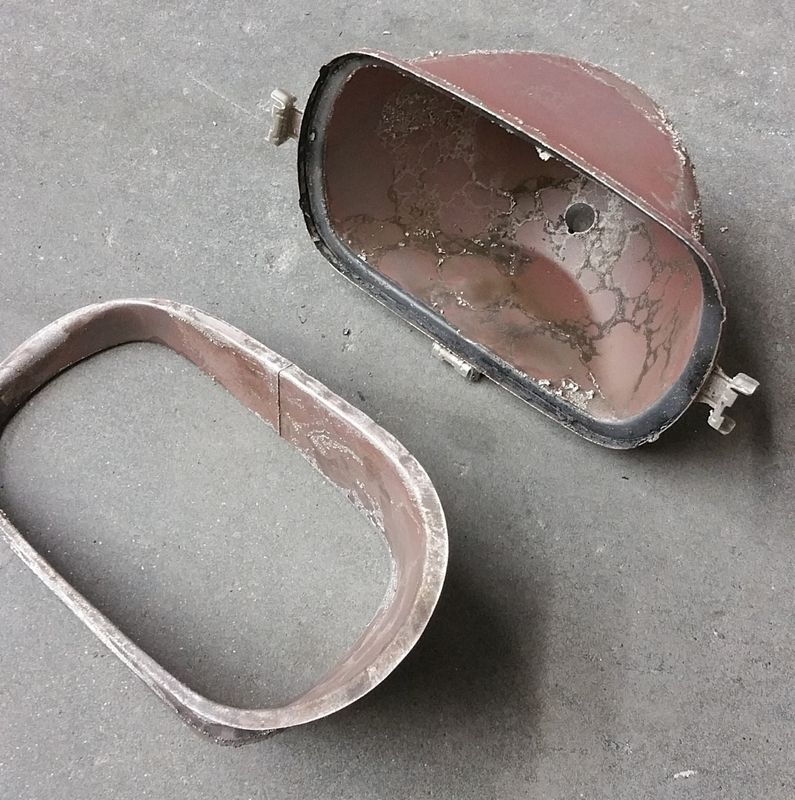
Out of the burnoff oven: (800deg overnight to get rid of all paint, oil, rubber, etc.)
Recoated:
After I bonded it all together, I put the projectors in and with a few times of having the lights in and out to aim them/tighten them up, I was satisfied with the output and bonded the glass back on with headlight butyl rubber from The Retrofit Source.
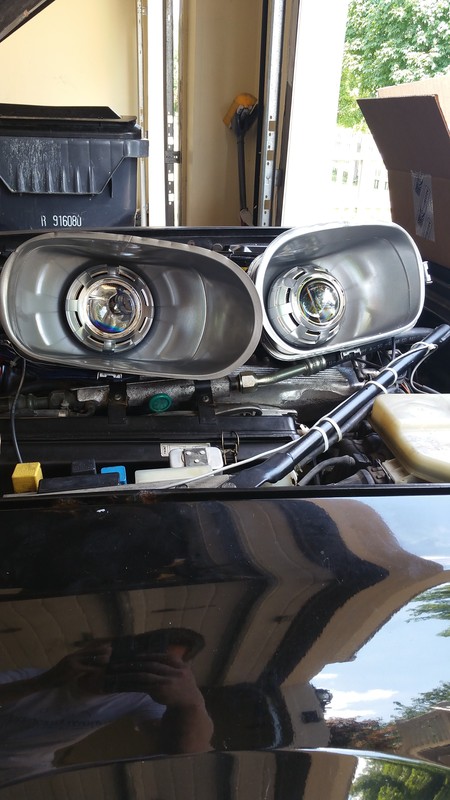
Finished, without the glass installed:
The fluting on the lenses messes with the output, but not to the point where it puts light in anyone's eyes. It's not ideal but I want the car to look as stock as possible. You can sand the fluting off of glass lenses and I plan to do this at some point (possibly this winter) but for now, this will work great. They're like projectors in disguise. If you're looking for them you can kind of tell they're there, but passerby won't be able to tell. Just what I was going for.

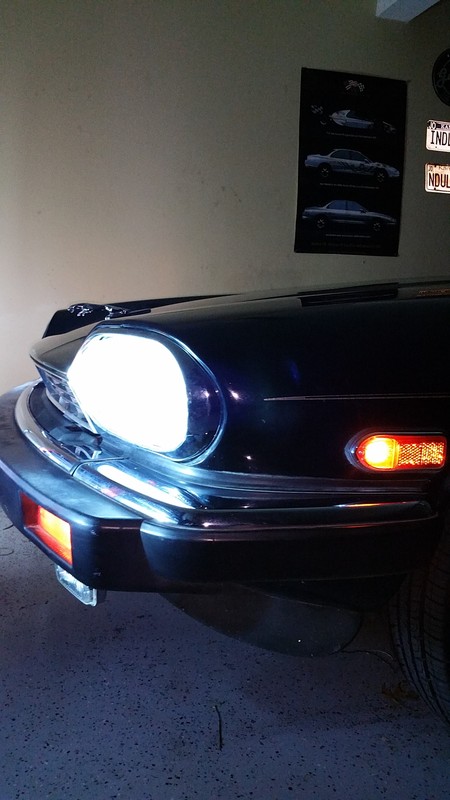
I'll take a few pictures of the light output and post them before too long, as well. I'm not a purist but I'm not about to make a whole lot of crazy modifications to the car. I still want it to look stock, but not necessarily be stock underneath. I like to think of my taste as modern, but unobtrusive. I didn't want to pay $300 or more for a new pair of lamps to replace my rusted ones just have halogen output when I could purchase this system cheaper, have fun with the retrofit, and have modern components on the car that have a much better light output.
Since I went with a 55 watt ballast with a bi-xenon D2S projector setup I actually have high beam brightness with the low beam as well, but the cutoff shield keeps it out of the eyes of oncoming traffic. When I press the high beams the cutoff moves and I have 55 watt brightness unobstructed. I love it.
Comments and questions are appreciated, but I know that some of you might not like the modification. I'm aware of this, but in terms of things that can ruin the look of the car I believe that this is relatively low on the scale!
I had the bowls coated in a silver powder coat. We tested the driver's light and the seal between the front and back half of the lens survived oven temps, so we went ahead and blasted/coated both lenses. The passenger side lens didn't survive, so I ended up having to JB Weld both halves back together. It still worked out great.

The passenger side lamp that came apart, ended up burning it off, re-sandblasting it, and recoating it to give the JB Weld a nice, clean surface to bond to.

Out of the burnoff oven: (800deg overnight to get rid of all paint, oil, rubber, etc.)

Recoated:

After I bonded it all together, I put the projectors in and with a few times of having the lights in and out to aim them/tighten them up, I was satisfied with the output and bonded the glass back on with headlight butyl rubber from The Retrofit Source.


Finished, without the glass installed:

The fluting on the lenses messes with the output, but not to the point where it puts light in anyone's eyes. It's not ideal but I want the car to look as stock as possible. You can sand the fluting off of glass lenses and I plan to do this at some point (possibly this winter) but for now, this will work great. They're like projectors in disguise. If you're looking for them you can kind of tell they're there, but passerby won't be able to tell. Just what I was going for.


I'll take a few pictures of the light output and post them before too long, as well. I'm not a purist but I'm not about to make a whole lot of crazy modifications to the car. I still want it to look stock, but not necessarily be stock underneath. I like to think of my taste as modern, but unobtrusive. I didn't want to pay $300 or more for a new pair of lamps to replace my rusted ones just have halogen output when I could purchase this system cheaper, have fun with the retrofit, and have modern components on the car that have a much better light output.
Since I went with a 55 watt ballast with a bi-xenon D2S projector setup I actually have high beam brightness with the low beam as well, but the cutoff shield keeps it out of the eyes of oncoming traffic. When I press the high beams the cutoff moves and I have 55 watt brightness unobstructed. I love it.
Comments and questions are appreciated, but I know that some of you might not like the modification. I'm aware of this, but in terms of things that can ruin the look of the car I believe that this is relatively low on the scale!

Veteran Member
Joined: Jul 2010
Posts: 7,362
Likes: 1,241
From: Austin tx and Daytona FL.
as usual i may be a little ahead of the curve(story of my life)!
pic of my both projector beam lights and Hi-way driving lights, inside are projectors, outside are driving beams, look nice on the dip!
installed 1994, old style pros. but they work fine.
pic of my both projector beam lights and Hi-way driving lights, inside are projectors, outside are driving beams, look nice on the dip!
installed 1994, old style pros. but they work fine.
Last edited by ronbros; Aug 19, 2015 at 06:26 PM.
Trending Topics

Senior Member
Joined: Feb 2014
Posts: 883
Likes: 149
From: Houston Tx
1993 XJS
I ordered HID lights last night and this morning began removing the light assembly. I am removing the light assembly because the alignment mechanism is defective. The major hold up to the project is the removal of the bottom screw that attaches the bezel to the car. I plan to make a tool to overcome this problem and not remove the bumper. My question is: how did you remove the screw?
It's your car. You can do anything to it that pleases you. There are too many critics and not enough actors!
Last edited by afterburner1; Aug 24, 2015 at 10:52 PM.
It's actually the pictures of your car floating around the forum that convinced me to pull the trigger and try a retrofit in the first place, ronbros. I like it, it's definitely a custom look. I decided to go with the one projector simply because with bi-xenon you can get both a low beam and high beam in one projector. I don't know how new that technology is, but I'm thankful for it! How did you end up mounting them in there? Did you use a quad lamp bracket or something of the sort, a custom setup, or drill holes in the back of the housing?
Thanks for the kind words! I like the look and definitely like the output, it's not an "original" car anymore but considering I bought the car back for $1800, I'll go for better output over originality.
The short answer is that I didn't remove the screw. The longer answer is that someone (most likely the dealer) so graciously left that screw off when they reinstalled the bezels after replacing the bulbs. I'm still shaking these down a bit to see if these lights will work long term so I haven't gone searching for the lower bezel screws yet. I'm not sure if it will work or not but I have a little ratcheting phillips screwdriver that's a great tool for super low-profile situations, and my guess was that that special screwdriver would work for me. It looks similar to this one:
Offset Screwdrivers | MSCDirect.com
Maybe that might help you? I'll check tonight and see if it fits!
Last edited by xjsman89; Aug 25, 2015 at 04:52 PM.
Senior Member
Joined: Feb 2014
Posts: 883
Likes: 149
From: Houston Tx
Thanks for the info on the screwdriver. I even went a head and actually made one.. I made a mistake and identified what I thought was a screw going into the bezel. The bottom screw is dead ahead and removable with a Philips screwdriver. My face is really red. Vee is the person that set me straight.
All I want to do is lube the adjusters. Still can't do that because there doesn't appear to be any access when you remove the bezel. I would just like to pull the headlight assembly lube it and put it back! Frustrated
All I want to do is lube the adjusters. Still can't do that because there doesn't appear to be any access when you remove the bezel. I would just like to pull the headlight assembly lube it and put it back! Frustrated
Senior Member
Joined: Feb 2014
Posts: 883
Likes: 149
From: Houston Tx
After seeing your installation I am going to abandon the HID bulb approach and go with projectors. I won't have the trouble you had, my lamps have no rust and are pristine. I was fortunate, the previous owner limited his mileage and stored the car in an A/C garage.
I have a screw problem (no pun intended) I understand there are five screws that hold the light unit in the car, but I'll be darned if I can find them. Drawings show the units but not the screws. If you could give me a hint on finding them, I would be appreciative
It would be very helpful if you could reveal your source of purchase of the projectors. There is so much junk out there and you seem pleased with the product.
Thanks much for such an informative posting. The detail and pictures were great!
Afterburner,
I'm glad you found the post helpful! I'd be happy to help however I can, if you have any more questions just PM me your number and I'd be happy to call you and discuss it.
I haven't tracked down any bezel screws myself either, if I figure it out before you do then I'll be sure to post where I found them and everything.
I have yet to post an output picture, I will try to do so soon. The output isn't nearly as perfect as the shot I posted while testing because I was testing without the glass lens. Keep in mind that with the glass lens it gets rid of the perfect cutoff. Like I stated earlier, though, it doesn't put anything in anyone's eyes at all so it's still legal, it just isn't as perfect as it could be without sanding down the fluting on the lenses.
Another thought: If you haven't separated the lenses yet, I would use heat. You can't pry on these without bending the metal, but I heated them up with a heat gun and they came apart quite easily. I've never bought into the "put them in the oven" trick and prefer to use a heat gun, but that can work as well.
For the cutoff solenoids I ran the wires through the hole for the small bulb at the bottom of the bowl (not sure what these were for, neither one worked on my XJS. running lights, maybe?) and just coiled up some butyl and sealed the hole with that. TRS has some patches you can use to seal holes like that, I am going to get some of these and try this when I take the lights back out. Found here.
I got the parts from The Retrofit Source. I used their components in my Oldsmobile Aurora retrofit in the past and I was very happy with them. Many people on the Aurora Club of North America have used their kits with no issues so I decided to go with them for the Jag retro. I was, once again, pleased with the quality of the parts.
Link to the product here.
Here are the details of what I purchased:
- Mini D2S 3.0 Projectors, O lens. (The X lens is just a square, no change in output. If the shroud was any wider I would think it would need to be trimmed, so that would be something to check. The round shroud fits pretty perfectly back in our bowls.)
- 50W Morimoto XB55 Ballasts (Since our euro lenses use one bulb for low/high if you go with 35W ballasts then you only have low beam brightness when you use your high beam since it just moves the cutoff shield, it doesn't increase the lighting intensity. I went with 50W for this reason. As explained earlier you have high beam brightness for the low beam. it's a little bright, but I like it.)
- Morimoto XB D2S Igniters
- XB 6500K D2S bulbs (These are the most blue that you can get while still being a reasonable output. The K rating is the temperature the bulb burns at in Kelvin. 4500K is a hint of yellow, 5500K is white with a *hint* of blue, 6500K is a light blue color. I believe that 5500K is the temp of most factory HIDs, but I'm not positive. There are color charts on their site that can help you decide what temp you like. All will function the same.)
- Apollo 3.0 Shrouds (Again, this is personal preference. Go here to check out the different shroud designs.)
- MotoControl Bixenon H4/9003 Harness (This is very important, you have to get the right one. The MotoControl is really easy; you just plug one of our factory H1 connectors from the car into the harness, give it power and ground and it does the rest.)
- No LED halos for me. You won't see them anyway, and it would look cheesy on a Jag IMO.
- Black Retrorubber. This is Butyl rubber for resealing the lights, specially made for headlights. It's not the same stuff people use to seal windows with, it's a little more pliable. I just got one package and it was plenty for me. I still have about half the package left. Be sure to stretch the stuff as you apply it. You heat it up, stretch a bit and lay it in the channel, then press the glass on. It bonds as it cools. Just heat it up again when you want to remove the lens and it pops right off.
I hope this helps, let me know if you have any other questions! If you feel like making the drive up from Houston I'd be happy to help! :P
Last edited by xjsman89; Sep 8, 2015 at 11:26 AM.
Senior Member
Joined: Feb 2014
Posts: 883
Likes: 149
From: Houston Tx
What a great posting! Really helped. I thought you worked from a kit, but now know it was individual parts. I don't think I would deviate from your assembly.There is no need to reinvent the wheel!
There was a communications breakdown. My interpretation of bezel is the outer surround chrome cover with three screws. Its the bowls that hold the lens and the lamps that I fail to know how to remove. So far all my work has been through the wheel well. I can't go forward until I remove the bowls.
I tried some Chinese HID lights (not projectors) and they are really junk. That is why your posting interested me.
You were wondering about the small lights in the bowl. They are of little value here, but in the UK they are parking lights that must be displayed when parking on the street at night.
Thanks for the invitation to Kansas. My wife is a KU grad and her family live in KC, KS. She was originally from Salina. She was just there for a wedding. It's a long trip from Houston if you don't fly.
I have a black '93 coupe that is truely pristine. Everything original except for tires and 16" wheels that resembly the original 15" It really is of show room quality.The car spent its life in an A/C garage and has 60k miles on the clock.
Thanks again for your response; I'm going back to reread it now !
I'm a KU grad myself, I graduated with my BS in Mechanical Engineering in 2012. I live in Olathe, a suburb of KC. I actually work in Kansas City, KS. Small world!
Just to be clear, I actually did buy a "kit" but I got to choose the parts that I wanted in it. I bought it from The Retrofit Source, linked to above. I got their Mini D2S complete retrofit kit. The bullet points that I posted previously are the various selections that I made when purchasing their kit. I would buy it through them for sure, that have a very knowledgeable customer support staff and it's great to get it all from one place. Their products have a 5 year warranty, too.
I tried that cheap Chinese crap in my Olds years ago before I did the retrofit on it. It was hardly worth installing. I went right for the good stuff with the Jag!
It sounds like you've got a great car! Mine is far from pristine. It has rust, fading clearcoat, and a myriad of issues from sitting in a field for years. I love it though, and I'm excited to continue working on it and making it better. She's at least drivable now, which is something I couldn't say a few months ago!
Last edited by xjsman89; Sep 8, 2015 at 11:37 PM.
Senior Member
Joined: Feb 2014
Posts: 883
Likes: 149
From: Houston Tx
To XJSMAN
I never did go with the projectors but installed the Kelsum HID Kit. I fabricated a reflector shield for the bulbs out of 3/4 inch copper pipe. The shield blocks the reflector and hence the glare to oncoming traffic.
One of the bulbs burned out and as I removed it the reflector fell into the bowl. Getting it out require removing the headlight assembly and letting the reflector drop out.
PROBLEM: I removed the bezel but I am unsure if the assemble snaps into fittings and just requires a sharp pull. or if there are screws that attach it. Looking between the light assemble and the fender, I can see two torx screws? and not much else. Since you have been through this exercise and also have a facelift model, I call upon your expertise for assistance. In advance: Thank you
FOLLOW UP SAME DAY
Found a total of four torx bolts and remove them; could not find the fifth bolt, unless access to it is through the wheel well. The location of the found bolts were two on top and two on the bottom each near the side. My son and I both feel that the fifth bolt comes in from the wheel well and found one bolt head very low down and blocked by the windshield washer reservoir. At 88 doing a contortion act is near impossible and my son, who is helping me, moans about not bending that way. Still need that expertise
and again Thank you
Last edited by afterburner1; Apr 23, 2016 at 07:35 AM.
Senior Member
Joined: Feb 2014
Posts: 883
Likes: 149
From: Houston Tx
Editor Please cancel above message and substitute this one. Found solution
After you remove the Bezel, three screws,
Removing the headlight assembly is not difficult if you can find the five #30 torx screws. They are some what hidden behind the headlight assembly and hold the black ring to the chassis and also holds the lamp assembly.
I used a 1/4 inch extension and tape the torx driver to the socket so it would not come apart. There are three screws on top at the nine, twelve and one o'clock positions. The one at one o'clock is the hardest to find. The bonnet must be up to get a good fix on it and remove. The bottom ones are easy and at the five and seven o'clock position.
The adjuster cable must be separated from the yellow plastic holder in the engine compartment. This is much easier with two people although I separated them, alone. with difficulty. A word of caution after you remove the screws you will see the adjuster cables attached to the casing of the headlamp assembly. Don't try to uncouple at that point as the case still won't uncouple. It is better and easier to remove the yellow plastic part. At this point you are ready to remove the headlight assembly.

Thread
Thread Starter
Forum
Replies
Last Post
OkieTim
S-Type / S type R Supercharged V8 ( X200 )
3
Sep 8, 2015 04:48 PM
Currently Active Users Viewing This Thread: 1 (0 members and 1 guests)