
Changing Headlight bulb


Joined: Dec 2011
Posts: 120,439
Likes: 17,014
From: Durham, UK
Welcome to the forum robc4me,
I've moved your question from General Tech Help to XK/XKR forum. This is the place to post technical questions about your model.
Please follow this link New Member Area - Intro a MUST - Jaguar Forums - Jaguar Enthusiasts Forum to the New Member Area - Intro a MUST forum and post some information about yourself and your vehicle for all members to see. In return you'll get a proper welcome and some useful advice about posting to the forum.
Graham
Veteran Member
Joined: Mar 2017
Posts: 2,936
Likes: 978
From: Hagerstown MD
Download the service manual from the stickies in this subforum. Headlamps aren't horrible to replace. Just take your. Unscrew the round cover on the back of the housing. Twist to release the bulb holder and remove once the plug is undone. Holder clam shell's around the bulb. Open the clam shell and replace bulb being sure to index the bulb in the holder before closing the shell. Before sliding it back in the housing I dose the bulb with alcohol to clean any oils off.
Veteran Member
Joined: Mar 2012
Posts: 1,072
Likes: 269
If you're talking about the Bi-Xenon bulbs (D1S), the service manual has this to say:
As a mechanically inexperienced person, I found that scary enough to let the indie garage those two bulbs with the ones I had bought (Osram Night Breaker Unlimited) rather than tackle them myself. They should last for years, after all, so it's not a frequent cost.
WARNING: The Xenon system generates up to 28000 volts and contact with this voltage could lead to fatality. Make sure that the headlamps are switched off before working on the system.
Veteran Member
Joined: Dec 2011
Posts: 3,453
Likes: 882
From: Pacific Northwest
Assuming you mean the xenon, it is pretty straight forward. The headlamp must be removed or unmounted to the point of be able to slide it forward (removing it completely is far more practical.)
1st you will see a washer feed line attached, A small black clip with ridges hold the two together. Lift this clip straight up and off... (don't loose it!) and the lines will easily detach from each other. You may see a little fluid leaking from the hose when disconnected, so you can elevate it a bit and it will stop.
From there the headlamp is held in place with 2 10mm bolts, easily visible from the top. Remove the bolts and gently slide the lamp assembly forward. At that point you can disconnect the harness and remove the entire assembly.
Senior Member
Joined: Sep 2008
Posts: 727
Likes: 202
From: Richmond, TX.
Assuming you mean the xenon, it is pretty straight forward. The headlamp must be removed or unmounted to the point of be able to slide it forward (removing it completely is far more practical.)
1st you will see a washer feed line attached, A small black clip with ridges hold the two together. Lift this clip straight up and off... (don't loose it!) and the lines will easily detach from each other. You may see a little fluid leaking from the hose when disconnected, so you can elevate it a bit and it will stop.
From there the headlamp is held in place with 2 10mm bolts, easily visible from the top. Remove the bolts and gently slide the lamp assembly forward. At that point you can disconnect the harness and remove the entire assembly.
1st you will see a washer feed line attached, A small black clip with ridges hold the two together. Lift this clip straight up and off... (don't loose it!) and the lines will easily detach from each other. You may see a little fluid leaking from the hose when disconnected, so you can elevate it a bit and it will stop.
From there the headlamp is held in place with 2 10mm bolts, easily visible from the top. Remove the bolts and gently slide the lamp assembly forward. At that point you can disconnect the harness and remove the entire assembly.
Joined: Dec 2011
Posts: 120,439
Likes: 17,014
From: Durham, UK
Reading this thread leads me the conclusion that I may be the only one who has actually removed an XK headlight unit.  There's 3 fixing bolts.
First, turn the wheels to be able to access the lower fixing bolt through the wheelarch liner. Full RH lock for the LH headlight; full LH lock for the RH headlight.
Second, put a soft towel on the ground so you have somewhere to put the unit down without scratching the glass.
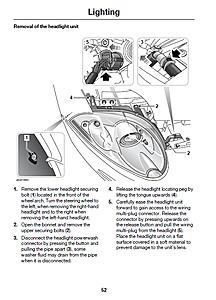
(click on the image to enlarge it)
Took me about 15 minutes the first time but after numerous Channel crossings to mainland Europe where I needed to use the lever on the back of the headlight unit to switch the dip beam direction, I can do both sides in less than 5 minutes.
Graham
Trending Topics

Veteran Member
Joined: Dec 2011
Posts: 3,453
Likes: 882
From: Pacific Northwest
It's plexiglass, not glass.... You people and your silly mistakes... yeash!

Thread
Thread Starter
Forum
Replies
Last Post
JimC64
XK8 / XKR ( X100 )
3
Sep 22, 2025 02:52 PM
Currently Active Users Viewing This Thread: 1 (0 members and 1 guests)