
Easy peasy with the right tools. There is no warranty expressed or implied by me or this forum. These are your brakes! Proceed at your own peril!
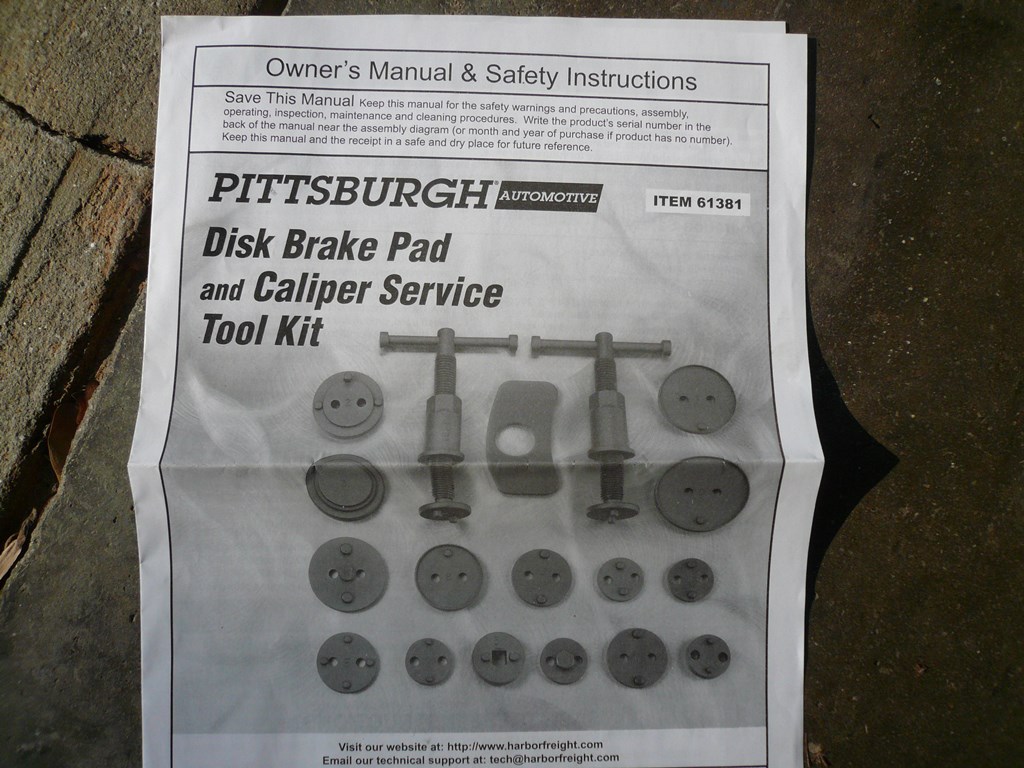
1st things first, you'll need the caliper tool. I bought this one at Harbor Freight for $35 with a coupon. You don't need any of the adapters! The one on the main tool works perfectly. Use the one on the right.
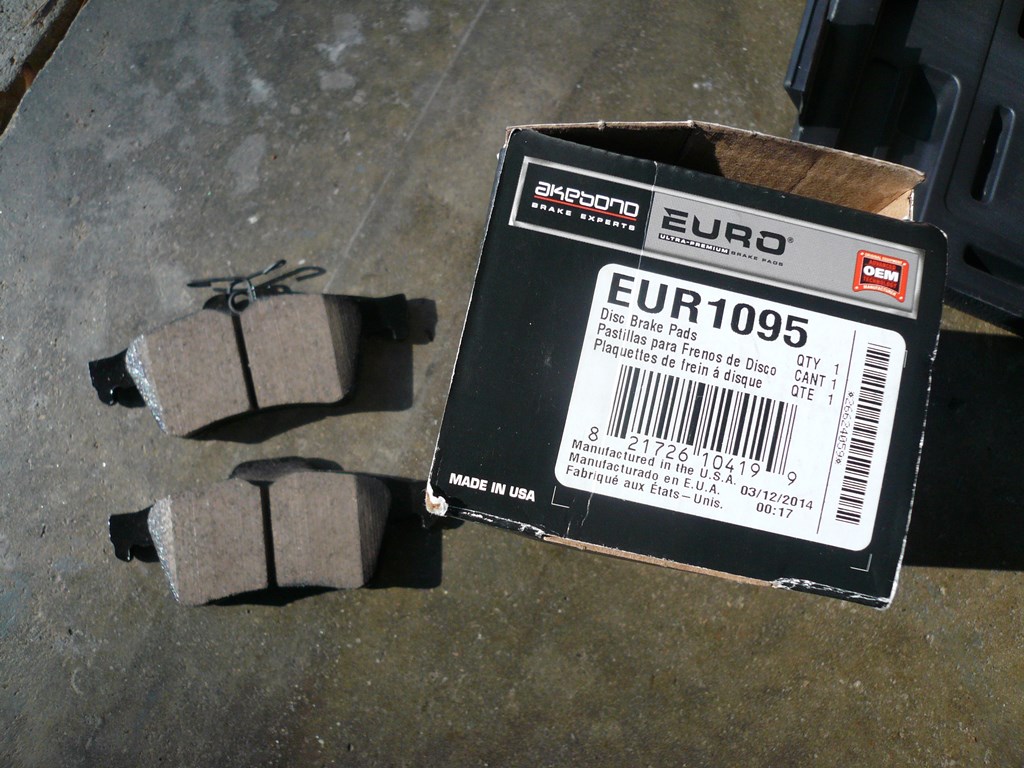
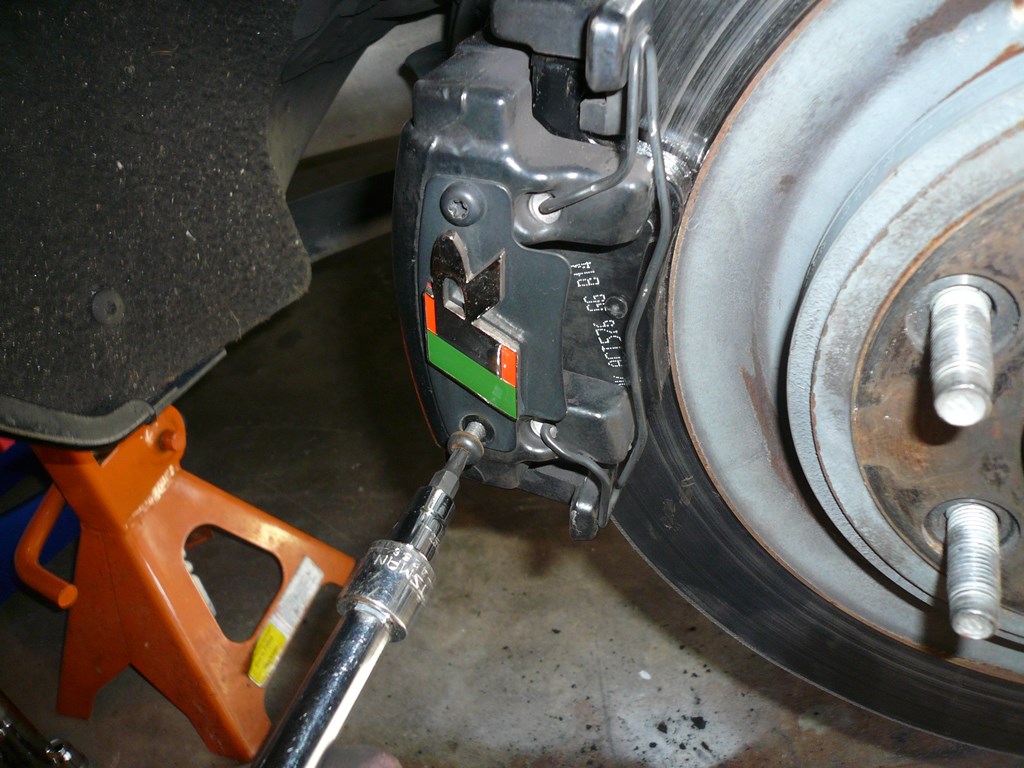
Pads (hint: pad with the spring on top goes against the caliper piston)
Some of the tools you'll need:
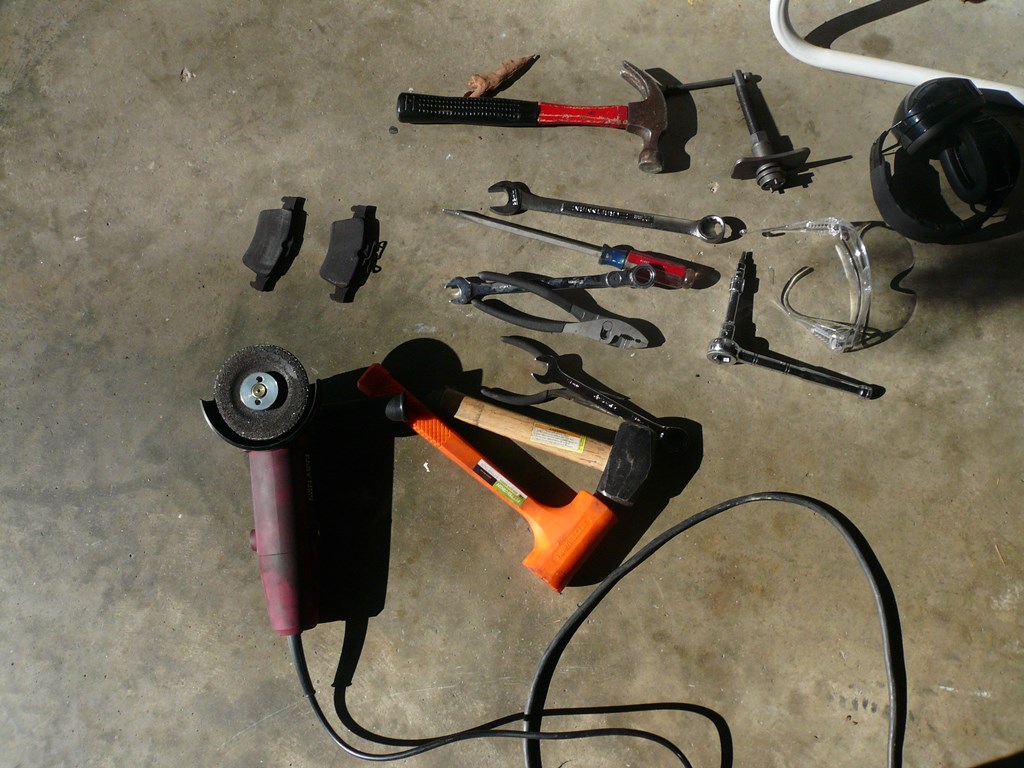
Torx for the "R" cover is a T25.
Caliper mount bolts are 15mm
Prep!
Crack all the lugs on both rear wheels while the car is on the ground. Chock both front wheels, RELEASE the parking brake and put the car in NEUTRAL. Neutral is needed so you can turn the discs with one wheel on the ground. They won't turn if the car is in park. I did one wheel at a time, this is the drivers side. Jack, insert a jack stand and remove the wheel.
Remove the "R" cover:
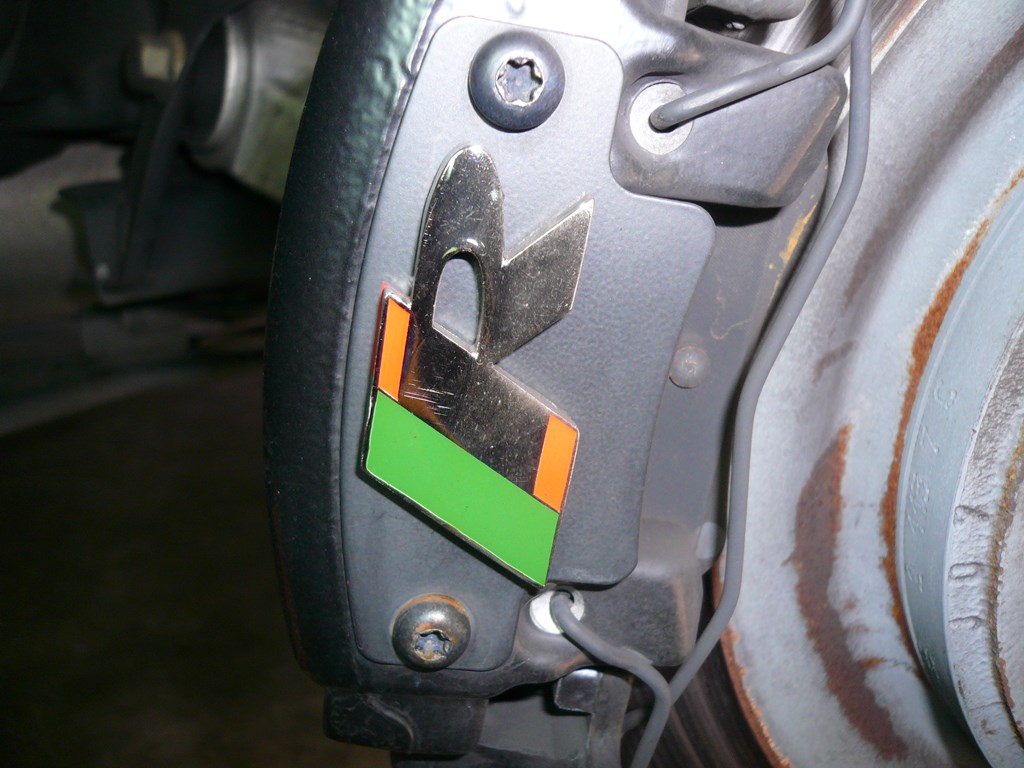
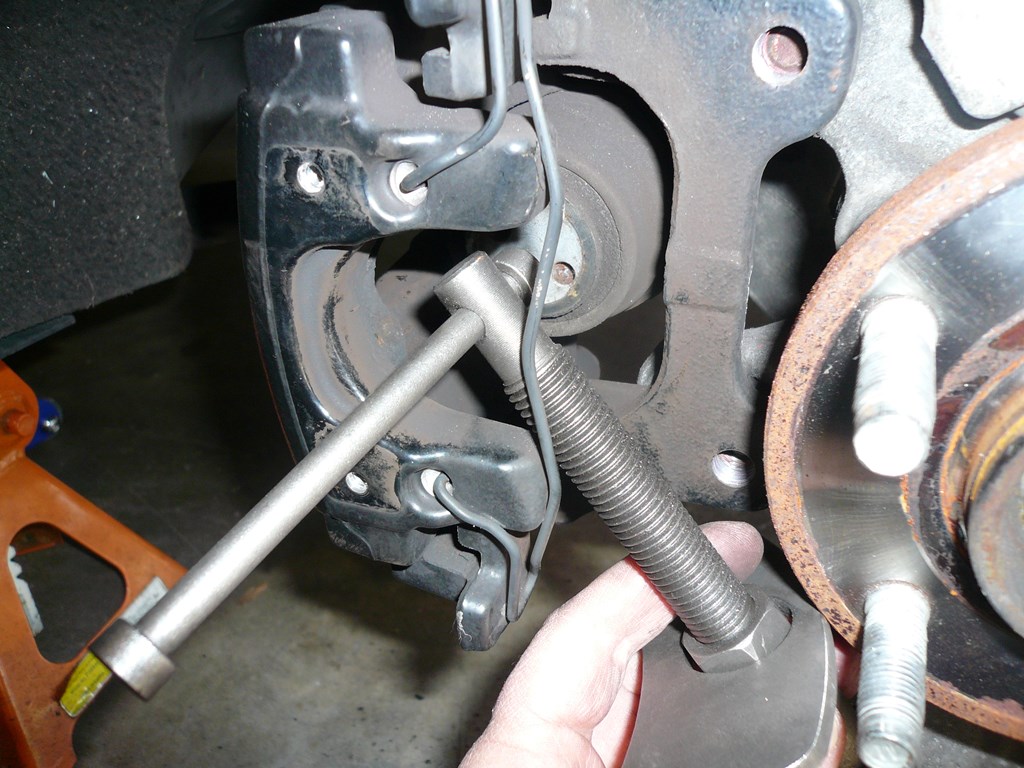
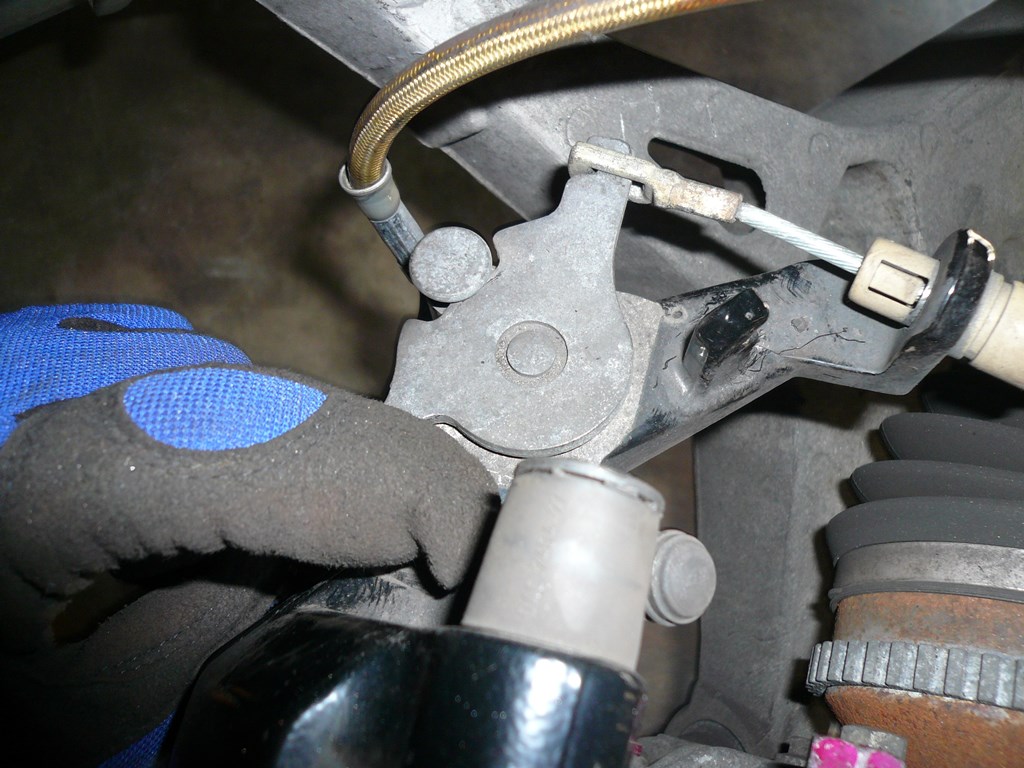
Remove the parking brake cable as follows. Using needle nose pliers remove the return spring.
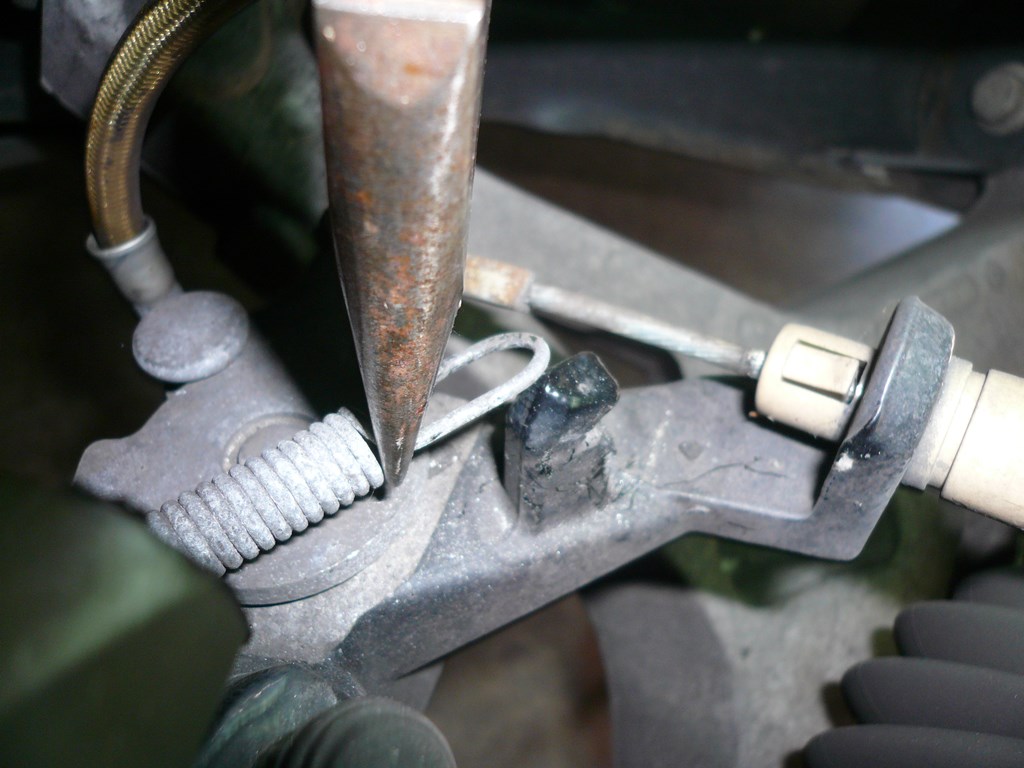
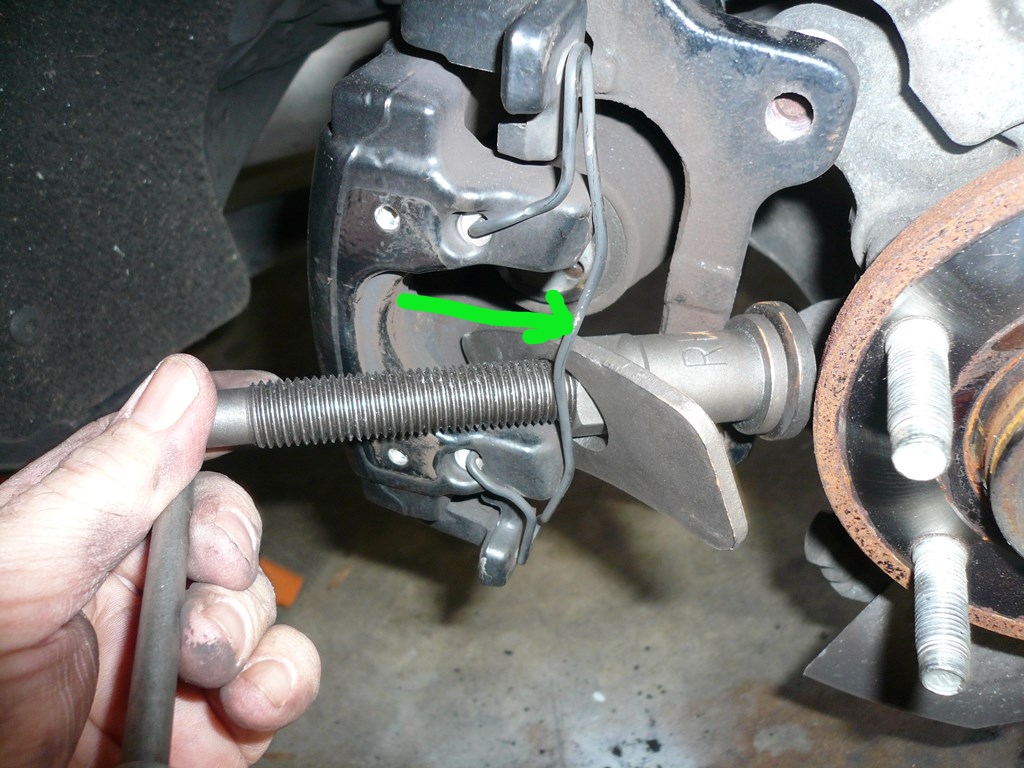
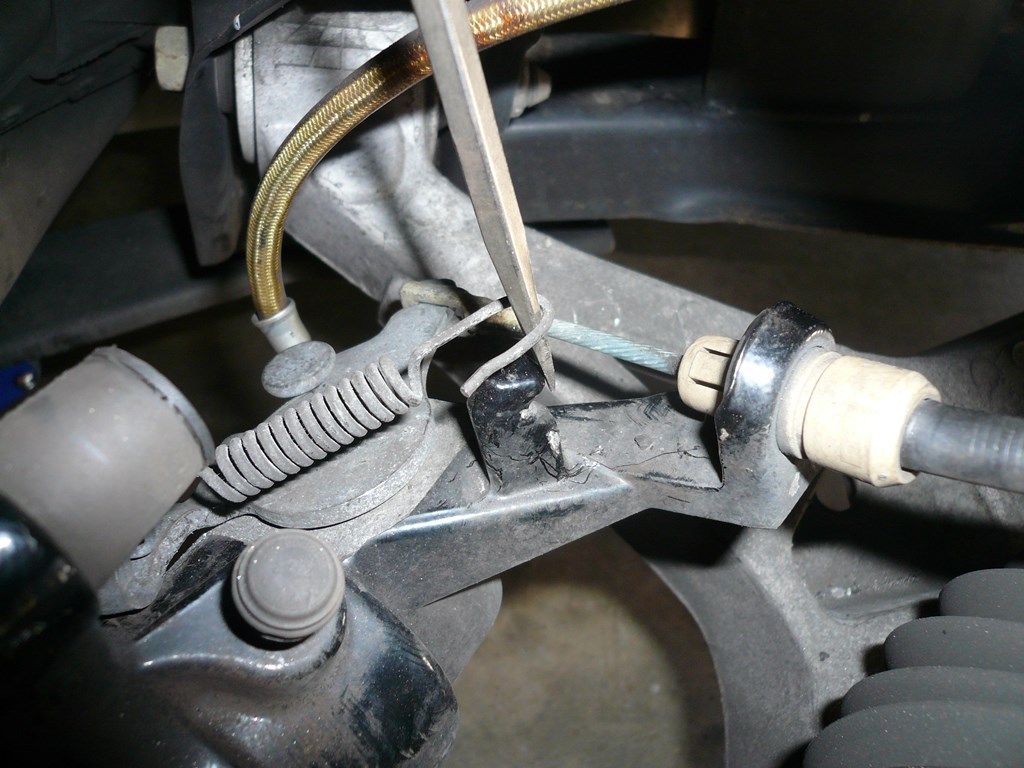
By inserting a flat screwdriver here you can pry forward and release tension on the cable.
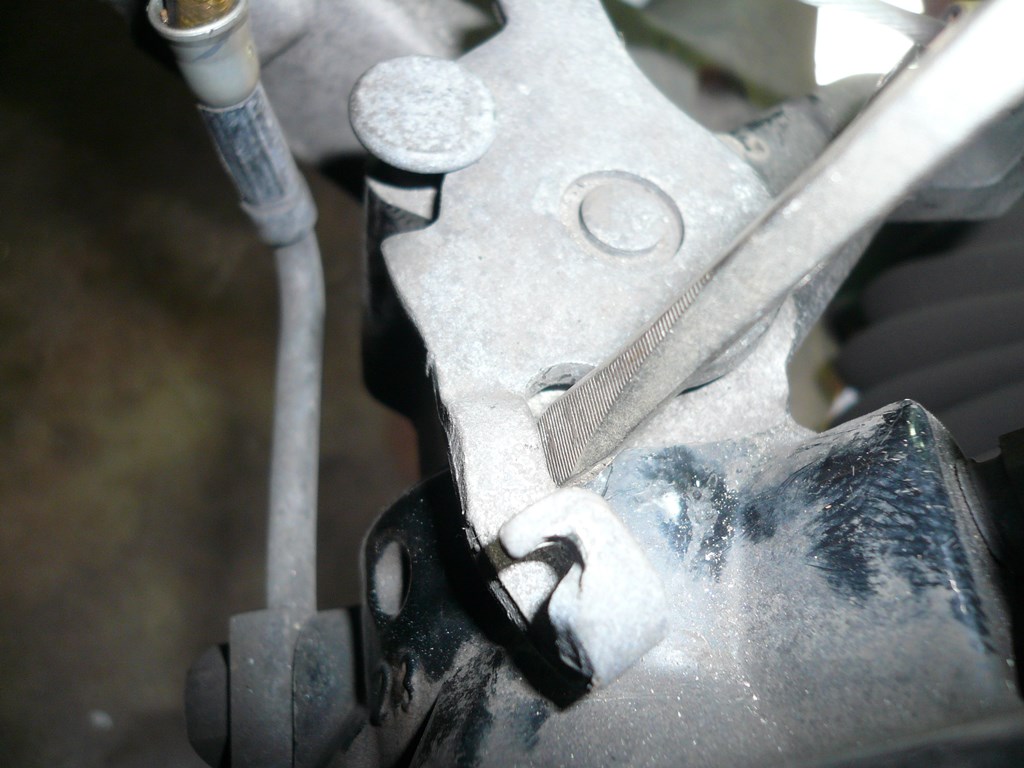
Using another flat screwdriver push here inward and forward to remove the cable from the "hook".

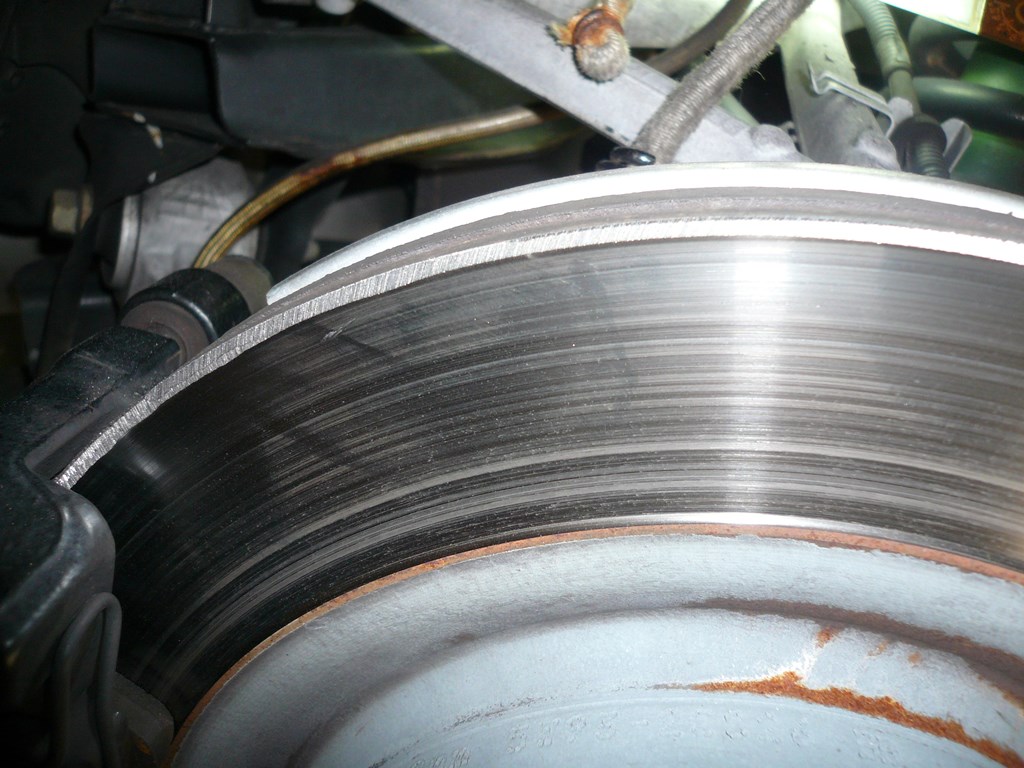
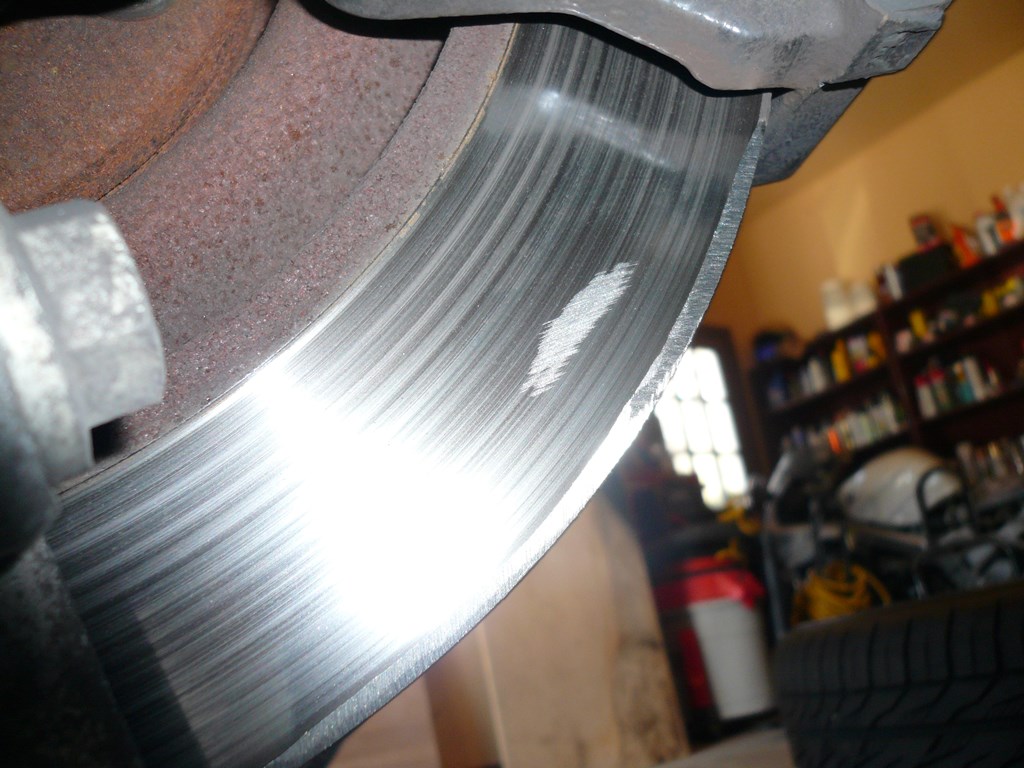
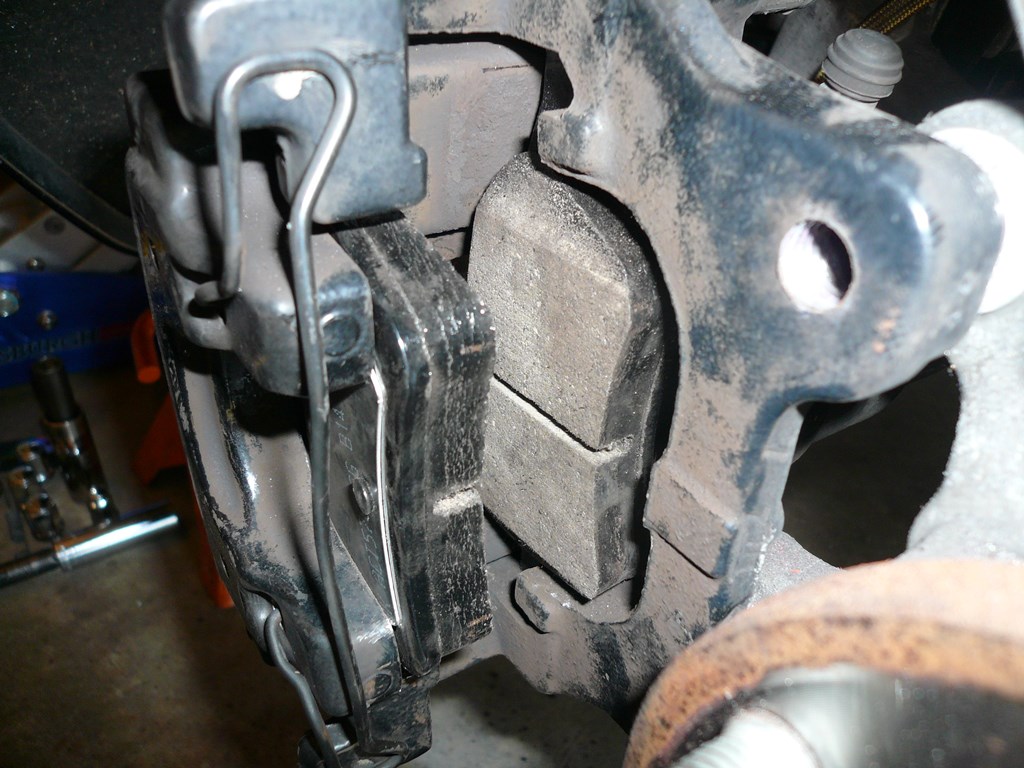
Now, if you have a huge groove like this on the front and back of the rotor the pads won't slip past it. I ground mine out front and back like so..
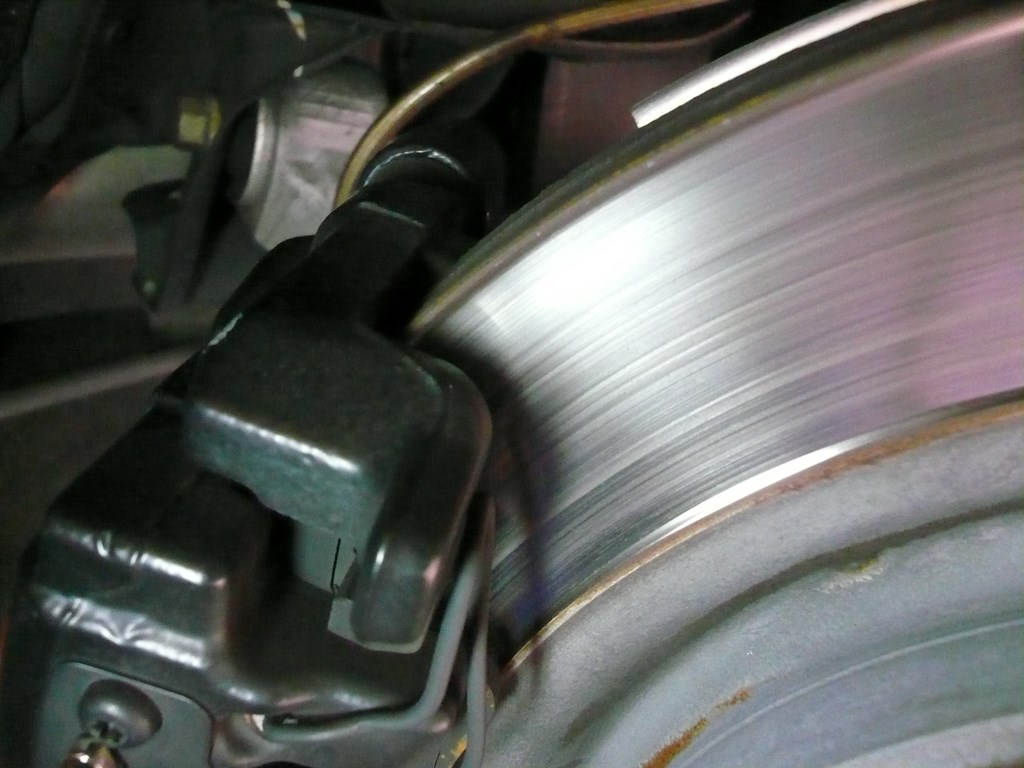
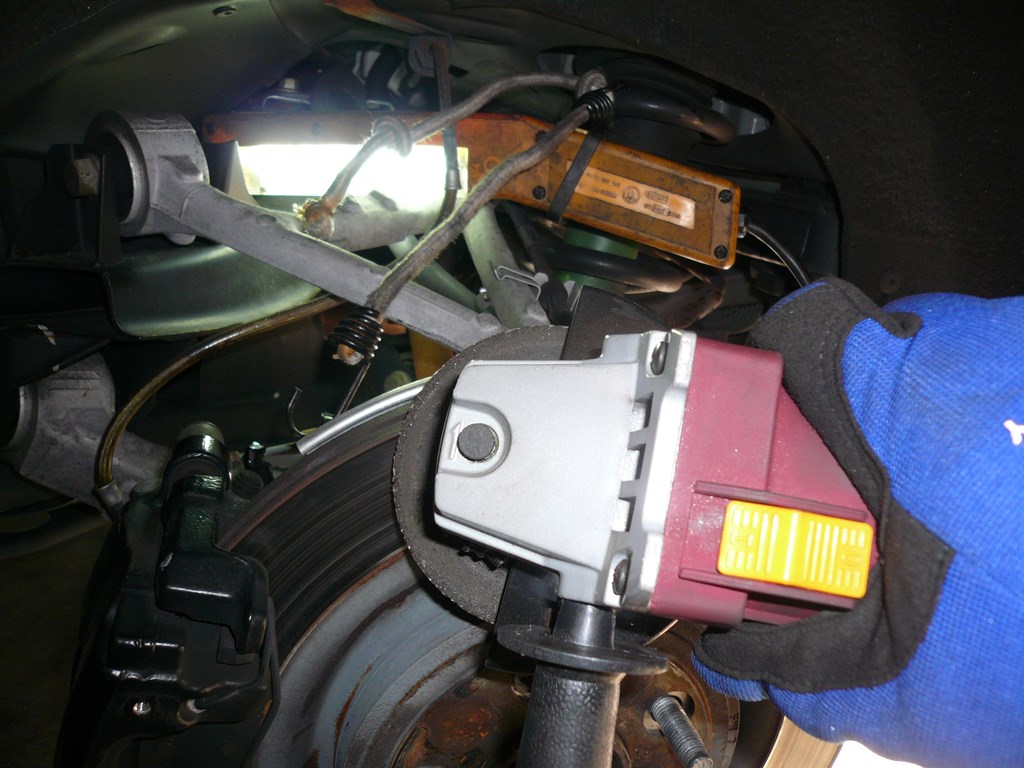
The fun part is doing the back. You have to do it here...
^Once you've ground the back turn the disc so the part you ground off on the back is in the middle of the caliper. Now the pads can slide off the disc without catching that ridge!
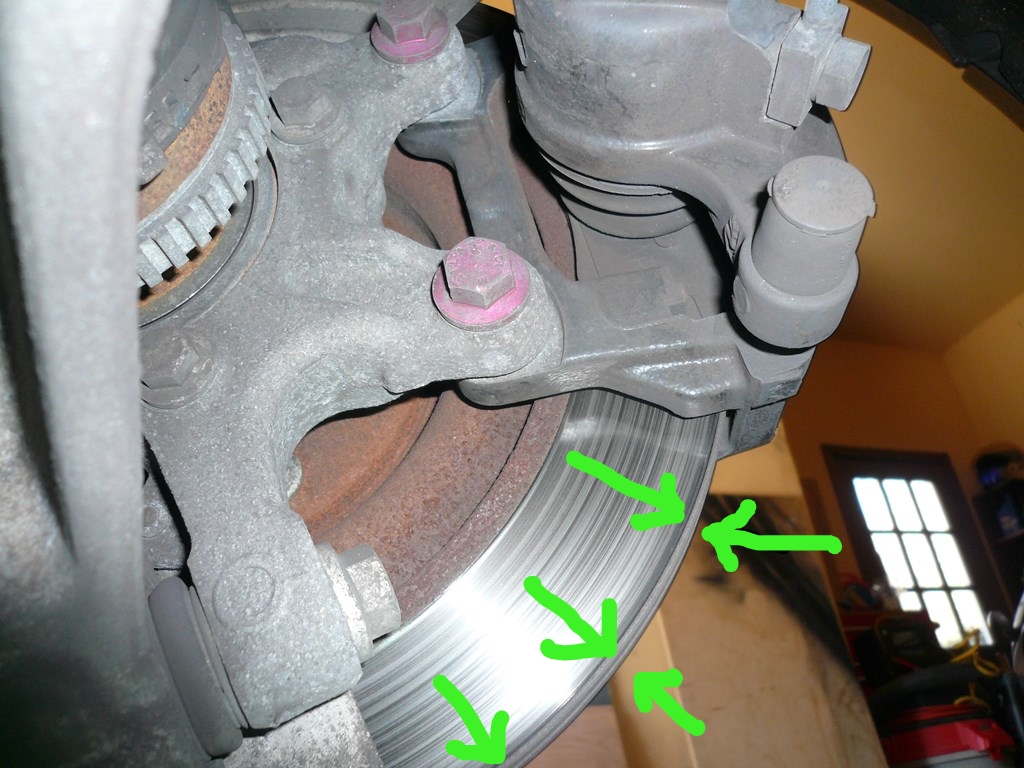
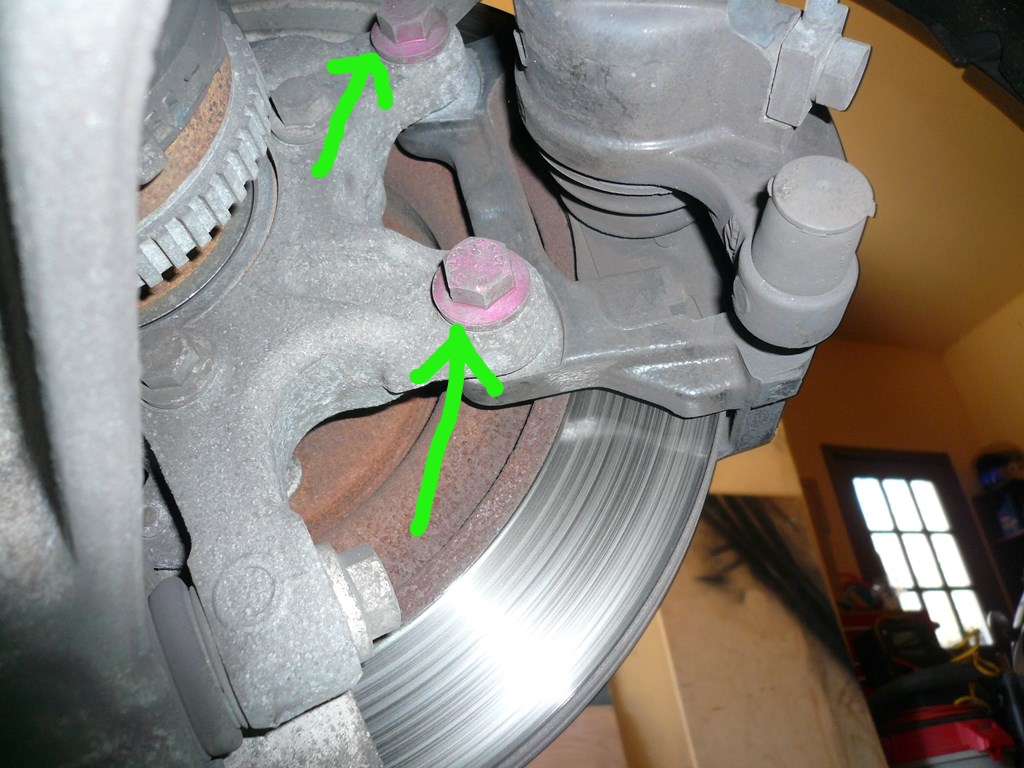
You need a way to support the caliper once you remove it. NEVER let it hang by the brake line or ABS wire. I use a ratty old bungie. Remove the pink bolts:
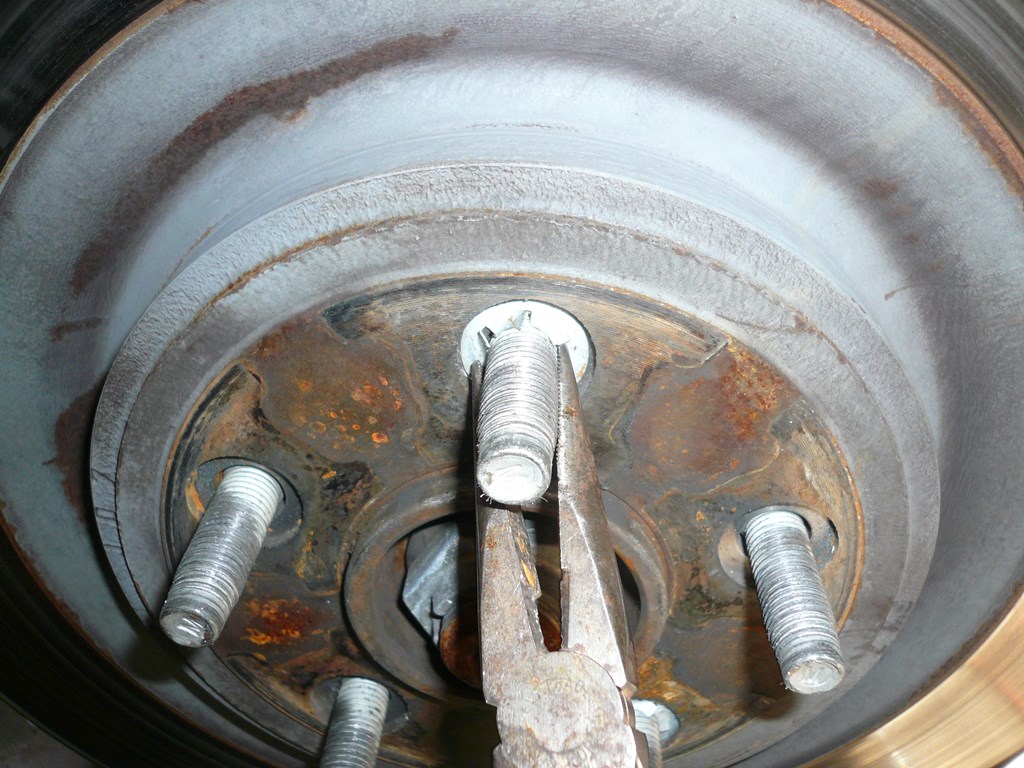
Hang the caliper. To remove the disc you get to deal with these little jewels. I used needle nose pliers to unsrew them. Some back pressure on the disc helps them come off.
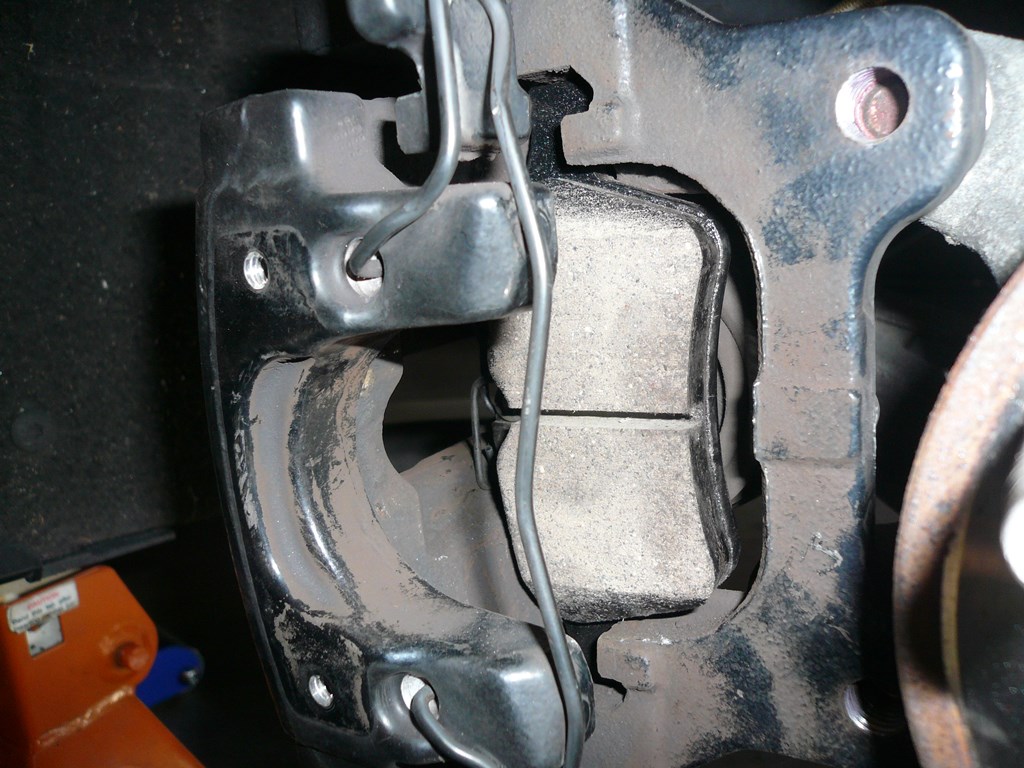
Once the disc is off put the caliper back in it's place and with a few threads install the top bolt to hold it. Pop the old pads out. Should look like this:
1st things first, you'll need the caliper tool. I bought this one at Harbor Freight for $35 with a coupon. You don't need any of the adapters! The one on the main tool works perfectly. Use the one on the right.

Pads (hint: pad with the spring on top goes against the caliper piston)

Some of the tools you'll need:

Torx for the "R" cover is a T25.
Caliper mount bolts are 15mm
Prep!
Crack all the lugs on both rear wheels while the car is on the ground. Chock both front wheels, RELEASE the parking brake and put the car in NEUTRAL. Neutral is needed so you can turn the discs with one wheel on the ground. They won't turn if the car is in park. I did one wheel at a time, this is the drivers side. Jack, insert a jack stand and remove the wheel.
Remove the "R" cover:

Remove the parking brake cable as follows. Using needle nose pliers remove the return spring.

By inserting a flat screwdriver here you can pry forward and release tension on the cable.

Using another flat screwdriver push here inward and forward to remove the cable from the "hook".

Now, if you have a huge groove like this on the front and back of the rotor the pads won't slip past it. I ground mine out front and back like so..


The fun part is doing the back. You have to do it here...


^Once you've ground the back turn the disc so the part you ground off on the back is in the middle of the caliper. Now the pads can slide off the disc without catching that ridge!
You need a way to support the caliper once you remove it. NEVER let it hang by the brake line or ABS wire. I use a ratty old bungie. Remove the pink bolts:

Hang the caliper. To remove the disc you get to deal with these little jewels. I used needle nose pliers to unsrew them. Some back pressure on the disc helps them come off.

Once the disc is off put the caliper back in it's place and with a few threads install the top bolt to hold it. Pop the old pads out. Should look like this:

Popular Reply
flyc2c Feb 2, 2015 03:35 PM
Senior Member
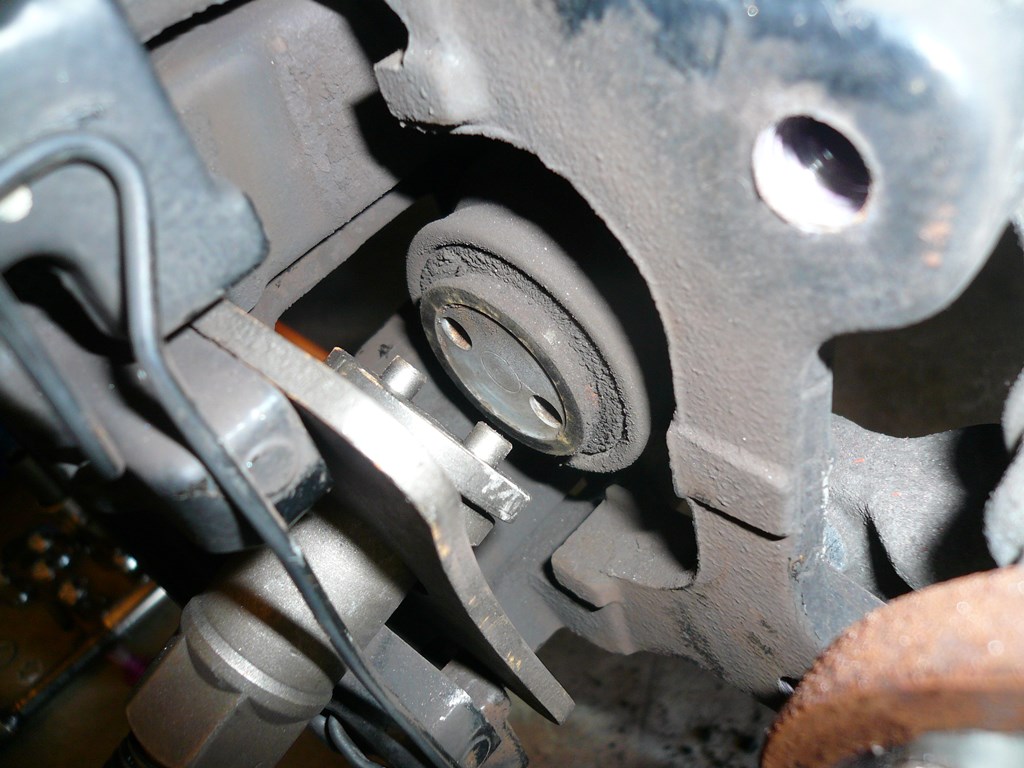
You have to turn this piston while applying pressure to it. That's why you need the tool. Tricky part is getting the tool in there. Here it is step by step.
A little outward pressure on this spring helps get the hex part through..
In position.
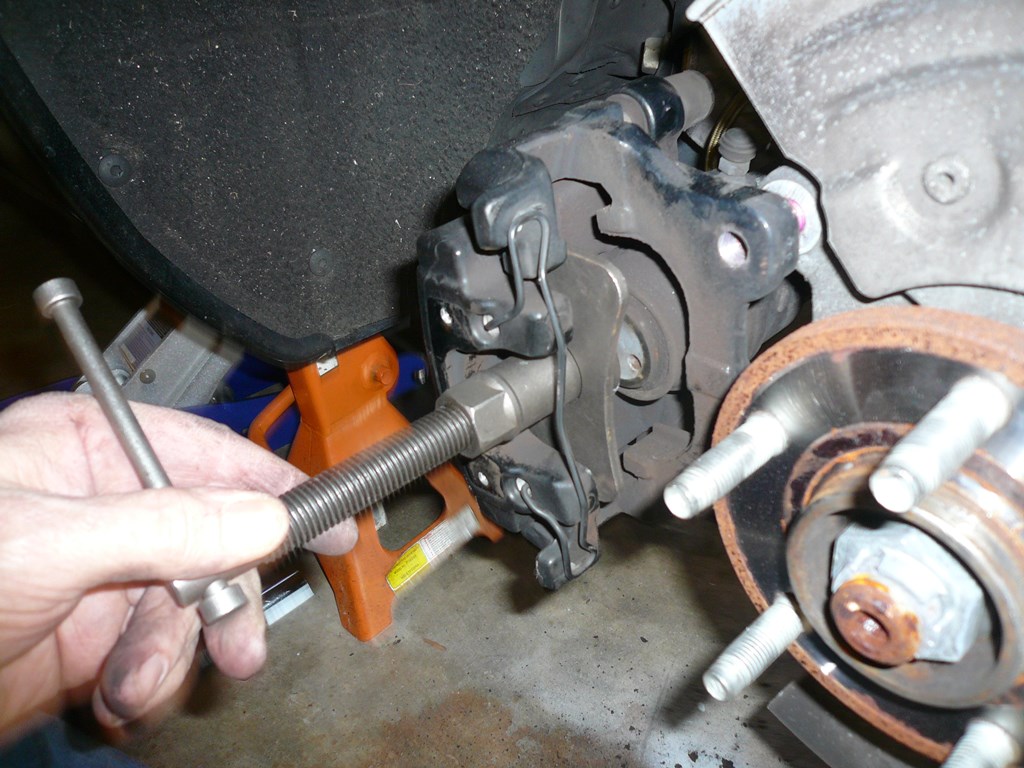
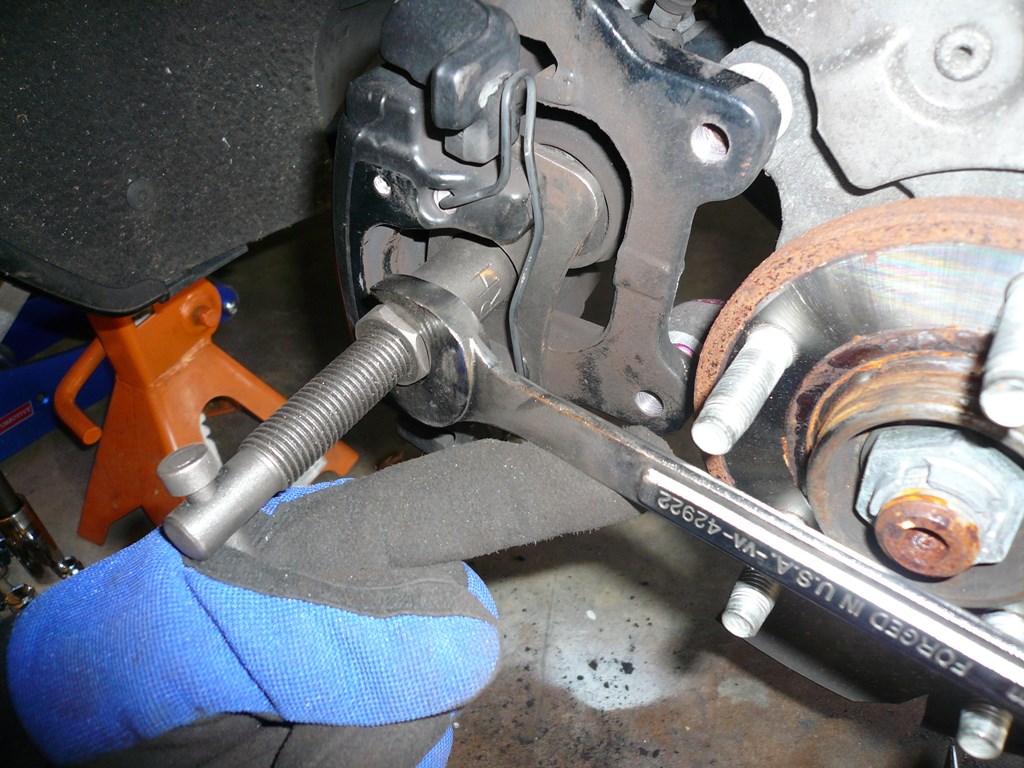
Now line up the tool with the piston:
Turn the hex part with your fingers(It's right hand thread) so it pushes the backing plate against the caliper bracket. What you should have is the pins on the end of the tool inserted in the brake piston and the plate firmly against the bracket. Now put in the lower caliper mounting bolt. Just a few turns is fine to hole it. Now tighten (It was a 22mm wrench) (remember RH thread) the hex which applies pressure to the piston. Using the T handle on the end of the tool turn clockwise to turn the brake piston in. The 22mm hex will loosen as the piston goes in. Continue to tighten the 22mm hex and then turn the T handle until the piston won't turn anymore.
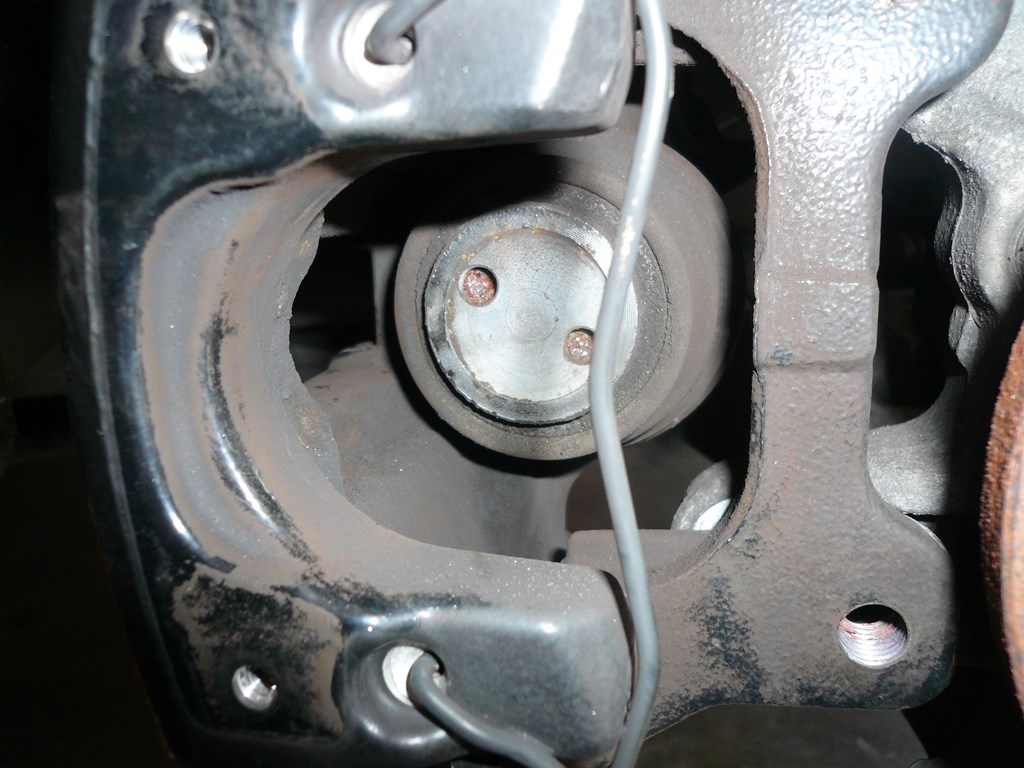
Here's the piston all the way in:
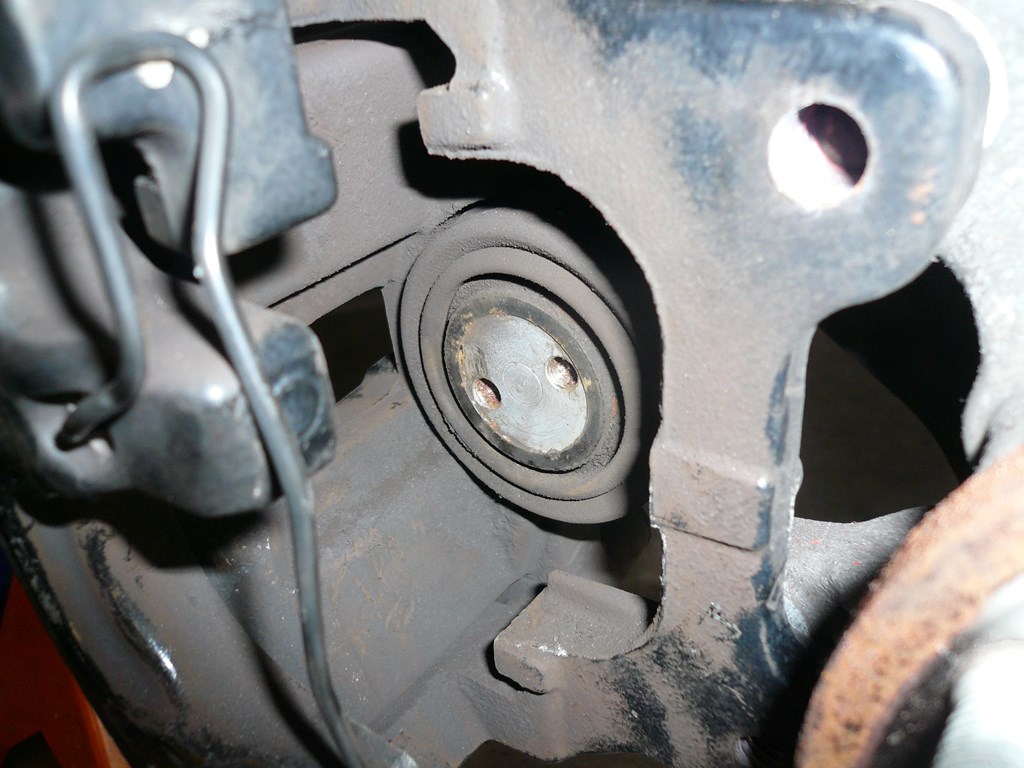
Install the inside pad first. The one with the spring on top of it!
Outside pad...
Remove the pink caliper bolts again and support the caliper out of the way. Install the new or old discs (if they are in spec) and install those caliper retaining clips that slide down the wheel studs. I just pushed them down with a socket. Install the pink caliper bolts and torque to spec. (98lb ft I think).
Now for the parking brake cable. Using your finger pull the pivot forward to move the cable "hook" back and slide the cable over the hook.
Reinstall the return spring:
And the "R" cover!
Reinstall the wheel getting the lugs as snug as you can by hand. Remove jack stands and jack and start the other side!
After you're done with both sides with both wheels on the ground put the car back in to park with the car off. Now push the brake pedal a few times until it's firm.
TORQUE THE LUG NUTS!!
Now start the vehicle and push the brake pedal until it's good and firm. It may take several pumps. Now release the brake and set the parking brake. If you get an error, don't panic. Some more pumping and parking brake setting and it'll go away.
DONE!!
Use standard brake pad breaking in procedure. Gentle use of the brakes for about 100 miles is usually accepted.

A little outward pressure on this spring helps get the hex part through..

In position.

Now line up the tool with the piston:

Turn the hex part with your fingers(It's right hand thread) so it pushes the backing plate against the caliper bracket. What you should have is the pins on the end of the tool inserted in the brake piston and the plate firmly against the bracket. Now put in the lower caliper mounting bolt. Just a few turns is fine to hole it. Now tighten (It was a 22mm wrench) (remember RH thread) the hex which applies pressure to the piston. Using the T handle on the end of the tool turn clockwise to turn the brake piston in. The 22mm hex will loosen as the piston goes in. Continue to tighten the 22mm hex and then turn the T handle until the piston won't turn anymore.

Here's the piston all the way in:

Install the inside pad first. The one with the spring on top of it!

Outside pad...

Remove the pink caliper bolts again and support the caliper out of the way. Install the new or old discs (if they are in spec) and install those caliper retaining clips that slide down the wheel studs. I just pushed them down with a socket. Install the pink caliper bolts and torque to spec. (98lb ft I think).
Now for the parking brake cable. Using your finger pull the pivot forward to move the cable "hook" back and slide the cable over the hook.

Reinstall the return spring:

And the "R" cover!

Reinstall the wheel getting the lugs as snug as you can by hand. Remove jack stands and jack and start the other side!
After you're done with both sides with both wheels on the ground put the car back in to park with the car off. Now push the brake pedal a few times until it's firm.
TORQUE THE LUG NUTS!!
Now start the vehicle and push the brake pedal until it's good and firm. It may take several pumps. Now release the brake and set the parking brake. If you get an error, don't panic. Some more pumping and parking brake setting and it'll go away.
DONE!!
Use standard brake pad breaking in procedure. Gentle use of the brakes for about 100 miles is usually accepted.
You have to turn this piston while applying pressure to it. That's why you need the tool. Tricky part is getting the tool in there. Here it is step by step.
Attachment 155714
A little outward pressure on this spring helps get the hex part through..
Attachment 155715
In position.
Attachment 155716
Now line up the tool with the piston:
Attachment 155717
Turn the hex part with your fingers(It's right hand thread) so it pushes the backing plate against the caliper bracket. What you should have is the pins on the end of the tool inserted in the brake piston and the plate firmly against the bracket. Now put in the lower caliper mounting bolt. Just a few turns is fine to hole it. Now tighten (It was a 22mm wrench) (remember RH thread) the hex which applies pressure to the piston. Using the T handle on the end of the tool turn clockwise to turn the brake piston in. The 22mm hex will loosen as the piston goes in. Continue to tighten the 22mm hex and then turn the T handle until the piston won't turn anymore.
Attachment 155718
Here's the piston all the way in:
Attachment 155719
Install the inside pad first. The one with the spring on top of it!
Attachment 155720
Outside pad...
Attachment 155721
Remove the pink caliper bolts again and support the caliper out of the way. Install the new or old discs (if they are in spec) and install those caliper retaining clips that slide down the wheel studs. I just pushed them down with a socket. Install the pink caliper bolts and torque to spec. (98lb ft I think).
Now for the parking brake cable. Using your finger pull the pivot forward to move the cable "hook" back and slide the cable over the hook.
Attachment 155722
Reinstall the return spring:
Attachment 155723
And the "R" cover!
Attachment 155724
Reinstall the wheel getting the lugs as snug as you can by hand. Remove jack stands and jack and start the other side!
After you're done with both sides with both wheels on the ground put the car back in to park with the car off. Now push the brake pedal a few times until it's firm.
TORQUE THE LUG NUTS!!
Now start the vehicle and push the brake pedal until it's good and firm. It may take several pumps. Now release the brake and set the parking brake. If you get an error, don't panic. Some more pumping and parking brake setting and it'll go away.
DONE!!
Use standard brake pad breaking in procedure. Gentle use of the brakes for about 100 miles is usually accepted.
Cee Jay
Veteran Member
close


May 4, 2026
- Join DateApr 2013
- LocationKaysville, Utah, US
- Posts:11,890
-
Likes:6,153
-
Liked:6,400 Times in 3,740 Posts
100% agree, get the caliper piston compression tool. Up until I used one from a buddy of mine, I did it the hard way; a pair of long nose pliers, opened up to use the tips in the piston holes. Same deal, push and twist. The pliers DID work, but it wasn't friendly on my hands and it took way longer than it should have.
It's all about the proper tools! Now the job takes no more than 30 minutes per side instead of 45+ minutes, along with bruised fingers.
It's all about the proper tools! Now the job takes no more than 30 minutes per side instead of 45+ minutes, along with bruised fingers.
Veteran Member
jagtoes
Veteran Member
close
Feb 22, 2025
- Join DateSep 2013
- LocationNY
- Posts:5,209
-
Likes:424
-
Liked:1,847 Times in 1,238 Posts
I usually remove the spring clip and also leave the rotor in place and turn the piston in while holding the caliper. I would also check the rotor thickness if I see a larger ridge otherwise I can usually get the old pads over the ridge without grinding the ridge. Nice write up. Thanks.
Ordering new discs today. The backs were really heavily ridged although surprisingly the thickness is within spec. I thought of holding the caliper too I just went a different route. Holding the caliper while tightening the hex and turning the T handle was more challenge than I was ready for! It's certainly a valid method.
Senior Member
8bit
Senior Member
close
Aug 22, 2023
- Join DateOct 2013
- LocationScotland
- Posts:618
-
Likes:149
-
Liked:197 Times in 125 Posts
I've done my rear pads and discs twice now, never removed the handbrake cable personally, always managed to maneuver the caliper out of the way and support it using a cable tie to hang it off the suspension spring. Otherwise spot on IMHO. Caliper rewind tool is a must.

Member
A few notes about working on brakes.
There is no reason to mess with the parking brake setup at all when doing a rear pad change on this vehicle. It could cause issues with the function and calibration of the assembly.
Never ever take a grinder to any part of your rotors unless you are bored and intend to immediately toss them in a trash can, I seriously can't stress this issue enough.
The two pink looking bolts do not need to removed unless you are changing out the rotors. Rotor removal is not needed for a pad swap. If rotors are being removed the caliper will already be removed from the caliper bracket making getting to those pink bolts much easier.
The spring clip on the pictures on the front of the caliper needs to be removed. Removal allows the caliper to slip away from the caliper bracket and makes it much easier to attach the special compression tool.
To remove the caliper from its caliper bracket there are two plastic caps on the back of the caliper. They are very easy to remove. Under the caps will be a 7mm allen bolt. Remove both these bolts. The caliper will be snug but can be slid from the caliper bracket leaving the pads in their correct place resting on the rotor. The caliper bracket actually holds the pads in notches.
Once you have seated the the special compression tool into the two notches and tightened the adjustment tube, do not futher tighten this while spinning the compression tool. The whole purpose of that tool is that it turns the piston at a constant rate while compressing the piston at the same time. It is very easy to hold the caliper in one hand while turning the compression tool with the other, no need for anything else.

Senior Member
britannia
Senior Member
close
Feb 8, 2024
- Join DateJul 2011
- LocationFederal Way,WA
- Posts:665
-
Likes:149
-
Liked:110 Times in 88 Posts
When retracting the caliper I bleed the displaced fluid into a jar; you don't want that 'used' fluid to remain in the system. Don't forget to top up m/c with fresh; never, leave cap off of fluid container too long: it's hygroscopic (attracts water very easily). Water in brake fluid is a certain killer.
I have never found the need to remove the disc; if you have a major groove toss them.
Great pictures............
Cheers Adrian
I have never found the need to remove the disc; if you have a major groove toss them.
Great pictures............
Cheers Adrian
Senior Member
8bit
Senior Member
close
Aug 22, 2023
- Join DateOct 2013
- LocationScotland
- Posts:618
-
Likes:149
-
Liked:197 Times in 125 Posts
Quote:
I have never found the need to remove the disc; if you have a major groove toss them.
Great pictures............
Cheers Adrian
I've never had to remove any fluid to retract the pistons.Originally Posted by britannia
When retracting the caliper I bleed the displaced fluid into a jar; you don't want that 'used' fluid to remain in the system. Don't forget to top up m/c with fresh; never, leave cap off of fluid container too long: it's hygroscopic (attracts water very easily). Water in brake fluid is a certain killer.I have never found the need to remove the disc; if you have a major groove toss them.
Great pictures............
Cheers Adrian
Veteran Member
jagtoes
Veteran Member
close
Feb 22, 2025
- Join DateSep 2013
- LocationNY
- Posts:5,209
-
Likes:424
-
Liked:1,847 Times in 1,238 Posts
FYI I didn't see any disk brake grease used on the sliding surfaces. Did I miss that step or don't you use it.
Senior Member
britannia
Senior Member
close
Feb 8, 2024
- Join DateJul 2011
- LocationFederal Way,WA
- Posts:665
-
Likes:149
-
Liked:110 Times in 88 Posts
8bit,
Fluid in the caliper will always shows signs of contamination; if you don't remove it, how will you know! It's not a big expense, even for a Scotsman!
Always go 1st class on brakes, please..........
Retired UK apprentice & Boeing engineer, Adrian
Fluid in the caliper will always shows signs of contamination; if you don't remove it, how will you know! It's not a big expense, even for a Scotsman!
Always go 1st class on brakes, please..........
Retired UK apprentice & Boeing engineer, Adrian
Senior Member
8bit
Senior Member
close
Aug 22, 2023
- Join DateOct 2013
- LocationScotland
- Posts:618
-
Likes:149
-
Liked:197 Times in 125 Posts
But you wouldn't remove the fluid from the caliper to wind the piston back, you'd remove it from the reservoir using a syringe (or turkey baster). If you remove it from the caliper you'd have to either drain that whole line or clamp the hose, not a good idea on braided hoses. You'd also then have to bleed it afterwards.
If just doing a change of pads or pads and discs it's not necessary to remove brake fluid at all on an XK/XKR (indeed on most cars I've changed brake parts on), just loosening the cap on the reservoir a bit to allow a little air to be pushed out when winding in the piston is sufficient.
As for brake fluid contamination, yes it will change over use but typically changing it every 2 years given normal usage of the car is sufficient, adjusting for things like track days or other situations of hard brake use.
You're right, it's not expensive (in the grand scheme of things) to replace brake fluid, even to do all of it, but it's just not necessary to have to lose any when changing pads and discs.

Banned
FlyC2C Excellent write-up thank you so much! This is what makes forums worthwhile. Awesome of you to take the time to detail this
Two things I might add to this.
#1 - I always recommend that when about to do work on an engine, trans, or brakes to either spray the area with a high pressure sprayer or at least a garden hose to try and make the area as clean as possible. Makes things much easier also may help to see any mistakes or leaks when checking it shortly after repair.
#2 - I did not see you using any brake cleaner either before or after retracting that piston. I'd strongly recommend spraying the rubber bellow around the brake piston to remove as much dirt and debris before you retract it... spray the whole area well. Brake cleaner costs @$2-3 a can.
There's also a lot of mention about removing brake fluid and whether that is necessary, I'd recommend replacing the brake fluid period if you're that far along. It costs between $8 (for regular DOT 4 fluid to $20 for the SL.6 I used and purchased from Amazon), unless it was recently done now is a good time and you're already in there. Might as well make it a complete brake job.
Cee Jay
Veteran Member
close
May 4, 2026
- Join DateApr 2013
- LocationKaysville, Utah, US
- Posts:11,890
-
Likes:6,153
-
Liked:6,400 Times in 3,740 Posts
Quote:
#2 - I did not see you using any brake cleaner either before or after retracting that piston. I'd strongly recommend spraying the rubber bellow around the brake piston to remove as much dirt and debris before you retract it... spray the whole area well. Brake cleaner costs @$2-3 a can.........
ALWAYS use brake cleaner beforehand, and spray the new (or old) rotor to get the shipping slime (and your fingerprints) off before you complete the job.Originally Posted by Leeper
........... #2 - I did not see you using any brake cleaner either before or after retracting that piston. I'd strongly recommend spraying the rubber bellow around the brake piston to remove as much dirt and debris before you retract it... spray the whole area well. Brake cleaner costs @$2-3 a can.........
Brake cleaner $$$..... Not at Walmart it isn't...
CRC Brakleen Brake Parts Cleaner, 19 Wt Oz - Walmart.com
I think someone there effed up pretty bad.
Anyway, does anyone out there know where to buy Brake Cleaner in bulk, like a gallon can? I used to get it from an indie car parts place near me, but they went under about eight years ago and I can't find any elsewhere.
Banned
Amazon -
http://www.amazon.com/s/ref=nb_sb_no...=brake+cleaner
Good point on spraying the rotor too CeeJay, should have mentioned that as well, either brake cleaner or some sort of good cleaner to remove the production+shipping oils and finger oils that is really important
http://www.amazon.com/s/ref=nb_sb_no...=brake+cleaner
Good point on spraying the rotor too CeeJay, should have mentioned that as well, either brake cleaner or some sort of good cleaner to remove the production+shipping oils and finger oils that is really important

Cee Jay
Veteran Member
close
May 4, 2026
- Join DateApr 2013
- LocationKaysville, Utah, US
- Posts:11,890
-
Likes:6,153
-
Liked:6,400 Times in 3,740 Posts
When in a pinch, I've used a long-nosed plier, insert the tips of each lever into the piston holes then push and twist clockwise. Doing so hurts a bit, but it is quite doable.
Member
Thanks for the write-up, I need to do the backs soon on my car. I think I will try mine a little differently though. I don't need to replace my rotors, so I'll leave the calipers attached, remove the rubber covers over the guide pins and then remove the pins. That will allow me to separate the caliper halves, remove the old pads and install the new ones. And it also allows me to grease up the guide pins with new silicone grease. And I always put silicone grease in the pad slides. I usually also put some anti-squeal stuff on the backs of the pads just to help to avoid the obnoxious screeches you can get from new pads.
Govtslug
Govtslug

guy
Veteran Member
close

Today
- Join DateApr 2008
- LocationOttawa, Ontario, Canada
- Posts:3,674
-
Likes:4,077
-
Liked:1,674 Times in 1,169 Posts
Just a minute... did you add the R emblem to the cover? Mine are painted on, and weathered.
Its a very nice touch.
Its a very nice touch.
Quote:
Its a very nice touch.
Yup. Buy these, cut the loop of for the chain and use some 3m outdoor adhesive tape. They are the perfect size to cover the old decal.Originally Posted by guy
Just a minute... did you add the R emblem to the cover? Mine are painted on, and weathered.Its a very nice touch.
R performance Key Chain - Mina Gallery Inc