When you click on links to various merchants on this site and make a purchase, this can result in this site earning a commission. Affiliate programs and affiliations include, but are not limited to, the eBay Partner Network.
Probably harder to get everything lined up �just right�, but I don�t see why it couldn�t be done. In fact, you�ll probably end up with a better water tight seal, as you will have glued all the way around.
Thanks man !
Even though I have a spotty record when it comes to DIY projects ( C grade , kind of ) , I really don�t want to spend 2500-4000 that replacement would cost; esp since it�s a 2007 car with 140k miles on it.
Having said that , it�s not that i won�t go for it if the regluing fails . I am not parting with the jag till one of us is totally unquestionably dead :-)
You have a 2007 XKR and you're in Houston, TX. If that's the original top, you're lucky it lasted 18 years - and it's beyond the point where regluing the window makes sense. You won't be satisfied with the result.
Think of it this way - convertible tops are like tires, brakes, hoses, and many other parts that don't last forever and need to be replaced.
I think you knew that when you bought a convertible.
Yes, and I as well. I've been re-gluing and and repairing for the past couple of years and am at that point, it's time.
Just need to find a shop with the expertise and reputation for quality workmanship, then, what is a recognized brand? Mine is original.
[QUOTE=Stuart S;2786323]You have a 2007 XKR and you're in Houston, TX. If that's the original top, you're lucky it lasted 18 years - and it's beyond the point where regluing the window makes sense. You won't be satisfied with the result.
Think of it this way - convertible tops are like tires, brakes, hoses, and many other parts that don't last forever and need to be replaced.
I think you knew that when you bought a convertible.
I'll be replacing mine soon.[/QUOTE
I actually knew nothing when I bought the vehicle ; I didn�t know how to drive & didn�t have a car till I was 25. N 7 yrs after the first one when I bought the jag my knowledge about cars was still an F ( now it�s C- or D + )
I know the top has lasted me well . I can imagine spending 3k to replace it bc the fabric is torn , or there is a big gaping hole too ugly to stitch-repair ; i find it tough to spend 3k bc even in this day n age mankind doesn�t have a reliable way to glue glass to canvas lol
has anyone tried to reglue the window with the top removed from the car ? More cumbersome I know but u would be able to apply more direct pressure on the glued areas n also avoid the structural tensions working against the glue?
Last edited by Kanwarpreet Baweja; Sep 17, 2024 at 01:18 PM.
4. Adhesive Cleaner (Already had)
5. Masking tape, 1" wide and 2" wide. (Already had)
6. Cotton swabs. (Already had)
7. Rubber gloves. (Already had) You'll probably need 2 or 3 pair.
8. Standard caulk gun (Already had) for the adhesive tube.
PHASE 2. PREPARATION
1. I inspected the top again to see where it separated from the glass. I noticed a gap of about 1/4" where the top appears to have shrunken downward from the glass. The top fabric wouldn't stretch, so I decided to apply masking tape over that visible section so I wouldn't get adhesive all over it.
2. I taped the glass to keep it free of excess primer and adhesive, which are black and very sticky.
Here's the glass completely taped.
3. Next, I taped the top, making sure that I overlapped about 1/4" of tape around the upper edge, in order to keep it free of adhesive. Here's the upper edge of the top being taped.
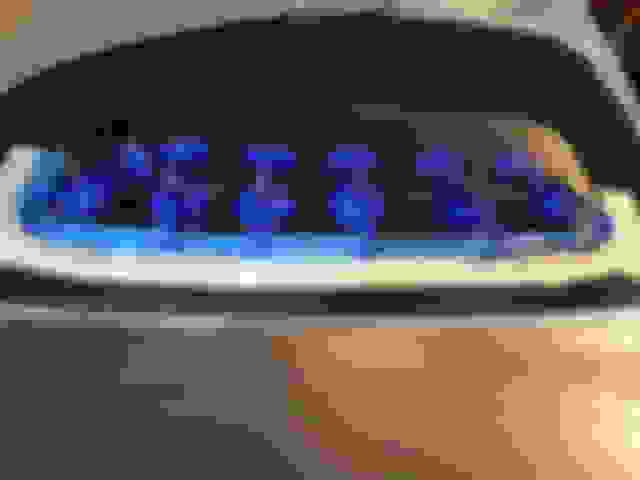
4. I put all the suction cup clamps on the glass and aligned them with the upper edge of the top, but left them loose. Because the adhesive dries very quickly, I wanted the clamps to already be in place so I could tighten them down as soon as I applied the adhesive.
5. Lastly, I added a wider band of tape just in case I got sloppy. I'm glad I did, because I did. Disregard the green plant food measuring cup. I was going to use it as a wedge to separate the top and glass in order to get the adhesive in, but doing so was cumbersome and I simply used my left hand to hold the top up while I applied the adhesive cleaner, primer, and sealant with cotton swabs. The arrow is the point where the top separated from the glass.
PHASE 3. THE DIRTY STUFF
1. Now's the time for the gloves. I wiped both surfaces with cotton swabs soaked in adhesive cleaner, and then used new swabs to dry them off.
2. I waited about 5 minutes and then used cotton swabs to carefully apply the 3M Single Step Primer to both surfaces. I let that dry for about 10 minutes. I left all the clamps loose. Here's the open bottle of primer.
3. I decided to not use the plastic spout that came with the 3M adhesive cartridge since that would make a mess. Instead, I used cotton swabs to apply that adhesive. I pulled the tab to open the bottom of that cartridge so I could put it in the caulk gun and squeeze a small amount of adhesive into a leftover yogurt cup. Here's the opened adhesive cartridge.
And the adhesive in the cup.
I kept the tip of that cartridge temporarily sealed with a cotton swab. I used the cotton swabs to apply a thin bead of adhesive to both surfaces as quickly as I could. When that swab ran out of adhesive, I tightened the clamps and got a new cotton swab and repeated the process. Here's the separated section completely glued. As you can see, it's messy and I'm glad I masked it to keep it free of adhesive.
PHASE 4. THE HOME STRETCH
1. Although the adhesive sets up fast, I didn't want to try to remove the masking tape too soon and risk smearing adhesive on the glass, top, or paint. I waited about 30 minutes and then removed the masking tape.
DONE!
I decided to leave the clamps on overnight, just to make sure that the bond is as strong as possible.
A note about the Suck-N-Clamps. They are the greatest thing since sliced bread! I was skeptical when I saw them on Amazon, but they work much better and are far easier to use in this repair application than a standard "C" clamp. As you can see from my repair, it wasn't necessary to raise the top to insert a "C" clamp above and below the separation, or use a board to distribute the clamping force (although you could, if you wanted to do so).
I'm not a mechanic, but I'm somewhat mechanically inclined since I assemble my grandkids toys. On a scale of 1 to 10, I'd give this job a 2 - really easy. All it takes it patience and taking your time. If I can do it, so can you.
It didn't take much primer or adhesive to do this repair. There's at least 90% of the primer and adhesive left, so if you're interested in doing this repair yourself, send me a PM and I'll sell the leftover primer, adhesive, and clamps for half of what I paid plus shipping at cost.
Hope this helps!
Stuart
Just curious how long did the repair hold? Would you have done anything differently?
Just curious how long did the repair hold? Would you have done anything differently?
The 3M adhesive didn't hold very long, and after it failed I used Rhino Glue, which was great and held for many years. You need to read further in that thread to the end. I decided to replace the original top even though the repaired rear window was still holding up because the rest of the top had creases and was showing its age.
Many thanks to the innovative pioneers on this forum that are willing to work more solutions than just throwing money at it.
My 2010 XK finally decided it was time for the window to let go - 14 years is good for any glue I would say.
Unfortunately my car is outside in the 100 degree DC metro heat and I have a few more bills than cash until I sell some properties and such.
Nice fellow in Alexandria will replace my top for $2,200 in one day but I don�t have that cash handy today - so many blessing to Stuart and his post.
I followed Stuart�s rhino glue solution and apart from me rushing and my sloppiness it has worked very well for the last month.
I did add an additional component - the rarely seen and highly regarded Jaguar XK Rear Window Support System. The JXKRWSS or affectionately known as the Jags *** - which is a complex system of toliet paper rolls and leather glued together and inserted into the rear window well to ease the weight and stress of the glass window on the glue and canvas.
Pictures attached and I am taking orders for $2,200 per set. Cash or diamonds only.
As a Triumph, Lotus, and now second time Jaguar owner, thank you to the community of fine folks that make these cars fun and exciting to own.
Best,
Ash Worboys The toliet paper rolls worked well but they seemed to hurt the big cat�s prestige- kind like being a big shot and walking around with toilet paper attached to your shoe. This seems more civilized. It does seem to help with the weight especially on the very hot days. Well, it guess it had to happen sooner or later.
Well, it lasted about year but finally failed again. Got a new top installed on DC at BZ Auto upholstery for $2,600 out the door.