Air Con leak


Thread Starter
|
Veteran Member


Joined: Apr 2012
Posts: 1,854
Likes: 987
From: UK
I have had to regas our a/c both last summer and just today, so next year I must put some effort into finding the leak.
Is there a weak spot that I should check first?
Is there a weak spot that I should check first?

Veteran Member
Joined: Apr 2014
Posts: 4,792
Likes: 3,006
From: Jersey, Channel Islands

Veteran Member
Joined: Apr 2014
Posts: 4,792
Likes: 3,006
From: Jersey, Channel Islands
Hi RD
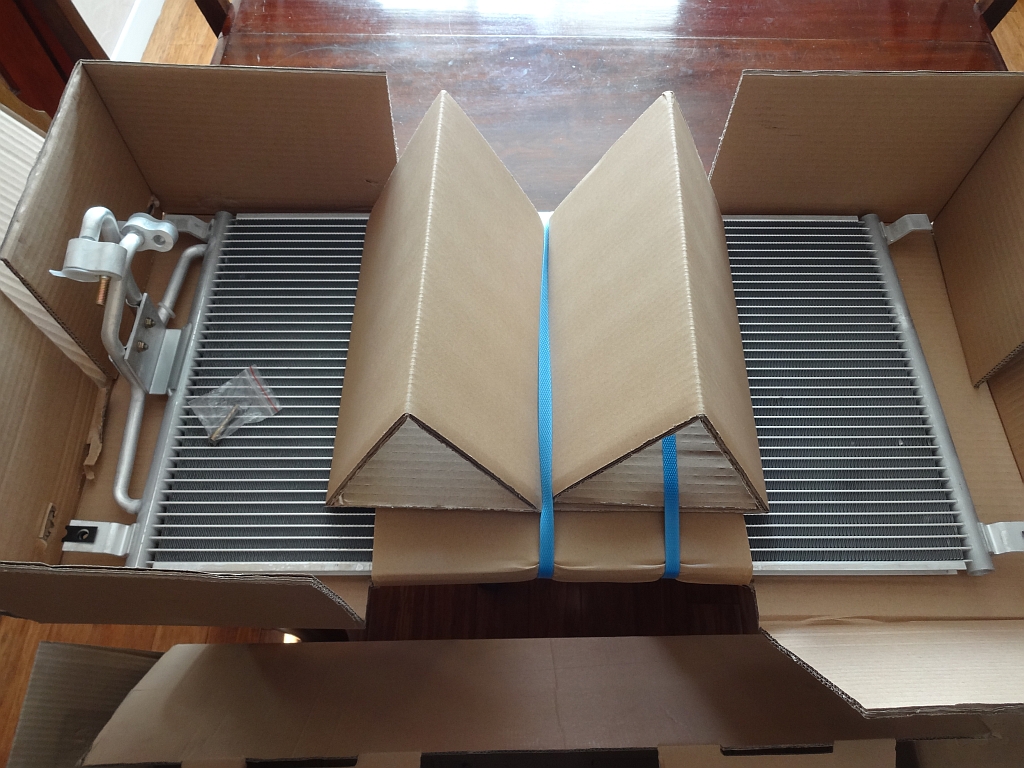
I've just completed this as part of a front end plumbing refurb. I didn't find anything particularly difficult, although I did remove the radiator. IMO it's much easier in the long run.
It might be possible to extract the condenser without the rad, as the whole assembly can be leant forward to get to the two condenser retaining bolts at the top. However, there's a panel on the RHS of the radiator that protects the condenser pipes that has to come off. It's held by two torx head screws that are awkward to get to.
I used a Nissens part (#94798) from Amazon :
Tips would be to:
1) Get it degassed properly. Even though I had a leak, there was a lot of refrigerant (and pressure) still in the system.
2) Replace the receiver/dryer at the same time as it needs to be disconnected anyway.
3) Plug all the A/C connector openings on disassembly, and have new o-rings on hand before you put it all back together to keep any moist air entry to a minimum. They are a different size on each connector: the condenser only had one, and the Jag. dryer none The A/C specialist matched up the old ones for me.
4) Check the positioning of the condenser A/C connections against the old unit, and also that the short flexible link to the dryer fits in the condenser properly. The new unit was very poorly packed by Nissens and I guess it had taken a knock in transit as it took some bending to get the connectors in the right place. There is some latitude, however.
5) The rubber seals around the rad may need to be replaced. They're available at around �30 each . The underneath strip on mine was decomposing so I sourced some suitable foam from a local upholsterers cut to 12mm square for �1. It's blue and not self adhesive, but I didn't spend too much time agonising...
The A/C man did say that he would need to add some PAG oil on recharge as a result of replacing a major part - ymmv.
Still waiting for the man to recharge the system, so I'll report back if anything is amiss with the Nissens part.
HTH,
Mike
I've just completed this as part of a front end plumbing refurb. I didn't find anything particularly difficult, although I did remove the radiator. IMO it's much easier in the long run.
It might be possible to extract the condenser without the rad, as the whole assembly can be leant forward to get to the two condenser retaining bolts at the top. However, there's a panel on the RHS of the radiator that protects the condenser pipes that has to come off. It's held by two torx head screws that are awkward to get to.
I used a Nissens part (#94798) from Amazon :
Tips would be to:
1) Get it degassed properly. Even though I had a leak, there was a lot of refrigerant (and pressure) still in the system.
2) Replace the receiver/dryer at the same time as it needs to be disconnected anyway.
3) Plug all the A/C connector openings on disassembly, and have new o-rings on hand before you put it all back together to keep any moist air entry to a minimum. They are a different size on each connector: the condenser only had one, and the Jag. dryer none
The A/C specialist matched up the old ones for me.4) Check the positioning of the condenser A/C connections against the old unit, and also that the short flexible link to the dryer fits in the condenser properly. The new unit was very poorly packed by Nissens and I guess it had taken a knock in transit as it took some bending to get the connectors in the right place. There is some latitude, however.
5) The rubber seals around the rad may need to be replaced. They're available at around �30 each
The A/C man did say that he would need to add some PAG oil on recharge as a result of replacing a major part - ymmv.
Still waiting for the man to recharge the system, so I'll report back if anything is amiss with the Nissens part.
HTH,
Mike
Member
Joined: Dec 2014
Posts: 53
Likes: 29
From: Staffordshire England
Hello RD, I also replaced the condenser about a year ago - When the air con started to blow warm it was checked by my trusted specialist XJK who diagnosed a condenser so porous the gas could be heard escaping.
I decided to replace it myself after being given a price just for the genuine Jag condenser of �549!
I ended up buying pattern one from Fast Rads in South Wales for �67 plus delivery, a fair mark up by Jaguar I would say. When you come to take the condenser out, I would drain the coolant and lift out the radiator and condenser as a unit, I tried separating them on the car which proved to be nigh on impossible.
The only difference between the pattern condenser and genuine part appears to be the angle of the pipework as it comes around the side- 45� for the Jag part, 90� on the pattern, because the pipework and the bracket are aluminium, they can easily be shaped to match the original part.
BTW SNG Barratt have a pattern part for �112 if this helps.
Trending Topics
Thread Starter
|
Veteran Member
Joined: Apr 2012
Posts: 1,854
Likes: 987
From: UK
Thanks guys, I had an AC guy come round and evacuate the refrigerant and I ordered a new condenser from ebay. Ill order up a new dryer too and I have asked Gus where he got his A/C o-ring seal set from. I'll probably do the job in a few weeks time due to travel but will post up some pictures of the job when I do it.
BRAND NEW CONDENSER (AIR CON RADIATOR) JAGUAR XK8 / XKR 4.0/4.2 PETROL M8 STUD | eBay
BRAND NEW CONDENSER (AIR CON RADIATOR) JAGUAR XK8 / XKR 4.0/4.2 PETROL M8 STUD | eBay
Veteran Member
Joined: Apr 2014
Posts: 4,792
Likes: 3,006
From: Jersey, Channel Islands
Looks very much like the Nissens unit I bought: better deal though!
Watch out where the clamp bolts fit on the condenser bracket (see below). I had to grind them flat as well as bend out the bracket to get the condenser to sit properly on the front of the rad. Might have been transit damage, but I didn't want to fracture a pipe with over-zealous reshaping.
You may also find that the lower pipe blocks access to the bottom torx holding the side plate on the rad. Annoying, but that's pattern parts.
Last edited by michaelh; Jun 20, 2017 at 06:34 PM.
Veteran Member
Joined: Apr 2014
Posts: 4,792
Likes: 3,006
From: Jersey, Channel Islands
No more than an eggcup full, and most of that came out of the cooler. I guess it just drains back into the trans.
I took the top connection off first and let it sit for a while before plugging the open ends, which may have helped.
I took the top connection off first and let it sit for a while before plugging the open ends, which may have helped.