
Air hammer question. Worst or genius idea?


Thread Starter
|
Veteran Member
Joined: Apr 2014
Posts: 5,457
Likes: 1,816
From: New Jersey USA
I am getting to the point of exploring: cut the bolt for the upper wishbone bolt you were all so kind to offer advice last week.
I've never seen an air hammer in action so I'm clueless. Could I pick up a small air hammer and use it without any attachments to effectively hammer the end of the bolt like I've been doing with a 4lb hammer?
I think I asked this question once before and was quickly advised I'd ruin the bolt in no time. I've always wondered if that assumed I was planning to use some kind of chisel or something. Does the chuck on the end of an air hammer just hammer in and out? Seems like i could then just hold it pressed to the end of the bolt and give my arms a break :-).
Thanks, John

Popular Reply
May 27, 2021, 05:53 PM
Thread Starter
Veteran Member
Joined: Apr 2014
Posts: 5,457
Likes: 1,816
From: New Jersey USA
***UPDATE: SOLVED!!!! *****
Its been an all day job, but a happy ending. Guys please forgive me for not giving individual recognition, comments, and thanks - I am officially wiped out.
But you've all been so kind and giving, let me try to fill you in.
I bought a medium sized air hammer and a husky 800 ft lbs impact wrench from home depot.
I was disappointed the air hammer came with no attachment (probably for the best in the end).
Well I turned my 20 gallon compressor on and unpacked the new air tools. First up, the impact wrench. If you remember I bought and returned a $140 Ingersoll Rand impact wrench to harbor freight. It couldn't turn the bolt. I wondered if it was my compressor or the wrench. Good news, the new impact wrench didn't blink. Started to turn the bolt no problem!
Then I hooked up the air hammer. No attachments didn't stop me. You know, the darn thing hammers 3,000+ cycles per minute, i tried holding it to the threaded end of the frozen bolt. Did it have enough energy to move the bolt? No, nowhere near that, but I figured holding it there will set up vibration, perhaps motivate the pb blaster.
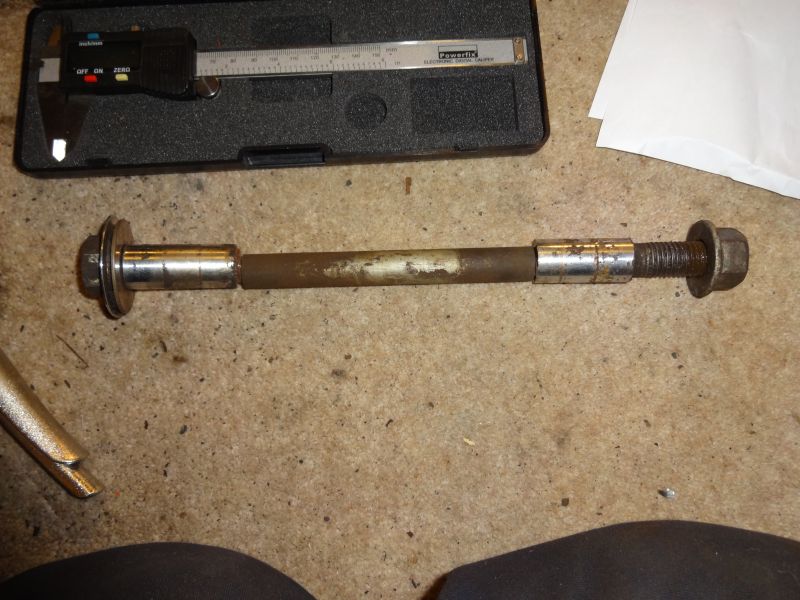
After doing that for a while I thought about the design of the air hammer. They put chisels on it and I've read it can be aggressive. I looked at the frozen bolt head, it was flush with the big washer and that washer was pressed up against the cylindrical metal sleeve inside the bushing. Well I thought, lets give it a try.
I grabbed a flat head screwdriver and pressed it against the bolt / washer. Pressed the business end of the air hammer against the screwdriver end and turned her on. Count to 20 and look - by golly it was working!!! I could now get a bit with the screwdriver. Repeat. . .
As the space got bigger, I swapped to larger screwdrivers. Soon enough there was a gap between the bolt head and the washer!
After wasting 15 minutes or an hour trying to use the gap as a fulcrum and lever the bolt free I remembered a suggestion from Jay and XKRday. Hammer it in / out / repeat.
Well I needed empirical evidence, grabbed my new caliper and measured the gap, bolt head face to face of washer. 3lb hammer in 1 hand 4lb hammer in the other - begin. After a few whacks i measured - wow I gained a mm! One mm at a time turned into 5mm - she was moving!
All of a sudden the bolt moved like it should! Of course the big washer follows it and clogs everything up on the firewall protrusion. We've all seen this before, I reached out to slide it back - no way! The small amount of corrosion on the smooth shaft of the bolt impeded any movement. (This is where your arms are tired ready to fall off, and you start overreacting as you begin to think about how to cur the washer off without damaging the bolt!) Eventually oxygen gets to the old brain. . .I wet the shaft with wd40, grabbed a piece of 4,000 grit sandpaper, folded it into a long thin strip, threaded it behind the bolt and turned the impact wrench on. Seconds later the shaft is shiny, washer slides easily.
Bolt was out minutes later! (Woo hoo!!!)
I should mention that I paid careful attention to the sleeve inside the bushing. Neither side spun with the stuck bolt! Guys I never would have believed it, but the bolt was locked in place by debris and corrosion on the shaft of the bolt.
God only knows what I drove through to start this but I was surprised to find both the thick and thin shim was corroded away to almost nothing!
Heartfelt thanks, appreciation and good thoughts to each of you for helping me out. I appreciate being part of this team.
John
Its been an all day job, but a happy ending. Guys please forgive me for not giving individual recognition, comments, and thanks - I am officially wiped out.
But you've all been so kind and giving, let me try to fill you in.
I bought a medium sized air hammer and a husky 800 ft lbs impact wrench from home depot.
I was disappointed the air hammer came with no attachment (probably for the best in the end).
Well I turned my 20 gallon compressor on and unpacked the new air tools. First up, the impact wrench. If you remember I bought and returned a $140 Ingersoll Rand impact wrench to harbor freight. It couldn't turn the bolt. I wondered if it was my compressor or the wrench. Good news, the new impact wrench didn't blink. Started to turn the bolt no problem!
Then I hooked up the air hammer. No attachments didn't stop me. You know, the darn thing hammers 3,000+ cycles per minute, i tried holding it to the threaded end of the frozen bolt. Did it have enough energy to move the bolt? No, nowhere near that, but I figured holding it there will set up vibration, perhaps motivate the pb blaster.
After doing that for a while I thought about the design of the air hammer. They put chisels on it and I've read it can be aggressive. I looked at the frozen bolt head, it was flush with the big washer and that washer was pressed up against the cylindrical metal sleeve inside the bushing. Well I thought, lets give it a try.
I grabbed a flat head screwdriver and pressed it against the bolt / washer. Pressed the business end of the air hammer against the screwdriver end and turned her on. Count to 20 and look - by golly it was working!!! I could now get a bit with the screwdriver. Repeat. . .
As the space got bigger, I swapped to larger screwdrivers. Soon enough there was a gap between the bolt head and the washer!
After wasting 15 minutes or an hour trying to use the gap as a fulcrum and lever the bolt free I remembered a suggestion from Jay and XKRday. Hammer it in / out / repeat.
Well I needed empirical evidence, grabbed my new caliper and measured the gap, bolt head face to face of washer. 3lb hammer in 1 hand 4lb hammer in the other - begin. After a few whacks i measured - wow I gained a mm! One mm at a time turned into 5mm - she was moving!
All of a sudden the bolt moved like it should! Of course the big washer follows it and clogs everything up on the firewall protrusion. We've all seen this before, I reached out to slide it back - no way! The small amount of corrosion on the smooth shaft of the bolt impeded any movement. (This is where your arms are tired ready to fall off, and you start overreacting as you begin to think about how to cur the washer off without damaging the bolt!) Eventually oxygen gets to the old brain. . .I wet the shaft with wd40, grabbed a piece of 4,000 grit sandpaper, folded it into a long thin strip, threaded it behind the bolt and turned the impact wrench on. Seconds later the shaft is shiny, washer slides easily.
Bolt was out minutes later! (Woo hoo!!!)
I should mention that I paid careful attention to the sleeve inside the bushing. Neither side spun with the stuck bolt! Guys I never would have believed it, but the bolt was locked in place by debris and corrosion on the shaft of the bolt.
God only knows what I drove through to start this but I was surprised to find both the thick and thin shim was corroded away to almost nothing!
Heartfelt thanks, appreciation and good thoughts to each of you for helping me out. I appreciate being part of this team.
John
Thread Starter
|
Veteran Member
Joined: Apr 2014
Posts: 5,457
Likes: 1,816
From: New Jersey USA
Well still hypothetical but I could put the nut on flush with the end. Maybe put a block of metal between hammer and nut/bolt?
Michaelh, I trust you will let me know when I'm, um, beating a dead horse ;-).
Conceptually this all just sounds like it may be a viable path.
John
Michaelh, I trust you will let me know when I'm, um, beating a dead horse ;-).
Conceptually this all just sounds like it may be a viable path.
John
Veteran Member


Joined: Dec 2011
Posts: 2,935
Likes: 1,576
From: Spencer, NC
Generally they come with a small selection of chisels , but the one you want is the pointed flathead one.
My only concern is having the room to get a straight shot at it. May have to take the inner fender out.
My first try would be with caution, put the chisel right on the bolt and pull the trigger, applying pressure so it doesn't jump off.
I'm sure you have it well soaked with all the other effort, so if it's going to move, the hammer will do it.
The tool does need for the operator to keep applying hand pressure to keep it on the bolt, the nut will help and you can always clean up the end.
Wear a face shield, or at least safety glasses, sometimes they move in a hurry.
Veteran Member
Joined: Apr 2014
Posts: 4,792
Likes: 3,005
From: Jersey, Channel Islands
John, I'm an armchair advisor here as mine came apart without any drama.
Yes, you could do the nut trick to help protect the end of the bolt.
The main issue here is that the damn bush spacers get 'welded' to the pivot bolt. Of course, impossible to get at because of the way it's all put together. Why they weren't made of stainless steel is anyone's guess. I'm just nervous of possible damage to the subframe from lots of hammering.
Rothwell reported that the washers can get jammed on the bolt, so it's worth making sure that they're staying 'square' during the extraction.
'orrible bit of engineering, IMO.
Thread Starter
|
Veteran Member
Joined: Apr 2014
Posts: 5,457
Likes: 1,816
From: New Jersey USA
Wayne, Michael,
Big thanks! I may just give it a try tomorrow.
BTW today I tried to see if I could buy 1/2 set of poly bushings from powerflex. Applied heat to the bolt makes them noisy. No go on 1/2 set, worse yet, they are 6 weeks away from filling any new orders. The price doubled since the last time I bought them.
Thought you might find interesting/frustrating/useful. . .
John
Veteran Member
Joined: Dec 2011
Posts: 2,935
Likes: 1,576
From: Spencer, NC
John, boy do I understand parts not being available. 5 to 8 weeks at one place and needing 4 different bushings, I had to go to 4 different suppliers, even then they didn't have all I needed.
Trending Topics

Senior Member

Joined: Jul 2020
Posts: 334
Likes: 206
From: Lena, Norway
I have used an air hammer for the same purpose on several Audi's through the years, and found it very useful.
Just modify one chisel so it is cylindrical an flat at the end.
The problem as stated before is the steel inner part of the bushing that has became "welded" to the bolt, so it can be difficult.
Just modify one chisel so it is cylindrical an flat at the end.
The problem as stated before is the steel inner part of the bushing that has became "welded" to the bolt, so it can be difficult.

Veteran Member
Joined: Apr 2012
Posts: 1,854
Likes: 987
From: UK
Hi John, I had been thinking about using an air hammer and would give it a try but am not sure it will make much difference. If the nut is threaded on 3/4 of the way you will be able to get onto the end of the bolt without worrying about it slipping off.
The main issue I see is that it will just not be man enough for the job. I used on to remove valve guides but they weren't in too tight.
Having gone down the poly bush route, I would advise against it, as they ended up seizing and creaking badly after a couple of years, I then went back to conventional bushes.
Last edited by RaceDiagnostics; May 25, 2021 at 03:38 AM.
Senior Member
Joined: Jan 2020
Posts: 473
Likes: 321
From: Maineville, Ohio
Update me here......the bolt turns in the subframe but stuck on the bush sleeves?? Then I might try using a wiz wheel (cutting disc on die grinder) and cut the bush apart on the nut end. You going to replace the bolt anyway so you don't have to worry about ruining the bolt. Maybe cut only the rubber outer part and see what you can do from there. Geeeez, sorry about your luck, mine also came apart with no issues. Just my .02. TM
Veteran Member
Joined: Sep 2016
Posts: 4,277
Likes: 1,314
From: New York New York
Hmm. I think I might have a good spare bolt around here somewhere. Haha, you can have it IF you teach me some basics on this doggone oscilloscope. The manual you sent me I THINK got stolen at my door after being left by the carrier. Give me a call later and I'll see if I can find it. I just moved and my doggone apartment looks like a used parts storehouse!
Veteran Member
Joined: Sep 2016
Posts: 4,277
Likes: 1,314
From: New York New York
I don't know where it's hung up BUT, I've had success with yes, pulling the wheel liner (which you may have done) and putting some sort of impact gun on the bolt head and spinning the hell out of it and while it's spinning wacking on the end (with the nutt on it) in the out (then back in) direction. I didn't like it but if I made any out progress I would wack it back IN and start again. No no no fun... Believe it or not, supporting the engine and dropping the subframe completely is not as bad a job as it sounds. Full access from there.
Veteran Member
Joined: Apr 2012
Posts: 1,854
Likes: 987
From: UK
I have had the subframe off this car twice now but wouldn't feel comfortable about taking it off just to be able to swing a large sledgehammer at the end of the bolt. Given the subframe is aluminium some level of finesse is still required.
5 minutes with the angle grinder and $20 for a second hand bolt and move on.
5 minutes with the angle grinder and $20 for a second hand bolt and move on.
Veteran Member
Joined: Sep 2016
Posts: 4,277
Likes: 1,314
From: New York New York
I have had the subframe off this car twice now but wouldn't feel comfortable about taking it off just to be able to swing a large sledgehammer at the end of the bolt. Given the subframe is aluminium some level of finesse is still required.
5 minutes with the angle grinder and $20 for a second hand bolt and move on.
5 minutes with the angle grinder and $20 for a second hand bolt and move on.
Veteran Member
Joined: Apr 2012
Posts: 1,854
Likes: 987
From: UK
When using an angle grinder, don't use a new disc as it will be too easy to clip the top arm, one about half used is a good compromise to cut about half way through the bolt, then rotate and cut, by the third rotation you should be able to cut right through.
Thread Starter
|
Veteran Member
Joined: Apr 2014
Posts: 5,457
Likes: 1,816
From: New Jersey USA
Quick recap. Bolt spins with effort (foot long 15/16 wrench). Impact wrench won't turn it (either my Husky impact wrench went weak, air compressor which shows 100lbs on its meter isn't delivering air like it says, or bolt is winning).
Heat applied at bolt head end just manages to melt poly bush. Bolt head got to 325 degrees farenheit I stopped.
I can not get any space between bolt head and its washer (though after heat i maybe got half a mm just enough to start to get a bite with thin screwdriver). Those washer can be spinned independently of bolt, leads me to conclude the sleeve inside the bush is pressing against washer. If so, why i wonder wouldn't bolt and sleeve be hammered though the bushing?
Perhaps sleeve on nut side is also "welded" to bolt?
For the life of me I couldn't see how to get a grinder wheel in there to cut the bolt without wearing the side of the structural mount in the center.
I sure thought the bolt cost $70. Someone suggested using grinder to cut away the bushings. Well I've got replacement bushes coming in - might be a good idea.
I launched the air hammer idea because I figured I could save the bolt + air hammer costs $65, whereas new impact wrench is north of $165.
John
Veteran Member
Joined: Apr 2012
Posts: 1,854
Likes: 987
From: UK
I bought second hand bolts here in the UK for �20.
Pics of cutting the bolt.


I managed to hit the upper arm with a grinding disc when cutting off the stuck fulcrum bolt so take care with this method.
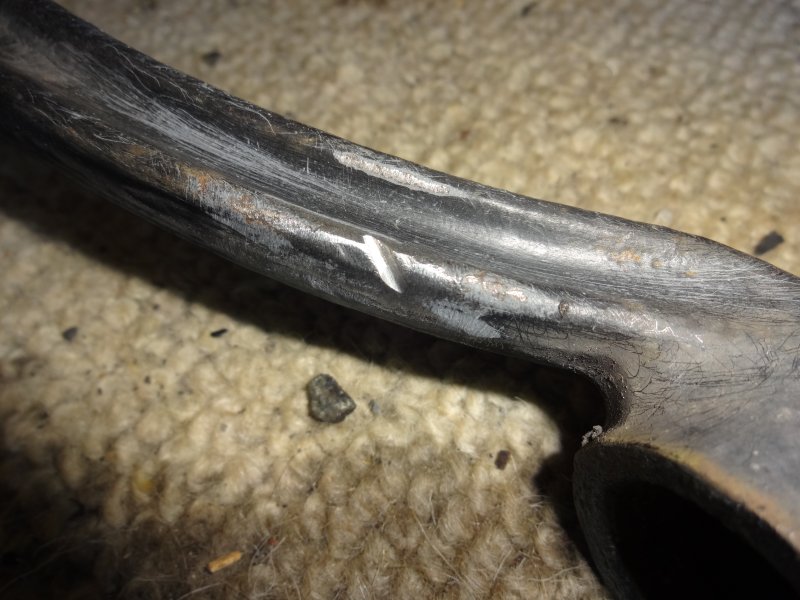
So welded it up and sanded it down, 7 years later its still good.
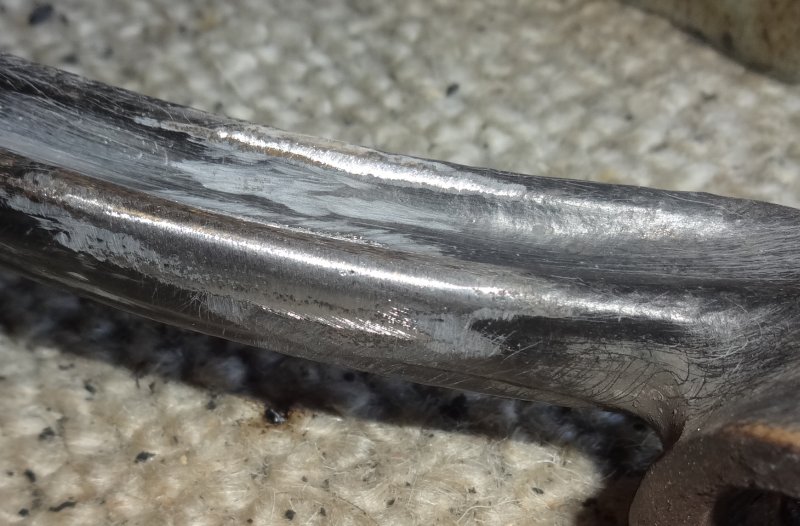
The second time I did it I took more care!
Pics of cutting the bolt.
I managed to hit the upper arm with a grinding disc when cutting off the stuck fulcrum bolt so take care with this method.
So welded it up and sanded it down, 7 years later its still good.
The second time I did it I took more care!

Senior Member
Joined: Mar 2019
Posts: 335
Likes: 273
From: Durham......UK.
Once/if it starts to spin fast with the impact wrench then tap the other end to get it moving out. (at the same time as using impact)
Good luck.
Veteran Member
Joined: Sep 2016
Posts: 4,277
Likes: 1,314
From: New York New York
What i do with the impact wrench, on stubborn bolt/nut is to switch between forward and reverse at 4 second intervals (rely fast) and 99% of the time the bolt/nut will start to spin freely, this is the way i got mine out.
Once/if it starts to spin fast with the impact wrench then tap the other end to get it moving out. (at the same time as using impact)
Good luck.
Once/if it starts to spin fast with the impact wrench then tap the other end to get it moving out. (at the same time as using impact)
Good luck.
You said it better than I couldah and tried!