
Change fuel pump xk8 convertible


Thread Starter
|
Junior Member
Joined: Apr 2018
Posts: 7
Likes: 1
Hi!
Im about to change fuel pump in my fathers xk8.
Now I need Your support. I'm normally very strict to original. But in this case... Is it a sacrilege to carful cut out a hole in the plate that I cover with a original cover plate from another car?
Is it an option or is it so hard to get the pump from the tank so I've got to have it loose anyway?
There are only one fuel pipe connection on top of the pump cover that I guess is the return connection. Does that mean that the pump has the pressure connection inside the tank?
Best regards Staffan

Veteran Member


Joined: Dec 2010
Posts: 8,837
Likes: 2,925
From: Douglasville Ga.
It's hard to answer questions without knowing which year car you are working on. You can add that information to your signature by clicking on the User CP in the navigation bar.
When I changed the pump in my 97 I cut the parcel shelf for access and it was not difficult to change the pump. I may have removed the passenger seat, also. But the primary reason for going that route was to make it easy to replace the pump in the future if I was traveling out of town.
When I changed the pump in my 97 I cut the parcel shelf for access and it was not difficult to change the pump. I may have removed the passenger seat, also. But the primary reason for going that route was to make it easy to replace the pump in the future if I was traveling out of town.

Member
Joined: Sep 2017
Posts: 40
Likes: 9
From: suffolk UK
Hi Staffan , I've just done exactly that on my XKR (two pumps) I'm sure some would say its not the right way to do it but i found it very easy and if you take your time and cut a very neat, accurate 'hatch' i really can't see what is wrong , you can make a cover plate and refit it , as far as I'm concerned it means you don't have to struggle underneath using axle stands trying to disconnect those fuel lines and you have a reusable access to the pump and judging by the number of posts with the same problem these cars are very prone to pump failure.
it was very straightforward but do disconnect the battery and be very aware of the potential fire hazard so plug the top fuel hose and keep everything clean , incidentally i purchased both my pumps from Euro car parts , fitted perfectly . good luck
it was very straightforward but do disconnect the battery and be very aware of the potential fire hazard so plug the top fuel hose and keep everything clean , incidentally i purchased both my pumps from Euro car parts , fitted perfectly . good luck
Veteran Member
Joined: Oct 2010
Posts: 2,086
Likes: 1,039
From: Spain
Hi Staffan , I've just done exactly that on my XKR (two pumps) I'm sure some would say its not the right way to do it but i found it very easy and if you take your time and cut a very neat, accurate 'hatch' i really can't see what is wrong , you can make a cover plate and refit it , as far as I'm concerned it means you don't have to struggle underneath using axle stands trying to disconnect those fuel lines and you have a reusable access to the pump and judging by the number of posts with the same problem these cars are very prone to pump failure.
it was very straightforward but do disconnect the battery and be very aware of the potential fire hazard so plug the top fuel hose and keep everything clean , incidentally i purchased both my pumps from Euro car parts , fitted perfectly . good luck
it was very straightforward but do disconnect the battery and be very aware of the potential fire hazard so plug the top fuel hose and keep everything clean , incidentally i purchased both my pumps from Euro car parts , fitted perfectly . good luck
This is a job that needs to be done on my XKR and I'm not looking forward to it.

Veteran Member
Joined: Apr 2014
Posts: 5,457
Likes: 1,816
From: New Jersey USA
RJ, Could you please tell us how you chose the exact spot to cut the hole? I've been thinking of doing the same thing, someday I'll need to replace my fuel pump too, but I don't recall any exact location details being posted before.
I don't have any idea how precise one needs to be with that hole's location. Is there much space between the shelf bottom and the fuel pump? If there is I suppose I'm being too careful, but I don't want to assume anything.
What diameter hole did you cut? Thanks, I am sure your answer will help folks down the road too.
John
Veteran Member
Joined: Dec 2010
Posts: 8,837
Likes: 2,925
From: Douglasville Ga.
There has been at least two diy writeups with pics, one using a large hole saw, the other a nibbler, which I followed. I bought the pneumatic nibbler at Harbor Freight, about $25.
I don't have time to search for the thread right now, but it's pretty obvious once you remove the trunk liner and uncover the parcel shelf.
I don't have time to search for the thread right now, but it's pretty obvious once you remove the trunk liner and uncover the parcel shelf.
Trending Topics
Veteran Member
Joined: Dec 2010
Posts: 8,837
Likes: 2,925
From: Douglasville Ga.
Senior Member
Joined: Oct 2010
Posts: 750
Likes: 308
From: Near Charlotte, NC
1. Do a dry run before you cut the hole to make sure you can physically fit between the top , top bow, and rear seat bulkhead in order to get your body oriented and arm / arms in the tank to do the necessary work. Just being physically able to cut the hole is not enough.
2. I made a masonite cover which I fully intended to replace with a polished stainless steel laser cut and etched one. However, my work changed, and I made a carbon steel one in my garage. This is a rear collision/fire safety issue.
Member
Joined: Sep 2017
Posts: 40
Likes: 9
From: suffolk UK
Hi , we used a small air driven cutting disc but there is a fair amount of room so an air nibbler would be just as good , my own car is a convertible , have someone else watch where you are cutting from the rear of the car and take your time , it was not too difficult to do , my only problem was that my air compressor was struggling to keep up the required air supply but it did mean that we had time to make sure all was safe . , my own hatch was cut about 25mm wider than the fuel tank flange so that there was plenty of room to work inside to unbolt the pumps .

Veteran Member
Joined: Mar 2008
Posts: 5,390
Likes: 1,116
From: Ellijay
Great thread! Just what I was looking for.
Got the seats out, hole cut, lock ring loose. Quit for the day.
Doesn't seem to be enough room to slip the hoses off the pump to tank plastic housing. Lines seem rigidly attached. Where is the slack to remove the hoses coming from?
Got the seats out, hole cut, lock ring loose. Quit for the day.
Doesn't seem to be enough room to slip the hoses off the pump to tank plastic housing. Lines seem rigidly attached. Where is the slack to remove the hoses coming from?
Veteran Member
Joined: Oct 2010
Posts: 2,086
Likes: 1,039
From: Spain
Great thread! Just what I was looking for.
Got the seats out, hole cut, lock ring loose. Quit for the day.
Doesn't seem to be enough room to slip the hoses off the pump to tank plastic housing. Lines seem rigidly attached. Where is the slack to remove the hoses coming from?
Got the seats out, hole cut, lock ring loose. Quit for the day.
Doesn't seem to be enough room to slip the hoses off the pump to tank plastic housing. Lines seem rigidly attached. Where is the slack to remove the hoses coming from?
Veteran Member
Joined: Mar 2008
Posts: 5,390
Likes: 1,116
From: Ellijay
With the locking ring still in place I removed the spring clips from the hoses on the trunk side and pulled the hard lines real hard. There was enough give to separate the hard lines from the rubber just barely.
A few other learning experiences that I did not find in forum searches:
This job must be done blindly with only one hand. You will have to learn braille auto mechanics.
The access hole needs to be 8" or more centered on the seam of the insulating material as far back as your nibbler will permit. Learn how to index the nibbler before starting. The cutting shaft is more than a half inch in diameter and therefore require a starting hole bigger than found in most amateur tool boxes . Bits larger are expensive and too long. A step bit resolved that. The edges of the cut hole are sharp. A little duct tape solved that.
Stop by your local ACE Hardware and buy a couple M5 .70 bolts about 30mm long so that you do not have to make that trip in the middle of the work. The original bolt that secures the pump is only about 3/4" long and is very difficult to get in place blindly with one hand and even harder to find when you drop it several times.
Connect the electrical leads to the pump before putting it back in the tank. My connector pins did not line up well and required removing the pump to resolve.
The pump mounting bracket must be reused. The Delphi pump I purchased did not fit the bracket with the included rubber pieces. I had to modify the original rubber mounts to make it work. The pump came with about 6 'O' rings but the original looked more effective so it was reused.
After all that it started right up. Probably not the most difficult repair I have tried but was right up there with the worst. Working with a lift removing the tank would be the preferred method. Using jack stands the hole method is probably best. The hundreds of labor dollars saved was some salve.
Last edited by test point; May 3, 2018 at 06:07 AM.
Senior Member
Joined: Oct 2010
Posts: 750
Likes: 308
From: Near Charlotte, NC
With the locking ring still in place I removed the spring clips from the hoses on the trunk side and pulled the hard lines real hard. There was enough give to separate the hard lines from the rubber just barely.
A few other learning experiences that I did not find in forum searches:
This job must be done blindly with only one hand. You will have to learn braille auto mechanics.
The access hole needs to be 8" or more centered on the seam of the insulating material as far back as your nibbler will permit. Learn how to index the nibbler before starting. The cutting shaft is more than a half inch in diameter and therefore require a starting hole bigger than found in most amateur tool boxes . Bits larger are expensive and too long. A step bit resolved that. The edges of the cut hole are sharp. A little duct tape solved that.
Stop by your local ACE Hardware and buy a couple M5 .70 bolts about 30mm long so that you do not have to make that trip in the middle of the work. The original bolt that secures the pump is only about 3/4" long and is very difficult to get in place blindly with one hand and even harder to find when you drop it several times.
Connect the electrical leads to the pump before putting it back in the tank. My connector pins did not line up well and required removing the pump to resolve.
The pump mounting bracket must be reused. The Delphi pump I purchased did not fit the bracket with the included rubber pieces. I had to modify the original rubber mounts to make it work. The pump came with about 6 'O' rings but the original looked more effective so it was reused.
After all that it started right up. Probably not the most difficult repair I have tried but was right up there with the worst. Working with a lift removing the tank would be the preferred method. Using jack stands the hole method is probably best. The hundreds of labor dollars saved was some salve.
A few other learning experiences that I did not find in forum searches:
This job must be done blindly with only one hand. You will have to learn braille auto mechanics.
The access hole needs to be 8" or more centered on the seam of the insulating material as far back as your nibbler will permit. Learn how to index the nibbler before starting. The cutting shaft is more than a half inch in diameter and therefore require a starting hole bigger than found in most amateur tool boxes . Bits larger are expensive and too long. A step bit resolved that. The edges of the cut hole are sharp. A little duct tape solved that.
Stop by your local ACE Hardware and buy a couple M5 .70 bolts about 30mm long so that you do not have to make that trip in the middle of the work. The original bolt that secures the pump is only about 3/4" long and is very difficult to get in place blindly with one hand and even harder to find when you drop it several times.
Connect the electrical leads to the pump before putting it back in the tank. My connector pins did not line up well and required removing the pump to resolve.
The pump mounting bracket must be reused. The Delphi pump I purchased did not fit the bracket with the included rubber pieces. I had to modify the original rubber mounts to make it work. The pump came with about 6 'O' rings but the original looked more effective so it was reused.
After all that it started right up. Probably not the most difficult repair I have tried but was right up there with the worst. Working with a lift removing the tank would be the preferred method. Using jack stands the hole method is probably best. The hundreds of labor dollars saved was some salve.
Thread Starter
|
Junior Member
Joined: Apr 2018
Posts: 7
Likes: 1
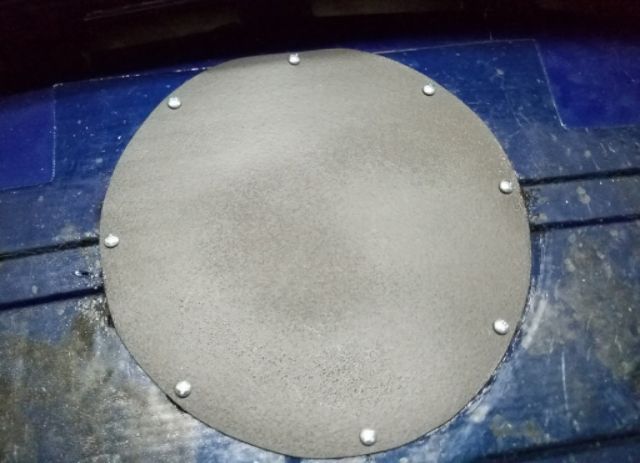
Thanks for all of Your support! I'll came home from an period of work yesterday and started up directly with the xk8.
3 hours of work and it was running.
Rented a 1st class nibbler and made a exactly 180mm hole. Picked up a very nice fuel pump cover plate ( Citroen C5) at the junkyard that suits perfect in the hole.
3 hours of work and it was running.
Rented a 1st class nibbler and made a exactly 180mm hole. Picked up a very nice fuel pump cover plate ( Citroen C5) at the junkyard that suits perfect in the hole.

Senior Member
Joined: Apr 2014
Posts: 732
Likes: 128
From: LI NY
Just a note. Replacement of the fuel filter is essential. Too often a service we overlook. I've seen vehicles towed in to the shop with clogged filters due to lack of service. Often these same vehicles are towed back in again with a failed fuel pump. An over due filter replacement places strain on the pump. Just a thought. Rich
Veteran Member
Joined: Mar 2008
Posts: 5,390
Likes: 1,116
From: Ellijay
Out of consideration of the convertible frame and potential for gas fumes I just had to finish off the big honking hole I cut in the panel. With a piece of 18ga sheet metal cut into something approximating a circle about 1 1/4" larger and coated with auto undercoating. I screwed it down with self tapping screws and a bead of adhesive silicone caulk.
Off to replace the fuel filter.
Off to replace the fuel filter.
Last edited by test point; May 6, 2018 at 07:25 PM.