
The Horrible Ragtop Headliner Thread!


Thread Starter
|
Senior Member


Joined: Oct 2013
Posts: 735
Likes: 286
From: Las Vegas, NV, USA
Hey Lads,
The headliner in my newly acquired 2003 XK8 is definitely in need of replacement. I have scoured the forum in search of anyone who has ever done this themselves and have found very little. More specifically I see that most just say to have a pro do it.
While I am not against taking it in to have it done if it comes to that, I really want to see if I can perform this repair myself. So I have decided to start this thread in hopes that we can all discover together whether or not this is do-able for the average DIY guy or gal.
If anyone has anything specific to say about this repair or especially any experience doing it themselves, I would love to hear about it and I am sure the entire XK8 community will like to know as well. We all hate to hear that there are repairs that we cannot do and I think if we have enough information, we may be able to create a useful procedure to do this job.
Right now, I am feeling confident - that may change
Veteran Member


Joined: Apr 2010
Posts: 7,657
Likes: 3,021
From: Arlington VA USA
I did it myself a few years ago and it still looks great. Here is what I wrote about it:
If you are careful, detail oriented, and document your disassembly with a camera you can do it yourself. Also give yourself plenty of time (like a weekend). Have a few layers of soft towels to kneel on...your knees will thank you. You will also need a drill and a decent pop-rivet tool.
Some of the other lessons learned:
-Make sure your replacement has the white cloth liner like the original
-Make sure that your replacement has the sewn in plastic hardware, otherwise you will have to cut the stiches on the old hardware and sew all the old hardware into the new headliner.
- The inside rear window frame is also stitched in and needs to be reused unless you buy a genuine Jaguar headliner for big $. Instead of resewing the frame in, headliner adhesive can be used on the inside frame perimeter.
- Make sure to ask your vendor for a couple of yards of extra material to do the matching A-plliars and front roof console headliner. 1 yard is enough, but 2 is wise in case you mess up the first time.
-Behind the headliner you will find tension straps for the outer canvas top also covered with deterioriated foam. Make sure you clean these up and glue new foam on them also...they will improve the outer appearance of the top.
-Make sure you get the correct headliner version. Halfway through 2001 Jaguar changed from a two piece headliner to a one piece headliner.
- Be especially careful when drilling out the rivets for the white tension cords..they need to be reused and will rip up easily if you use too large a drill bit.
Thread Starter
|
Senior Member
Joined: Oct 2013
Posts: 735
Likes: 286
From: Las Vegas, NV, USA
Maybe we can create a definitive thread that works this all out once and for all
I think a great place to start is to find a good supplier for a replacement headliner that takes into account some of what was mentioned above. We obviously would all like to stay clear of sewing material if at all possible.
I found a resource on ebay that has them but I know little about their product. I will ask them some questions to see if we can find out exactly how good their product is.

Member
Joined: Dec 2014
Posts: 38
Likes: 5
From: Edgerton, WI
This is on my to do list so I would appreciate any guidance or tips either of you discover in your endeavors.
Trending Topics

Senior Member
Joined: Nov 2011
Posts: 828
Likes: 142
From: Stamford CT USA
You guys are all braver than me! My headliner is fine now, but I don't think I'd have the nerve to tackle that job myself. No doubt after I screwed it up, I'd have to take it to a specialist, anyway. Good luck, I hope you all post great "before, during & after" pics. This could be a very valuable thread.
Thread Starter
|
Senior Member
Joined: Oct 2013
Posts: 735
Likes: 286
From: Las Vegas, NV, USA
You guys are all braver than me! My headliner is fine now, but I don't think I'd have the nerve to tackle that job myself. No doubt after I screwed it up, I'd have to take it to a specialist, anyway. Good luck, I hope you all post great "before, during & after" pics. This could be a very valuable thread.
I believe what will make the difference is how the aftermarket headliner is prepared. If it has a lot of sewing that needs to be done using specialized equipment its going to be tough.
Thread Starter
|
Senior Member
Joined: Oct 2013
Posts: 735
Likes: 286
From: Las Vegas, NV, USA
Thought I would show you guys just how bad the headliner is in my car.
This is the way I got it of course but I assume that someone left the top down quite a bit and without the cover too.
Looks pretty bad but you can notice in front of that my newly recovered A pillars and bulkhead. Looking pretty nice up there.
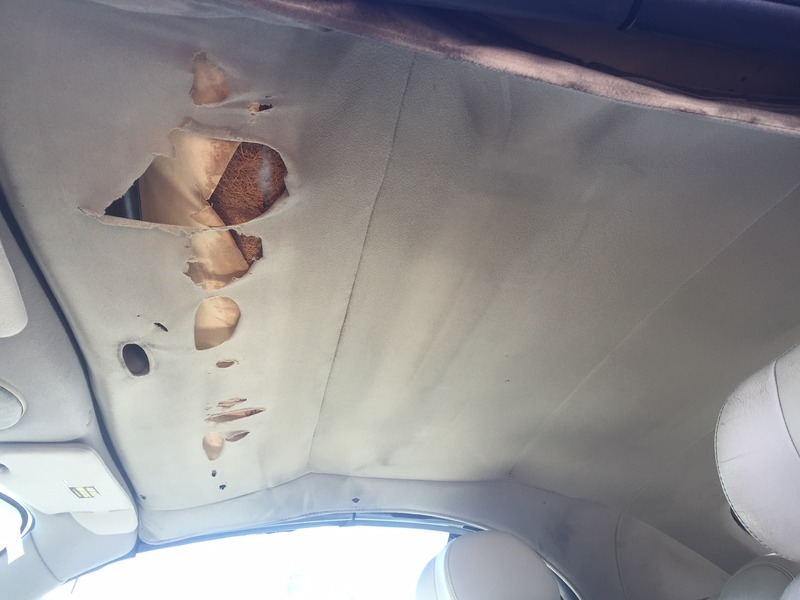
Also a picture of my cover.
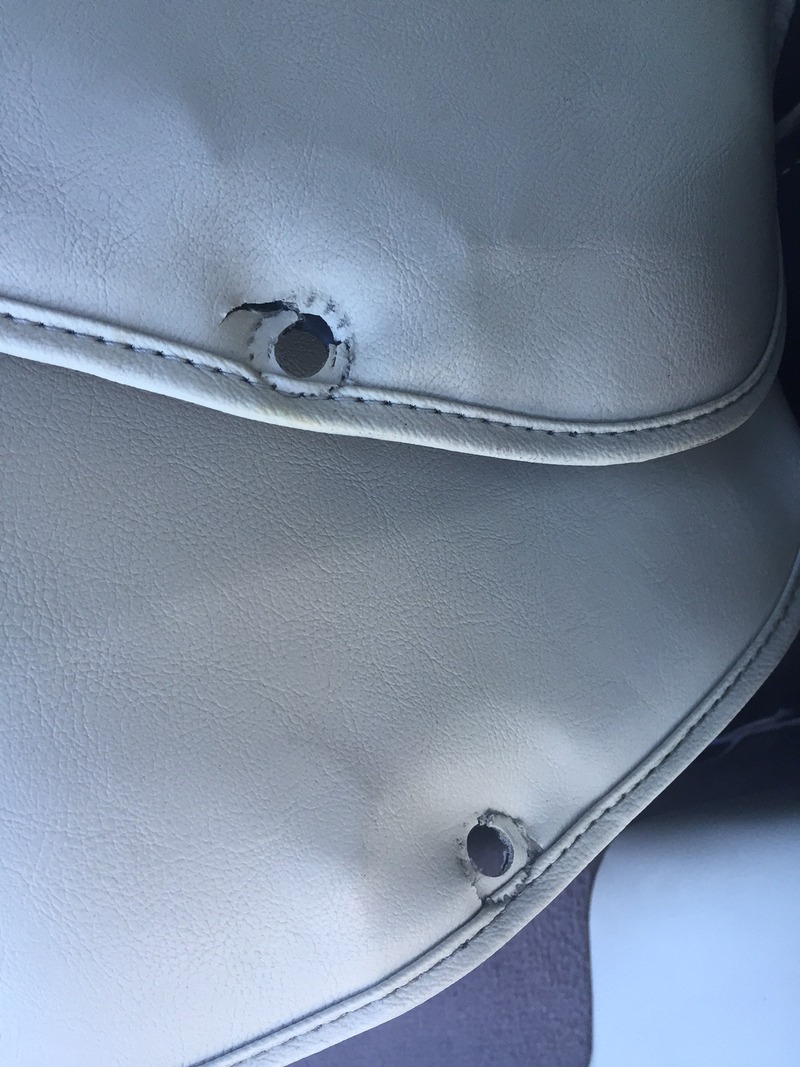
The ball-pin locks were tearing themselves out of the material and once I removed them, I could see why. The fitting is serrated all the way around to hold it in place but that does its own damage over time. The plan here is to get some off white leather and have these areas rebuilt with a half-moon cut of leather on either side. Should be able to hold the fittings nicely and repair the torn areas.
So far I am looking at this vendor for a replacement headliner
1997 thru 2006 Jaguar XK8 & XKR
Will have to see how they and their product stacks up.
This is the way I got it of course but I assume that someone left the top down quite a bit and without the cover too.
Looks pretty bad but you can notice in front of that my newly recovered A pillars and bulkhead. Looking pretty nice up there.

Also a picture of my cover.
The ball-pin locks were tearing themselves out of the material and once I removed them, I could see why. The fitting is serrated all the way around to hold it in place but that does its own damage over time. The plan here is to get some off white leather and have these areas rebuilt with a half-moon cut of leather on either side. Should be able to hold the fittings nicely and repair the torn areas.

So far I am looking at this vendor for a replacement headliner
1997 thru 2006 Jaguar XK8 & XKR
Will have to see how they and their product stacks up.

Senior Member
Joined: Aug 2012
Posts: 818
Likes: 83
From: Berlin
Hey Lads,
The headliner in my newly acquired 2003 XK8 is definitely in need of replacement. I have scoured the forum in search of anyone who has ever done this themselves and have found very little. More specifically I see that most just say to have a pro do it.
While I am not against taking it in to have it done if it comes to that, I really want to see if I can perform this repair myself. So I have decided to start this thread in hopes that we can all discover together whether or not this is do-able for the average DIY guy or gal.
If anyone has anything specific to say about this repair or especially any experience doing it themselves, I would love to hear about it and I am sure the entire XK8 community will like to know as well. We all hate to hear that there are repairs that we cannot do and I think if we have enough information, we may be able to create a useful procedure to do this job.
Right now, I am feeling confident - that may change
The headliner in my newly acquired 2003 XK8 is definitely in need of replacement. I have scoured the forum in search of anyone who has ever done this themselves and have found very little. More specifically I see that most just say to have a pro do it.
While I am not against taking it in to have it done if it comes to that, I really want to see if I can perform this repair myself. So I have decided to start this thread in hopes that we can all discover together whether or not this is do-able for the average DIY guy or gal.
If anyone has anything specific to say about this repair or especially any experience doing it themselves, I would love to hear about it and I am sure the entire XK8 community will like to know as well. We all hate to hear that there are repairs that we cannot do and I think if we have enough information, we may be able to create a useful procedure to do this job.
Right now, I am feeling confident - that may change
I changed it last year, bought the new one here:
replacement soft top, soft tops Artikel im Convertible Tops Shop bei eBay!
The biggest problem was the back window surround.
Try to upload some pictures at the weekend.
Last edited by toaster; Apr 21, 2016 at 04:47 AM.

Senior Member

Joined: Jul 2016
Posts: 134
Likes: 59
From: Chicago NW Burbs
I'm going to bump this thread back up. I have a new headliner and am going to give it a go in the very near future. Hopefully Toaster is still around and still has some pics that can be shared!
If anyone else has done this since 2016 and has any pics to share please do so otherwise I will document as I go for those that follow me.
If anyone else has done this since 2016 and has any pics to share please do so otherwise I will document as I go for those that follow me.
Senior Member
Joined: Aug 2012
Posts: 818
Likes: 83
From: Berlin
I'm going to bump this thread back up. I have a new headliner and am going to give it a go in the very near future. Hopefully Toaster is still around and still has some pics that can be shared!
If anyone else has done this since 2016 and has any pics to share please do so otherwise I will document as I go for those that follow me.
If anyone else has done this since 2016 and has any pics to share please do so otherwise I will document as I go for those that follow me.
Sorry, long ago, i forgot it, the instructions from JTIS should help (for now)

Senior Member
Joined: Jun 2016
Posts: 209
Likes: 70
From: Georgia
I (finally) got mine done through an auto upholstery shop, but it was - despite the self-professed expertise of the owner - a fiasco, nevertheless. He had to 'eat' the first attempt at the job because of baggy fit, glue visible at front bow, badly fitting rear window area. The latter, he claimed, would come with the liner kit. In fact, neither I nor he know of any place that a kit containing the liner and the plastic bezel. Perhaps Jaguar, but after all this time, I doubt it. If it is available from Jag, it will cost a fortune, to be sure. Oh, did I forget that even after I wrote everything down and went over it with the installer, he still ordered and installed the wrong color. I mean, Antelope looks a lot like Silver Grey doesn't it? Ergo, he gets to take it all out and start over.
In all this, the plastic bezel gets another workout and becomes even more damaged. In the end, I had to agree to his gluing and blocking the fabric on bezel into place around the window, because the only other option is screwing it down with finish screws / washers. Each blocked and glued section required 24 hours before the next could be attempted. Screwing is feasible, but very scary, should a mistake get made when transferring / drilling.
Bottom line, if you are agile as well as handy, this job can be done at home (I am not agile!) but that bezel is a killer, because it is going to be already cracked, or become so, during the process. Making another one out of, say, aluminum occurred to me, but the bezel is 3 dimensional, so think shaping and heli-arc welding. Also, I could find no write-up at the forum that covered my 2005. There are some instructions for early cars with 2 piece liners, but there seemed to be no complete set for my car. Again: treat that rear window bezel like it was the thinnest, finest crystal!
Thread Starter
|
Senior Member
Joined: Oct 2013
Posts: 735
Likes: 286
From: Las Vegas, NV, USA
I finally made it to the finish line with my headliner.
It seems that when it comes to the jobs I tackle, there is little to no information available and I end up doing things by trial and error.
My history with my transmission and wheel bearings was a classic example of that. Documenting something that I have absolutely no idea where I am going with it is tough as it takes a while to figure stuff out and since I am hopefully only going to do it once, priorities are certainly not on documenting. Having said that, the job is tedious and without any instructions, it took a couple of hours to strip out the completely destroyed original headliner and then 2 days to finally get the new one in. Not 2 days of solid work but two days of figuring, testing, wasting time on the internet looking for a pic of this or a pic of that, etc. While a step by step is not in the cards, I don't mind sharing some tips as I remember them and if someone wants to use my words and match it to pics as you go, even better!
- There is absolutely zero information on line that I have found to replace the convertible headliner. I searched a lot.
- It will take one visit to remove the old headliner and another visit to put in the new one. Cannot be done in one session
- Removing the old headliner can be done leaving the seats in. In hindsight, absolutely pull both seats when putting the new one in - space is a premium.
- Once you pull the rear seats out, the sheet metal on the top for the rear backrest is insanely sharp. Have a load blanket to cover it up or your forearms will pay the price.
- Bought my replacement headliner on ebay for 230.00 and can vouch for the workmanship - https://www.ebay.com/itm/Jaguar-XK8-...EAAOSwZjJU8-1o - I was surprised by how well it was done and now that it is installed, it is hard to tell that it is not the original
- Steps as I remember (this includes hindsight as I would have done things differently is I had to do it all again)
DO NOT THROW OUT THE OLD HEADLINER! THERE ARE SOME BITS YOU WILL NEED FROM IT TO INSTALL THE NEW ONE.
- Lower the top with the pump.
- Now release the t-handle on the pump so that you can manually pull the top up and down. Don't kid yourself that you can pull this off using the pump to raise and lower the top when necessary. List and lower it manually or else you may find yourself in a bind.
- Remove all the seats front and rear. I am 6'1" and again, if doing it over, I would give myself all the space I needed and a load blanket over the sharp metal in the rear when the back seat is removed.
- Manually pull the top up and over. No need to have it lock into place, it will just lay down on the hook. You will be working inside for a while so if it is hot outside, get a fan going inside the car or even start the car and run the AC for a while if you want. Being in this sweat box situation sucks, especially when putting the new headliner in because you do not want sweat stains on your new headliner right?
- There is a plastic trim that goes around the entirety of the rear window held on with Phillips head screws. Some of mine were rusted and were a bitch to get out. You have to be super patient here because if they strip, the job just escalated quickly. Make sure you use the right Phillips bit (I believe #2) and spray a little WD40 on the area of each screw that resists coming out. Just slowly work the screw in and out until the WD gets in the threads. Pleas do not strip these screws!
- Once all the screws are out, you may notice, like mine, that this trim piece is cracked in multiple locations. I tried to fix mine and probably could have done a better job using some material to reinforce but it seemed ok. This trim ring has to be glued into place on the replacement and when I got mine back from the upholsterer, he said that the plastic broke looking at it sideways. Doesn't matter as when it is all back in, you can hardly tell. You cannot buy these trim rings AFAIK. Ok, getting ahead of myself here.
- Pull the tray out from the rear storage area and you will see little tabs held with 8mm nuts that run along the bottom of the headliner. A rod runs through here so you need to remove all of the nuts across the bottom. I think there are like 6 or 8 x 8mm head nuts. BTW - I used a long Phillips head and long extensions on my ratchet. This kept my arms as free as possible from that sharp metal I spoke of earlier. It really is sharp and sucks
- There is also a pair of steel wire tension lines that run up each side. Use the 8mm socket to loosen (not remove) the nuts and release these tension wires (there are pads above them to protect the top material).
- If you have gotten this far, you are in pretty good shape. This is the most demanding part of the retro and if you haven't stripped anything or lost anything, you will be ok going forward.
- At this point, you should have the rear trim ring and material hanging free. The metal tabs on that lower rod can be spread and taken off. Do this and make sure you haven't lost any of the parts to this point. The rod can be pulled out of the material now. Careful you don't scratch or puncture anything while removing the rod. You may even be able to leave it until the headliner is completely removed. Don't know for sure as I pulled it out
- Then there are those two material tabs with the FIR trees in them that I was asking about. Once you get here, let me know where they come out of lol.
- There is a reinforced area on the left and right to go around / over the main hinges of the roof. I think I just cut this area with scissors to clear the area but when putting the new one in, I need to unbolt the hinge from the roof one side at a time to slip the reinforced area over the hinge. Then bolted the hinge back on. Don't worry as with mine there wasn't any real tension or anything going on with these hinges.
- I believe you can drop the top for the rest of this?
- Coming forward, there is now a larger diameter tension rod that must be removed. Compress the rod on one side to pop it out of the plastic holder and please remember the direction and position of this rod so you know where it goes when replacing it. I had forgotten and had to try a couple of times before getting it right. Again, no pics or anything online to assist so trial and error. The rod may be able to be pulled out of the old headliner now too.
- IIRC, there are two more rods as you move forward. These are held in place by tabs and Phillips head screws. By undoing the screws, you release these rods and they can be slipped out of the old headliner as well. Keep all of these rods numbered and in order for replacing the headliner.
- At the very front, you have to remove or at least loosen a couple of the rubber pieces. The front edge of the headliner is a plastic strip that is held on with adhesive. Just gently pry it up and you should be pretty much ready to pull out the old headliner. There is also a piece on either side at the front held on with 2 x FIR trees. Use a body panel tool to pry these up gently to remove them. Keep all the FIRS as the new headliner does not come with any.
So the headliner is now out plus or minus a few steps that I may have missed but if you go slowly, you will capture these items as you go. The headliner I purchased had the rear window area marked out so I took mine to a upholsterer locally and had him glue the plastic trim ring to the new headliner and cut out the area. Take a couple of pics of the trim ring area prior to removing the old headliner because there were a couple of questions on his end about how it gets cut and glued. I never took any photos so had to go on memory but I got it right. It cost 60.00 to have this done and I was ready to install the new one.
- I started from the back window again and moved forward to put the new one. Not sure it would have been better to go the reverse but I thought it best to get the rear window area sorted out first and then move forward again.
- Use rubber gloves and make sure you clean and vacuum the areas out as best as you can. Don't want any stains on the new headliner.
- So basically just repeated the procedure but this time putting things back together instead of taking them apart.
- Replace the lower rear rod, Run the rod through the material and place the tabs back at the obvious openings. Place the tabs over the captive screws and replace the nuts. There is some pulling / tension in doing some of this stuff BTW.
- Screw the trim ring around the rear window again. By this point you are ready for a break
- There are also two horizontal tension rods I forgot to mention earlier. I believed that these two rods needed to run straight through the new headliner but the new one didn't have an opening on the backside so I made them. Doublecheck your old headliner with regards to this as you disassemble and let us all know.
- Get those two tensions wires back on and tighten down the nuts to secure them. Make sure the pads above are centered on the wires (indents will guide you)
- So as you move forward, you basically just need to go on what you documented / remember as far as putting the rods through again and placing things back where they were. This is where I failed because I thought I would remember but it was like three weeks between removing the old unit and installing the new one. You forget little details.
- You will have to use the old FIR trees from the original headliner in the places where they are needed. The headliner does not come with any so don't lose them.
- I was also required to mess with the openings in the new headliner where the primary hinge left / right is. They are reinforced with heavy vinyl but didn't seem to have the space needed so I sliced them open further. Another little gotcha as I went on memory. Document this as well when you do it.
- All things being ok, you should have no issues working towards the front again. Multiple times lowering and raising the top manually will confirm why you release the pump to do this.
- The one remaining item which I need to redo is the plastic strip across the front. I used contact cement to hold this piece down and with the tension, it didn't hold very long. I know there are some serious auto adhesives out there that I need to source to glue it down again but its not a big deal. Since its plastic to metal contact, I can easily clean up the area and glue it again. Will take advise on what adhesive holds like iron in this application.
So that's about it to the best of my recollection?
There are probably a few other bits and pieces and steps I have forgotten as it has been a few weeks since I did it but if someone else is going to tackle the job, feel free to cut and paste my list and add to it to create something more flushed out. If I had it to do again, I know I could write a really good procedure with pics but again, when there is no info available anywhere and no pics either, you aren't focused on creating a procedure, you just want to get the job done

Thread Starter
|
Senior Member
Joined: Oct 2013
Posts: 735
Likes: 286
From: Las Vegas, NV, USA

Thread
Thread Starter
Forum
Replies
Last Post
Currently Active Users Viewing This Thread: 1 (0 members and 1 guests)