
Installing Welsh urethane upper shock mount upgrade XKR

Thread Starter
|
Member
Joined: Feb 2014
Posts: 39
Likes: 9
From: Fort Worth
I am in the process of installing the Welsh urethane upper shock mount replacement parts in my 2006 XKR Victory w/adaptive shocks.
The original inner or smaller two foam bushings are bonded to either side of a round metal plate that acts as a guide for the shock rod and a washer or rest for the upper nut. The Welsh kit makes no mention of separating the original foam parts from this plate and rebonding the new bushings. I reviewed the Black Dog website, and it appears that they include a round guide plate with their kit, as if there is not one present in the OEM setup. I am wondering if my shock mounts could be engineered differently for the adaptive shocks, or if I am supposed to assume that the old foam bushings should be separated and the new ones bonded to the disk.
Also, compressing the springs with normally available external spring compressors is marginal at best due to the amount of preload and resultant close spacing of coils interfering with the "claws" on the threaded rods. Any suggestions for an affordable spring compressor that might work better than the claw types?
Any assistance would be greatly appreciated.

Veteran Member


Joined: Apr 2012
Posts: 1,854
Likes: 987
From: UK
Can't comment on the Welsh mounts, but it is possible to compress the springs (only just) with claw type compressors, but it is a tricky and potentially dangerous task.
If I have to do it again I would look around for a local shop with a bench mounted fork compressor to do the job.
If I have to do it again I would look around for a local shop with a bench mounted fork compressor to do the job.
Last edited by RaceDiagnostics; Dec 16, 2015 at 01:13 PM.
Senior Member
Joined: Oct 2014
Posts: 855
Likes: 695
From: Middle Tn. near Hsv. Al
The Welsh kit on regular shock requires the old foam to be cleaned off the metal. The poly mounts only get a light covering of silicone lube to make them squish together easier. The cyl. metal interior piece goes in the middle of the 2 dounuts. note there is a dedicated upper and lower end, don't get them upside down. Also, use C-Clamps and the nuts to squeeze the uppers together, this allows a tighter clamping when the rivets are installed. These are very good quality replacement and we prefer them over the OEM. Jon & Wayne plan to use this kit also. The new poly bump stops that fit over the center rod are possibly needed if you failed to purchase them.

Senior Member

Joined: Mar 2010
Posts: 739
Likes: 205
From: Atlanta, GA
autozone and a few other places have the compression tool as a free loaner. Look at some youtube vids of it being done correctly and incorrectly. It is safe as long as you do it correctly, but if you F-Up things can go very bad.
Veteran Member
Joined: Feb 2012
Posts: 2,997
Likes: 714
From: Waco, Texas, US
I dropped mine off at a local shop during lunch and picked them up about an hour later. $50 out the door. This is AFTER I had unsuccessfully spent 4 hours trying to make the loaner tools from AutoZone work.
Save yourself the frustration and avoid the danger. Each spring is holding up a corner of a 2-ton car. Released from a compressed state, it will go thru sheetrock walls and really, really mess up your day if you are in the way.

Veteran Member
Joined: Aug 2013
Posts: 1,036
Likes: 272
From: Poughkeepsie NY
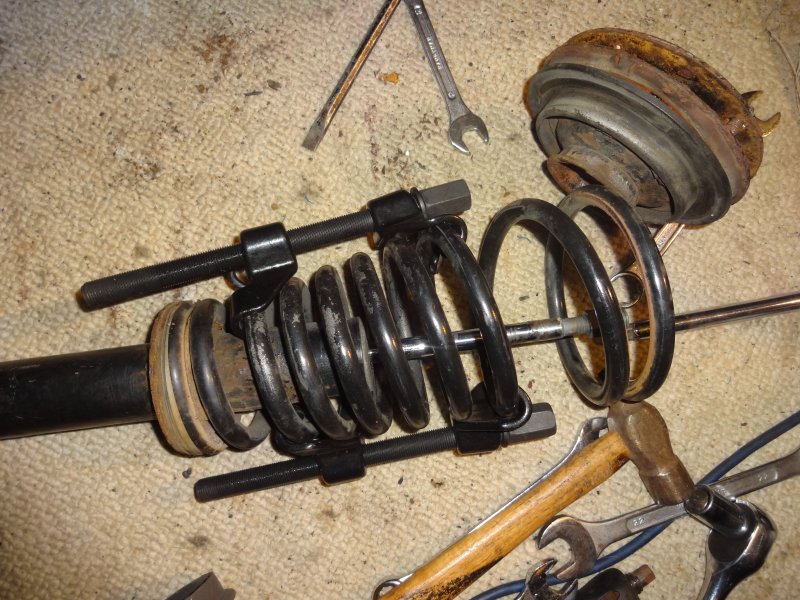
If you look behind the shock you'll see a scissor type compressor I used when replacing the top mounts, will be using it again this winter as I'm replacing shocks and springs.
And NO I'm not looking forward to it..
And NO I'm not looking forward to it..
Thread Starter
|
Member
Joined: Feb 2014
Posts: 39
Likes: 9
From: Fort Worth
Thanks to all. I felt silly, as after I took a quick look at the shock mount it became very obvious that the center piece between the two bushings is required, as the shock rod attaches to it!
Interesting though, as the two inner urethane bumpers alone are thicker than the original two foam pieces and the shock mount plate. It appears the mfg might have measured the entire stack and ordered the inner pieces cut to that measurement not allowing for the thickness of the plate. I am having to remove 5 mm from one of theses inner urethane bumpers, as there is no way to compress the two plates enough to rivet them without severe deformation of the top portion.
I used one auto repair shop's Chinese floor mounted strut compressor, but due to the tight coils and amount of preload, we still had to rid up a dangerous combination including an external claw compressor on the outside. Gonna go to a different shop or even see if the Jaguar dealer has the special tool.
Anybody else found a compressor that suits these cool over shocks properly?
Thanks to all!
Trending Topics

Veteran Member
Joined: Apr 2014
Posts: 5,457
Likes: 1,816
From: New Jersey USA
I am in the process of installing the Welsh urethane upper shock mount replacement parts in my 2006 XKR Victory w/adaptive shocks.
The original inner or smaller two foam bushings are bonded to either side of a round metal plate that acts as a guide for the shock rod and a washer or rest for the upper nut. The Welsh kit makes no mention of separating the original foam parts from this plate and rebonding the new bushings. I reviewed the Black Dog website, and it appears that they include a round guide plate with their kit, as if there is not one present in the OEM setup. I am wondering if my shock mounts could be engineered differently for the adaptive shocks, or if I am supposed to assume that the old foam bushings should be separated and the new ones bonded to the disk.
Also, compressing the springs with normally available external spring compressors is marginal at best due to the amount of preload and resultant close spacing of coils interfering with the "claws" on the threaded rods. Any suggestions for an affordable spring compressor that might work better than the claw types?
Any assistance would be greatly appreciated.
The original inner or smaller two foam bushings are bonded to either side of a round metal plate that acts as a guide for the shock rod and a washer or rest for the upper nut. The Welsh kit makes no mention of separating the original foam parts from this plate and rebonding the new bushings. I reviewed the Black Dog website, and it appears that they include a round guide plate with their kit, as if there is not one present in the OEM setup. I am wondering if my shock mounts could be engineered differently for the adaptive shocks, or if I am supposed to assume that the old foam bushings should be separated and the new ones bonded to the disk.
Also, compressing the springs with normally available external spring compressors is marginal at best due to the amount of preload and resultant close spacing of coils interfering with the "claws" on the threaded rods. Any suggestions for an affordable spring compressor that might work better than the claw types?
Any assistance would be greatly appreciated.
Post was from july or august I'm on a cell phone or I'd paste it for you.
Senior Member
Joined: Oct 2014
Posts: 855
Likes: 695
From: Middle Tn. near Hsv. Al
The issue of the poly bushing being too thick is handled by the nuts that draw the upper and lower plates together. This gives the proper tight feel to this kit. The instructions included with the Welsh kit appeared clear and easily explained the entire procedure. No reason to cut either poly dount, just lube and tighten them as instructed in the directions. very little deformation and once correctly completed, you'll have a great driving car.
Last edited by kstevusa; Dec 18, 2015 at 12:39 PM.
Thread Starter
|
Member
Joined: Feb 2014
Posts: 39
Likes: 9
From: Fort Worth
Yes, but if I were to run the nuts down completely, the top plate would be so deformed that the rivets would not reach the bottom plates. I cannot mate the top plate to the bottom plate with the thickness of the the supplied bushings?
Veteran Member
Joined: Dec 2011
Posts: 2,944
Likes: 1,585
From: Spencer, NC
Interesting, as we are installing this kit shortly in Jon89 wife's car. Could there have been some type of error in your particular kit? We don't need a fitment problem after having both sides all apart. Very concerning.
Wayne
Wayne
Senior Member
Joined: Oct 2014
Posts: 855
Likes: 695
From: Middle Tn. near Hsv. Al
The poly bushing "squeeze" together and for a tight fit over the metal center piece. Once the large plates are CLEAN, spray some silicone lube on the 2 dounts, and begin to tighten the plates together with the nuts and washer provided in the kit. I suggested use of C-Clamps due to the large area between the rivets. this pulls the plates together and allows tight fit prior to the riveting process. Once this is complete, you will see an assembly that look like the OEM mounts. Do not overthink this simple design. The springs are much more difficult than than assembly of this mount kit. Have a Merry Christmas and Happy New Year
Veteran Member
Joined: Dec 2011
Posts: 2,944
Likes: 1,585
From: Spencer, NC
Thanks, that was what I was thinking before the question turned up. The springs for the rear are a real pain but the front not so much. I have a press and the fronts just need a couple of clamps to make me feel safe.
We are looking forward to getting together and Jon always has a great lunch.
On the rears, next time I may try to drop the framing like has been suggested by one of our best techs.
Wayne
We are looking forward to getting together and Jon always has a great lunch.
On the rears, next time I may try to drop the framing like has been suggested by one of our best techs.
Wayne

When these first came out years ago and the cheaper cost, I though great and began to sell them right and left. Then after I was getting to still see those cars I found they lasted no longer than the factory pieces and in some cases less. And when you factor the extra cost for taking the mounts apart and fitting its almost a wash in cost. I no longer sell or recommend them. They just havent shown to be the God send I thought they were going to be 

Veteran Member
Joined: Jan 2009
Posts: 13,081
Likes: 4,736
From: Raleigh, NC
Most XK8 forum members who have installed these Welsh Enterprises poly front shock mount kits over the past couple of years and have posted their experiences here on the forum really seem to like them. I guess Wayne and I will find out once we do the front shocks/mounts/bushings job on my wife's 2006 XK8.....
Thread Starter
|
Member
Joined: Feb 2014
Posts: 39
Likes: 9
From: Fort Worth
I finally got them done! The small bushings I received were a total of 15mm taller than the stock items, which actually were still in good shape. I had to remove some material, and still had to use the three studs PLUS bolts in the three extra holes in order to get the two halves of the shock body to mate and accept the rivets. Still had some upen space between rivets. I used a combination of a high quality clamshell or scissor spring compressor, plus the screw/claw types in order to get the spring compressed enough for reassembly. ( I learned the hard way that the top nut must be fully bottomed on the shock rod for the CATS plug to engage the contacts inside the rod). Thanks to all for your comments/input. I would NOT want to do this one again without the specific Jaguar spring
tool.
tool.


Member
Joined: Dec 2015
Posts: 39
Likes: 8
From: Gordonsville, Tn USA
WARNING about the rental tools !! Make sure the kit is complete with the little safety pins that hold the bar on the spring. If that safety devise isn't on there then it will come off the spring and you better not be in the way.
I just replaced mine using the Welsh kits and spring compressor kit you find at Autozone. Everything went great. The Welsh kit made a big difference.
I just replaced mine using the Welsh kits and spring compressor kit you find at Autozone. Everything went great. The Welsh kit made a big difference.
Senior Member
Joined: Oct 2014
Posts: 855
Likes: 695
From: Middle Tn. near Hsv. Al
good show Roy! Wasn't too difficult once you visualize the process and read their enclosed directions. The coil springs were our most difficult chore. Made a call to Welsh asking for info on their poly kits, "who is Manufacturer"? no word yet, but will update when info available. UPDATE
Spoke with sales rep, Welsh's kits come from UK made by a company in racing industry. They did advise about 1 year ago some kits were on the market that the donuts would not compress adequately, but they did not use or sale them. Their kits have correct compression and really work well.
Spoke with sales rep, Welsh's kits come from UK made by a company in racing industry. They did advise about 1 year ago some kits were on the market that the donuts would not compress adequately, but they did not use or sale them. Their kits have correct compression and really work well.
Last edited by kstevusa; Dec 23, 2015 at 11:52 AM. Reason: updated info
to follow up on a pm. The kits I used are from motorcars and they do not all the same issue of swelling and mushrooming out. So it seems to be a Batch issue and could not tell you where they source them from because obviously they dont make the material. I have used energy suspension, delrin etc. on other cars. They like rubber have a LIFE expectancy too. I have energy suspension total change out on my 87 susburban when I rebuild the suspension, modified, lowered etc. shocks, suspension pieces, body and engine trans mounts. WHen I towed the suburban to its new home last year. The shop behind my new house there was a lot of red crumbs all over the trailer. So guess what has to be totally replaced again with little use on them only time.  My point being that I have not found them to be much if any longer lasting than the OEM parts, so in that regards just be forwarned
My point being that I have not found them to be much if any longer lasting than the OEM parts, so in that regards just be forwarned