
Oh Joy, I've joined the club - frozen upper A arm bolt!


Thread Starter
|
Veteran Member
Joined: Apr 2014
Posts: 5,457
Likes: 1,816
From: New Jersey USA
This morning I decided to put in new upper shock mounts and shocks. I've done it
severall times before - should be a piece of cake!
Well, I now should officially apologize to all of you who've posted this issue and I've thought to myself "yeah its hard but it'll work free soon enough - just hit it harder!" Sorry.
Five hours of pounding later - Um, maybe I was wrong? ;-)
Oh well guess I've got to get a bigger hammer and better penitrating oil!!! What the hell did I drive through in the last year to cause this?
Well let's just admit I'm a bit wiser today.
John

Popular Reply
May 10, 2021, 04:29 AM


Joined: Dec 2011
Posts: 120,439
Likes: 17,009
From: Durham, UK
Observant members following this thread will have noticed an increasingly unpleasant exchange has been removed and a relative newbie (Bobcat 888) permanently banned.
I expect disagreements on technical matters on our forums and at times these have become heated. What I do not expect is personal and offensive content in posts and this will not be tolerated.
Now back to the upper wishbone bolt.
Graham
I expect disagreements on technical matters on our forums and at times these have become heated. What I do not expect is personal and offensive content in posts and this will not be tolerated.
Now back to the upper wishbone bolt.
Graham
Last edited by GGG; May 10, 2021 at 01:38 PM.


Senior Member
Joined: Jan 2012
Posts: 480
Likes: 157
From: Green Valley, AZ
How could you get an impact wrench onto either the bolt head or the nut....there is no room....well perhaps if the inner liner were removed......
Oh and cost of a new fulcrum bolt...about $75.....the nut is extra.
Oh and cost of a new fulcrum bolt...about $75.....the nut is extra.

Banned
Joined: Jan 2021
Posts: 9
Likes: 4
From: England
just done this job on my 96 Convertible and it was a complete pig. You just cannot get enough of a swing in such a confined space, either end of the bolt.
In the end I used a combination of a 30oz hammer and a heavy 2 lb club/lump hammer but it took many hours of faffing about.
I even looked to see if there was somewhere I could place some sort of jacking device but there isn't.
What helped me a lot was to thoroughly clean the bolt between the mounting eyes and grease it well so that when it does start to enter the mounting brackets it self lubes its way through.
I used a succession of 3/8" socket extensions to drift the fulcrum bolt through , changing them periodically so as to maximise my swing distance and I regularly drifted the bolt back to its original position and re-cleaned and greased the bolt.
Senior Member
Joined: Feb 2021
Posts: 208
Likes: 69
From: Florida
Remove the inner fender liner, get a propane torch, and heat the nut for 30 seconds or so. It should expand enough to free it up. Be careful of the brake hoses and ABS sensor wires (or shield them with foil or wet rags or both). It's the easiest and quickest way to free up a frozen nut if you have access for it.
Trending Topics
Veteran Member
Joined: May 2019
Posts: 1,092
Likes: 927
From: Durham, NC
You can also freeze it with something like 'Freeze Off'. Thermal shock goes great with mechanical shock and penetrating oil.
You could also try propane torch on the outside and 'Freeze Off' on the inside at the same time as you are pounding on it, but I wouldn't recommend it. That also requires three hands and maybe some asbestos clothing...
You could also try propane torch on the outside and 'Freeze Off' on the inside at the same time as you are pounding on it, but I wouldn't recommend it. That also requires three hands and maybe some asbestos clothing...
Veteran Member
Joined: Apr 2014
Posts: 4,793
Likes: 3,008
From: Jersey, Channel Islands
John,
Sorry to hear you've also been bitten. You must have upset the Jaguar gods this week somehow
Good luck on getting it sorted and LOTS of grease & anti-seize on the reassembly...
Sorry to hear you've also been bitten. You must have upset the Jaguar gods this week somehow
Good luck on getting it sorted and LOTS of grease & anti-seize on the reassembly...

Veteran Member
Joined: Apr 2012
Posts: 1,854
Likes: 987
From: UK
Lots of advice on here from those who have never experienced this. The bolt has "welded" itself to the inner sleeve of the two bushes and no amount of pb blaster and pounding will get it out. Even if you could get enough of a swing to hit it with a sledge hammer you run the risk of damaging the subframe.
Buy a second hand bolt and cut the old one out with an angle grinder, that will save you many hours of frustration.
No, buy two or three second hand bolts and save them for the next few times.
I have now had to cut out three in the last ten years.
Buy a second hand bolt and cut the old one out with an angle grinder, that will save you many hours of frustration.
No, buy two or three second hand bolts and save them for the next few times.
I have now had to cut out three in the last ten years.
Veteran Member
Joined: Oct 2012
Posts: 3,780
Likes: 1,656
From: Puerto Rico
I had this happen to me twice already, including this past week on the Wayne�s shock mount install. I got it out by directly hitting the washers (the powerflex ones as I didn�t have the shims) with a hammer until I could spin them by hand without spinning the fulcrum shaft. After that I out the nut on the end of the bolt and tapped with a hammer. It came right off and only took me 10 minutes.
Senior Member
Joined: Jan 2012
Posts: 480
Likes: 157
From: Green Valley, AZ
Yeah I had to cut the left side fulcrum bolt the first time I was in there. That is how I know the cost of a replacement bolt.
I also destroyed all the washers as I was prying on them to get to the metal sleeves in the bushings that too had welded them selves to the bolt. I think I cut the rubber bushings out as well.
Was not much fun the first time.
I also destroyed all the washers as I was prying on them to get to the metal sleeves in the bushings that too had welded them selves to the bolt. I think I cut the rubber bushings out as well.
Was not much fun the first time.
Thread Starter
|
Veteran Member
Joined: Apr 2014
Posts: 5,457
Likes: 1,816
From: New Jersey USA
Appreciate the advice!!
While I'm going to still give it another day of trying to work it free, I can't picture how to cut it out.
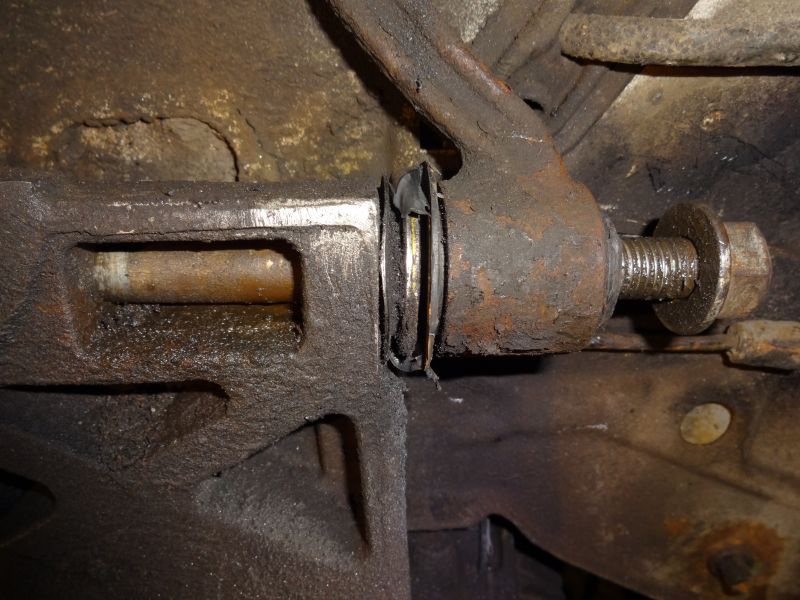
The bolt goes through the A arm, through the mount welded to the car, then out the same way on the other side. So, you've got access to the bolt head and the threads on the other side.
Where in the world would I cut it to free the A arm? Do you destroy the spacers and bushes on each side of the mount? That would be nerve wracking.
I can't picture it.
John
While I'm going to still give it another day of trying to work it free, I can't picture how to cut it out.
The bolt goes through the A arm, through the mount welded to the car, then out the same way on the other side. So, you've got access to the bolt head and the threads on the other side.
Where in the world would I cut it to free the A arm? Do you destroy the spacers and bushes on each side of the mount? That would be nerve wracking.
I can't picture it.
John
Veteran Member
Joined: Apr 2012
Posts: 1,854
Likes: 987
From: UK
Push the arm upwards and cut in with an angle grinder, the rotate the bolt 120 degrees, then cut again, rotate and then a final cut.
You will have a high chance of damaging either the "top hat" or "shim" washers, so have spares.
You will have a high chance of damaging either the "top hat" or "shim" washers, so have spares.
Banned
Joined: Jan 2021
Posts: 9
Likes: 4
From: England
Appreciate the advice!!
While I'm going to still give it another day of trying to work it free, I can't picture how to cut it out.
The bolt goes through the A arm, through the mount welded to the car, then out the same way on the other side. So, you've got access to the bolt head and the threads on the other side.
Where in the world would I cut it to free the A arm? Do you destroy the spacers and bushes on each side of the mount? That would be nerve wracking.
I can't picture it.
John
If you could obtain a mini cutter with a sub 3" disc you might be in with a fighting chance but unless you are used to using cutters its not worth the risk imho
I would remove everything from the wishbone ie the upper wishbone ball joint. That way someone can lever the wishbone up and down to help ease the bushes and fulcrum bolt whist you pound or turn the bolt.
Use a socket on the head of the bolt and turn it back and forth whilst pounding on the nut end of the bolt
Use some carborundum strip to clean the exposed centre part of the bolt by see-sawing a 1" strip along the bolt so it cleans the rear of the bolt you cannot see or access.
Apply some grease where the bolt enters the mounting eye .
If I had to tackle this job and the bush tubes were welded to the bolt with rust I would try to reduce drag and friction at every place I could.
Try to drift the bolt by placing a blunt chisel on the back of the bolt head ...that way you can get a huge swing with the hammer.
Periodically hit the bolt back into place and back out again This all helps free the bolt and bushes up.
Judging by the images posted by RD it would appear that the decision to use a cutter was made from the start as it is clear that no attempt has been made to clean the bolt or apply grease or solvent anywhere . If you are adept with a cutter it sure is a quick and easy solution and would save hours of work .
Last edited by Bobcat 888; May 9, 2021 at 09:48 AM.
Thread Starter
|
Veteran Member
Joined: Apr 2014
Posts: 5,457
Likes: 1,816
From: New Jersey USA
Thanks, I'm at the point where I can spin the bolt with a foot long 15/16 inch wrench. My bloody air powered impact wrench (Husky) no longer has the power it once did. It doesn't move it. The bolt moved a few milli meters with hammer so I'm hopeful.
Of course my 15/16 socket is 1/2 inch and my battery impact wrench is 3/8 . . . Bought a conversion attachment and PB Blaster (WD40 didn't work).
I'll get back to it as soon as the rain stops. BTW this is the 1st time I've done this with the inner fender plastic cover out (had to change a headlight bulb too). Part of me is wondering if I'm restricting full power swings with all the exposed tubing. Well inner fender back. Bought a 4lb hammer, will keep you posted:-).
John
Veteran Member
Joined: Oct 2012
Posts: 3,780
Likes: 1,656
From: Puerto Rico
Thanks, I'm at the point where I can spin the bolt with a foot long 15/16 inch wrench. My bloody air powered impact wrench (Husky) no longer has the power it once did. It doesn't move it. The bolt moved a few milli meters with hammer so I'm hopeful.
Of course my 15/16 socket is 1/2 inch and my battery impact wrench is 3/8 . . . Bought a conversion attachment and PB Blaster (WD40 didn't work).
I'll get back to it as soon as the rain stops. BTW this is the 1st time I've done this with the inner fender plastic cover out (had to change a headlight bulb too). Part of me is wondering if I'm restricting full power swings with all the exposed tubing. Well inner fender back. Bought a 4lb hammer, will keep you posted:-).
John
Of course my 15/16 socket is 1/2 inch and my battery impact wrench is 3/8 . . . Bought a conversion attachment and PB Blaster (WD40 didn't work).
I'll get back to it as soon as the rain stops. BTW this is the 1st time I've done this with the inner fender plastic cover out (had to change a headlight bulb too). Part of me is wondering if I'm restricting full power swings with all the exposed tubing. Well inner fender back. Bought a 4lb hammer, will keep you posted:-).
John
You are getting close. Don�t give up. Once the bolt is inside the crossmember eye, you can use a 4 or 6 inch ⅜� drive extension to keep hammering at the bolt and once it is further in, you can switch to a longer extension.
Veteran Member
Joined: Apr 2012
Posts: 1,854
Likes: 987
From: UK
Full story here. https://www.jaguarforums.com/forum/x...e-91230/page2/
Veteran Member
Joined: Apr 2014
Posts: 4,793
Likes: 3,008
From: Jersey, Channel Islands
The more I read about these damn upper control arm woes, the more convinced I am that a bushing R&R should be part of the maintenance schedule unless your car never sees wet.
For �33/$47 each (OEM) for the bushes, I'd expect to see better materials used.
Design questionable - execution poor, IMO
For �33/$47 each (OEM) for the bushes, I'd expect to see better materials used.
Design questionable - execution poor, IMO
Joined: Dec 2011
Posts: 120,439
Likes: 17,009
From: Durham, UK
Observant members following this thread will have noticed an increasingly unpleasant exchange has been removed and a relative newbie (Bobcat 888) permanently banned.
I expect disagreements on technical matters on our forums and at times these have become heated. What I do not expect is personal and offensive content in posts and this will not be tolerated.
Now back to the upper wishbone bolt.
Graham
I expect disagreements on technical matters on our forums and at times these have become heated. What I do not expect is personal and offensive content in posts and this will not be tolerated.
Now back to the upper wishbone bolt.
Graham
Last edited by GGG; May 10, 2021 at 01:38 PM.