When you click on links to various merchants on this site and make a purchase, this can result in this site earning a commission. Affiliate programs and affiliations include, but are not limited to, the eBay Partner Network.
I must be missing something as well because I tried it that way and couldn't get it to work - ended up buying a set of slim spring compressors(Autocraft AC500 - less than $30) and they worked fine.
It does work. I just removed mine on a convertible. I also unbolted one end of x-brace and sway bar end link. You have to push shock up into spring and retain with shock bolt.
With the shock unbolted, the lower arms should bottom on the plate when the arms are pushed down.
Removing the 4 bolts allows the plate to bend lower, allowing the arms to travel further down.
Free spring length will determine if the arms will go down far enough to let the spring out.
On My car, I jacked the arm up to compress the spring. Clipped on a spring compressor. Lowered the jack down and pressed down the arm and the spring came right out.
My new lowering springs didn't need much compression to go back in, because their free length was less.
Just finished all shocks, mounts, and bushing. What a difference in the ride��
Thanks Motorcarman. Your procedure worked even though I had my doubts for awhile
Now, to take care of 1384 and 1396 codes. Any advise appreciated
If the VVT DTCs are cleared and come back on almost immediately, then there is probably an ELECTRICAL fault.
If the DTCs come on after the engine has been run for an extended period, then it could be an oil flow issue. OIL too thick or too thin, an orifice clogged, etc.
Hi , Tony here in UK ..Cornwall ..I have a 1998 xk8 coupe , just read motorcarman method to change rear springs , fortunately I have a mid rise ramp at home and will be attempting the rear spring and shock change in the next few days ,will let you know my experience.
Great thread. Photos always help.
I just replaced my rear shocks and it is indeed a PITA. Not sure how removing the four diff bolts allows the whole assemble to come out, I still needed spring compressors. Couple of things I learned.
Definitely remove the brake caliper/rotor - two 15mm bolts and you are done
Compress the shock on install and tie in place with string
At times a second pair of hands is helpful
Have a day dedicated to this if it is the first time
It took 50% longer than the front
You need a LONG prybar and BEND THE LIVING **** out of the plate to drop the plate and jam a block of wood or something to keep the plate DOWN!!!!!!!!!!!!!!!!!!!!!!!!!!!!!!!!!!!!!!!!!!!!!! !!!!!!!!!!!!!!!!!!!!!!!!!!!!
Vakxr, just wanted to ask for clarification. Are you saying you held the springs compressed with string? I must be misreading that so I figured I'd ask.
Just replaced my driver side rear shock-on my 99 convertible xk8...
VERY SIMPLE
Use a floor jack and jack car up and remove the rear wheel.
facing rearward mark and index the existing eccentric nut on the bottom of the wheel hub then remove with a 22mm
and a 22wrench.
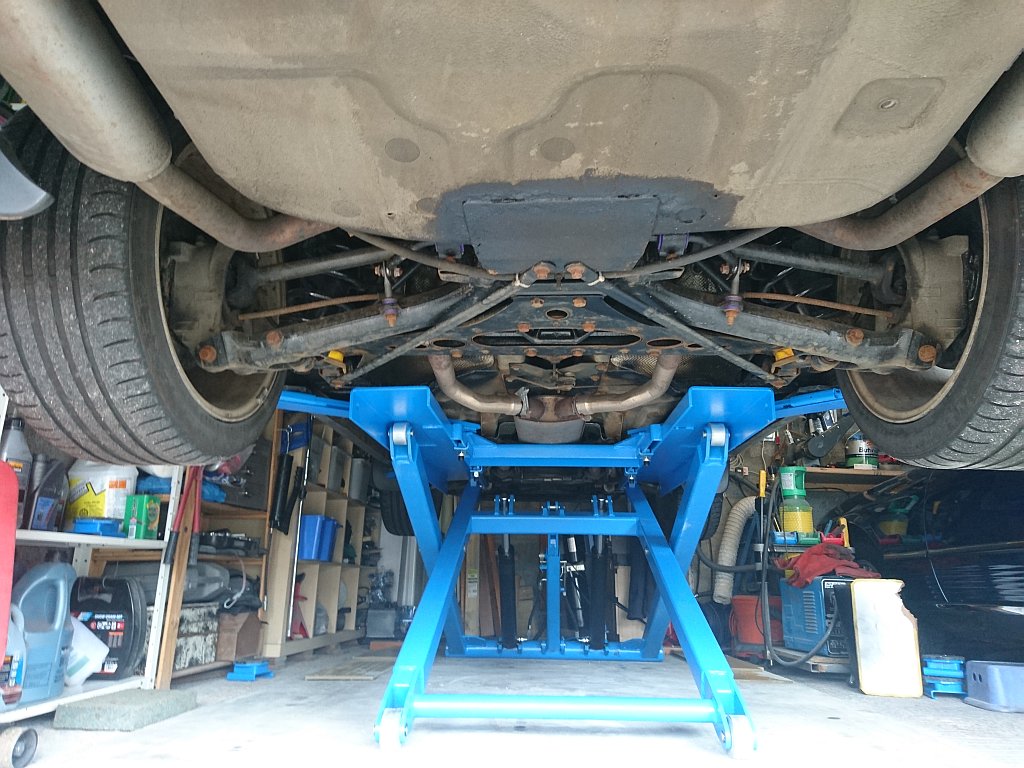
in the middle of the car under the rear transmission remove the 4 -19 mm bolts on the triangular plate
at the very rear middle pry the plate down and insert a small 2x4
Remove the driver side cross brace 2 14-mm
remove 15mm nut and rubber washer on bottom of driver side sway bar mount
remove the bolt holding the bottom of shock 24mm and 22
swing the axle and wheel hub towards the rear for some room
put some sort of extension in the middle hole in the lower a arm ( for leverage)
remove the 4 -13mm nuts holding the shock cap in place( note the orientation)
use your hand or foot and push lower a arm down and then pull and drop shock
1st. Try took 10 minutes and the shock was on my bench!
Last edited by Ktmscott; Aug 5, 2019 at 03:33 PM.
Reason: Missed a step
I changed mine this past weekend and followed the procedure outlined by Rothwell. which involved unbolting the center plate and then using the car's jack to push the control arm down a little further for shock clearance. Extremely easy.
Hi all!
I DEEPLY appreciate all the advice and suggestions.
motorcarman, the trick about removing the four bolts from the A-plate was right on the money and worked for me; Thank you!
Twice, I've taken the wheels off, and used spring compressors and played the up-down hokey pokey trying to get the struts and coils out. Third time (after the A-plate technique was the charm.
Here's what worked for me:
I jacked the car up under the side sills, then put jack stands under both sills. I chocked the front wheels.
Put on safety glass, and laid down some floor matting near the rear wheels. I figured I would be there for a while, might as well get comfy.
Removed wheel,
Removed Brake caliper
Went under car and found that big beautiful A-plate, removed those 4 bolts
Removed the bolts from the Anti-sway bars/ struts/ whatever those X-braces are.
Bent the A-plate down with a 3-foot crowbar and braced it with a block of wood. Kids, don't try this at home.
Undid the bottom bolt from the strut.
Unscrewed the four bolts from the top of the shock mount.
Played hokey pokey jigging it up and down, still not enough room to get it out.
Used a scissor jack to push the lower control arm down. (IMPORTANT!!! Don't smush any fuel lines or anything else!
Used a smaller crowbar to jimmy the coil and strut out of the bottom control arm.
WHEW! Hard part's done, right? Yeah. We all know how that goes.
The Billstein shocks on the car are bolted to themselves, through the motor mount. Trying to unscrew it, by bracing against the mount just turns it around and around. The top of the strut has two flat surfaces. I applied peneating lubricant. I turned them round, trying to get a grip on them, then said screw it and drank a Coke.
I came back with guns blaing. I used vice grips and crushed the heck out of the threads, then hit the nut with a blow-torch to loosen it up. It worked. About 45 seconds of flame, rotating carefully to heat evenly. The nut turned... up until it got to the part I crushed with the vice grips. By that time, it was far up enough I could cut it off with a sawzall. If a torch and sawzall won't fix it, I don't know what will.
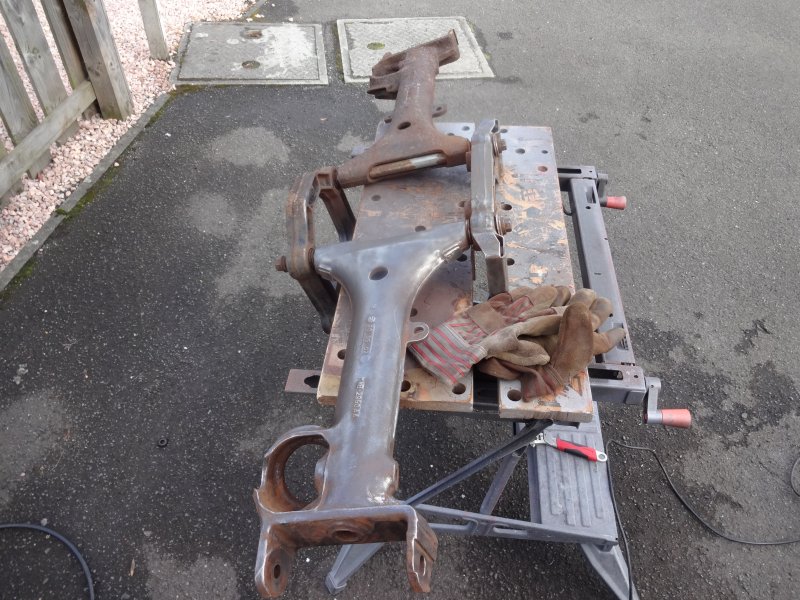
BOOM! Victory! You can see form the pics, the old upper mount (shock isolator) was fried. It looks like my knee cartilidge feels. I'm VERY glad I opted to replace that along with the struts. I lubed everything with a lithium grease, then screwed the strut into the nut, through the strut mount. I hope I NEVER have to take this one off! Half the battle.
I got a little turned around putting the mount back in the car. I forgot to mark which way was forward, and wasted time turning it around to see which way it fit. Ijacked the control arm down again, and shoved the strut into place. There's a rubber thingy at the botton of the spring. It seems to had a preferred way of fitting, and it REALLY helps to make sure the spring fits it exactly.
Buttoned that side up and headed over to the other side. Wish I had remember to tighten the mount bolts BEFORE putting the wheel on, but I was in a hurry; it was getting dark and clouds were rolling in.
The other side went much easier, but I still didn't beat the rain or the sunset. And that's how I found myself under the car with the work light, wet, tired, sore and hungry, but not finding any spare parts. Dark, wet, but with a new suspension!
I was so excited, I cracked my lug lock tool, tightening the lugs. Meh. No tst drive until I get a new lug lock, and use the torque wrench tomake sure I don't over-tighten.
Thank you, again to everyone who's offered their wisdom! It probably save me $1000 of labor, today alone!
Sorry the pictures are so huge. I'm still getting the hang of forum and image settings.
2006 XK8 147,000 miles.
�...The other side went much easier, but I still didn't beat the rain or the sunset. And that's how I found myself under the car with the work light, wet, tired, sore and hungry, but not finding any spare parts.....
.
Oh how I know that feeling. Once you've finish one side, you find out time is running out to do the other side. Then weather/night comes rolling in, and/or life/wife has something else needing doing. You end up either working on the car in the darkness of the night, with skinned knuckles, and end up with a very untidy garage. Oh the joys of DIY home wrenching, but the end satisfaction that it's a job done is worth it. Plus you'll know exactly how to access/fix when you're next in that area.
I like to clear the entire day and start as early in the morning as the sunlight will allow whenever I am tackling a time-consuming job that I have never done before. That way I have the best chance of finishing up before darkness arrives. I do not like working on a vehicle at night because regardless of how many lights I set up, nothing beats the visibility allowed in broad daylight....
I agree. There's nothing like having a whole day clear to work on a project, completing it in the alotted time, and then sitting back with a fine beverage admiring the clean lines of the cat...
... and last weekend was NOTHING like that....!!
Oh well, the ride's a lot smoother, and as DavidYau said, there is satisfaction in knowing how it was done.
Hi all!
I DEEPLY appreciate all the advice and suggestions.
motorcarman, the trick about removing the four bolts from the A-plate was right on the money and worked for me; Thank you!
Twice, I've taken the wheels off, and used spring compressors and played the up-down hokey pokey trying to get the struts and coils out. Third time (after the A-plate technique was the charm.
Here's what worked for me:
I jacked the car up under the side sills, then put jack stands under both sills. I chocked the front wheels.
Put on safety glass, and laid down some floor matting near the rear wheels. I figured I would be there for a while, might as well get comfy.
Removed wheel,
Removed Brake caliper
Went under car and found that big beautiful A-plate, removed those 4 bolts
Removed the bolts from the Anti-sway bars/ struts/ whatever those X-braces are.
Bent the A-plate down with a 3-foot crowbar and braced it with a block of wood. Kids, don't try this at home.
Undid the bottom bolt from the strut.
Unscrewed the four bolts from the top of the shock mount.
Played hokey pokey jigging it up and down, still not enough room to get it out.
Used a scissor jack to push the lower control arm down. (IMPORTANT!!! Don't smush any fuel lines or anything else!
Used a smaller crowbar to jimmy the coil and strut out of the bottom control arm.
WHEW! Hard part's done, right? Yeah. We all know how that goes.
The Billstein shocks on the car are bolted to themselves, through the motor mount. Trying to unscrew it, by bracing against the mount just turns it around and around. The top of the strut has two flat surfaces. I applied peneating lubricant. I turned them round, trying to get a grip on them, then said screw it and drank a Coke.
I came back with guns blaing. I used vice grips and crushed the heck out of the threads, then hit the nut with a blow-torch to loosen it up. It worked. About 45 seconds of flame, rotating carefully to heat evenly. The nut turned... up until it got to the part I crushed with the vice grips. By that time, it was far up enough I could cut it off with a sawzall. If a torch and sawzall won't fix it, I don't know what will.
BOOM! Victory! You can see form the pics, the old upper mount (shock isolator) was fried. It looks like my knee cartilidge feels. I'm VERY glad I opted to replace that along with the struts. I lubed everything with a lithium grease, then screwed the strut into the nut, through the strut mount. I hope I NEVER have to take this one off! Half the battle.
I got a little turned around putting the mount back in the car. I forgot to mark which way was forward, and wasted time turning it around to see which way it fit. Ijacked the control arm down again, and shoved the strut into place. There's a rubber thingy at the botton of the spring. It seems to had a preferred way of fitting, and it REALLY helps to make sure the spring fits it exactly.
Buttoned that side up and headed over to the other side. Wish I had remember to tighten the mount bolts BEFORE putting the wheel on, but I was in a hurry; it was getting dark and clouds were rolling in.
The other side went much easier, but I still didn't beat the rain or the sunset. And that's how I found myself under the car with the work light, wet, tired, sore and hungry, but not finding any spare parts. Dark, wet, but with a new suspension!
I was so excited, I cracked my lug lock tool, tightening the lugs. Meh. No tst drive until I get a new lug lock, and use the torque wrench tomake sure I don't over-tighten.
Thank you, again to everyone who's offered their wisdom! It probably save me $1000 of labor, today alone!
Sorry the pictures are so huge. I'm still getting the hang of forum and image settings.
The huge pictures are GREAT!!!
BeaUTIful, King. Thank you. And thank you Bob for the shared wisdom - as always... I will be doing the 4bolt prydown method as described...
With all the needed stuff on the xjs i have sadly neglected BabyBlu... Last few days placed a set of motor mounts, the transgo trans valve bit, MAF, Plugs, Rear parking and foot brake - still trying to adjust for the streched cable and getting into drive with differculty at the J-Gate....
Just one quick question about the rear shockerz...
For the rear - how many EXTRA bits and peices are needed for rears when all is said and done?
Is there anything you would recommend having in advance, after your go at it?
The large donut up top - the isolator...? I'll get one (2 actually)
The shock (blisten) should/will come with the foamy yellow isolator pads preinstalled up top...?
What about at the base of the shock,,, the control arm end? Is there a rubber donut - or something - where it seats?
My only real fear is that the 4 bolts (8 actually) holding the upper mount plates to the body are going to shear off. They look horrible...
I have a TON of work to do on the *** end of this car. Cant be neglecting a 20yo car. Bites ya.