
Transmission pan screws


Thread Starter
|
Veteran Member


Joined: Apr 2012
Posts: 1,854
Likes: 987
From: UK
Two years on from my last attempt at removing the transmission pan I decided to try again but am no further forwards.
Brand new torx bit stripped out the first 6 screws that I tried at even spacing round the pan. I infer from this that every one will strip out if I continue.
Penetrating fluid was applied at mid day and left on for hours before my first attempt.
I tried with an Allen in the tripped out hole but that also spun.
I may try hammering in a spline to see if that will grip any better but am not hopeful.
Another option would be to weld in the torx bit but that will be time consuming and I will need a lot of torx bits.
Or cutting a slot and using a screw driver, but don't thing there is access to do this.
Or along the same lines, drill a hole on either side of the screw thread and use a large U shaped bit made out of a ground down socket to create the prongs.
I don't want to use an "Easy out" as 50% of the time the small diameter ones snap and make the job even harder.
Or leave the pan in place and just change the oil again.
Any other suggestions are most welcome.


Veteran Member

Joined: Dec 2010
Posts: 8,835
Likes: 2,924
From: Douglasville Ga.
I removed several with stripped heads using a cold chisel to get them started. ZF now has larger head screws available, but I just bought hex head cap screws and washers to replace.
I'm not a great fan of torx heads, either internal or external.
I'm not a great fan of torx heads, either internal or external.
Senior Member
Joined: Oct 2014
Posts: 855
Likes: 695
From: Middle Tn. near Hsv. Al
The chisel trick should work, because we had 19 of 21 strip. Wound up using a air hammer with chisel blade and impacted the edge (sides) of the frozen bolts at angle and they loosen up, then hammered the next larger size of Torx bit in and removed ALL of them. This is scary, but was our last resort rather than breaking the (6H26) plastic pan into pieces and using locking pliers. Good Luck!
Senior Member
Joined: May 2010
Posts: 670
Likes: 163
From: Mississippi
This problem sounds very similar to the issues we in the motorcycle trade ran into when phillips head engine case screws first came into common usage.
After many engine heating/cooling cycles, the fastener that was installed at X in. lbs. of torque had worked itself into X plus a bunch in. lbs, effectively overcoming the ability of the standard tool to remove it without damage.
The fix, and standard equipment in everyone's toolbox in that era, was your standard ol' 3/8" drive hand impact, a tool that I think today has been largely forgotten. These are available almost anywhere in the $10 - 20.00 price range.
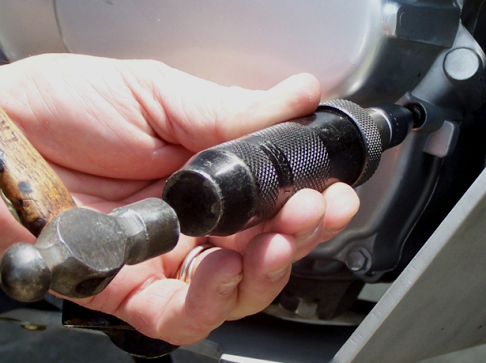
For those who have never used this basic tool, the concept is simple. You insert the appropriate bit into the fastener, pressing down on the tool body and rotating it in the appropriate direction. This winds up the internal spring.
Whack the tool as pictured, and the stored energy of the spring is transmitted to the fastener as both rotational and impact forces. This "shocks" the fastener loose, usually without damage.
From my reading about the pan screw problem, it sounds like Jaguar in their infinite wisdom undersized the fasteners on this application. I'd bet good money a hand impact would remove these problem screws toot sweet!
After many engine heating/cooling cycles, the fastener that was installed at X in. lbs. of torque had worked itself into X plus a bunch in. lbs, effectively overcoming the ability of the standard tool to remove it without damage.
The fix, and standard equipment in everyone's toolbox in that era, was your standard ol' 3/8" drive hand impact, a tool that I think today has been largely forgotten. These are available almost anywhere in the $10 - 20.00 price range.
For those who have never used this basic tool, the concept is simple. You insert the appropriate bit into the fastener, pressing down on the tool body and rotating it in the appropriate direction. This winds up the internal spring.
Whack the tool as pictured, and the stored energy of the spring is transmitted to the fastener as both rotational and impact forces. This "shocks" the fastener loose, usually without damage.
From my reading about the pan screw problem, it sounds like Jaguar in their infinite wisdom undersized the fasteners on this application. I'd bet good money a hand impact would remove these problem screws toot sweet!
Thread Starter
|
Veteran Member
Joined: Apr 2012
Posts: 1,854
Likes: 987
From: UK
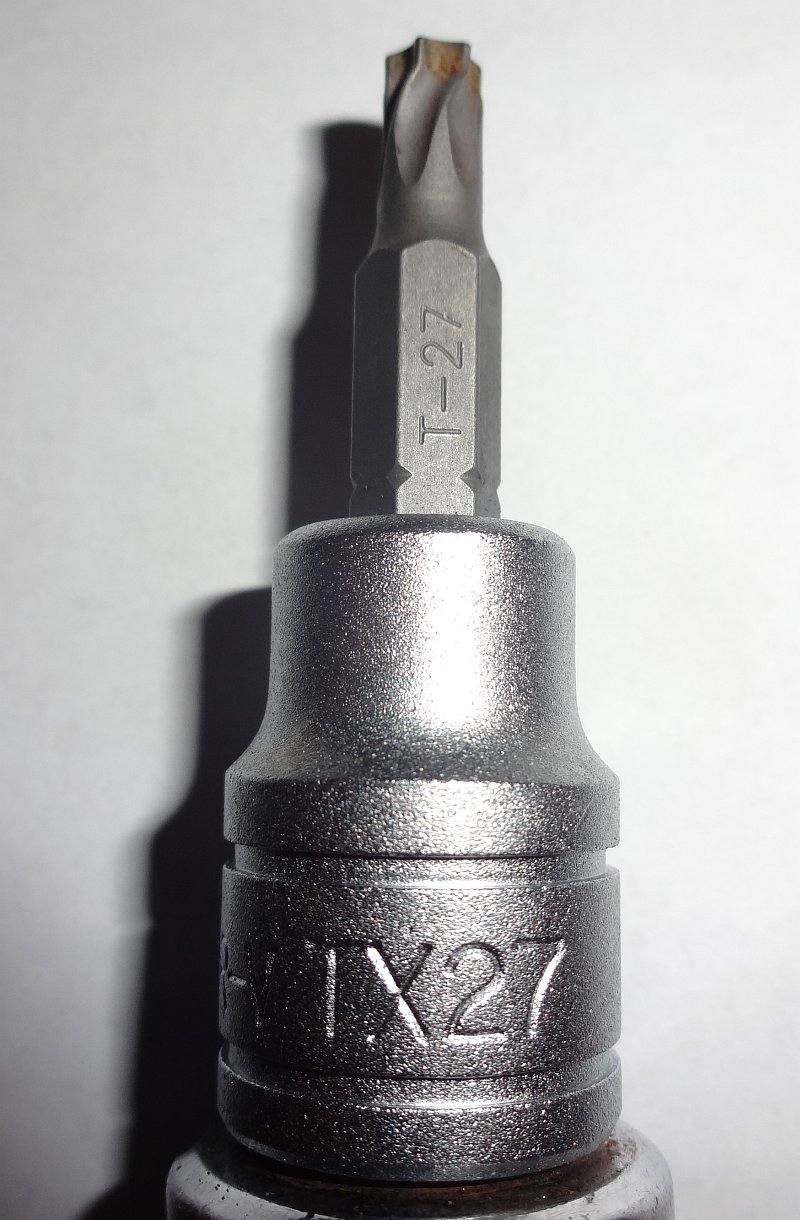
I went out this morning and purchased a new T27 bit and had another go. This was the result of the first screw.
It seems to me that every single screw on this sump is going to give me big problems, so once again I'm going to take the bad option and change the oil only and leave the sump in place.
If I ever get the chance to get the car up on a ramp for a day then maybe I will have another go but for me it is just to cramped lying under the car to be able to do a good job on all 21 screws without damaging the gearbox casting in some way.
Veteran Member

Joined: Nov 2014
Posts: 2,675
Likes: 1,578
From: Eastern USA
I ran into a similar issue when I did mine a few weeks back. I ended up stripping 6 of them. I used a combination of extractors and chisel. The extractor works fine if you manage to drill deep enough. If the bore is too shallow, the extractor breaks and make the situation worse. I ended up working with the chisel the most. The metal of the screw is fairly soft (see stripping above!), so it is easy to first create a small notch on the outer perimeter of the bolt head by hammering the chisel towards the threaded part of the bold (at 90 deg, so to speak). Easy hammering is enough, remember you need this general area to keep a seal later. Once there is a notch, you can start chiseling at an angle until the screw loosens up. The thing is that the screw is not seized that badly, just that the Torx is just the wrong size.
You already know, but the upside of changing the pan is that you replace the filter, and you get to see if the 2 big magnets have collected any metal shavings, an indication of further issues.
My only regret is that I wished I had ordered all new bolts for this job. The new bolts have a bigger Torx that seem much better suited for the job. Best of luck.
Trending Topics
Veteran Member
Joined: Apr 2010
Posts: 7,657
Likes: 3,020
From: Arlington VA USA
I went out this morning and purchased a new T27 bit and had another go. This was the result of the first screw.
It seems to me that every single screw on this sump is going to give me big problems, so once again I'm going to take the bad option and change the oil only and leave the sump in place.
If I ever get the chance to get the car up on a ramp for a day then maybe I will have another go but for me it is just to cramped lying under the car to be able to do a good job on all 21 screws without damaging the gearbox casting in some way.
It seems to me that every single screw on this sump is going to give me big problems, so once again I'm going to take the bad option and change the oil only and leave the sump in place.
If I ever get the chance to get the car up on a ramp for a day then maybe I will have another go but for me it is just to cramped lying under the car to be able to do a good job on all 21 screws without damaging the gearbox casting in some way.
Senior Member
Joined: Oct 2014
Posts: 855
Likes: 695
From: Middle Tn. near Hsv. Al
Touche! The impact driver stripped the holes for us. I have 2 of them from M/C days and they were my 1st "got to". The chisel was the key to success. Impact hammer was icing on the cake. The T40 screws work great and anti seize should help with future removal. Crescent wrenches and locking pliers for mundane tasks ,Quality specialized tools required for special ops. :-)
Thread Starter
|
Veteran Member
Joined: Apr 2012
Posts: 1,854
Likes: 987
From: UK
Thanks for all the suggestions, sounds like the chisel is the way to go
I will give that a try in a couple of years time, by then and with the 3rd refill with fresh fluid the box should be good for a few more years.
I will give that a try in a couple of years time, by then and with the 3rd refill with fresh fluid the box should be good for a few more years.

Member
Joined: Dec 2014
Posts: 47
Likes: 5
From: Bradenton FL
Be sure to use a metric chisel and not a whitworth one!

Thread
Thread Starter
Forum
Replies
Last Post
aholbro1
XJ XJ6 / XJR6 ( X300 )
18
Dec 29, 2024 06:46 PM
chatmanx
S-Type / S type R Supercharged V8 ( X200 )
0
Sep 11, 2015 07:17 PM
Currently Active Users Viewing This Thread: 1 (0 members and 1 guests)