XK8 / XKR ( X100 ) 1996 - 2006

Upper control arm removal - bushing issue

Thread Tools
 
Search this Thread
 
Old Nov 30, 2018 | 12:38 PM
  #1  
Higgins's Avatar
Thread Starter
|
Senior Member
5 Year Member
Liked
Loved
Community Favorite
Joined: Dec 2017
Posts: 410
Likes: 111
From: Gothenburg
Default Upper control arm removal - bushing issue

I'm in the process of replacing some bushings and joints in the front end of my Xkr,2000 year model. Some of the bushings are already replaced recently like the control arm bushings and the bushings for the anti-roll bar. What I plan to replace now is the rest; the lower shock absorber bushings, upper shock mounts, tie end rods and all ball joints.

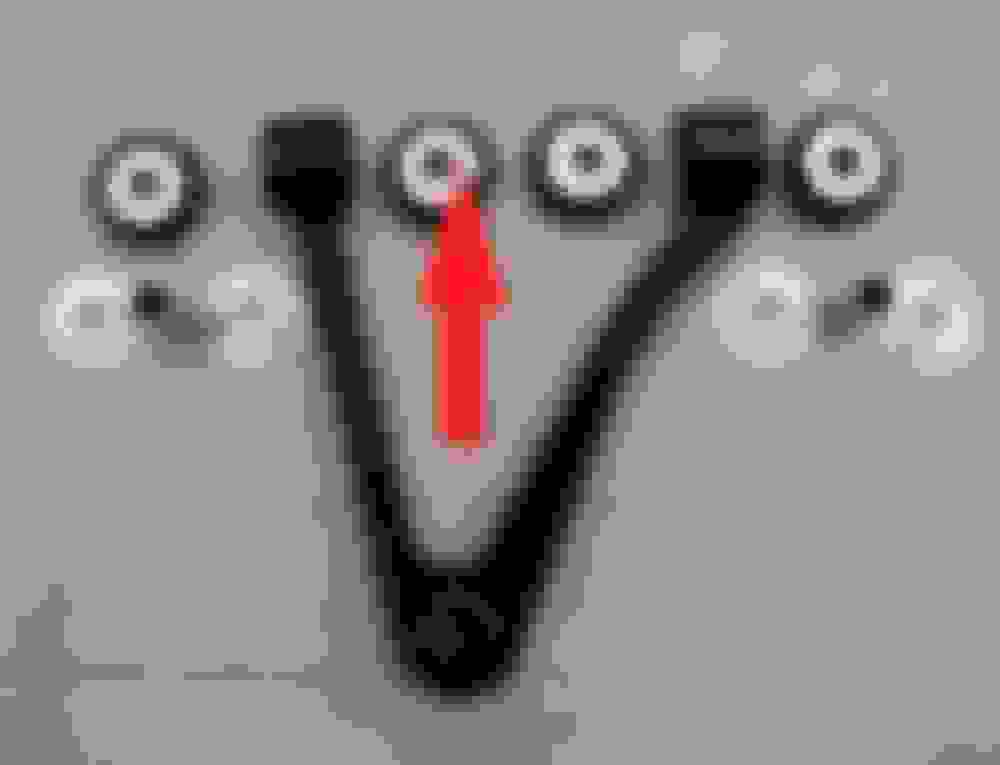
When I loosen the bolt for the upper control arm (see picture below) a part of the right hand bushing is separating from the bushing itself. The part separating is in the shape of a washer and seems to me to be the "wall" of the bushing. Together with the actual washer of course, so that it seems to be two washers on the bolt. The part from the bushing is very tight to the bolt, so when I pressed the bolt out the "washer" followed the bolt out.

Is this a normal behaviour? Or is this causing me problems later on? Those bushing were replaced one year ago by my workshop and I would prefer not to need to change them again


Reply
Old Nov 30, 2018 | 01:01 PM
  #2  
fmertz's Avatar
Veteran Member
10 Year Member
Liked
Loved
Top Answer: 1
Joined: Nov 2014
Posts: 2,674
Likes: 1,574
From: Eastern USA
Default

Originally Posted by Higgins
What I plan to replace now is the rest; the lower shock absorber bushings, upper shock mounts, tie end rods and all ball joints.
You can remove the wheel well liner. It leaves enough room to remove the strut without dealing with the upper control arm at all...
 
Reply
Old Nov 30, 2018 | 05:32 PM
  #3  
GGG's Avatar
GGG
Joined: Dec 2011
Posts: 120,439
Likes: 17,001
From: Durham, UK
Default

The OE upper wishbone bush is not a single component - it can be completely dismantled and go back together without damage.


It looks like the flat washer (arrowed in red) has come out of the rubber moulding. Just carefully press it back in.

Graham
 
Reply
Old Dec 1, 2018 | 01:45 AM
  #4  
Higgins's Avatar
Thread Starter
|
Senior Member
5 Year Member
Liked
Loved
Community Favorite
Joined: Dec 2017
Posts: 410
Likes: 111
From: Gothenburg
Default

Originally Posted by GGG
The OE upper wishbone bush is not a single component - it can be completely dismantled and go back together without damage.


It looks like the flat washer (arrowed in red) has come out of the rubber moulding. Just carefully press it back in.

Graham
Thank you for the advice!
 
Reply
Old Dec 1, 2018 | 05:06 AM
  #5  
Jandreu's Avatar
Veteran Member
Joined: Mar 2014
Posts: 2,173
Likes: 605
From: Goldsboro, NC
Default

Be sure to note the inner shims, location of each as they are different sizes. They must go back in exactly as remove or your tracking will be off.
 
Reply
Old Dec 1, 2018 | 08:24 AM
  #6  
Higgins's Avatar
Thread Starter
|
Senior Member
5 Year Member
Liked
Loved
Community Favorite
Joined: Dec 2017
Posts: 410
Likes: 111
From: Gothenburg
Default

Originally Posted by Jandreu
Be sure to note the inner shims, location of each as they are different sizes. They must go back in exactly as remove or your tracking will be off.
Thanks for the headsup. That one I was aware of thanks to the eminent video at Youtube by Sam1174
 

Last edited by Higgins; Dec 1, 2018 at 10:31 AM.
Reply
Old Dec 1, 2018 | 12:20 PM
  #7  
Johnken's Avatar
Veteran Member
Joined: Apr 2014
Posts: 5,457
Likes: 1,816
From: New Jersey USA
Default

Looks like you got your answer, yes its ok and normal. Just in case you are still in the middle of this job: watch the washer as you pound the bolt out. It can move with the bolt and get jammed up against one of the metal protrusions. Sounds like a simple so what, but i remember it being a real roadblock in this job. Keeping the washer free from binding will save you from frustrating headaches.

John
 
Reply
Old Dec 2, 2018 | 02:15 PM
  #8  
White Bear's Avatar
Senior Member
Liked
Loved
Community Favorite
Joined: Oct 2012
Posts: 434
Likes: 162
From: Minnesotsa/Arizona
Default

Originally Posted by Jandreu
Be sure to note the inner shims, location of each as they are different sizes. They must go back in exactly as remove or your tracking will be off.
Those shims are for caster adjustment not alignment. IMHO, within reason, the more caster the better, so when I did this job I placed the shims to give maximum caster, the car is now very stable, and drives like its on rails.
By the way Johnken is right, keep that washer up against the arm to prevent it from binding.
Regards,
 

Last edited by White Bear; Dec 2, 2018 at 02:18 PM.
Reply
Old Dec 3, 2018 | 03:35 AM
  #9  
Higgins's Avatar
Thread Starter
|
Senior Member
5 Year Member
Liked
Loved
Community Favorite
Joined: Dec 2017
Posts: 410
Likes: 111
From: Gothenburg
Default

White bear, thanks for that story. I plan to do the same, increase caster for better steering. To increase caster, you moved shims from the rear side of the control arm to the front side?
 
Reply
Old Dec 4, 2018 | 09:36 AM
  #10  
White Bear's Avatar
Senior Member
Liked
Loved
Community Favorite
Joined: Oct 2012
Posts: 434
Likes: 162
From: Minnesotsa/Arizona
Default

I added the thin shim to #1 and #4 removing it from #2 & #3 increasing caster to the maximum using the shims.
Regards,
 

Last edited by White Bear; Dec 4, 2018 at 09:42 AM.
Reply
Old Feb 9, 2019 | 12:35 PM
  #11  
Higgins's Avatar
Thread Starter
|
Senior Member
5 Year Member
Liked
Loved
Community Favorite
Joined: Dec 2017
Posts: 410
Likes: 111
From: Gothenburg
Default

White bear,

can your described modification really give maximum caster angle? I can understand that there is a difference to left side and right side of the car, but to me your change will give maximum caster on one side and minimum caster on the other
 
Reply
Old Feb 9, 2019 | 02:26 PM
  #12  
scottatl's Avatar
Senior Member
15 Year Member
Liked
Loved
Community Favorite
Joined: Mar 2010
Posts: 733
Likes: 200
From: Atlanta, GA
Default

that bolt is hard to get out even with the wheel liner removed, I remember the struggle.
 
Reply
Old Feb 10, 2019 | 02:16 AM
  #13  
dibbit's Avatar
Veteran Member
15 Year Member
Liked
Loved
Community Favorite
Joined: Oct 2010
Posts: 2,012
Likes: 960
From: Spain
Default

Originally Posted by scottatl
that bolt is hard to get out even with the wheel liner removed, I remember the struggle.
I've just done mine. The passenger side slid out quite easily, the drivers side needed to be soaked in penetrating oil before it would move at all.
 
Reply
Old Feb 10, 2019 | 02:38 AM
  #14  
Higgins's Avatar
Thread Starter
|
Senior Member
5 Year Member
Liked
Loved
Community Favorite
Joined: Dec 2017
Posts: 410
Likes: 111
From: Gothenburg
Default

I have left to put everything back together. Got my control arms back from the workshop after they pressed out all the old ball joints and pressed new ones in. But wants to set maximum caster also when putting it all together, and since the pain in the process of getting the fulcrum bolt out I want to get things right from the start
 
Reply
Old Feb 10, 2019 | 05:01 PM
  #15  
kdm's Avatar
kdm
Junior Member
Joined: Sep 2016
Posts: 18
Likes: 3
From: Brunswick, GA, USA
Default

I recently replaced the front springs, upper A-arm bushings and outer tie rod ends on my 2000 XKR with 71,000 miles. The ride height in the front had dropped about 1 inch (so 14.75 inches) and I was wearing out the inside of both front tires as camber was way off. Toe measurements looked good at the time. Removing the a-arm bolt was a bear - one side took almost 3 hours and the other was about an hour. No corrosion at all - just very tight clearances through the aluminum mounts on the body. I initially thought it might have been the inner diameter of the bushing washers binding on the bolt, but once off I checked and they they were ok.

I compared the uncompressed height of both old and new springs and they were an inch difference. Once everything was installed it brought the front ride height back to 15.75 inches and was able to get camber in spec. Took it in for an alignment yesterday to get toe set. Hoping this get tire wear back to normal. Have not had an issue with rear tire wear and ride height there is about 15.5 inches.

Sad part of all this is I worked on the front end about year and half ago when I replaced the upper shock mounts with Welsh poly mounts along with lower shock mount bushings, sway bar, drop links etc. I had to fight with the a-arm bolts then as well (along with compressing the springs). Not sure why I didn't replace the springs then. Glutton for punishment I guess.
 
Reply
Related Topics
Thread
Thread Starter
Forum
Replies
Last Post
zidjan
XJ XJ6 / XJ8 / XJR ( X350 & X358 )
10
Oct 24, 2018 12:05 PM
mhamilton
XJ XJ6 / XJ8 / XJR ( X350 & X358 )
24
Jun 15, 2017 03:51 PM
SD96XJ6L
XJ XJ6 / XJR6 ( X300 )
4
Mar 10, 2015 10:12 AM
elmostro
S-Type / S type R Supercharged V8 ( X200 )
2
Jan 18, 2015 07:43 PM
gunnerman
XJ40 ( XJ81 )
1
Jan 5, 2012 11:12 PM

Currently Active Users Viewing This Thread: 1 (0 members and 1 guests)


All times are GMT -5. The time now is 01:10 AM.