
Water Pump Adventure

Thread Starter
|
Veteran Member
Joined: Jun 2012
Posts: 1,245
Likes: 338
From: Gainesville, VA
Kitty was nice to me. She waited until the end of a 2000 mile cross country trip before letting the water pump start to go. It started with intermittent low coolant warnings and needing about a quart of water. Something started squealing the next day! At first it was about 4 days between top offs, but that was down to less than every other day before all the parts came in and I had the chance to put her on the lift.
As I do not like doing things twice, whenever I have to work on something "inconvenient", I replace everything I can get my hands on. So I ordered new belts, accessory pulleys and a new lower hose along with the pump. All available at Rock Auto. And of course plenty of new Orange Dex Coolant.
The water pump was without a doubt the easiest part of the project. For those of you with S/C engines, even getting the fan assembly out was a bit of a chore. First get the air filter box out of the way. For S/C engines you must disconnect all the upper connections of the lower hose (driver's side - US), remove the upper hose and disconnect the fan wires (on top) just to get at the fan retaining nuts. Be careful - the bolts there are just sitting in slots and can easily fall into never-never land. Put them aside. Then release a S/C hose from a retaining clip on the passenger side of the fans and a clip holding an A/C line in place across the bottom of the fans. You can remove the fans now.
The whole project took just over seven hours. The vast majority of the time was spent getting the lower radiator hose out and replaced. A previous mechanic must have assembled the engine bay from the outside-in and the hose clamp on the S/C radiator was facing the A/C condenser and was "almost" inaccessible! What a PITA. Make sure you loosen the water pump pulley bolts before removing the belt - it's a snap that way. The new idler and tensioner pulleys were easy (wish I could have found the S/C pulleys also - fingers are crossed). Getting those new belts on "was" a little trying, especially the S/C belt. I drained as much coolant as I could. Pulled the plugs on both radiators and opened up the S/C Heat Exchanger (HX) top-off plug. What a mess.
When re-installing, make sure the sequence is right, or you'll be taking things out again. Start with the pulleys, then the pump. Install the pump pulley but don't worry about tightening the bolts tight. Install the belts (now tighten the pump pulley bolts) and the lower hose. It's hard to snake the hose through to the S/C radiator, but once you wiggle and push it in far enough you can reach around from under the bonnet and pull while you twist & push. Attach it to both radiators (you wont be able to get to the main radiator clamp after the fan assembly is in), but not the thermostat housing or HXs. It must be loose to get the fan in. Install the fans, then the rest of the lower hose and the upper hose. Don't put the upper hose onto the radiator before the fans - you'll have to take it out again. The air box goes in and it's time to fill 'er up.
Refilling the coolant from the reservoir didn't take as long as I thought. I left the S/C HX coolant plug out while filling and that might have sped things up. Once the coolant appeared toward the top of the S/C plug, I put it in finger tight. After the reservoir was topped up, I started the engine and warmed it up. To tell the truth, considering the maze of hoses we have, I was surprised that it didn't need much more coolant after that. Opened the S/C HX plug and the coolant was right there at the top, so the plug was torqued in. Took her for a half hour drive and she took about a cup more coolant - about two gallons total. For the life of me I could not find the engine block drain, and wasn't going to go through the hassle of a full flush to get to the heater core. So the entire system would take a bit more coolant following a full flush and drain.
Two special things helped:
1. Release the bonnet struts (carefully!) and "over open" the bonnet until you can slip small bolts into the exposed holes on the hinge assemblies (it'll be obvious). This provides surprisingly more room to work.
2. Make a tool to remove the S/C HX plug by using an M12 1.25 bolt and two nuts jammed onto it so that their flats align. I had to put it in a vise and pound the crap out of it to align the flats, but when it came to removing and torquing the plug, it was a snap.
Pay close attention to the routing of "all" the lower hoses before removing it. I've attached a picture of this bizarre thing so you can see what you're dealing with. Amazing. That's ONE assembly!
Good luck, and don't forget to reconnect your bonnet struts!!!
Last edited by scardini1; Dec 18, 2014 at 10:02 AM.
Veteran Member


Joined: Dec 2011
Posts: 2,931
Likes: 1,572
From: Spencer, NC
Thanks for the well explained procedure, now if I can ever get out of that one I'll buy a dozen lottery tickets, what a mess!
We all know how tight things are and the proper order is a big help.
Thanks again,
Wayne
We all know how tight things are and the proper order is a big help.
Thanks again,
Wayne


Thread Starter
|
Veteran Member
Joined: Jun 2012
Posts: 1,245
Likes: 338
From: Gainesville, VA
"Tight" is an understatement. This is the highest performance car I've owned and it's amazing how compactly they've located all the systems. As you work on the car and get to know it better, it's hard not to marvel at how truly well designed it is. Consider this: My '68 Triumph has a Radiator - period. We have five(!) coolers of various types in the front of the car. If you include the HXs and HVAC system we have a total of NINE things in the car that exchange heat. I never thought I'd ever be working on something so complicated (and sometimes successfully! :-D )

Veteran Member
Joined: Aug 2013
Posts: 1,036
Likes: 272
From: Poughkeepsie NY
That would equate to 100 HP BS ;-)
Veteran Member
Joined: Sep 2012
Posts: 1,473
Likes: 655
From: Devon. U.K.
Jon,
Don't want to scare you, but that is *just* the radiator bottom hose. The "octopus hose" looks much more complicated that that one, and is about 10 times more difficult to get at
Don't want to scare you, but that is *just* the radiator bottom hose. The "octopus hose" looks much more complicated that that one, and is about 10 times more difficult to get at
Last edited by DevonDavid; Dec 18, 2014 at 09:04 AM. Reason: spelling
Trending Topics
Veteran Member
Joined: Sep 2012
Posts: 1,473
Likes: 655
From: Devon. U.K.
It's #1 in this diagram - the whole lot is one part.
You can't really see much of it - it is cleverly concealed at the back of the engine, beneath the throttle body and firewall. If you know a gynaecologist who is handy with a wrench, that's probably the way to go !!
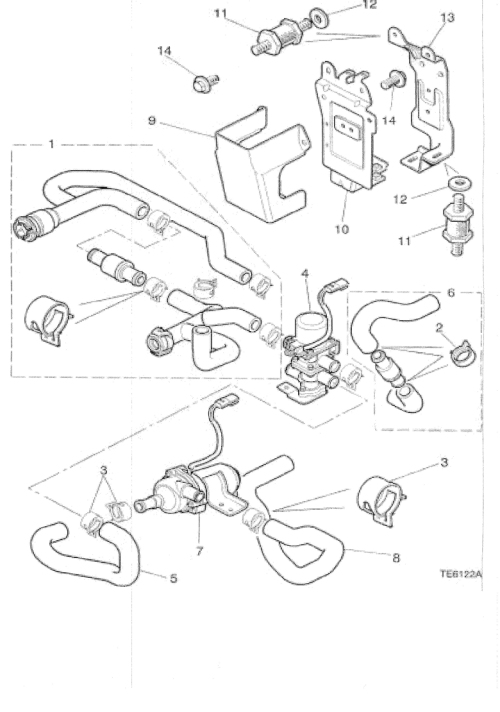
You can't really see much of it - it is cleverly concealed at the back of the engine, beneath the throttle body and firewall. If you know a gynaecologist who is handy with a wrench, that's probably the way to go !!

Veteran Member
Joined: Aug 2008
Posts: 2,904
Likes: 364
From: SW OH
Knowing the headaches these cars can be and the extra work the the SC causes to repair things, I would just go buy something that puts out the same HP without the aid of that stuff on the motor.
Veteran Member
Joined: Aug 2008
Posts: 2,904
Likes: 364
From: SW OH
I agree until you have to WORK ON IT. ha ha ha ha
I had a 04 6sp GTO for a few years. Talk about pure bust *** ***** of a drive and that only had 350 HP, the 05/06 models have 400 HP and they absolutely scream and no BS SC, hidden hoses, octopus crap. Yes I know it is not as refined and great to look at but it was good old American (via Australia's Chevy Holden Division) ***** to the wall right out of the package.

Senior Member
Joined: Sep 2013
Posts: 729
Likes: 257
From: Cincinnati,Ohio USA
Stiegemeier can drill out your eaton M112 rotors and cap them off.
This will reduce rotating weight of the rotors by 60% !
(IAT Heavily decreased, engine power needed to drive blower-heavily decreased,boost-increased without heat)
Now to move the air from those lightweight propellers spinning very fast,you need a port job, and the upper pulley swap will not only create a great amount of boost, it will do so without belt slip and the blower overheating because the rotors are so light now!
I watched a few dynos and the results were stunning !!!!!!!
Thank me later,
Last edited by aode06; Dec 21, 2014 at 07:53 AM.

Senior Member
Joined: Oct 2012
Posts: 853
Likes: 192
From: Panama City, Florida
I wonder??? Would it be easier and save time and energy to disconnect what one would have to, then lift the engine out of the car? Then one could change everything on the front of the engine with ease.
Just a thought.
Just a thought.

Thread
Thread Starter
Forum
Replies
Last Post
Ozzy_UK
S-Type / S type R Supercharged V8 ( X200 )
45
Feb 19, 2019 02:05 PM
FS[SouthWest]: Red 2001 XK8 Convertible in Colorado
picard
PRIVATE For Sale / Trade or Buy Classifieds
7
Oct 12, 2015 11:56 AM
Currently Active Users Viewing This Thread: 1 (0 members and 1 guests)