When you click on links to various merchants on this site and make a purchase, this can result in this site earning a commission. Affiliate programs and affiliations include, but are not limited to, the eBay Partner Network.
I have just ordered a pair (a rather expensive pair) of elegant walnut door cappings from XK Interiors (Myrtle Group) in the UK. I am now waiting for them to arrive. Does anyone have any good tips on how to remove the original door cappings, and how to install these wooden ones? I would be grateful for any advice... I suppose the tricky bit will be dealing with the door latches, particularly the one on the driver's side (RHD) that also has the electric controls for the seat memory positions.
Rae, can you please say a little more ? I'm not sure what cappings means. My car's in the shop so you're testing my memory, but the only wood on the door is by the switches right ? That's super easy to remove but I bet you are referring to something else.
I bet it will be obvious when door card removed. Much easier than it sounds.
I think rev Sam has a video. But if you want to dive in:
Remove screw cover under door open handle.
Unscrew #2 Phillips
Move to armrest
Remove rubber liner inside arm rest.
Use big flat blade screwdriver to pry vertical pad towards back of car. This is in the front section of the armrest stowage area below window switch pack. It is fastened by friction (plastic peg). Remove this panel expose Phillips head screen fastens window switch pannel.
Take a moment to note position of this screw's speed nut receptacle. It may move on you.
Remove window switch wood holder.
Unfastened wires at bottom.
Unfasten vertical screw holding arm rest to door. This is at bottom of armrest pocket.
You do not need to remove speaker Grill.
Now pull to Unfasten door pannel.
Start at top inside corner ( nearest dashboard). Slip fingers under edge pull straight backnow.
Move down same side pull.
Move to outside bottom corner, pull.
Pull to disconnect remaining top straightening.
Disconnect puddle light (don't lose retaining clip, they can launch on you).
Door card should now be free.
Fyi, I always have 1 or 2 of the plastic fasteners that attach to the door on hand. They can break. You can use off the shelf at autozone, get the diameter of the male insert right, Super easy to trim the "head" to fit with plain old scissors.
When reinstalling hook lip over window edge first, line up holes &fasteners press on. (IME - watch the pin in upper rear of door pannel ensure attachment)
Rae, with eyeballs on the inside of the door card, it's gotta be an easy install.
John
Last edited by Johnken; 12-04-2016 at 03:19 PM.
Reason: Spell check created nonsense statemen
been looking at those since I got my car 4.5 years ago - think it adds considerably to the car and should have been a standard trim item for the price.
Once you get them - let me know your thoughts on the quality and match as may just bite the bullet and get as my Christmas gift to me!!
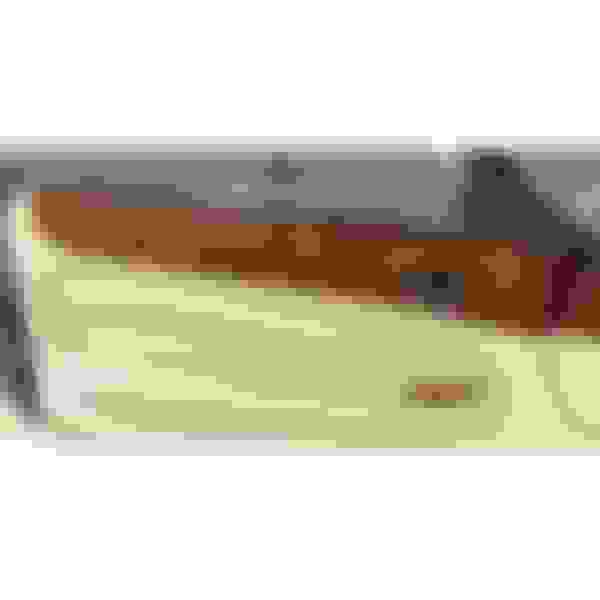
Thank you very much JohnKen, for your detailed notes on removing the door cards. The photo suggests that they will look great once fitted, and I am really looking forward to the overall effect. I suppose my taste in these matters has been profoundly influenced by the cars I drove in my late teens and early twenties: a 1958 MG Magnette ZB varitone (my first car, passed down from my mother), with red leather interior and acres of wood everywhere; and a 1967 Jaguar Mark II 3.4, also with exquisite wood trim right across the dashboard, between the dash and the windscreen, across the tops of the doors...
When I order these door capping from XK Interiors (Myrtle) I found that they can also supply walnut door handle bezels to fit inside the door cappings; but these bezels are pretty expensive for such small items. I recall seeing a thread on this forum about some "faux wood" finish for the bezels. I might try that trick in due course.
I am a little apprehensive about the various electrical connections I will find behind the door "cards". There will be connections for the electric windows (on both sides), but there will also be connections for the seat memory (on the driver's side). Will I need to disconnect all of that wiring in order to remove the door cards?
All fittings behind the door card are modular plugs, not an issue.
Your biggest problem will be dealing with any possible broken ( very common) fur tree fasteners when reassembling. Everything plastic breaks on these cars as it does not age well and is very brittle.
Do your self a favor and download the service manual in the sticky's.
As far as the wood trim I also think it looks great however matching it to your dash is next to impossible and getting a complete matched set is very expensive.
How do I download a service manual ? Where from (precisely) ? What is a "sticky"? I have tried various sites (including this one) for a service manual, but without success.
if you go to the top of the XK8/XKR section - the first few threads are the "stickies" In there, you will find a wealth of information
Here is the direct link to the How To & DIY sticky - scroll down toward the bottom of the second post and you will see Workshop Manual PDF version - download the appropriate version for your particular MY
Nice job!! I love how they look. Around how much do they cost? I have no idea.
Hey don't forget a nice coat of high quality Carnuba Wax will really light these (and all your dash's wood) up more than you ever thought. Please don't use some $8 turtle wax type - they likely have very fine abrasives in them. I welcome other's suggestions about affordable pure carnuba wax. I used a bit of my Zymol Atlantique on my wood - Wow it makes a huge improvement and it is pure wax.
Yeah those look really good. Definitely adds class to the interior.
One thought after seeing them in the sunlight. I wonder how they will hold up in the direct sun? The rest of the wood dash avoids the direct sun most of the time while these will get blasted almost all the time. My top is down about 95% of the time here in Florida.
They do look great and are a very nice addition to the wood bling in the XK8/R, I saw these awhile back and they are expensive 495 sterling = around $622.
For that kind of coin they would have to be a match to my dash.
No offense to the poster but these are not even a close match to your cars wood, sorry but I think they look added on with the mismatch.
I think it would be very difficult to get a perfect match. The wood is clearly already 'milking'. Once the resin start to age, it's almost impossible to match. Best bet is to redo the existing original wood panels and have everything looking brand new!
Yes, it would look better if the woods were a better match. But the problem is with the age discolouration of the original dash rather than with the new door cappings. The solution is for me to renovate or replace the dash. But that will be an expensive job and not something I plan to do in the very near future.
If the door cappings start to fade a bit that will not be a problem, because they will then blend better with the (already faded) dash ! In South Australia, as in Florida, the hood is down most of the time.
I basically like the look but not at $600+. So physically what does the install entail? Do you remove the original leather-look caps somehow or do these stick over the existing?

 12-02-2016, 08:39 PM