When you click on links to various merchants on this site and make a purchase, this can result in this site earning a commission. Affiliate programs and affiliations include, but are not limited to, the eBay Partner Network.
My drivers window had been playing up for a while, clunking when wound to the top. The drivers door regulator will take a pounding over its lifetime as it is actuated every time the driver door is opened.
In order to find a good second hand replacement for my RHD car I sourced one from a USA LHD car.
Stripped off the door card as per Rev Sam's video.
Then wound the glass to this position and removed the earth from the battery.
Next you have to remove the retaining clips from two of these on the bottom rail of the regulator. It's worth buying a couple of new clips in advance as the old clips may break.
They are here in the door.
Next you need to lever out the arms from the plastic clips, I used a small prise bar.
I then lifted the glass to the fully up position and held it in place with a strip of tape.
JTIS says that it is important to mark the position of this nut before removal to ensure refitting is done correctly, looks like mine has been all over the place.
Now you need to remove the electrical plug from the motor.
Release the locking tab by pushing here.
Release the four screws holding the regulator in place.
Then a bit of manoeuvring to get it out like this.
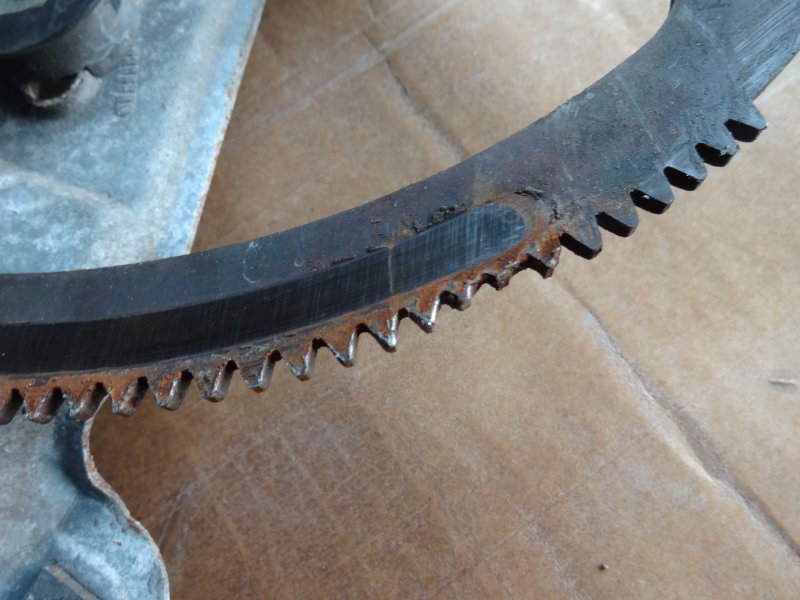
So here is the problem.
The new and the old.
I needed to reuse my old motor. It is released by these three screws.
But bad news, my motor gear is trashed.
So now ordered a new one off ebay (from a Range Rover), hope its teeth are in good condition. It should be less worn as the Range Rover door is not frameless like the XK8.
Part number is - Bosch 0130821317
Since I will now have to wait till next weekend to finish the job I decided to remove the glass to inspect the runners etc.
Remove the screw that retains the top of the runner.
...and then the two torx screws from the bottom runner adjuster.
The runner can then be worked out.
Lower the glass and then remove the screw holding the retaining bracket.
Remove the inner and outer weather strips on the top of the door.
The glass can then be lifted out at this angle.
Close inspection of the runner guides shows they are ok but I will need to search for pics on the web to confirm this.
Now is also a good time to replace the inner weather sheet.
I was also in need of a RH regulator and found one (motor attached) at a wreckers yard in Florida. Since it was a LHD car I figure the window was used four or five times.
Works perfectly and cost me $US125 with shipping to Australia.
Great write-up and it is nice to see a bunch of pics--especially clear and in good focus (not a skill everyone has). It would be nice to have this converted to pdf as a sticky how-to.
Great photos, thanks. I am still somewhat astonished at all the rust that the "damp country" Jags seem to have in nearly every cavity and on every part within. I had mine open today and also went in with a scope and not a single spot of rust on anything. Of course our drought here in the west is not so much fun if that is the trade-off.
Race, a couple of things that may help for your reassembly. Put the pins back into the window clips before attaching them. I used a pair of very large channel lock (welders) pliers to snap the regulators arms back on (really hard to get leverage with hand fingers alone). If you don't have tape, a small Stanley pipe clamp is perfect for hold ing the window (it's rubber jaws hold with light pressure).
Great write-up and it is nice to see a bunch of pics--especially clear and in good focus (not a skill everyone has). It would be nice to have this converted to pdf as a sticky how-to.
Just to close this one off, the replacement motor from a Range Rover (Bosch 0130821317) worked out well with the replacement regulator from the US car and has been working perfectly since I completed the job three years ago.
Thanks for following up on your original posting. Good clear pics.
As our cars age, gears take a bit of a pounding. On youtube sam1174 shows some tilt adjustment screws, but you can also adjust the pitch of the glass via the three triangle screws holding the regulator in place. I had to do this as my quarter glass and door window didn't meet correctly. It was a simple task really, and your pics clearly shows how/where things are.
I know this an old post but the pics are great. My 98 XK8 convertible has a rear window on the passenger side that does not work when I put the top down. I hear the motor but window does not move. Have any experience with this issue and how I can fix it?
Thank you for info on sourcing this plastic guide piece! I figured I might break one or have need for the other side of the car, so I ordered 2.
Attempting to install i've made 1 of 2 new ones look like that in your picture, so now seek help!
Could you provide any advice on how to install the little plastic piece. I only seemed to be able to engage 1 side correctly & could not get leverage to push the other side in. I attempted to raise the window to encourage it into its position, that was when it became shrapnel.
Appreciate any guidance you can provide! (I feel like perhaps removing front guide rail is in order but unable to find or figure out removal instructions)
Thanks in advance,
David
Originally Posted by RaceDiagnostics
I took the door card off and found this in the bottom of the door.
Looks like it is the remains of the top buffer on the front rail that should be here.
It should look like this.
Anyway I think the root cause is the angle of the window had slipped forward putting too much pressure on the plastic insert.
I adjusted the forward/rear tilt level a bit and the window now closes much better. Just need to source the clip as it's NLA from Jag.

 01-23-2016, 12:48 PM