
Front wing refurb


Thread Starter
|
Veteran Member


Joined: Apr 2012
Posts: 1,854
Likes: 987
From: UK
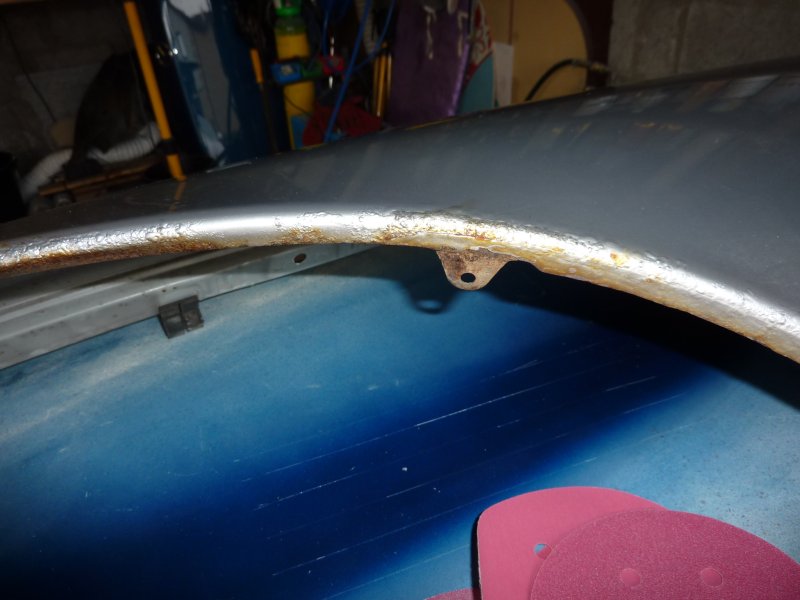
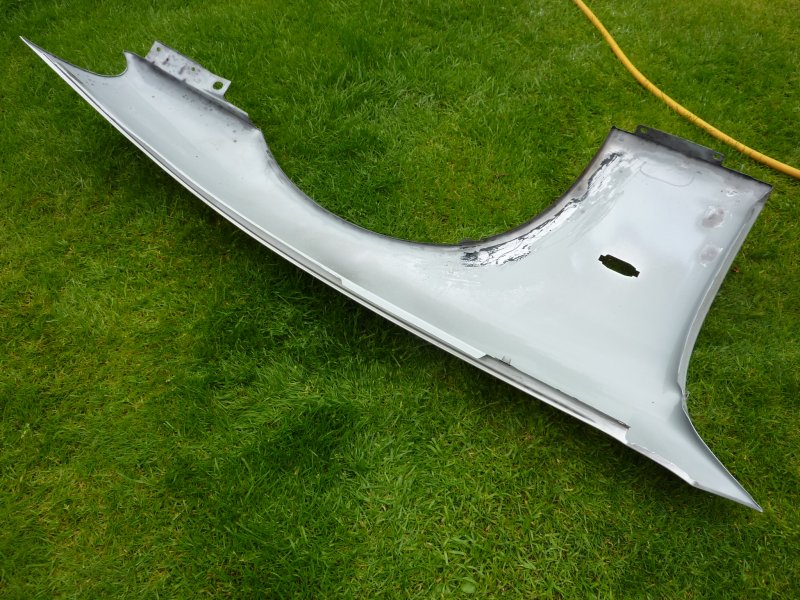
Both of my front wings are rusty, the left more than the right so I started with the left.
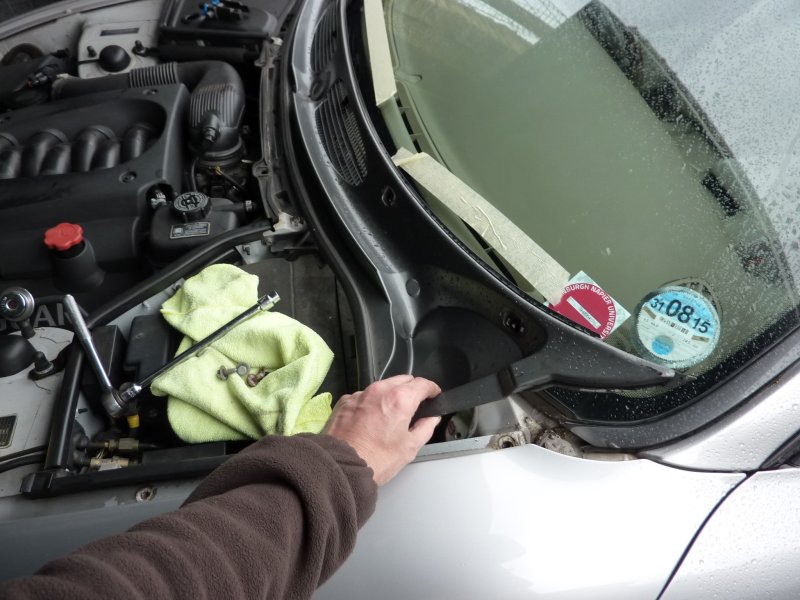
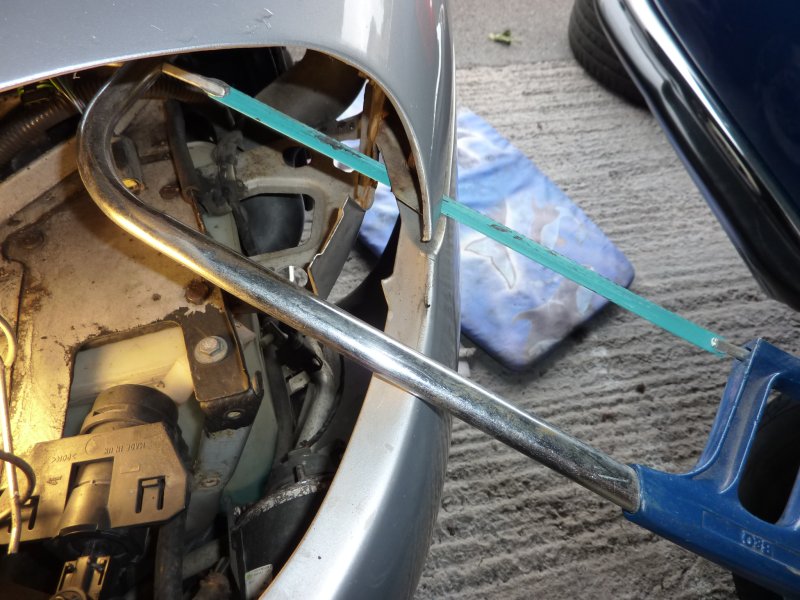
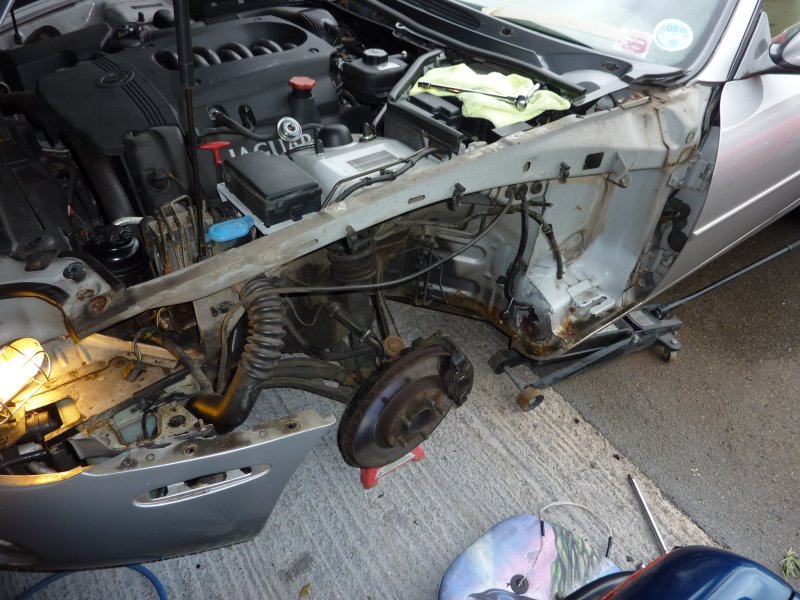
To remove the wings, you need to remove the cowl at the bottom of the windscreen, the wipers need to come of first, removing the headlamp also makes it a bit easier.
You can see there is a bolt holding the wing under the cowl.
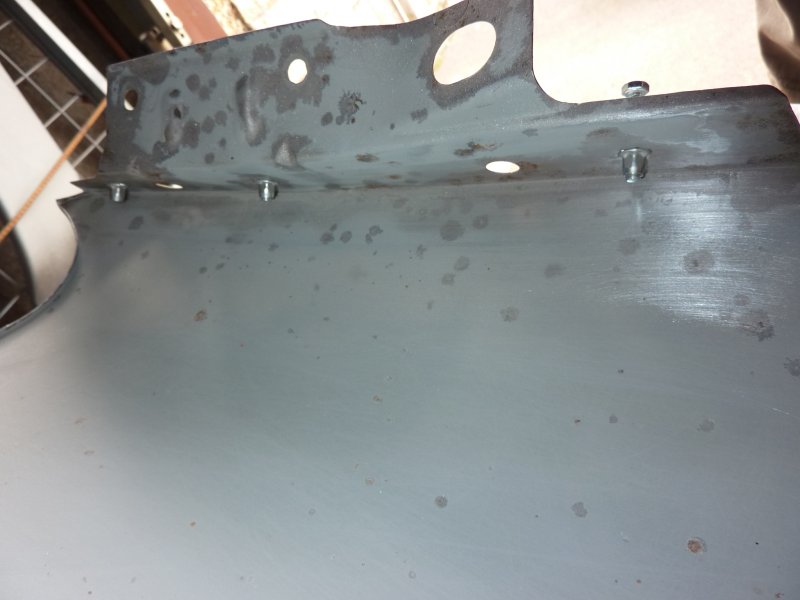
Once the light is removed you can see these 5 fixing.
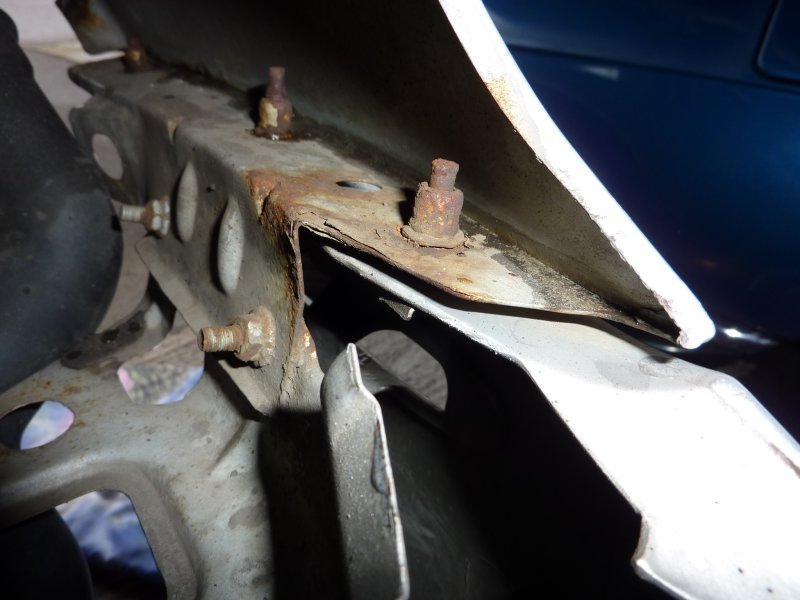
And from beneath from the wheel arch.
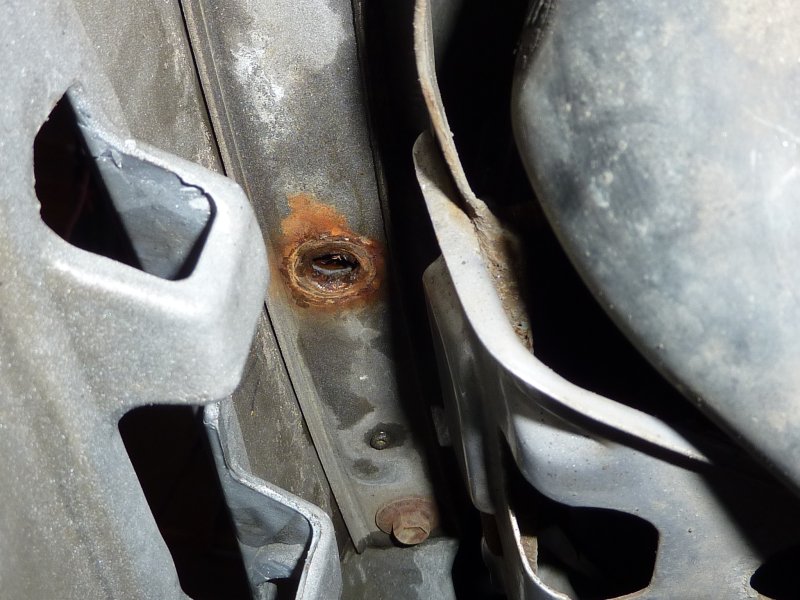
Of course my first try sheared off.
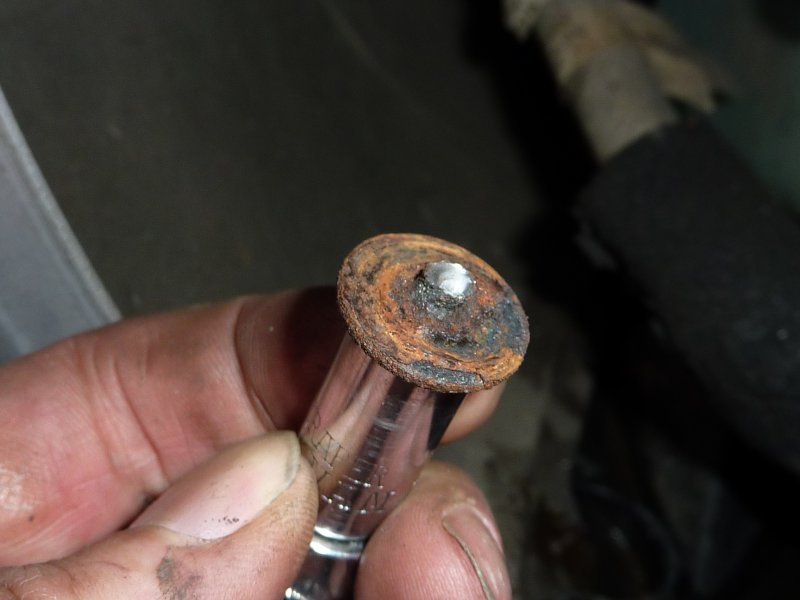
And the second one just spun so I had to hack saw it off.
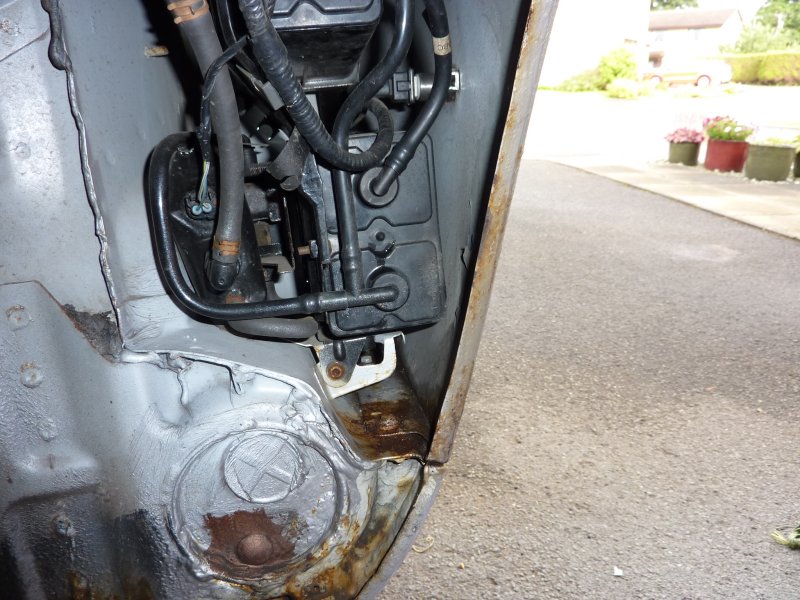
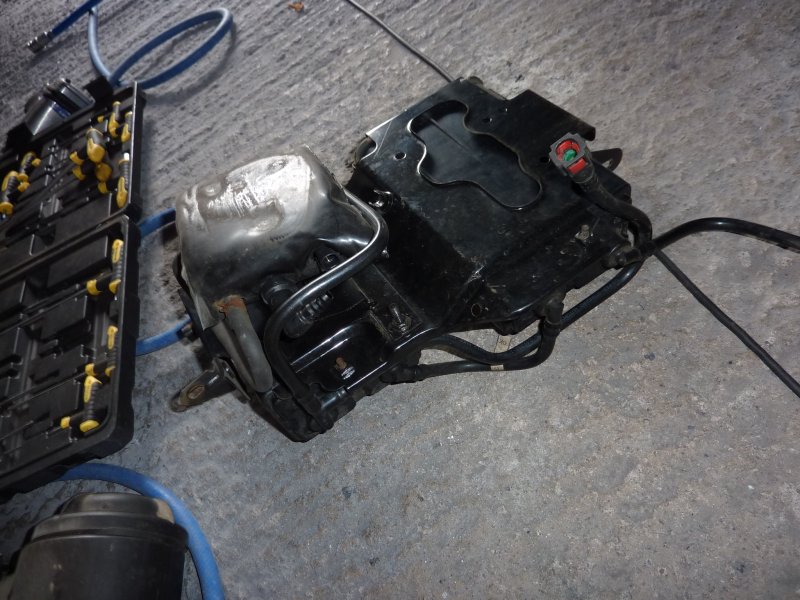
Unfortunately this lot is on the back of the wing and needs to come out, I detached the easiest looking clips and removed one nut and bolt plus the electrical connector to it and the wing indicator.
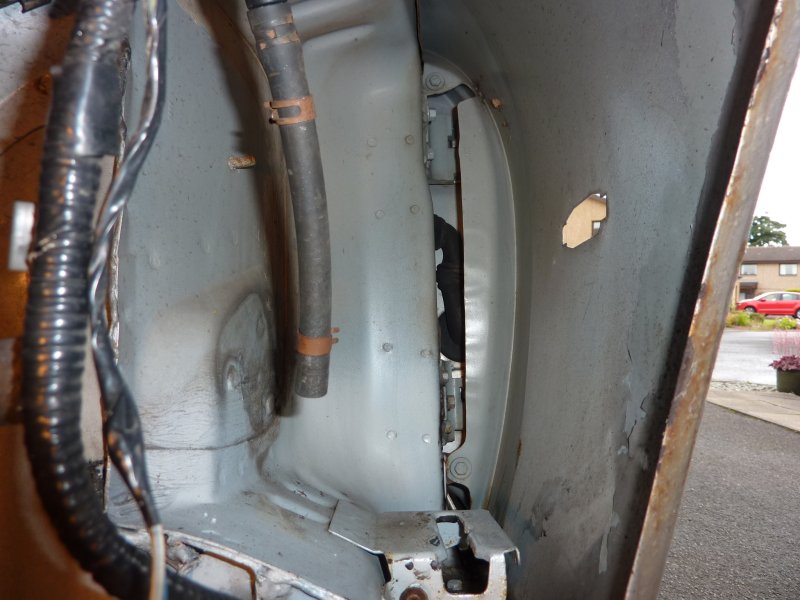
It is also held in place by a couple of large rubber pegs at the base which just pull out.
Once out the way you have easy access to two bolts at the back and two at the bottom.
Removing the remainder of the bolts on the top of the wing then allows you to lift it off.
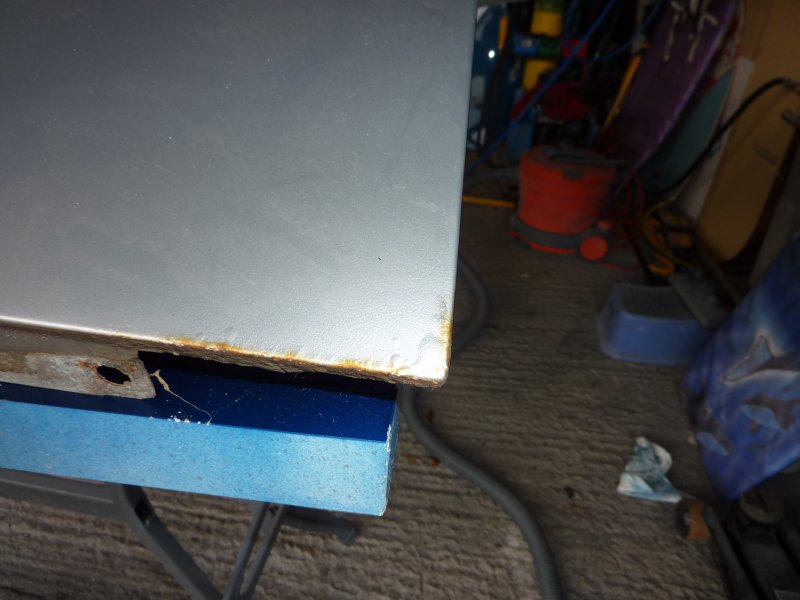
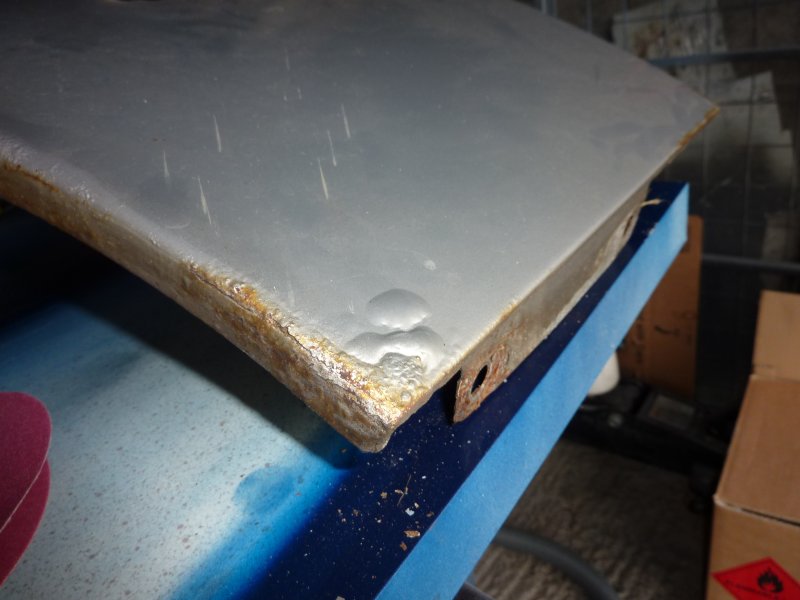
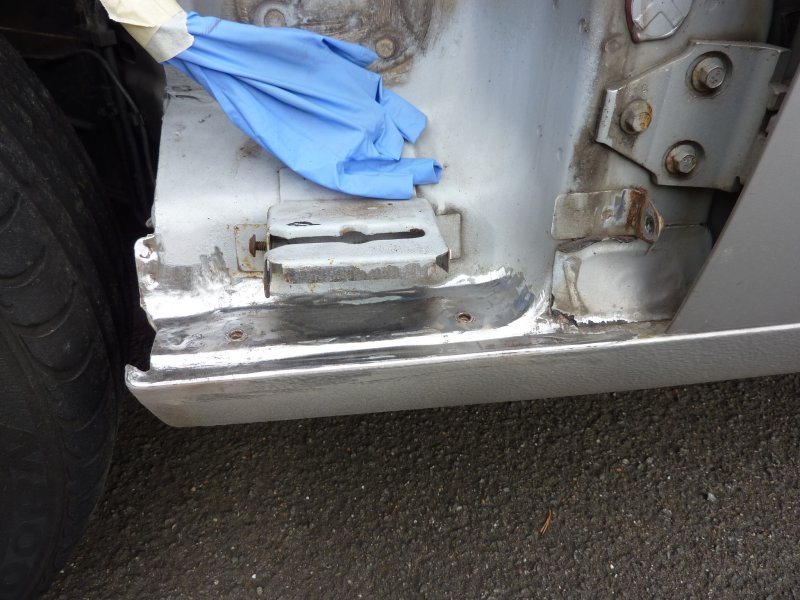
The rust!
To remove the wings, you need to remove the cowl at the bottom of the windscreen, the wipers need to come of first, removing the headlamp also makes it a bit easier.
You can see there is a bolt holding the wing under the cowl.
Once the light is removed you can see these 5 fixing.
And from beneath from the wheel arch.
Of course my first try sheared off.
And the second one just spun so I had to hack saw it off.
Unfortunately this lot is on the back of the wing and needs to come out, I detached the easiest looking clips and removed one nut and bolt plus the electrical connector to it and the wing indicator.
It is also held in place by a couple of large rubber pegs at the base which just pull out.
Once out the way you have easy access to two bolts at the back and two at the bottom.
Removing the remainder of the bolts on the top of the wing then allows you to lift it off.
The rust!
Thread Starter
|
Veteran Member
Joined: Apr 2012
Posts: 1,854
Likes: 987
From: UK
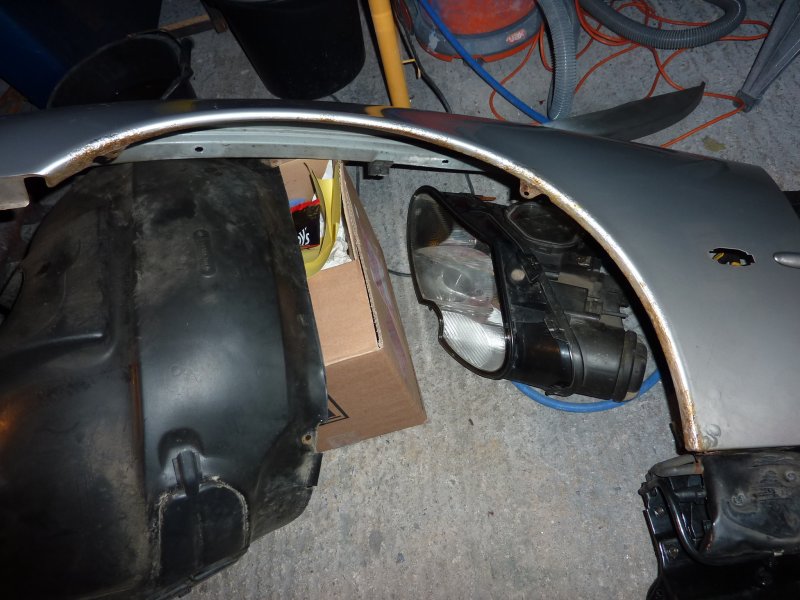
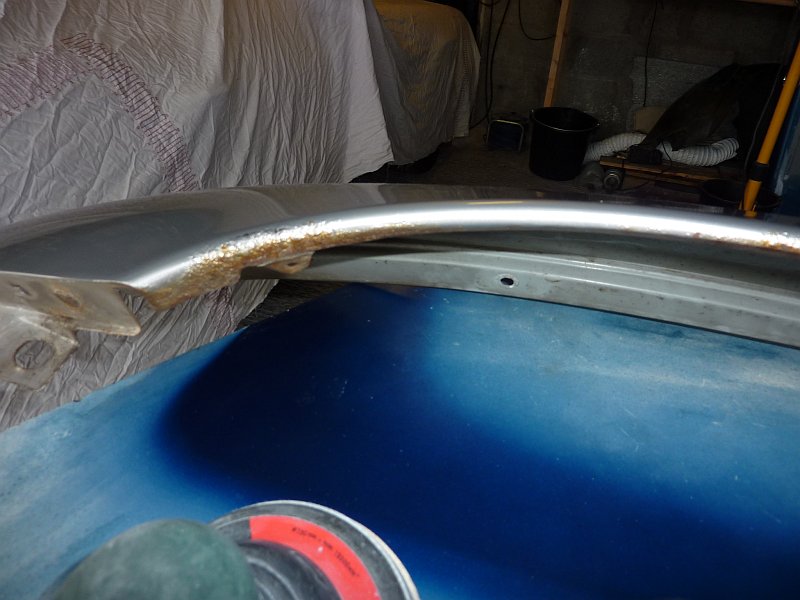
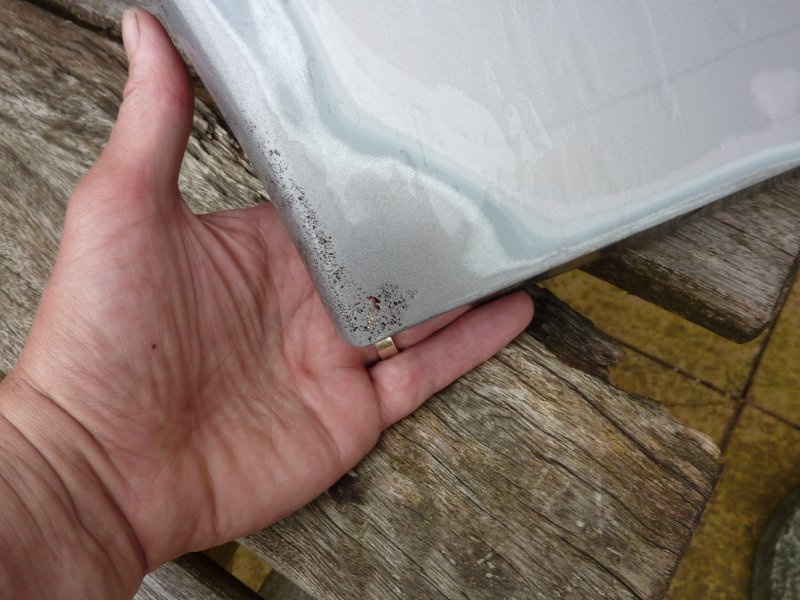
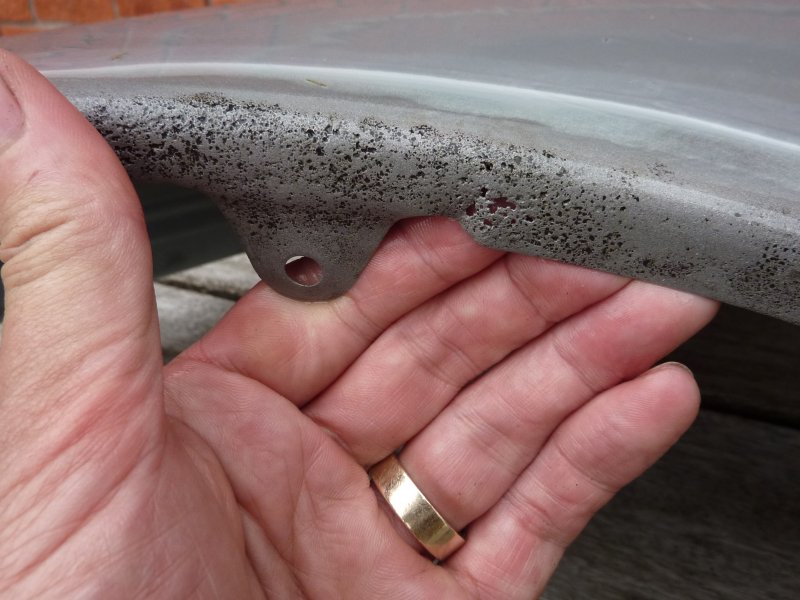
Close ups of the problem areas.

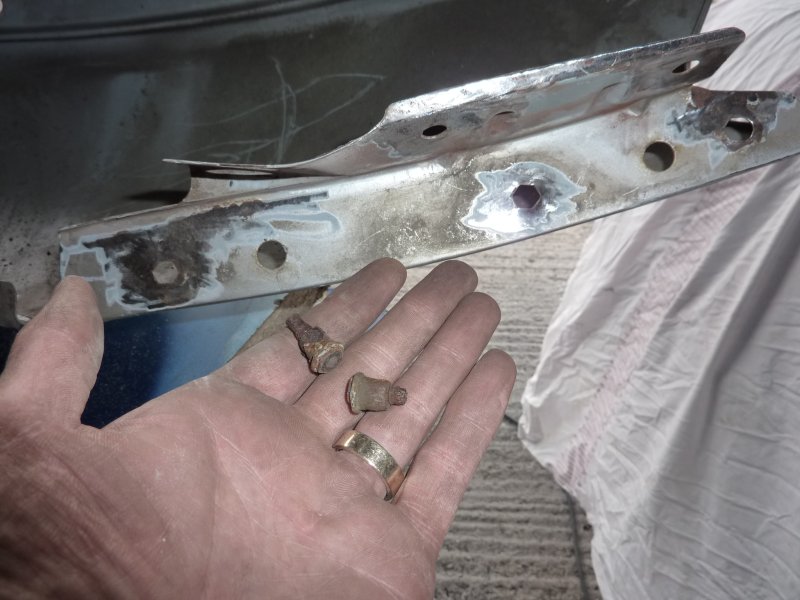
I was able to pull out the captive nuts with some pliers.
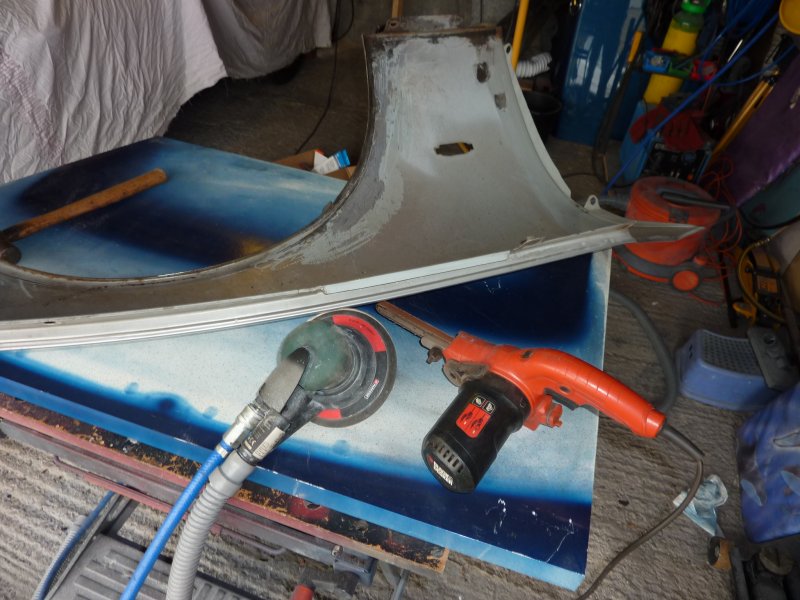
On to the clean up with the weapons of choice.
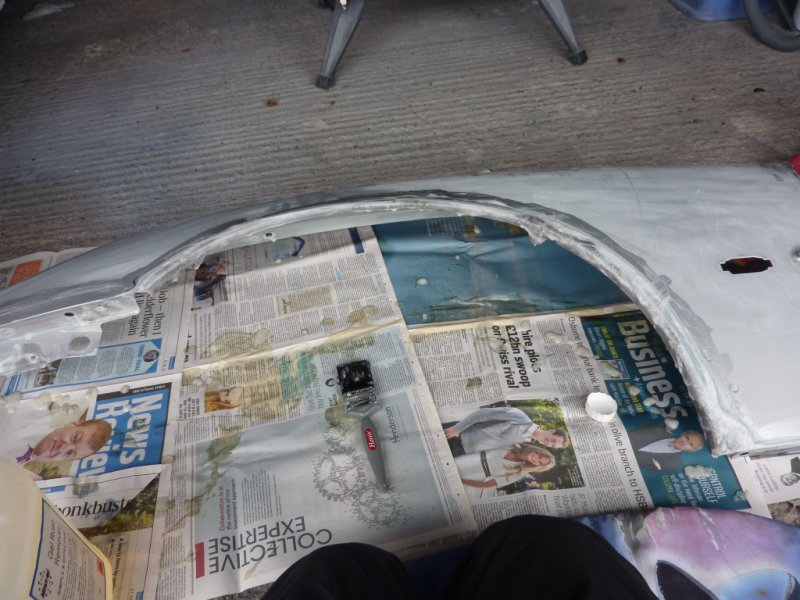
Once that was done I took it to the garden to be sand blasted.
About 10kg of media later I could see the full damage.
I was able to pull out the captive nuts with some pliers.
On to the clean up with the weapons of choice.
Once that was done I took it to the garden to be sand blasted.
About 10kg of media later I could see the full damage.
Thread Starter
|
Veteran Member
Joined: Apr 2012
Posts: 1,854
Likes: 987
From: UK
Next I flattened off the area where the captive nuts were.
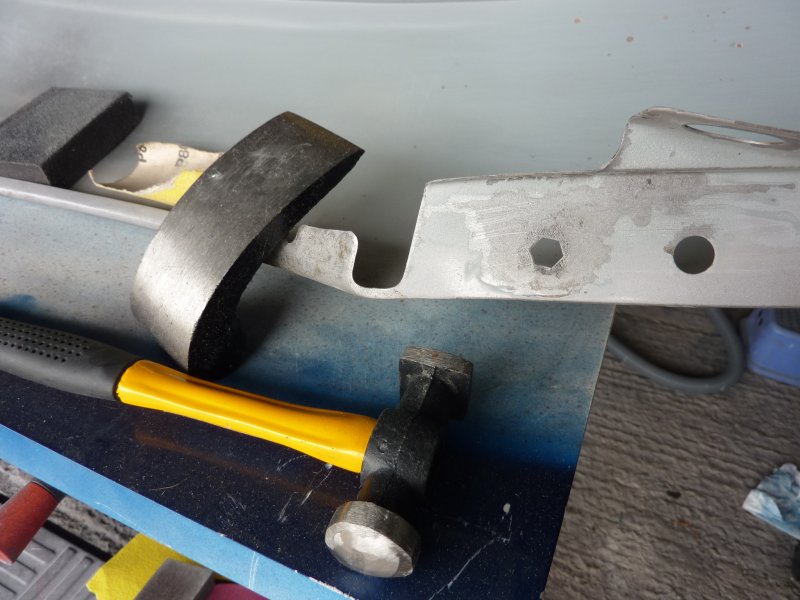
The fitted some new riv nuts.


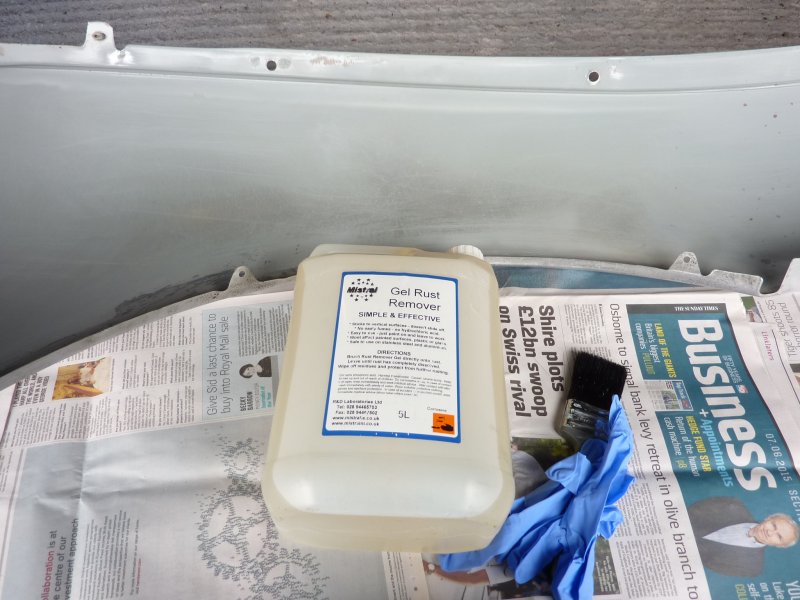
Next some rust eater to get into the pitting.
Then went on to clean up a couple of areas on the car while waiting for that to work.
More later...
The fitted some new riv nuts.
Next some rust eater to get into the pitting.
Then went on to clean up a couple of areas on the car while waiting for that to work.
More later...
Thread Starter
|
Veteran Member
Joined: Apr 2012
Posts: 1,854
Likes: 987
From: UK
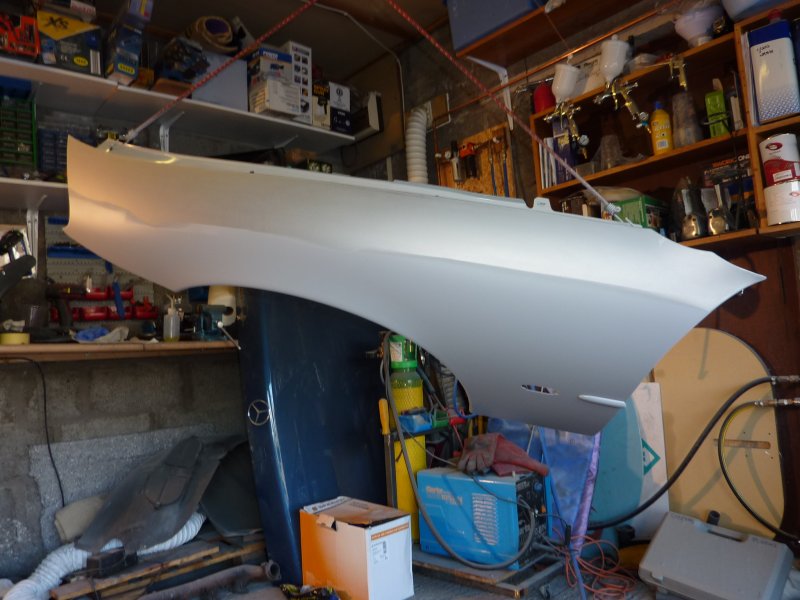
Last job today was putting on some epoxy chassis paint on the critical areas on the wing and car.
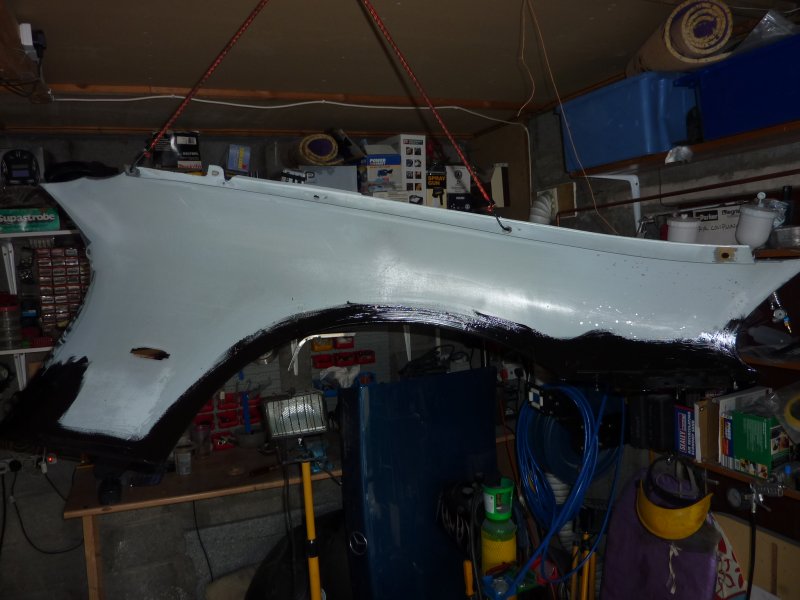
Tomorrow I will spray 2 or 3 coats of epoxy primer on the inside and outside surfaces of the wing and follow up on the outside with 3 coats of high build.
Tomorrow I will spray 2 or 3 coats of epoxy primer on the inside and outside surfaces of the wing and follow up on the outside with 3 coats of high build.
Last edited by RaceDiagnostics; Aug 6, 2015 at 02:45 AM.
Senior Member
Joined: Nov 2011
Posts: 581
Likes: 208
From: Devon, UK
I follow all your bodywork repairs with interest, my XKR spent the first 5 years of its life in Glasgow so I expect the same rust areas are festering away on mine.
I know the rear wheel arches are showing some signs.
I know the rear wheel arches are showing some signs.

Senior Member
Joined: Aug 2013
Posts: 801
Likes: 77
From: North Northumberland England
Great work mate, when you have finished could you give us a list of the materials you used and an approximate cost. Would be of interest to most of the forum I am sure, mine have already been done so not a problem for me ...yet. Also are you going to spray the wings yourself? Using rattle cans or mixed paint and spray gun/compressor?
Look forward to your posts.
Are you far from Newcastle?
Look forward to your posts.
Are you far from Newcastle?
Trending Topics
Thread Starter
|
Veteran Member
Joined: Apr 2012
Posts: 1,854
Likes: 987
From: UK
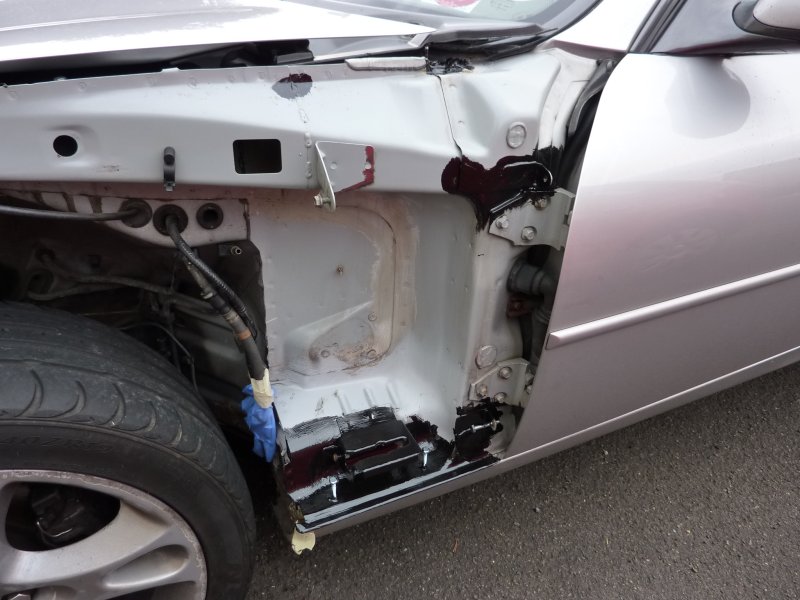
Access is just not good enough to do a proper job, I have patched this one up on the car before about 2 years ago and you can see the results. Doing it properly should last at least 10 years.
Thread Starter
|
Veteran Member
Joined: Apr 2012
Posts: 1,854
Likes: 987
From: UK
Great work mate, when you have finished could you give us a list of the materials you used and an approximate cost. Would be of interest to most of the forum I am sure, mine have already been done so not a problem for me ...yet. Also are you going to spray the wings yourself? Using rattle cans or mixed paint and spray gun/compressor?
Look forward to your posts.
Are you far from Newcastle?
Look forward to your posts.
Are you far from Newcastle?
Sure I'll keep a tally of what I've used. I'm in Dunfermline but plan to tour Northumberland next week. If the weather is good we will go in the Merc, if its bad we will go in the Jag.
So far
Tools
DA sander
Powerfile
Sandblaster
Compressor
Rivnut tool
Paint
1/4l Rustbuster epoxy mastic 121
1/4l Rustbuster epoxy mastic 121 hardner
Consumables
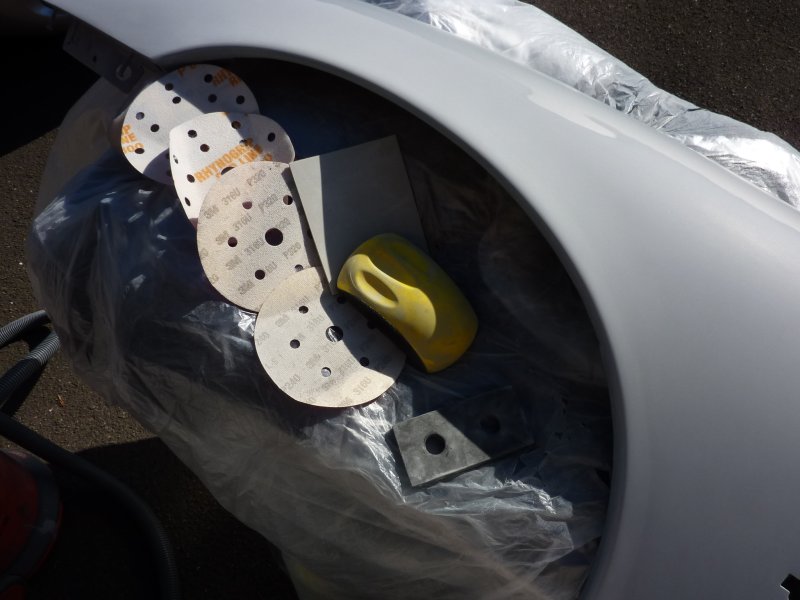
4 DA sanding discs 240 to 500 grit
2 80 grit powerfile belts
200ml rust eater
4kg blasting grit
Thread Starter
|
Veteran Member
Joined: Apr 2012
Posts: 1,854
Likes: 987
From: UK
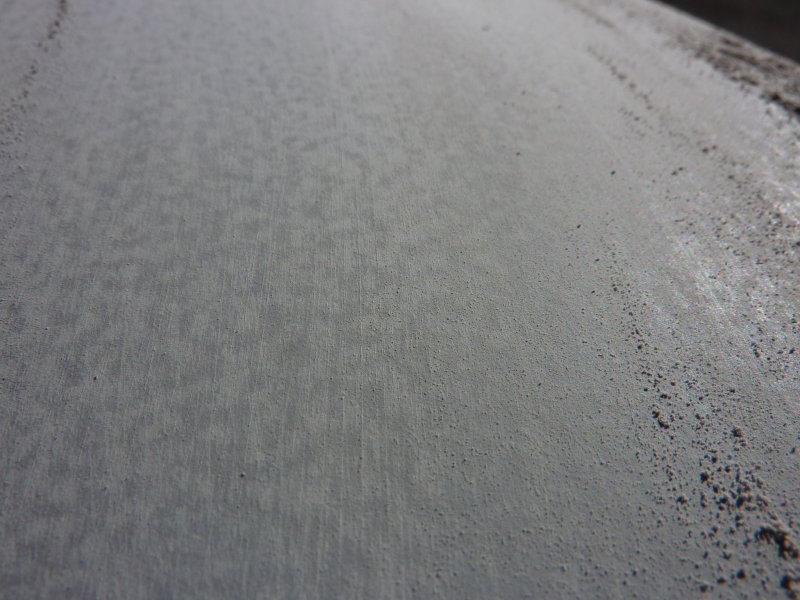
The next step was to sand down the epoxy mastic round the wheel arch to get a smooth transition from the bare metal to the mastic. I was not to worried about getting the mastic on the arch smooth as it will be over coated with stone chip later. The mastic also served as a filler for the pitting. 120 and 180 grit discs were used for this.
I then went over the entire outer surface with 500 and then 800 to get rid of any scratches and the orange peel on the existing clear coat.
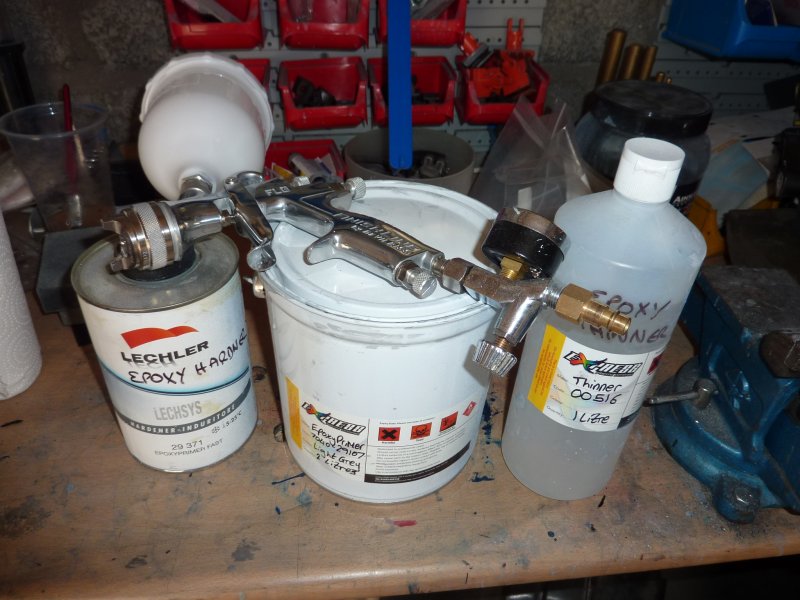
Next was 2 coats of epoxy primer for the inside and outside, great to cover any bare metal and provides additional protection to the areas with existing paint. I scuffed up the inside surface with a sanding sponge first to give it a key.
I made up 600ml and used all of it, sprayed on with an Devilbiss FLG5 1.8mm tip.
I masked up the top edge of the wing as to prevent primer coating this area which I will use a blend area for the base coat to get a good match to the bonnet/hood. I did not stick the last strip of tape down at the bottom to leave a soft edge.

And sprayed the floor with water after bowing the dust out with an air line.
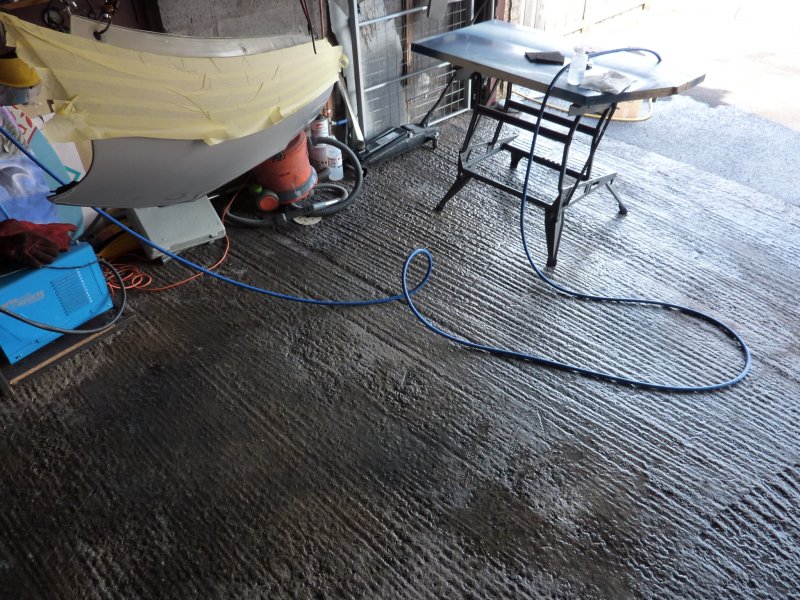
Degreased with panel wipe and wiped with a tac rag. This angle was not ideal for spraying the underside but it was all I could rig up. This is after the epoxy primer had been shot.

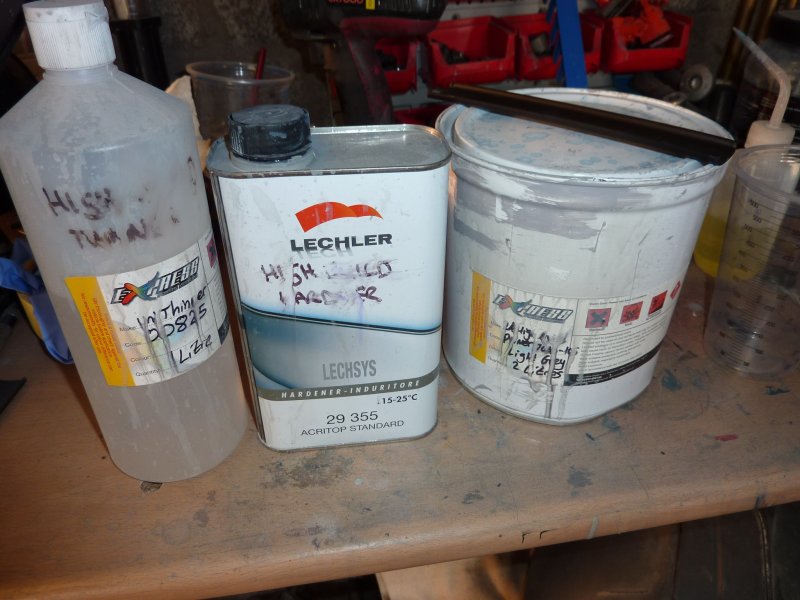
Next was 3 coats of high build primer on the outside of the wing, I made up about 300ml.
After painting with the high build primer.
That is for just now.
So far I have used ....
Tools
Windscreen wiper puller
DA sander
Powerfile
Sandblaster
Hammer and dolly
Rivnut tool
Compressor
Compressor particle/oil remover, dryer
Air fed mask & Charcoal belt filter
Devillbis FLG5 1.8mm tip spray gun + gun regulator
Paint
1/4l Rustbuster epoxy mastic 121
1/4l Rustbuster epoxy mastic 121 hardener
330ml Lechler epoxy primer
160ml Lechler epoxy primer hardener
40ml Lechler epoxy primer thinner
200ml Lechler high build primer
40ml Lechler high build primer hardener
50ml Lechler high build primer thinner.
Consumables
7 DA sanding discs 120 to 800 grit
2 80 grit powerfile belts
200ml rust eater
Paint brush for epoxy mastic
3 riv nuts
4kg blasting grit
4 pairs of disposable gloves
2 paint strainers
3 paint mixing cups
50ml panel wipe
100ml gun wash
1 tack rag
5m of masking tape
I then went over the entire outer surface with 500 and then 800 to get rid of any scratches and the orange peel on the existing clear coat.
Next was 2 coats of epoxy primer for the inside and outside, great to cover any bare metal and provides additional protection to the areas with existing paint. I scuffed up the inside surface with a sanding sponge first to give it a key.
I made up 600ml and used all of it, sprayed on with an Devilbiss FLG5 1.8mm tip.
I masked up the top edge of the wing as to prevent primer coating this area which I will use a blend area for the base coat to get a good match to the bonnet/hood. I did not stick the last strip of tape down at the bottom to leave a soft edge.
And sprayed the floor with water after bowing the dust out with an air line.
Degreased with panel wipe and wiped with a tac rag. This angle was not ideal for spraying the underside but it was all I could rig up. This is after the epoxy primer had been shot.
Next was 3 coats of high build primer on the outside of the wing, I made up about 300ml.
After painting with the high build primer.
That is for just now.
So far I have used ....
Tools
Windscreen wiper puller
DA sander
Powerfile
Sandblaster
Hammer and dolly
Rivnut tool
Compressor
Compressor particle/oil remover, dryer
Air fed mask & Charcoal belt filter
Devillbis FLG5 1.8mm tip spray gun + gun regulator
Paint
1/4l Rustbuster epoxy mastic 121
1/4l Rustbuster epoxy mastic 121 hardener
330ml Lechler epoxy primer
160ml Lechler epoxy primer hardener
40ml Lechler epoxy primer thinner
200ml Lechler high build primer
40ml Lechler high build primer hardener
50ml Lechler high build primer thinner.
Consumables
7 DA sanding discs 120 to 800 grit
2 80 grit powerfile belts
200ml rust eater
Paint brush for epoxy mastic
3 riv nuts
4kg blasting grit
4 pairs of disposable gloves
2 paint strainers
3 paint mixing cups
50ml panel wipe
100ml gun wash
1 tack rag
5m of masking tape
Last edited by RaceDiagnostics; Aug 6, 2015 at 02:42 PM.

Senior Member
Joined: Oct 2012
Posts: 853
Likes: 192
From: Panama City, Florida
Race di--
Reading your post in the pass and this latest one, tells me your a guy that loves to work on your cars and with the end results just adds to your pleasure.
I was just wondering however, why did you not just buy wings to keep from doing all the work. I checked car parts on ebaymotors and found wings for under 300 bucks US. One used one was for 175 US.
I know some work would still be required, but you would have started with rust free metal.
Just wondering Pal, not criticizing. Thanks for the efforts with pictures and explanations.
Cheers
Veteran Member
Joined: Feb 2011
Posts: 9,733
Likes: 2,203
From: on-the-edge
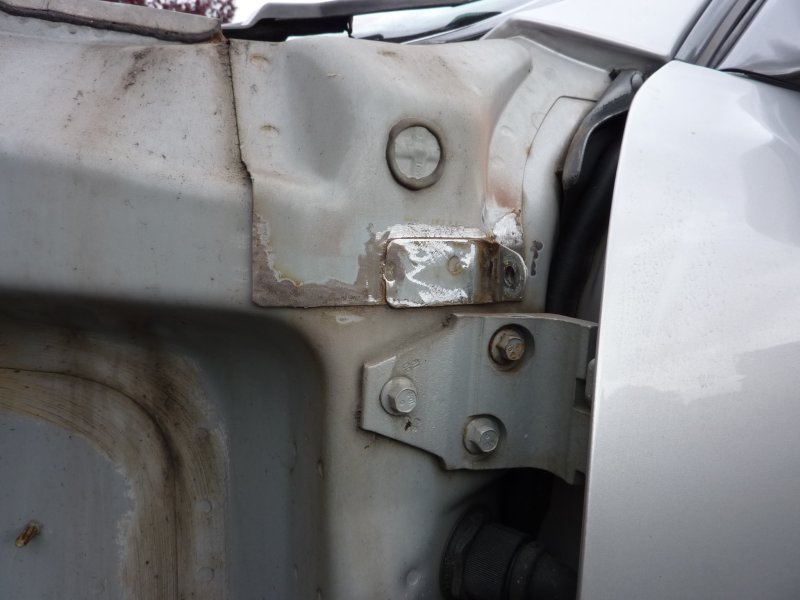
Those two covers/plugs at the bottom might be a prime place to introduce rustproofing oil
to the rockers.
Look on your arch liner for evidence of where hose cutouts and hose supports lie.
On the X308 the arch liner has provisions for routing the drain hoses to the outside of the
arch liner as designed by the engineers. It requires that the scribed holes be punched out,
the hoses pushed through and clipped into the retainers. The assembly line didn't bother and
left the hoses to drain into the enclosed area. Exactly what you don't want. You can see
where the water has drained from the hose and puddled onto the area of the two bolts holding
the rear of the wing. Then it sits there and does what water does best. The rust along the
front lip of the rocker panel is coincidentally where the water would finally drain.
The hoses will exit at a downwards angle just behind the front tires.
Your car has one hose on each side for the scuttle drains. Those equipped with sunroofs
have two.
Last edited by plums; Aug 6, 2015 at 03:05 PM.
Thread Starter
|
Veteran Member
Joined: Apr 2012
Posts: 1,854
Likes: 987
From: UK
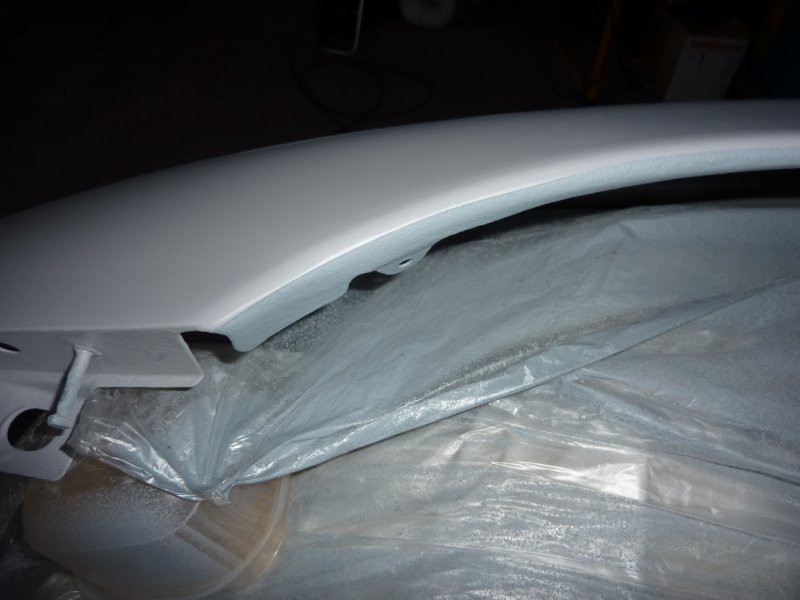
Last job of the day, stone chip.
I use pvc electrical tape when masking curves live these as it bends easily, then use normal masking tape to attach the masking sheets.
I have a Shutz type gun for this type of job and Upol Gravitex stone chip.
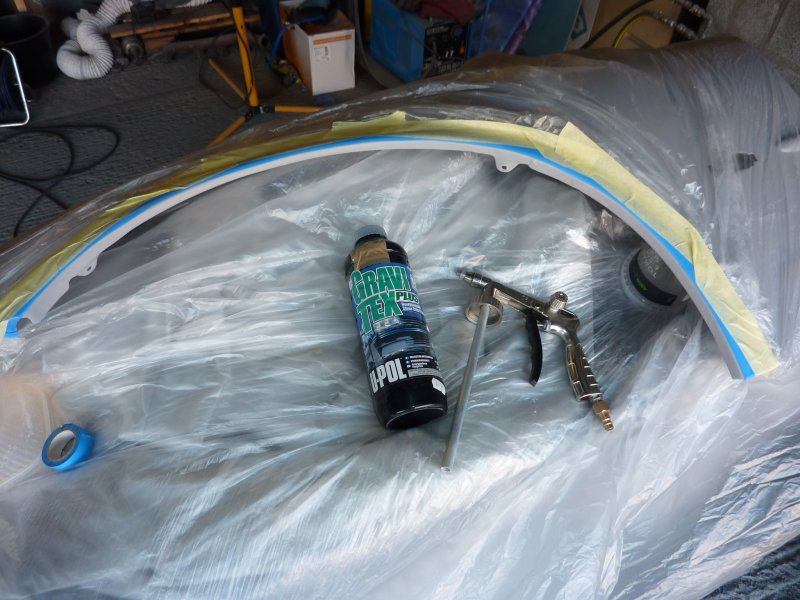
I lay down 3 coats with about 15 mins between coats.
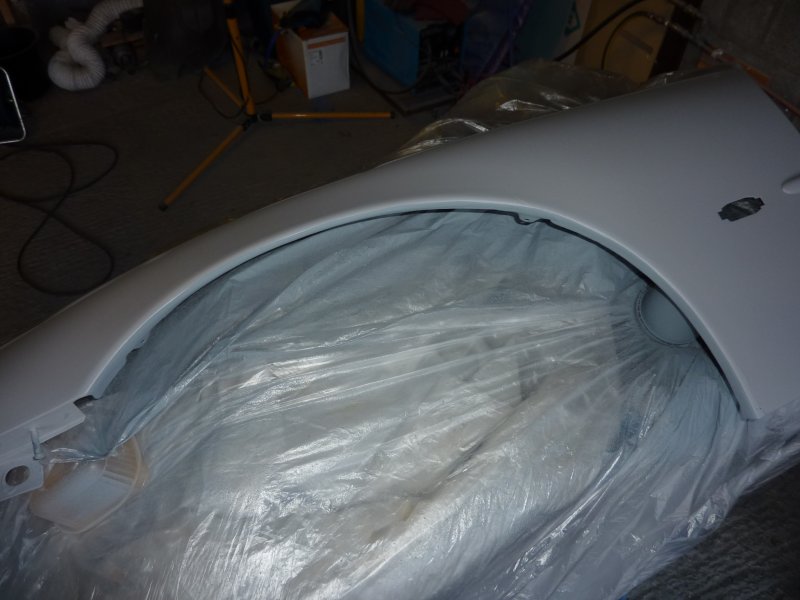
Close up.
Tomorrow I will flat it all, sort out the perforations in the bottom corner and put down the base and clear.
So far I have used ....
Tools
Windscreen wiper puller
DA sander
Powerfile
Sandblaster
Hammer and dolly
Rivnut tool
Compressor
Compressor particle/oil remover, dryer
Air fed mask & Charcoal belt filter
Devillbis FLG5 1.8mm tip spray gun + gun regulator
Shutz spray gun
Paint
1/4l Rustbuster epoxy mastic 121
1/4l Rustbuster epoxy mastic 121 hardener
330ml Lechler epoxy primer
160ml Lechler epoxy primer hardener
40ml Lechler epoxy primer thinner
200ml Lechler high build primer
40ml Lechler high build primer hardener
50ml Lechler high build primer thinner.
Consumables
7 DA sanding discs 120 to 800 grit
2 80 grit powerfile belts
200ml rust eater
Paint brush for epoxy mastic
3 riv nuts
4kg blasting grit
4 pairs of disposable gloves
2 paint strainers
3 paint mixing cups
50ml panel wipe
200ml gun wash
1 tack rag
6m of masking tape
1m electrical tape
2m of masking film
Time
Day 1 ~ 1h to remove wing
Day 2 ~ 4h to remove rust and brush on epoxy mastic
Day 3 ~ 4h to prep, spray paint with epoxy primer, high build primer and gravitex stone chip
Expenditure so far ~ �0.00 (everything used so far was already in my garage, most was purchased for this job Boot lid refurb continued | MIG Welding Forum and Rear end refurb. | MIG Welding Forum)
Actual cost ~ will work it out later
I use pvc electrical tape when masking curves live these as it bends easily, then use normal masking tape to attach the masking sheets.
I have a Shutz type gun for this type of job and Upol Gravitex stone chip.
I lay down 3 coats with about 15 mins between coats.
Close up.
Tomorrow I will flat it all, sort out the perforations in the bottom corner and put down the base and clear.
So far I have used ....
Tools
Windscreen wiper puller
DA sander
Powerfile
Sandblaster
Hammer and dolly
Rivnut tool
Compressor
Compressor particle/oil remover, dryer
Air fed mask & Charcoal belt filter
Devillbis FLG5 1.8mm tip spray gun + gun regulator
Shutz spray gun
Paint
1/4l Rustbuster epoxy mastic 121
1/4l Rustbuster epoxy mastic 121 hardener
330ml Lechler epoxy primer
160ml Lechler epoxy primer hardener
40ml Lechler epoxy primer thinner
200ml Lechler high build primer
40ml Lechler high build primer hardener
50ml Lechler high build primer thinner.
Consumables
7 DA sanding discs 120 to 800 grit
2 80 grit powerfile belts
200ml rust eater
Paint brush for epoxy mastic
3 riv nuts
4kg blasting grit
4 pairs of disposable gloves
2 paint strainers
3 paint mixing cups
50ml panel wipe
200ml gun wash
1 tack rag
6m of masking tape
1m electrical tape
2m of masking film
Time
Day 1 ~ 1h to remove wing
Day 2 ~ 4h to remove rust and brush on epoxy mastic
Day 3 ~ 4h to prep, spray paint with epoxy primer, high build primer and gravitex stone chip
Expenditure so far ~ �0.00 (everything used so far was already in my garage, most was purchased for this job Boot lid refurb continued | MIG Welding Forum and Rear end refurb. | MIG Welding Forum)
Actual cost ~ will work it out later
Last edited by RaceDiagnostics; Aug 6, 2015 at 04:11 PM.
Thread Starter
|
Veteran Member
Joined: Apr 2012
Posts: 1,854
Likes: 987
From: UK
Race di--
Reading your post in the pass and this latest one, tells me your a guy that loves to work on your cars and with the end results just adds to your pleasure.
I was just wondering however, why did you not just buy wings to keep from doing all the work. I checked car parts on ebaymotors and found wings for under 300 bucks US. One used one was for 175 US.
I know some work would still be required, but you would have started with rust free metal.
Just wondering Pal, not criticizing. Thanks for the efforts with pictures and explanations.
Cheers
Reading your post in the pass and this latest one, tells me your a guy that loves to work on your cars and with the end results just adds to your pleasure.
I was just wondering however, why did you not just buy wings to keep from doing all the work. I checked car parts on ebaymotors and found wings for under 300 bucks US. One used one was for 175 US.
I know some work would still be required, but you would have started with rust free metal.
Just wondering Pal, not criticizing. Thanks for the efforts with pictures and explanations.
Cheers
I had a look on ebay etc before starting, the cost for good(ish) second hand wings seemed to be about ~ �200 or so here and I am sure they would need some work due to salt being used extensively through the UK in winter.
Unfortunately we have no "dry hot states" to get good parts from so I opted for better the devil you know, cost to me was about 4 hours of extra work.
Thread Starter
|
Veteran Member
Joined: Apr 2012
Posts: 1,854
Likes: 987
From: UK
Day 4
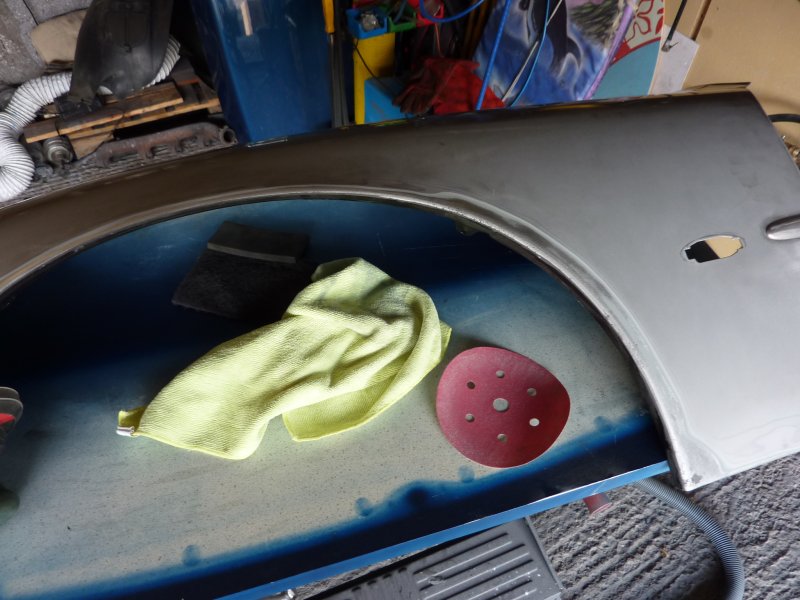
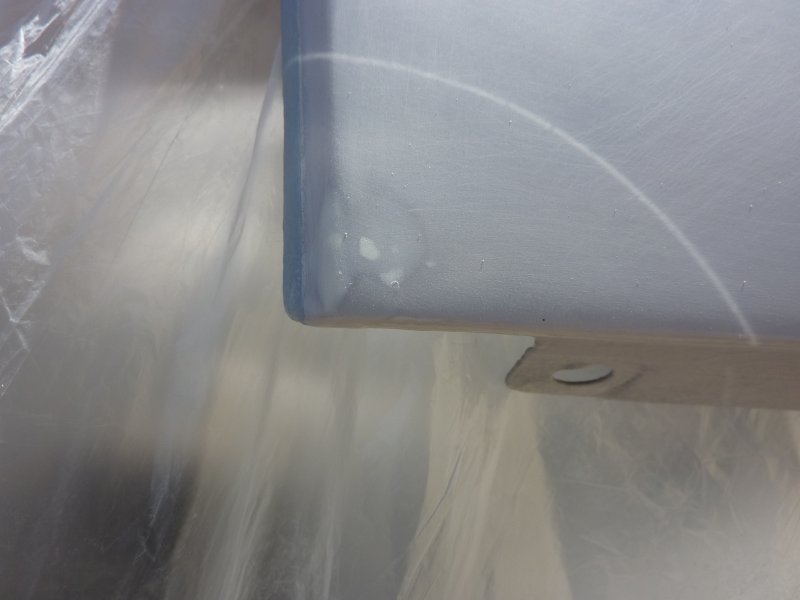
This is what the high build primer looks like close up.
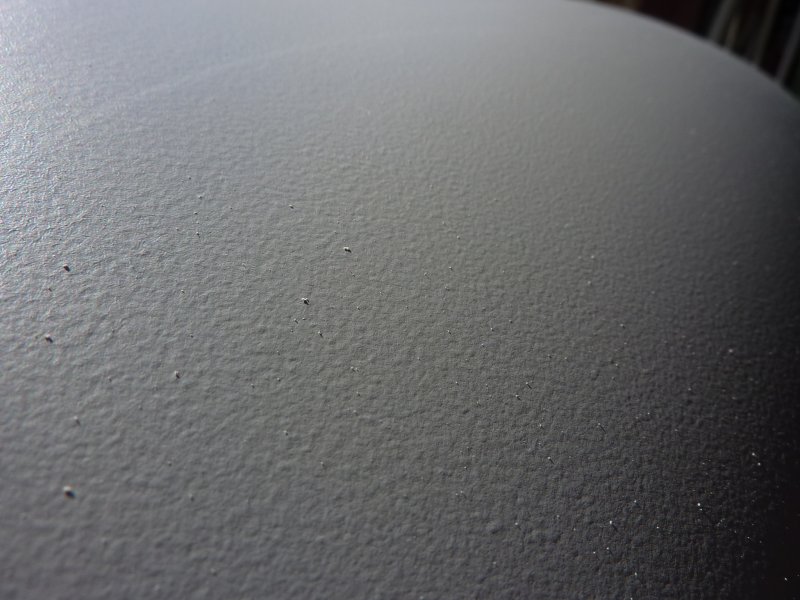
After a bit of sanding with 240 grit.
I went through 240, 320, 500 then 800 and used a foam sponge on the edges.
It then looked like this.
I then mixed up some Upol dolphin glaze.

And applied it to the perforations, I should have welded in some new metal here but went for the quicker option.
Smothed down, I will put a good amount of seam sealer in the rear of this fix.
I rigged this up to make the painting easier.
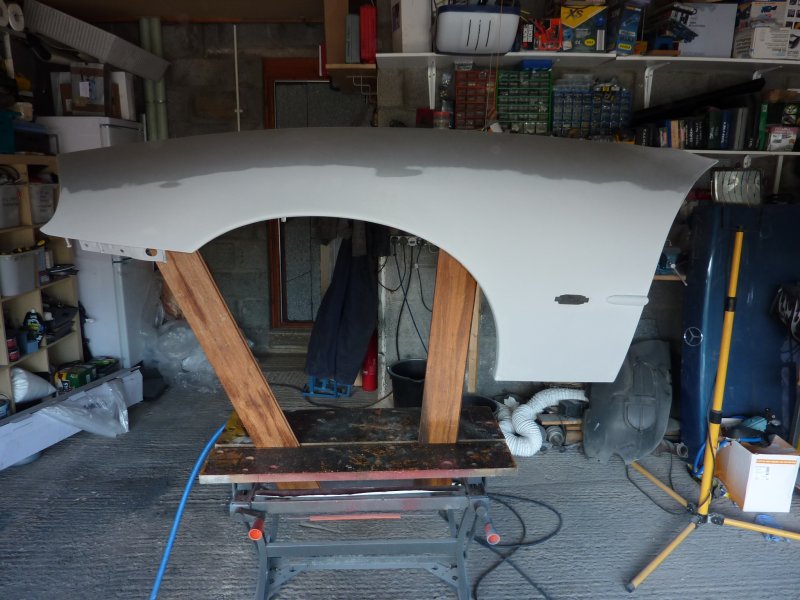
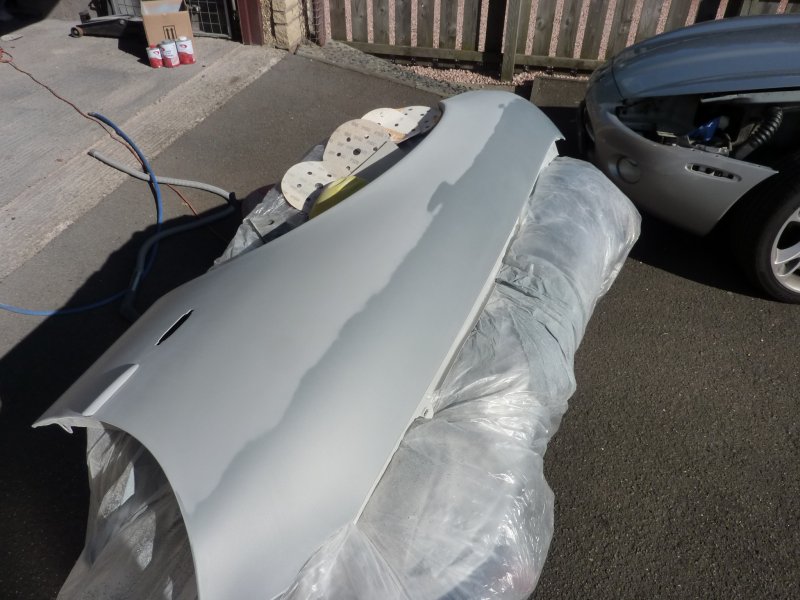
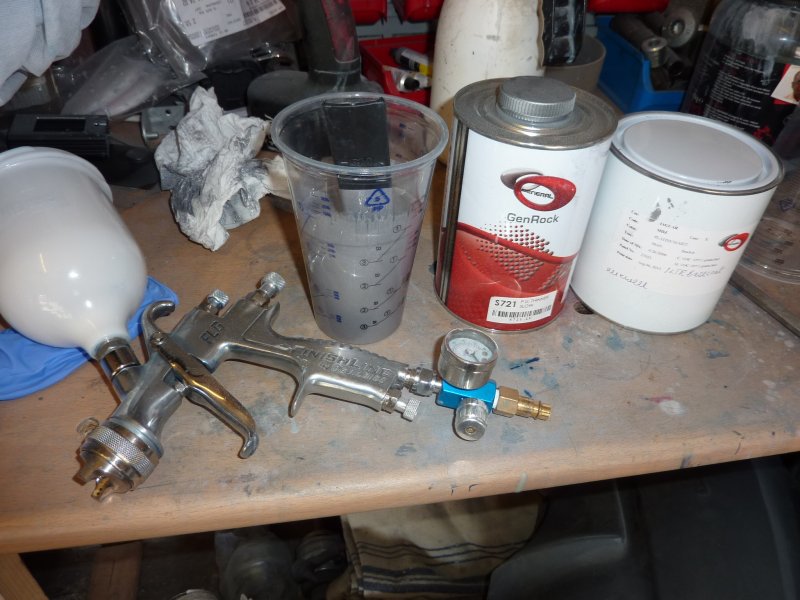
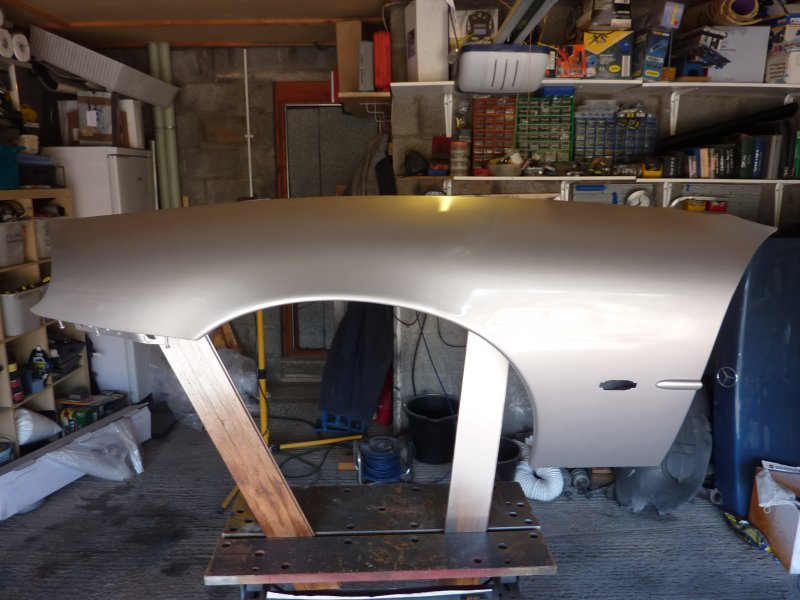
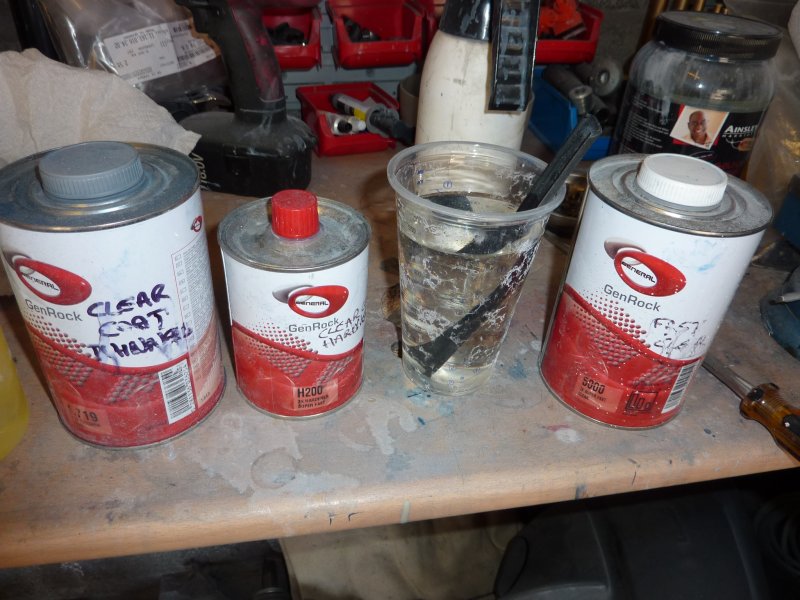
This is the first purchase I had to make, the base coat and thinners, enough to make 2l of paint, cost �45. This time I used a Devilbiss FLG5 with a 1.4mm tip, made up about 400ml
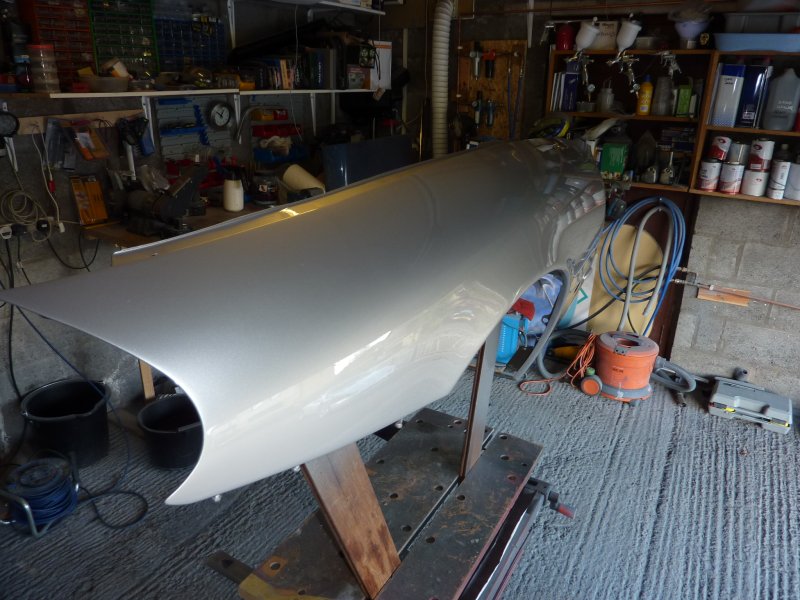
After painting.
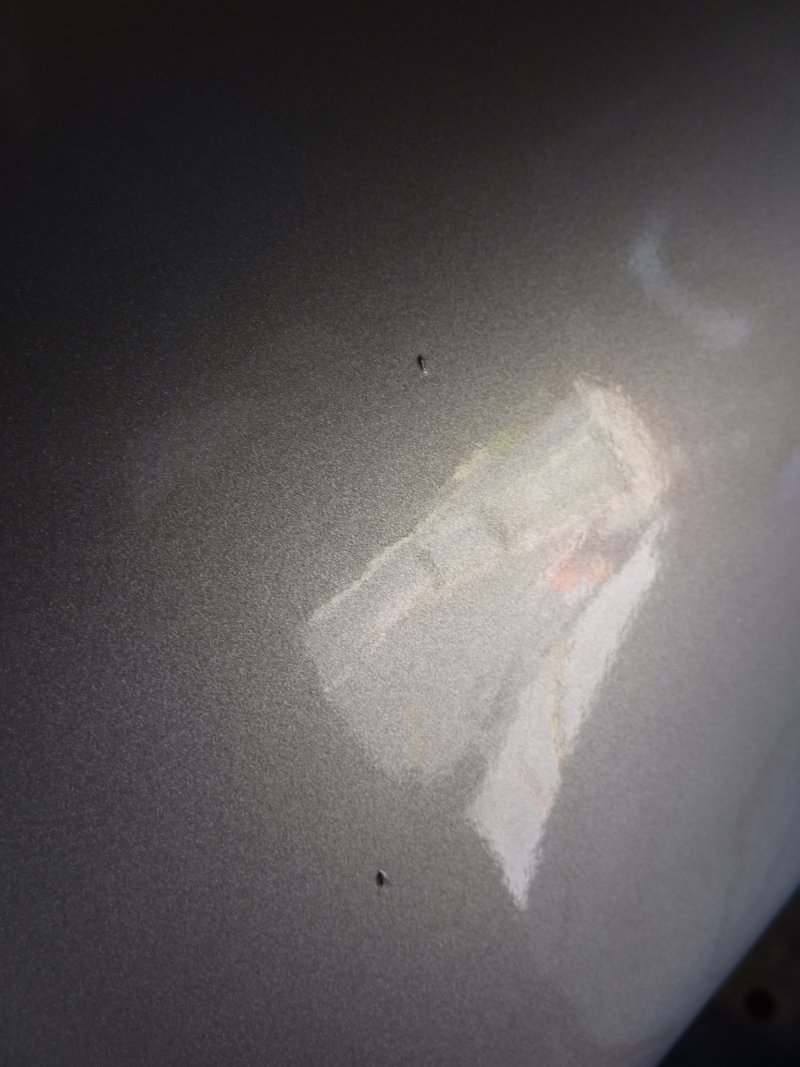
Unfortunately a few tiny corn flys landed in the base coat. I don't know what the best solution is for this, I just know that what I did was wrong. You should probably sand them out and lay down some new base coat. I tried to pick them out with a tack rag but ended up making a bigger mark, then used some panel wipe which made an even bigger mark which shows through the clear coat. Lesson learned, always keep a bit of mixed up base coat back.
Next on to the clear coat, about 500ml
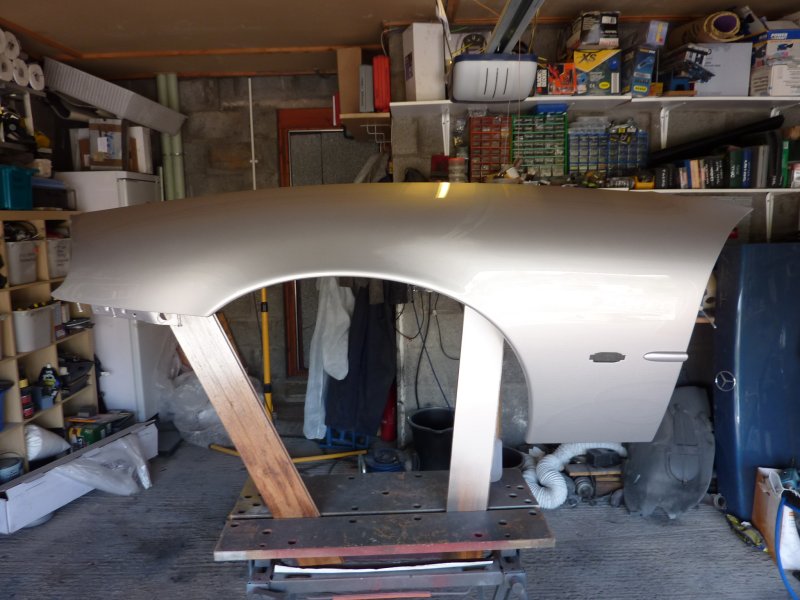
And after shooting...
So far I have used ....
Tools
Windscreen wiper puller
DA sander
Powerfile
Sandblaster
Hammer and dolly
Rivnut tool
Compressor
Compressor particle/oil remover, dryer
Air fed mask & Charcoal belt filter
Devillbis FLG5 1.8mm tip spray gun + gun regulator
Shutz spray gun
Devillbis FLG5 1.4mm tip spray gun + gun regulator
Paint
1/4l Rustbuster epoxy mastic 121
1/4l Rustbuster epoxy mastic 121 hardener
330ml Lechler epoxy primer
160ml Lechler epoxy primer hardener
40ml Lechler epoxy primer thinner
200ml Lechler high build primer
40ml Lechler high build primer hardener
50ml Lechler high build primer thinner.
200ml Genrock base coat
150mk Genrock thinners
300ml Genrock 5000 clear
150ml Genrock fast hardner
50ml Genrock thinners
Consumables
11 DA sanding discs 120 to 800 grit
1 fine sanding sponge
2 80 grit powerfile belts
200ml rust eater
Paint brush for epoxy mastic
3 riv nuts
4kg blasting grit
6 pairs of disposable gloves
4 paint strainers
5 paint mixing cups
100ml panel wipe
200ml gun wash
2 tack rag
6m of masking tape
1m electrical tape
2m of masking film
Time
Day 1 ~ 1h to remove wing
Day 2 ~ 4h to remove rust and brush on epoxy mastic
Day 3 ~ 4h to prep, spray paint with epoxy primer, high build primer and gravitex stone chip
Day 4 ~ 4h to flat, prep, base and clear the wing
Expenditure so far ~ �45.00 for the 1l of base coat & 1l of thinners (everything else used so far was already in my garage, most was purchased for this job Boot lid refurb continued | MIG Welding Forum and Rear end refurb. | MIG Welding Forum)
Actual cost ~ will work it out later
This is what the high build primer looks like close up.
After a bit of sanding with 240 grit.
I went through 240, 320, 500 then 800 and used a foam sponge on the edges.
It then looked like this.
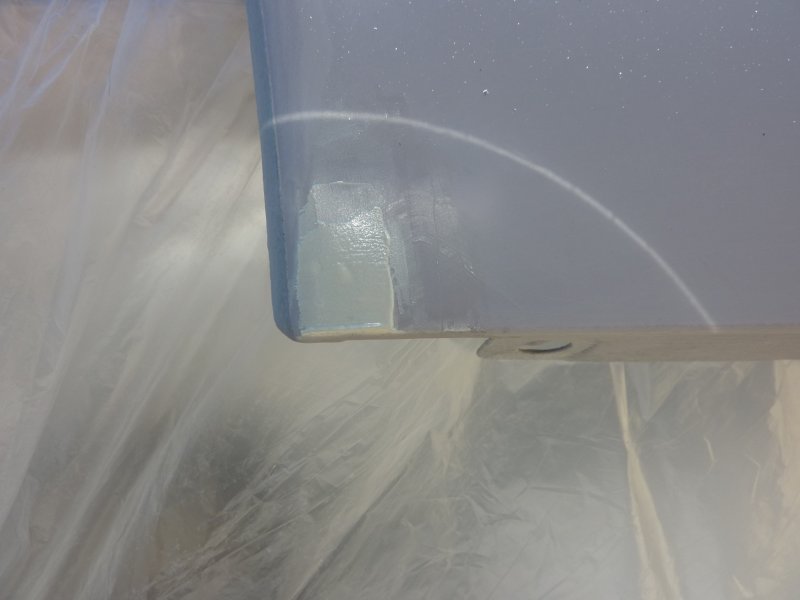
I then mixed up some Upol dolphin glaze.
And applied it to the perforations, I should have welded in some new metal here but went for the quicker option.
Smothed down, I will put a good amount of seam sealer in the rear of this fix.
I rigged this up to make the painting easier.
This is the first purchase I had to make, the base coat and thinners, enough to make 2l of paint, cost �45. This time I used a Devilbiss FLG5 with a 1.4mm tip, made up about 400ml
After painting.
Unfortunately a few tiny corn flys landed in the base coat. I don't know what the best solution is for this, I just know that what I did was wrong. You should probably sand them out and lay down some new base coat. I tried to pick them out with a tack rag but ended up making a bigger mark, then used some panel wipe which made an even bigger mark which shows through the clear coat. Lesson learned, always keep a bit of mixed up base coat back.
Next on to the clear coat, about 500ml
And after shooting...
So far I have used ....
Tools
Windscreen wiper puller
DA sander
Powerfile
Sandblaster
Hammer and dolly
Rivnut tool
Compressor
Compressor particle/oil remover, dryer
Air fed mask & Charcoal belt filter
Devillbis FLG5 1.8mm tip spray gun + gun regulator
Shutz spray gun
Devillbis FLG5 1.4mm tip spray gun + gun regulator
Paint
1/4l Rustbuster epoxy mastic 121
1/4l Rustbuster epoxy mastic 121 hardener
330ml Lechler epoxy primer
160ml Lechler epoxy primer hardener
40ml Lechler epoxy primer thinner
200ml Lechler high build primer
40ml Lechler high build primer hardener
50ml Lechler high build primer thinner.
200ml Genrock base coat
150mk Genrock thinners
300ml Genrock 5000 clear
150ml Genrock fast hardner
50ml Genrock thinners
Consumables
11 DA sanding discs 120 to 800 grit
1 fine sanding sponge
2 80 grit powerfile belts
200ml rust eater
Paint brush for epoxy mastic
3 riv nuts
4kg blasting grit
6 pairs of disposable gloves
4 paint strainers
5 paint mixing cups
100ml panel wipe
200ml gun wash
2 tack rag
6m of masking tape
1m electrical tape
2m of masking film
Time
Day 1 ~ 1h to remove wing
Day 2 ~ 4h to remove rust and brush on epoxy mastic
Day 3 ~ 4h to prep, spray paint with epoxy primer, high build primer and gravitex stone chip
Day 4 ~ 4h to flat, prep, base and clear the wing
Expenditure so far ~ �45.00 for the 1l of base coat & 1l of thinners (everything else used so far was already in my garage, most was purchased for this job Boot lid refurb continued | MIG Welding Forum and Rear end refurb. | MIG Welding Forum)
Actual cost ~ will work it out later
Last edited by RaceDiagnostics; Aug 7, 2015 at 08:33 AM.
Thread Starter
|
Veteran Member
Joined: Apr 2012
Posts: 1,854
Likes: 987
From: UK
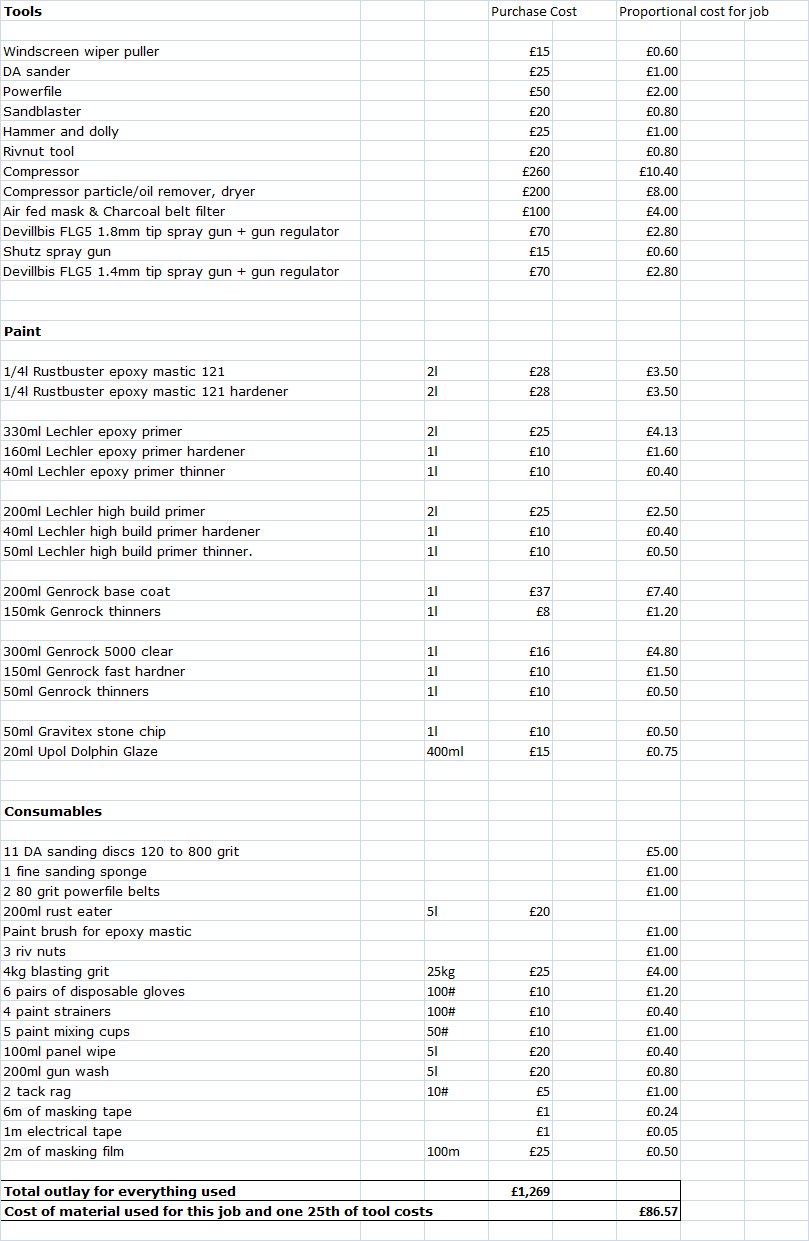
OK I worked out the cost for the job, �86.57, actual cost of paint used and consumables came to �51.77, and the rest is an amortised estimate for the tools assuming the tools all get used 25 times in their life.
Total up front outlay assuming you needed to buy everything to do the job came to �1269. Would I try to do this with rattle cans, no I just don't think I could get the quality of finish I would want. Does this make sense for a single job, no, but if you think you will need to do two or three paint jobs then I think you would start to break even.
When I got the rear end painted after welding on the new wing panels, it cost me �500, it was then that I decided that I would teach myself to paint as I have a fair bit to do on both the Jag and the Merc (I am giving it a full respray).
Veteran Member
Joined: Dec 2011
Posts: 2,943
Likes: 1,585
From: Spencer, NC
RD, great write up and a good results. Keeping bugs and dust out is a major problem for the home paint job. Yes, keep some base mixed and ready to go after a finished inspection, a light hit with 600 grit will get the ugly junk out and hit it for cover with base. The clear is a different story. Just do the best you can with a tack cloth to start and sand with 2000 grit when finished and buff it out. If you can figure out a way to ground the part, it helps keep the dust off. Wetting the floor is about the best way to keep it down, as you already know.
Great write up on the cost, by the time you finish with the Merc and couple more jobs on the Jag, you will be in a break even situation. We do it because we love it. LOL
Again, great thread.
Wayne
Great write up on the cost, by the time you finish with the Merc and couple more jobs on the Jag, you will be in a break even situation. We do it because we love it. LOL
Again, great thread.
Wayne

Veteran Member
Joined: Nov 2013
Posts: 1,286
Likes: 456
From: Malvern, England
Seriously impressed with that. You put some hard work in and the detail is fantastic.
I cheated with mine paid the guy �200 and he did the lot for me. Probably not as good a job as you have done with yours, but on the surface it looks great.
Anyway nice work. You should be proud of what you have done.

I cheated with mine paid the guy �200 and he did the lot for me. Probably not as good a job as you have done with yours, but on the surface it looks great.
Anyway nice work. You should be proud of what you have done.

Thread
Thread Starter
Forum
Replies
Last Post
Currently Active Users Viewing This Thread: 1 (0 members and 1 guests)