

Console Lid slides but doesn't open: Mended


Console lid movement is enabled when the chromed plastic lift-latch acts simultaneously on two braided steel cables. One unlocks the slide feature while the other retracts spring-loaded latches on both sides (port & starboard) of the lid which engage pockets molded into the center console liner, about 3" aft of the forward bulkhead of the compartment. I'm sure multiple failure modes of this system are possible, but I will deal herein with the failure of the lift-latch to retain the end of the cable that actuates these two latches. I reckon it is the predominant failure mode. I've not seen any posts complaining that the lid will open but not slide, nor any claiming it will do neither.
Here is the latch:
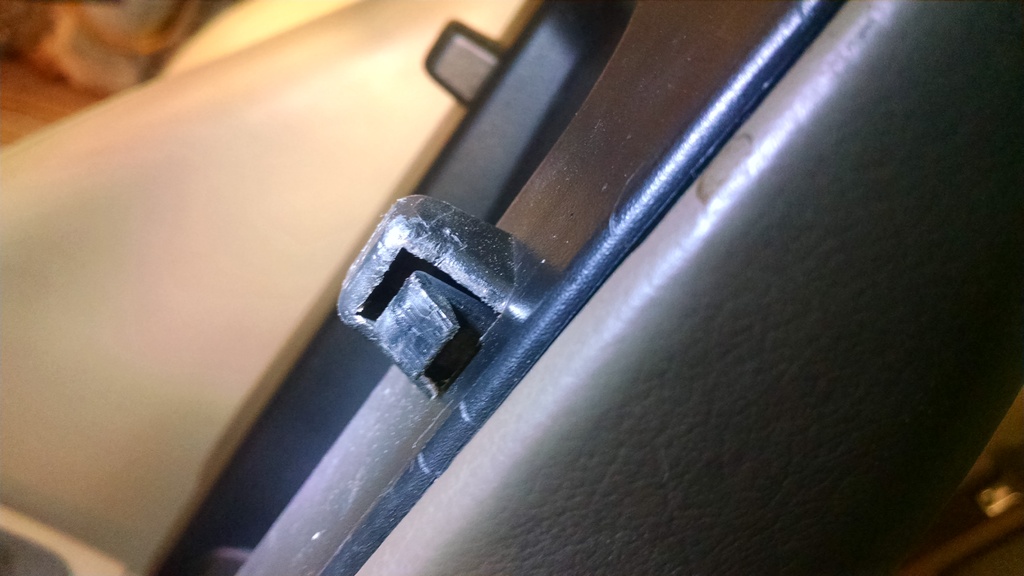
And the pocket:
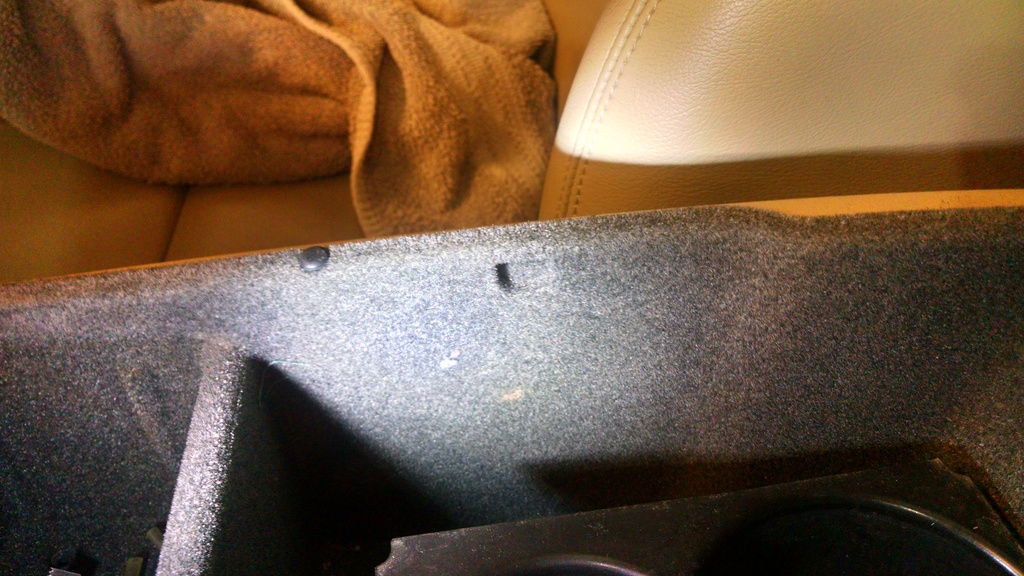
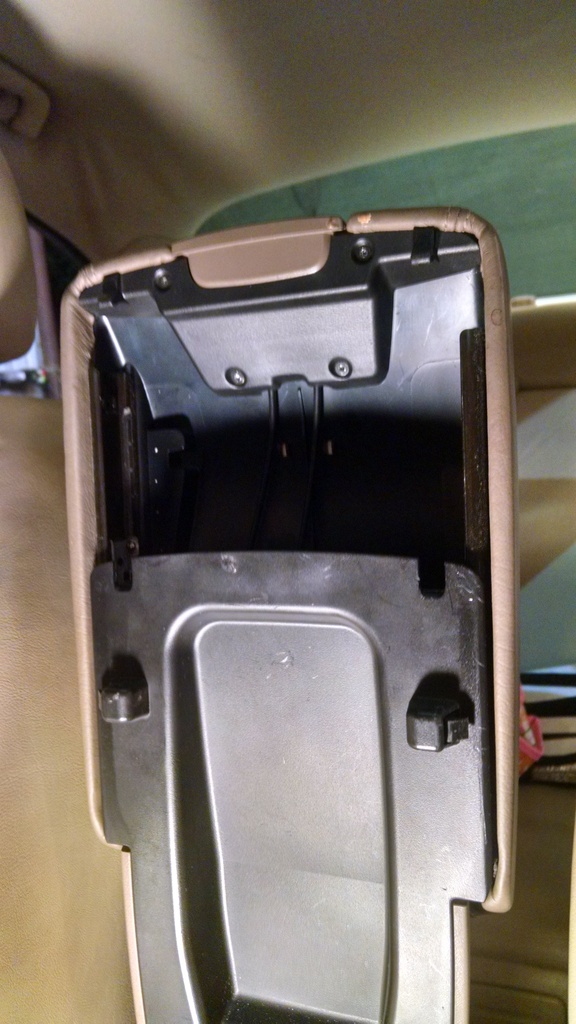
If you slide the lid fully aft, you can disengage the latches on each side using a screwdriver whilst lifting on the lid. I had the idea that whatever direction mending this problem might take, it would be more easily accomplished with the console lid off the car and on the bench. Consequently, I removed the two torx hinge-fixing screws revealed after removing the console liner. Ok, backing up, you first lift out the cupholder which reveals a small torx-screw in the forward-starboard corner of its compartment, then remove a like-screw located in the port-aft corner of the center console. Lift the felt box out and disconnect the power-point connector. Now, don't do any of that! After removing the hinge-fixing screws, which I found to be "hella-tight" btw, I found the hinge still rock-solidly attached. Not wanting to break the hinge nor the surrounding console plastic, I resigned myself to working kind of upside-down and backwards in the car with the lid opened fully. I did find a lid on eBay that the seller swears works both cables, so "won" it with an offer of $50 against a listing of $66 or best offer. I'm persuaded it could've been had cheaper as I got an immediate acceptance. Color was described as "tan leather" and I doubt it will match either S-type; I bought it solely for the chrome lift-latch after a couple of failed-attempts at mending the problem. I only mention it here because from the picture, it appears I had removed all fixings that secure the lid to the car, yet it still wouldn't budge with moderate force applied. While awaiting shipment to complete, a weekend showed up and with a bit of creative lubricant from Corona, I've mended it. Don't regret the purchase as I'm not sure how durable the fix will be.
Although I didn't study them with the aid of magnification, the cover is fixed by what at first glance appear to be four tiny torx screws. Not possessing any torx bit anywhere near that small, I attempted an allen-wrench with much success:
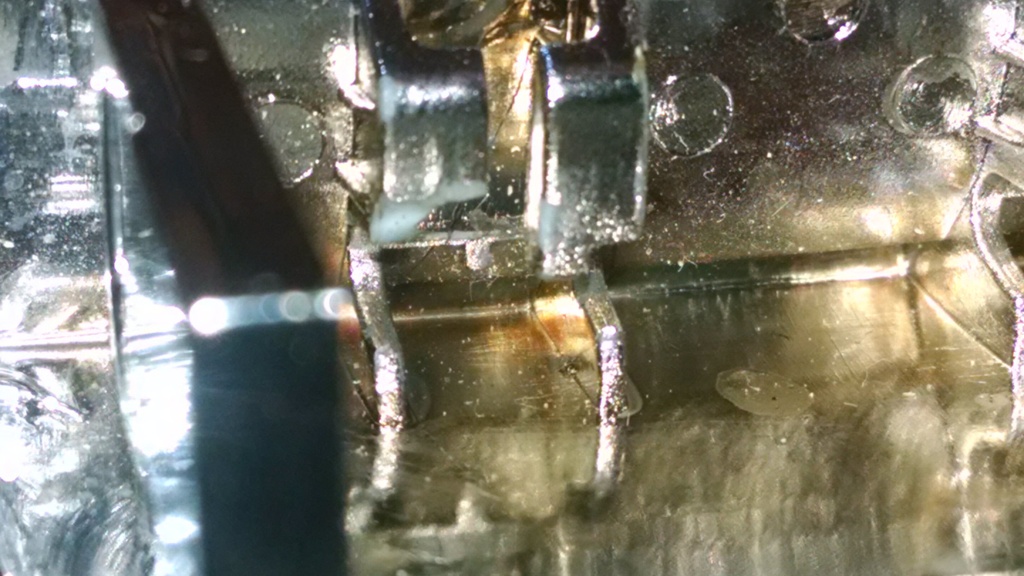
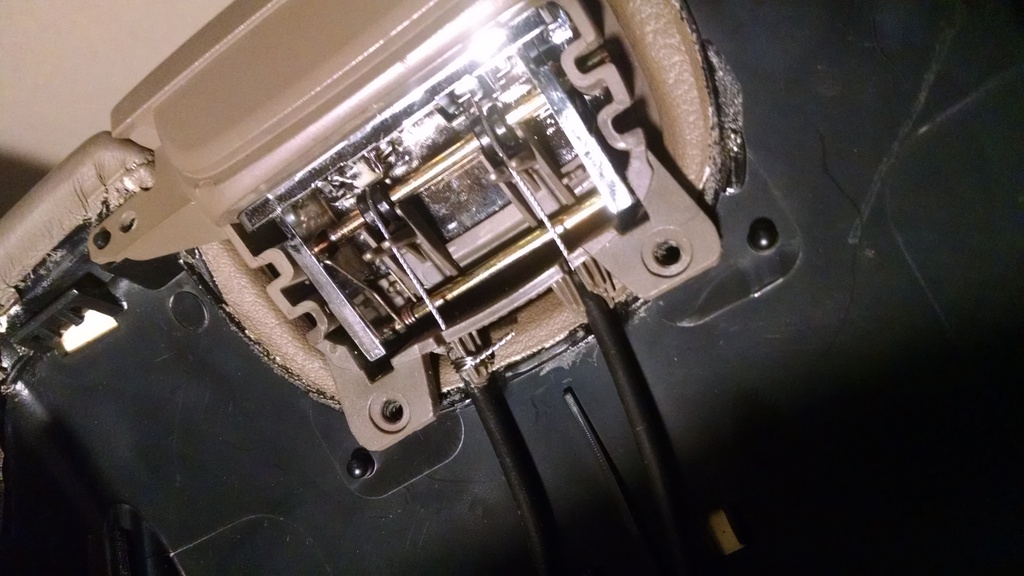
You can see the T-bar end of the cable slipping out here:
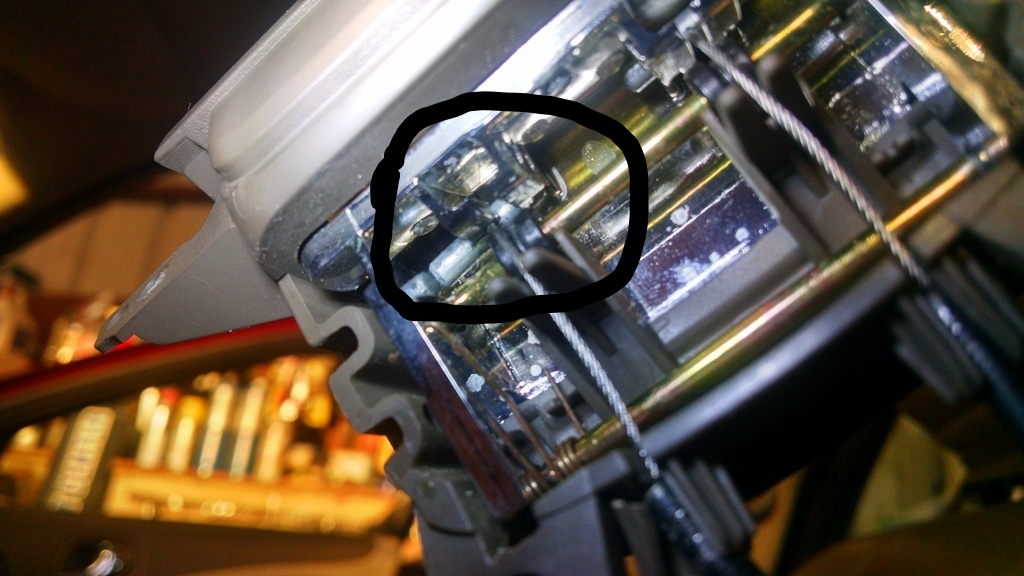
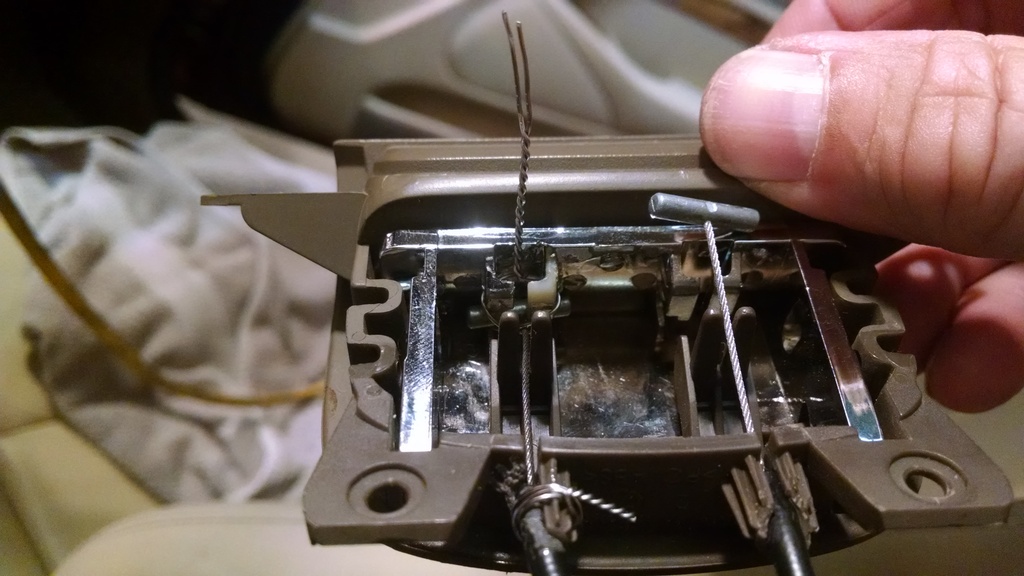
Here is a view of what's broken on my 05. I suspect yours may be similar, as it doesn't appear to be designed for the long-haul:
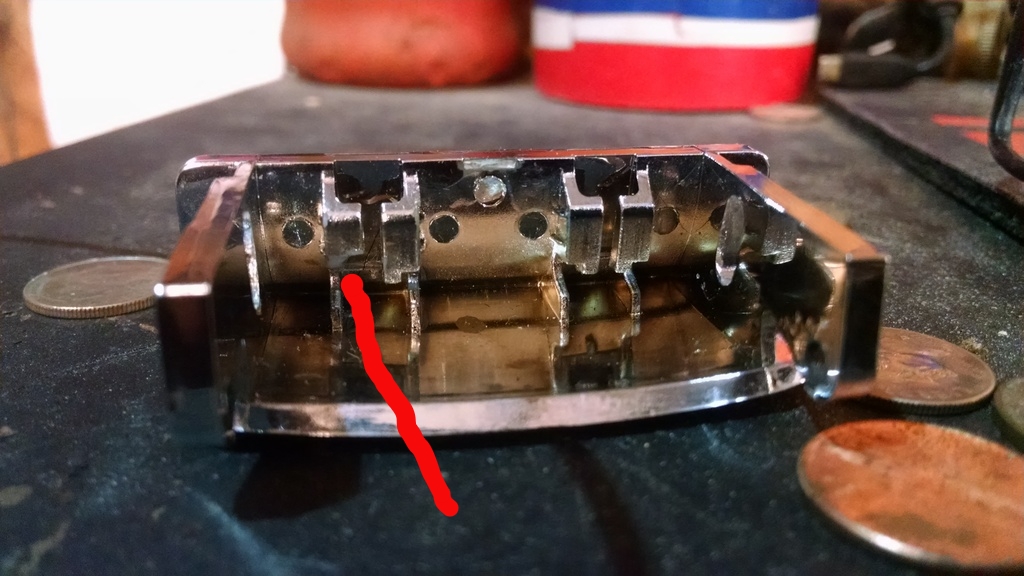
After several failed attempts at a fix, I decided I could retain the T-bar if I could anchor some safety wire on the lift-latch. I needed holes in the locations depicted by the four red dots. In order to drill them, I need to drill through the outer bulkhead of the piece. This is indicated by the other two red dots:
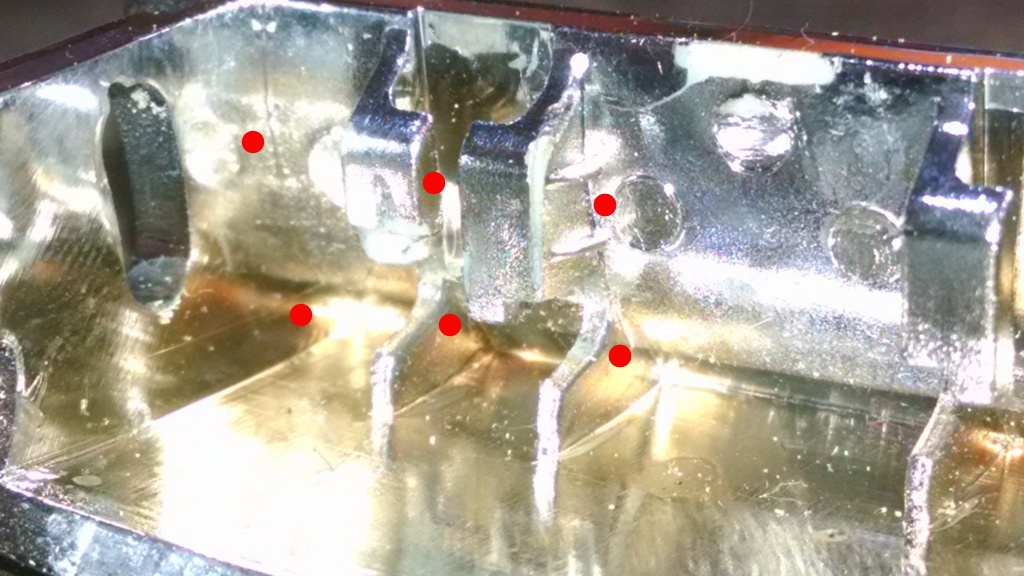
Naturally, I used advanced engineering methods to determine the proper hole-size: Searched for the smallest not-broken drill bit I had around the shop that was also long enough to reach the second stanchion(1/16".) I used similar high-level methodology in sizing the safety wire(0.021") the only spool of material I had. The hole could've been much smaller: 0.62" hole didn't leave a lot of meat in the realm of edge-distance on the lower holes.
I threaded the wire through the lower holes, then inserted the cable T-bar in its appropriate place. It still didn't want to stay due to the broken plastic. Really a 3 or 4-handed job, but by holding my tongue just right, I somehow managed it with 2, though could've used hands 5 and 6 to swat mosquitoes!
My idea was to take the wire coming out of the inboard lower hole, cross it over to enter the outboard upper hole from outboard-to-inboard and up and out the top, between the two upper holes. Once I finally managed this, I realized a slight departure from plan. I meant for it to pass under the steel cable but instead it was "over" it. Rather than trying a redo, I threaded the other side under the cable in passing it from the outboard lower hole to the inboard upper, passing inboard-to-outboard and out the middle, where I twisted the two ends together for security:
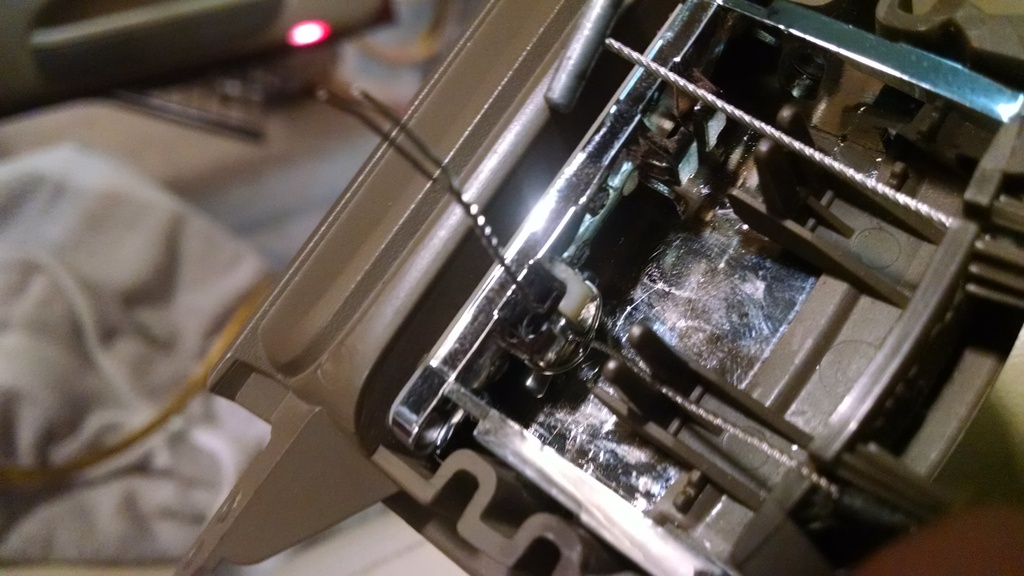
I'm not sure if the breakage on the mocha piece that retains the cable housing was pre-existing or a product of my dis-assembly. Likely the latter. No matter, a coupla wraps of safety wire and it was well-mended.
I realize I've ignored a few key items in my focus on the "fix." Once you've removed the latch mechanism from the lid, you can remove the slider cable from the unbroken side by sliding its T-Bar to the inside of the piece. There is not enough clearance on the outboard side to let it out. Proceed at your own risk if you fancy removing the whole assembly from the cables for further disassembly. It doesn't appear to me that the crimp on the colored trim-piece is designed for a non-destructive remove and replace evolution. I disassembled the latch in-situ and thus cautioned readers early in the post to leave the center console liner in-place. It will catch some of the small pieces when it all explodes in your face once the rods let go. Pray the ones not caught by the box are ferrous so you can successfully fish them out from between the seat and driveshaft hump with a small extendable magnet. To be fair, I was lucky, dropping the little plastic rollers once on disassembly and again on re-assembly and found them in the rear floorboard behind the driver's seat. I also dropped the tiny torsion spring between the seat and hump and snagged it with the first pass of the magnet.
Anyway, if you turn the business-side of the latch mechanism toward you, you will find two steel rods (brass-colored, but steel) with knurls or splines on one end. They were on the left on mine. I grasped the knurled ends of the shafts with a pair of needle-nose pliers and pulled, until they came out amidst much fanfare and flying parts. It may be less dramatic to push gently from the other side with a small drift, like an allen wrench, which you may have handy from removing the cover. One rod locates two plastic idler-rollers under the cables, while the other provides the pivot point for the chrome latch and locates a small torsion spring.
I did find it quite a challenge to fit the idler-rollers once the cables were installed. Do-able, but neither fun nor easy.
Not sure how durable it will be, but upon re-assembly, it checked 4.0. I do still have a replacement lid enroute in the event it fails or the 03 experiences a similar fate.....
Edit: I copied other posters initially in just defeating the latch mechanism. I reasoned the latch on my X300 console (although a totally different design) lid has never engaged, and it has always been perfectly acceptable. However, what I found with this one is that it has a torsion spring integrated into the hinge and will only stay closed if it is extended far enough to defeat the functionality of the cupholders. Otherwise, it rides at about a 30 degree elevation and bounces up and down with undulations in the road surface. Even fully extended, it will flop up and down with the big bumps. Totally unacceptable! I suppose if you could get at the hinge and remove or cut the torsion spring to defeat it, you would be fine with the latches inoperative.
One last idea (untried): Perhaps you could file the latches down a bit and add a slight chamfer so that they still latch, but can be disengaged with light-to-moderate force applied to the lid.
Here is the latch:

And the pocket:

If you slide the lid fully aft, you can disengage the latches on each side using a screwdriver whilst lifting on the lid. I had the idea that whatever direction mending this problem might take, it would be more easily accomplished with the console lid off the car and on the bench. Consequently, I removed the two torx hinge-fixing screws revealed after removing the console liner. Ok, backing up, you first lift out the cupholder which reveals a small torx-screw in the forward-starboard corner of its compartment, then remove a like-screw located in the port-aft corner of the center console. Lift the felt box out and disconnect the power-point connector. Now, don't do any of that! After removing the hinge-fixing screws, which I found to be "hella-tight" btw, I found the hinge still rock-solidly attached. Not wanting to break the hinge nor the surrounding console plastic, I resigned myself to working kind of upside-down and backwards in the car with the lid opened fully. I did find a lid on eBay that the seller swears works both cables, so "won" it with an offer of $50 against a listing of $66 or best offer. I'm persuaded it could've been had cheaper as I got an immediate acceptance. Color was described as "tan leather" and I doubt it will match either S-type; I bought it solely for the chrome lift-latch after a couple of failed-attempts at mending the problem. I only mention it here because from the picture, it appears I had removed all fixings that secure the lid to the car, yet it still wouldn't budge with moderate force applied. While awaiting shipment to complete, a weekend showed up and with a bit of creative lubricant from Corona, I've mended it. Don't regret the purchase as I'm not sure how durable the fix will be.
Although I didn't study them with the aid of magnification, the cover is fixed by what at first glance appear to be four tiny torx screws. Not possessing any torx bit anywhere near that small, I attempted an allen-wrench with much success:

You can see the T-bar end of the cable slipping out here:

Here is a view of what's broken on my 05. I suspect yours may be similar, as it doesn't appear to be designed for the long-haul:


After several failed attempts at a fix, I decided I could retain the T-bar if I could anchor some safety wire on the lift-latch. I needed holes in the locations depicted by the four red dots. In order to drill them, I need to drill through the outer bulkhead of the piece. This is indicated by the other two red dots:

Naturally, I used advanced engineering methods to determine the proper hole-size: Searched for the smallest not-broken drill bit I had around the shop that was also long enough to reach the second stanchion(1/16".) I used similar high-level methodology in sizing the safety wire(0.021") the only spool of material I had. The hole could've been much smaller: 0.62" hole didn't leave a lot of meat in the realm of edge-distance on the lower holes.
I threaded the wire through the lower holes, then inserted the cable T-bar in its appropriate place. It still didn't want to stay due to the broken plastic. Really a 3 or 4-handed job, but by holding my tongue just right, I somehow managed it with 2, though could've used hands 5 and 6 to swat mosquitoes!
My idea was to take the wire coming out of the inboard lower hole, cross it over to enter the outboard upper hole from outboard-to-inboard and up and out the top, between the two upper holes. Once I finally managed this, I realized a slight departure from plan. I meant for it to pass under the steel cable but instead it was "over" it. Rather than trying a redo, I threaded the other side under the cable in passing it from the outboard lower hole to the inboard upper, passing inboard-to-outboard and out the middle, where I twisted the two ends together for security:

I'm not sure if the breakage on the mocha piece that retains the cable housing was pre-existing or a product of my dis-assembly. Likely the latter. No matter, a coupla wraps of safety wire and it was well-mended.

I realize I've ignored a few key items in my focus on the "fix." Once you've removed the latch mechanism from the lid, you can remove the slider cable from the unbroken side by sliding its T-Bar to the inside of the piece. There is not enough clearance on the outboard side to let it out. Proceed at your own risk if you fancy removing the whole assembly from the cables for further disassembly. It doesn't appear to me that the crimp on the colored trim-piece is designed for a non-destructive remove and replace evolution. I disassembled the latch in-situ and thus cautioned readers early in the post to leave the center console liner in-place. It will catch some of the small pieces when it all explodes in your face once the rods let go. Pray the ones not caught by the box are ferrous so you can successfully fish them out from between the seat and driveshaft hump with a small extendable magnet. To be fair, I was lucky, dropping the little plastic rollers once on disassembly and again on re-assembly and found them in the rear floorboard behind the driver's seat. I also dropped the tiny torsion spring between the seat and hump and snagged it with the first pass of the magnet.
Anyway, if you turn the business-side of the latch mechanism toward you, you will find two steel rods (brass-colored, but steel) with knurls or splines on one end. They were on the left on mine. I grasped the knurled ends of the shafts with a pair of needle-nose pliers and pulled, until they came out amidst much fanfare and flying parts. It may be less dramatic to push gently from the other side with a small drift, like an allen wrench, which you may have handy from removing the cover. One rod locates two plastic idler-rollers under the cables, while the other provides the pivot point for the chrome latch and locates a small torsion spring.

I did find it quite a challenge to fit the idler-rollers once the cables were installed. Do-able, but neither fun nor easy.
Not sure how durable it will be, but upon re-assembly, it checked 4.0. I do still have a replacement lid enroute in the event it fails or the 03 experiences a similar fate.....
Edit: I copied other posters initially in just defeating the latch mechanism. I reasoned the latch on my X300 console (although a totally different design) lid has never engaged, and it has always been perfectly acceptable. However, what I found with this one is that it has a torsion spring integrated into the hinge and will only stay closed if it is extended far enough to defeat the functionality of the cupholders. Otherwise, it rides at about a 30 degree elevation and bounces up and down with undulations in the road surface. Even fully extended, it will flop up and down with the big bumps. Totally unacceptable! I suppose if you could get at the hinge and remove or cut the torsion spring to defeat it, you would be fine with the latches inoperative.
One last idea (untried): Perhaps you could file the latches down a bit and add a slight chamfer so that they still latch, but can be disengaged with light-to-moderate force applied to the lid.
Last edited by aholbro1; Sep 5, 2016 at 09:38 AM.
Veteran Member
Joined: Mar 2013
Posts: 3,018
Likes: 182
From: Pawleys Island, SC USA (formerly from Tabernacle, NJ USA)
Everything works a little smoother with Corona Lube, doesn't it? Thanks for the detailed write up. I hope to never have to do this fix. Seems like a real pain.


Veteran Member
Joined: Jun 2019
Posts: 1,710
Likes: 497
might just be to give you a little bit more overhead space in the console when the lid is down
Veteran Member
Joined: Feb 2018
Posts: 1,797
Likes: 684
From: The wilds of Montana
I think the indentation is made to clear an old school mobile phone handset...
Last edited by S-Type Owner; Feb 17, 2023 at 10:12 AM.
Trending Topics

Member


Joined: May 2013
Posts: 74
Likes: 28
From: San Diego
Console lid movement is enabled when the chromed plastic lift-latch acts simultaneously on two braided steel cables. One unlocks the slide feature while the other retracts spring-loaded latches on both sides (port & starboard) of the lid which engage pockets molded into the center console liner, about 3" aft of the forward bulkhead of the compartment. I'm sure multiple failure modes of this system are possible, but I will deal herein with the failure of the lift-latch to retain the end of the cable that actuates these two latches. I reckon it is the predominant failure mode. I've not seen any posts complaining that the lid will open but not slide, nor any claiming it will do neither.
Here is the latch:
Attachment 151258
And the pocket:
Attachment 151259
If you slide the lid fully aft, you can disengage the latches on each side using a screwdriver whilst lifting on the lid. I had the idea that whatever direction mending this problem might take, it would be more easily accomplished with the console lid off the car and on the bench. Consequently, I removed the two torx hinge-fixing screws revealed after removing the console liner. Ok, backing up, you first lift out the cupholder which reveals a small torx-screw in the forward-starboard corner of its compartment, then remove a like-screw located in the port-aft corner of the center console. Lift the felt box out and disconnect the power-point connector. Now, don't do any of that! After removing the hinge-fixing screws, which I found to be "hella-tight" btw, I found the hinge still rock-solidly attached. Not wanting to break the hinge nor the surrounding console plastic, I resigned myself to working kind of upside-down and backwards in the car with the lid opened fully. I did find a lid on eBay that the seller swears works both cables, so "won" it with an offer of $50 against a listing of $66 or best offer. I'm persuaded it could've been had cheaper as I got an immediate acceptance. Color was described as "tan leather" and I doubt it will match either S-type; I bought it solely for the chrome lift-latch after a couple of failed-attempts at mending the problem. I only mention it here because from the picture, it appears I had removed all fixings that secure the lid to the car, yet it still wouldn't budge with moderate force applied. While awaiting shipment to complete, a weekend showed up and with a bit of creative lubricant from Corona, I've mended it. Don't regret the purchase as I'm not sure how durable the fix will be.
Although I didn't study them with the aid of magnification, the cover is fixed by what at first glance appear to be four tiny torx screws. Not possessing any torx bit anywhere near that small, I attempted an allen-wrench with much success:
Attachment 151260
You can see the T-bar end of the cable slipping out here:
Attachment 151261
Here is a view of what's broken on my 05. I suspect yours may be similar, as it doesn't appear to be designed for the long-haul:
Attachment 151262
Attachment 151263
After several failed attempts at a fix, I decided I could retain the T-bar if I could anchor some safety wire on the lift-latch. I needed holes in the locations depicted by the four red dots. In order to drill them, I need to drill through the outer bulkhead of the piece. This is indicated by the other two red dots:
Attachment 151264
Naturally, I used advanced engineering methods to determine the proper hole-size: Searched for the smallest not-broken drill bit I had around the shop that was also long enough to reach the second stanchion(1/16".) I used similar high-level methodology in sizing the safety wire(0.021") the only spool of material I had. The hole could've been much smaller: 0.62" hole didn't leave a lot of meat in the realm of edge-distance on the lower holes.
I threaded the wire through the lower holes, then inserted the cable T-bar in its appropriate place. It still didn't want to stay due to the broken plastic. Really a 3 or 4-handed job, but by holding my tongue just right, I somehow managed it with 2, though could've used hands 5 and 6 to swat mosquitoes!
My idea was to take the wire coming out of the inboard lower hole, cross it over to enter the outboard upper hole from outboard-to-inboard and up and out the top, between the two upper holes. Once I finally managed this, I realized a slight departure from plan. I meant for it to pass under the steel cable but instead it was "over" it. Rather than trying a redo, I threaded the other side under the cable in passing it from the outboard lower hole to the inboard upper, passing inboard-to-outboard and out the middle, where I twisted the two ends together for security:
Attachment 151265
I'm not sure if the breakage on the mocha piece that retains the cable housing was pre-existing or a product of my dis-assembly. Likely the latter. No matter, a coupla wraps of safety wire and it was well-mended.
Attachment 151266
I realize I've ignored a few key items in my focus on the "fix." Once you've removed the latch mechanism from the lid, you can remove the slider cable from the unbroken side by sliding its T-Bar to the inside of the piece. There is not enough clearance on the outboard side to let it out. Proceed at your own risk if you fancy removing the whole assembly from the cables for further disassembly. It doesn't appear to me that the crimp on the colored trim-piece is designed for a non-destructive remove and replace evolution. I disassembled the latch in-situ and thus cautioned readers early in the post to leave the center console liner in-place. It will catch some of the small pieces when it all explodes in your face once the rods let go. Pray the ones not caught by the box are ferrous so you can successfully fish them out from between the seat and driveshaft hump with a small extendable magnet. To be fair, I was lucky, dropping the little plastic rollers once on disassembly and again on re-assembly and found them in the rear floorboard behind the driver's seat. I also dropped the tiny torsion spring between the seat and hump and snagged it with the first pass of the magnet.
Anyway, if you turn the business-side of the latch mechanism toward you, you will find two steel rods (brass-colored, but steel) with knurls or splines on one end. They were on the left on mine. I grasped the knurled ends of the shafts with a pair of needle-nose pliers and pulled, until they came out amidst much fanfare and flying parts. It may be less dramatic to push gently from the other side with a small drift, like an allen wrench, which you may have handy from removing the cover. One rod locates two plastic idler-rollers under the cables, while the other provides the pivot point for the chrome latch and locates a small torsion spring.
Attachment 151267
I did find it quite a challenge to fit the idler-rollers once the cables were installed. Do-able, but neither fun nor easy.
Not sure how durable it will be, but upon re-assembly, it checked 4.0. I do still have a replacement lid enroute in the event it fails or the 03 experiences a similar fate.....
Edit: I copied other posters initially in just defeating the latch mechanism. I reasoned the latch on my X300 console (although a totally different design) lid has never engaged, and it has always been perfectly acceptable. However, what I found with this one is that it has a torsion spring integrated into the hinge and will only stay closed if it is extended far enough to defeat the functionality of the cupholders. Otherwise, it rides at about a 30 degree elevation and bounces up and down with undulations in the road surface. Even fully extended, it will flop up and down with the big bumps. Totally unacceptable! I suppose if you could get at the hinge and remove or cut the torsion spring to defeat it, you would be fine with the latches inoperative.
One last idea (untried): Perhaps you could file the latches down a bit and add a slight chamfer so that they still latch, but can be disengaged with light-to-moderate force applied to the lid.


Thread
Thread Starter
Forum
Replies
Last Post
Under Pressure
S-Type / S type R Supercharged V8 ( X200 )
7
Jun 17, 2017 12:06 PM
Currently Active Users Viewing This Thread: 1 (0 members and 1 guests)