

How-To Fix Drooping S-Type Hood Liner Fabric

Thread Starter
|
Senior Member
Joined: May 2012
Posts: 104
Likes: 14
From: Tampa, FL
This is how to fix a drooping hood liner and reinforce it to prevent future issues without having to drill into the metal of your hood.
My S-Type's hood fabric was drooping onto the engine and causing burn marks on the intake manifold when I bought the car. To make matters worst, after detailing and washing the engine, water on the fabric caused the hood liner to droop even more.
Why does the hood liner droop? Two reasons; Jaguar didn't give the hood liner enough support in the center and because the screws and washers used are way too tiny for fabric, which tends to rip and stretch overtime and slip right over the screws.
Why do you even need a hood liner? Well it makes your engine look that much better, but also because the hood liner fabric is actually a heat resistant material. Some may say it helps with engine cooling, but the real purpose is to keep the actual top surface of the hood cool. When I've driven my car for an hour, I can touch the top center of the hood and it feels coolish, but then touch the top hood edges (where there's no hood liner) and it's hot to the touch.
This is a pretty easy project most of you can do. You'll no doubt need someone to help you with simply holding the hood liner while your working on it. Heat resistant cotton fabric WILL fall down onto your engine (and on you), so you will need to clean your engine or at least blow it off after.
What You'll Need
Automotive upholstery push tack things x16 (buy extras)
Washers (1" - 2" in diameter or so) x16 (buy extras)
Philips screw driver
Wrench or pliers
Optional
Black spray paint
Drill
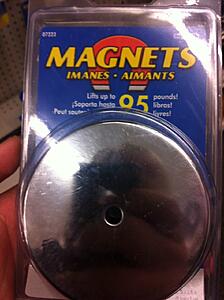
Optional Magnetic Center Support
Round screw-mount-ready magnet
Screw or bolt (capable to screw into magnet mount) x1
Washer (1" - 2" in diameter or so) x1
Drill
How To (Non-magnetic Center Support)
This is pretty simple. What your going to do is remove one of the special plastic screws from the hood liner. Then use that plastic screw to find the right sized plastic push tacks in a hardware store.
(Spray paint washers black ahead of time if you want a matching look.)
Place the washers on the push tacks.
Replace push tacks and washers where the screw once was.
Repeat this for each screw.
You don't have to take the hood liner down for this, and this can be done by yourself.
For Fabric With Stretched Or Ripped Screw Holes
If your fabric holes are stretched or ripped, they'll probably slip out from under the washers. For that, take a drill or something to pierce a new hole into the hood liner fabric next to the original hole and place your tack and washer through it. For this, you'll probably need to unscrew 75% of your hood fabric so you can make the holes. I highly recommend you do this if your fabric holes are messed up.
How To Magnetic Center Support
Even after reinforcing all the original screw holes and drilling new holes for the screws, a small portion of the center of the hood liner was still touching the engine cover when the hood was closed. A quick way to test if yours is (and I bet it is) is to take a piece of tape, lay it sticky side UP on a center / tallest area of your engine cover and close the hood. When you open the hood, if your tape is clinging to the fabric or has pieces of fabric on it, it means the fabric's touching the engine.
You'll need to find a way to create a support. You could always drill a hole into the metal of your hood (VERY risky!), but here's how I avoided doing that in a completely risk-free, safe and smart way.
I went and bought a special magnet from a hardware store (called "Ace Hardware"). It's a $10 or so magnet with a hole in the center, which is meant for screws or hooks to be screwed into it.
It's pretty simple, I took the hood liner down and placed the magnet against the center metal of the hood where I knew the fabric was drooping.
I drilled a small hole through the fabric of the hood liner, making sure it lined up close to the magnet screw hole.
I put the hood liner back over it and lined up a screw and washer against the hole and screwed it in.
What wasn't simple was finding a screw that would fit the hole, I only found a screw with a bolt head and it was way too long, so I had to use a dremel to cut the bolt to length.
Pics
Here's two shots of the new washers reinforcing the hood liner. You can see in the second picture just how close the stock fabric hole is to the edge and how useful the washers are for holding it all in place.


Here's a full view of the hood liner (the engine hood and liner does NOT look this dirty, or even this colorful... it's just the way the photo turned out)

And here's the bolt screw and washer for where the magnet is (yes, I did a sloppy and quick spray job on the bolt, but because you can't see the bolt upclose in reality to see spray marks).

My S-Type's hood fabric was drooping onto the engine and causing burn marks on the intake manifold when I bought the car. To make matters worst, after detailing and washing the engine, water on the fabric caused the hood liner to droop even more.
Why does the hood liner droop? Two reasons; Jaguar didn't give the hood liner enough support in the center and because the screws and washers used are way too tiny for fabric, which tends to rip and stretch overtime and slip right over the screws.
Why do you even need a hood liner? Well it makes your engine look that much better, but also because the hood liner fabric is actually a heat resistant material. Some may say it helps with engine cooling, but the real purpose is to keep the actual top surface of the hood cool. When I've driven my car for an hour, I can touch the top center of the hood and it feels coolish, but then touch the top hood edges (where there's no hood liner) and it's hot to the touch.
This is a pretty easy project most of you can do. You'll no doubt need someone to help you with simply holding the hood liner while your working on it. Heat resistant cotton fabric WILL fall down onto your engine (and on you), so you will need to clean your engine or at least blow it off after.
What You'll Need
Automotive upholstery push tack things x16 (buy extras)
Washers (1" - 2" in diameter or so) x16 (buy extras)
Philips screw driver
Wrench or pliers
Optional
Black spray paint
Drill
Optional Magnetic Center Support
Round screw-mount-ready magnet
Screw or bolt (capable to screw into magnet mount) x1
Washer (1" - 2" in diameter or so) x1
Drill
How To (Non-magnetic Center Support)
This is pretty simple. What your going to do is remove one of the special plastic screws from the hood liner. Then use that plastic screw to find the right sized plastic push tacks in a hardware store.
(Spray paint washers black ahead of time if you want a matching look.)
Place the washers on the push tacks.
Replace push tacks and washers where the screw once was.
Repeat this for each screw.
You don't have to take the hood liner down for this, and this can be done by yourself.
For Fabric With Stretched Or Ripped Screw Holes
If your fabric holes are stretched or ripped, they'll probably slip out from under the washers. For that, take a drill or something to pierce a new hole into the hood liner fabric next to the original hole and place your tack and washer through it. For this, you'll probably need to unscrew 75% of your hood fabric so you can make the holes. I highly recommend you do this if your fabric holes are messed up.
How To Magnetic Center Support
Even after reinforcing all the original screw holes and drilling new holes for the screws, a small portion of the center of the hood liner was still touching the engine cover when the hood was closed. A quick way to test if yours is (and I bet it is) is to take a piece of tape, lay it sticky side UP on a center / tallest area of your engine cover and close the hood. When you open the hood, if your tape is clinging to the fabric or has pieces of fabric on it, it means the fabric's touching the engine.
You'll need to find a way to create a support. You could always drill a hole into the metal of your hood (VERY risky!), but here's how I avoided doing that in a completely risk-free, safe and smart way.
I went and bought a special magnet from a hardware store (called "Ace Hardware"). It's a $10 or so magnet with a hole in the center, which is meant for screws or hooks to be screwed into it.

It's pretty simple, I took the hood liner down and placed the magnet against the center metal of the hood where I knew the fabric was drooping.
I drilled a small hole through the fabric of the hood liner, making sure it lined up close to the magnet screw hole.
I put the hood liner back over it and lined up a screw and washer against the hole and screwed it in.
What wasn't simple was finding a screw that would fit the hole, I only found a screw with a bolt head and it was way too long, so I had to use a dremel to cut the bolt to length.
Pics
Here's two shots of the new washers reinforcing the hood liner. You can see in the second picture just how close the stock fabric hole is to the edge and how useful the washers are for holding it all in place.


Here's a full view of the hood liner (the engine hood and liner does NOT look this dirty, or even this colorful... it's just the way the photo turned out)

And here's the bolt screw and washer for where the magnet is (yes, I did a sloppy and quick spray job on the bolt, but because you can't see the bolt upclose in reality to see spray marks).


Veteran Member


Joined: Apr 2010
Posts: 7,657
Likes: 3,020
From: Arlington VA USA
Nice fix!
Here is an alternative approach: Aircraft firewall material hood liner insulation pad for Mustang, Corvette, Jaguar, many other cars: Jaguar Gallery
Here is an alternative approach: Aircraft firewall material hood liner insulation pad for Mustang, Corvette, Jaguar, many other cars: Jaguar Gallery

Senior Member
Joined: May 2008
Posts: 408
Likes: 42
From: Portland, OR
What in the heck is that red thing in the engine compartment? Weird, never seen that before and IMHO is visually overwhelming....
Trending Topics
Senior Member
Joined: Mar 2010
Posts: 229
Likes: 43
From: Westland, Michigan but I'm from central New Jersey!
@JdB - my decals won't stay stuck to the original liner due to the type of material the stock liner is made of.
The liner is mainly for sound suppression and somewhat for heat protection on the hood paint. In my experience I've seen many original hoodliners that fail, even on brand new cars! My aircraft firewall material hoodliners won't fail, and they don't reflect heat back towards your intake. All the info is on my site.
The liner is mainly for sound suppression and somewhat for heat protection on the hood paint. In my experience I've seen many original hoodliners that fail, even on brand new cars! My aircraft firewall material hoodliners won't fail, and they don't reflect heat back towards your intake. All the info is on my site.

Veteran Member
Joined: Jun 2009
Posts: 3,899
Likes: 803
From: Home
Check out tbirddmnd's product. It head and shoulders above the factory hood liner. I had my factory one replaced under warranty. They are known to shrink and tear out the fasteners.
If I had to do it on my dime I would get the aircraft firewall material. Looks great is cheaper than factory and I think it would outlast the car!!
.
.
.
If I had to do it on my dime I would get the aircraft firewall material. Looks great is cheaper than factory and I think it would outlast the car!!
.
.
.

Thread
Thread Starter
Forum
Replies
Last Post
aholbro1
XJ XJ6 / XJR6 ( X300 )
18
Dec 29, 2024 06:46 PM
WinterJag
XJ XJ6 / XJ8 / XJR ( X350 & X358 )
16
Oct 9, 2015 07:49 PM
al_roethlisberger
XJ XJ6 / XJR6 ( X300 )
5
Sep 9, 2015 09:14 PM
Currently Active Users Viewing This Thread: 1 (0 members and 1 guests)