

Need step by step HID install!


Greetings, I tackled the project of doing my HIDs in the low beams and fogs,
I removed the bumper and got the fog lights out, (didn't even start the low beams yet) and I am stuck.
So here is what I have

This is my first time doing anything like this, so please, dumb it down for me.
I do not know where any of the wires go. Any help is much appreciated.
These are the lights I bought,
http://www.ebay.com/itm/221083512345...84.m1497.l2649
http://www.ebay.com/itm/H11-Slim-HID...9aae19&vxp=mtr
I also bought the head lamp adjuster repair thing
http://www.ebay.com/itm/Jaguar-X-typ...e246bd&vxp=mtr
~Boss
Edit: realized I messed up and tried using the H1's for my Fogs... now that I have the correct bulb...lets see what other problems i run into
Last edited by Boss_Fury; May 8, 2013 at 04:46 PM.
Veteran member


Joined: May 2008
Posts: 14,803
Likes: 4,102
From: Great Mills, MD
Boss, let me get back home and I will give you as much detail as you will need. I am in the process of heading back home and don't have the time to spend giving a step by step at the moment.
Senior Member


Joined: Jun 2010
Posts: 676
Likes: 57
From: Scottsdale, AZ
Thermo, I hope you do find time to do a run-down on this install. I just bought the Maxlux H1 kit @ 5K for my headlamps. Question: Should I buy the H11s for the fogs and not another set of H1s? I want the heads and fogs to be the same color (white).
I have an 02' Sport.
Also, let me know if you're getting out to AZ again.
I have an 02' Sport.
Also, let me know if you're getting out to AZ again.
Veteran member
Joined: May 2008
Posts: 14,803
Likes: 4,102
From: Great Mills, MD
Patterson, yes, get the H11 kit. It will make doing your fog lights tons easier as you won't have to do any modification. You will simply twist the bulb into the housing, make up the electrical connector to plug right into the factory plug. Then the hardest part is finding a place to mount the ballast.
Boss Fury, sorry about the long delay. To say that life has been a bit fast lately is an understatement (working 12 hour shifts 6 days a week and trying to buy a house). But, here is the short of what you need to do.
-Remove the front bumper (sounds like you have this whole process figured out and this is really the hardest part of this process)
-disconnect the factory wiring from the H11 bulbs and the remove the bulbs from the fog light housings
-install the new bulbs into the fog light housings. If you need to modify the bulb housings, let me know. Hopefully you got an H11 specific kit and not one of the generic kits that covers H1/H3/H5/H11/etc. If you got one of the generic kits, let me know as you will have to modify the original bulb housing to make it work.
-the kit should have a plastic connector with no wires in it that will plug into the factory plug for the bulb housing. You should see a black wire and then a green/white stripe wire. The black factory wire will connect to the black wire of the HID kit. The red wire of the HID kit will connect to the green/white stripe wire. But, these wires will be made up in the separate plug included with the kit.
From there, you just need to mount the ballast where it needs to and make up the connectors like the HID kit says to. Install the bumper cover and you are golden.

Junior Member
Joined: May 2013
Posts: 2
Likes: 0
From: Nuremberg
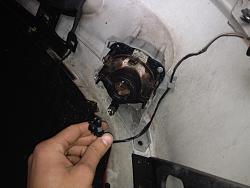
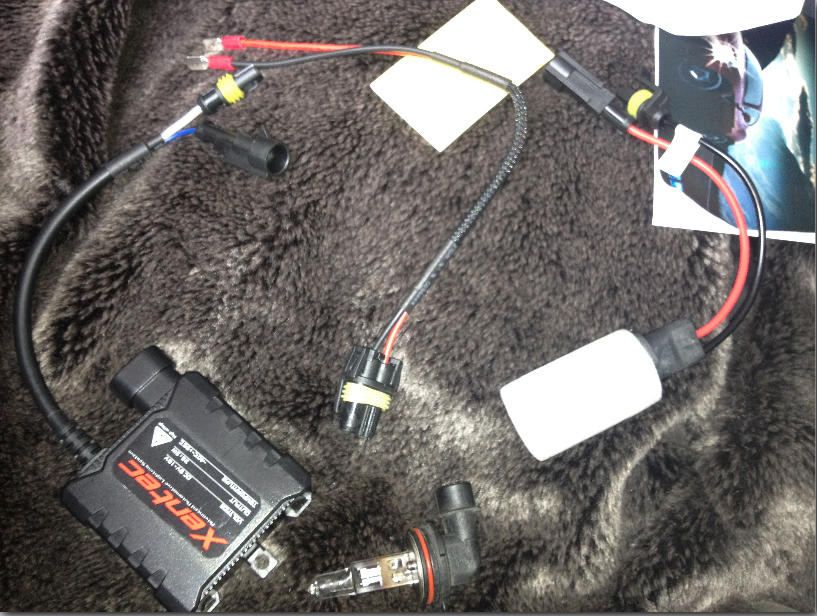
Greetings, I tackled the project of doing my HIDs in the low beams and fogs,
I removed the bumper and got the fog lights out, (didn't even start the low beams yet) and I am stuck.
So here is what I have
Attachment 42196
Attachment 42197
This is my first time doing anything like this, so please, dumb it down for me.
I do not know where any of the wires go. Any help is much appreciated.
These are the lights I bought,
H11 Slim HID Xenon Kit 2X35W Digital AC Ballast 4300K 6000K 8000K 10000K 12000K | eBay
H11 Slim HID Xenon Kit 2X35W Digital AC Ballast 4300K 6000K 8000K 10000K 12000K | eBay
I also bought the head lamp adjuster repair thing
Jaguar x Type x Type Headlamp Headlight Repair Kit Adjuster | eBay
~Boss
Edit: realized I messed up and tried using the H1's for my Fogs... now that I have the correct bulb...lets see what other problems i run into
Junior Member
Joined: May 2013
Posts: 2
Likes: 0
From: Nuremberg
Greetings, I tackled the project of doing my hid kits in the low beams and fogs,
I removed the bumper and got the fog lights out, (didn't even start the low beams yet) and I am stuck.
So here is what I have
Attachment 42196
Attachment 42197
This is my first time doing anything like this, so please, dumb it down for me.
I do not know where any of the wires go. Any help is much appreciated.
These are the lights I bought,
H11 Slim HID Xenon Kit 2X35W Digital AC Ballast 4300K 6000K 8000K 10000K 12000K | eBay
H11 Slim HID Xenon Kit 2X35W Digital AC Ballast 4300K 6000K 8000K 10000K 12000K | eBay
I also bought the head lamp adjuster repair thing
Jaguar x Type x Type Headlamp Headlight Repair Kit Adjuster | eBay
~Boss
Edit: realized I messed up and tried using the H1's for my Fogs... now that I have the correct bulb...lets see what other problems i run into
Wonderful information boss. Love the way you explained each step with pic. it is surely very useful. Thanks again

Senior Member
Joined: Jun 2010
Posts: 676
Likes: 57
From: Scottsdale, AZ
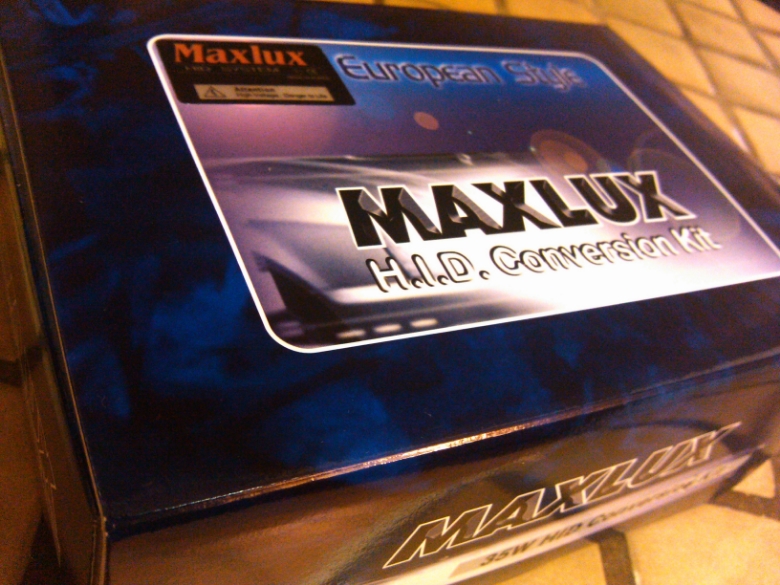
I bought the Maxlux HID Slim Conversion kit for my fogs last night: $150. I already have the Maxlux H1 conversion kit for my low beams, pictured above; that was $85.
The 2 kits add up to some coin, but I read up on the Maxlux kit and the ballasts and bulbs are first rate and reliable. I want to do this mod once and never touch it again.
Hey Boss, what made you decide on the Zentec kit?
Thank you Thermo! You are a Sage! If you have any other tips for this mod floating around in your head, please feel free to drop 'em!
Trending Topics
Veteran member
Joined: May 2008
Posts: 14,803
Likes: 4,102
From: Great Mills, MD
Patterson, wish I was making another trip to Phoenix for work, I would help you install the kits. Unfortunately, no trip in the near future planned.
The only other trick that I can tell you is that next to the fog light assembly, there is a nice brace there that might let you tuck the ballast in behind (granted, the Maxlux units are much bigger than the slim line units I used). Otherwise, you can probably zip tie the ballast to the bracket and go from there. That way, you undo the plug and the HIDs come off with the bumper assembly to make future removals easier.
The only other trick that I can tell you is that next to the fog light assembly, there is a nice brace there that might let you tuck the ballast in behind (granted, the Maxlux units are much bigger than the slim line units I used). Otherwise, you can probably zip tie the ballast to the bracket and go from there. That way, you undo the plug and the HIDs come off with the bumper assembly to make future removals easier.
Senior Member
Joined: Jun 2010
Posts: 676
Likes: 57
From: Scottsdale, AZ
Hey Thermo, you have a friend in Phoenix. Be sure to let me know when you might be in town again. I'm probably making more Hay of the HID upgrade than it is but I want to take the time to do a nice, clean install, and call it good. As far as removing the bumper cover goes, I've noticed a lot of cracks in mine around the attachment points. It must have been removed and then over torqued when reinstalled. So, I picture myself JB welding these eye holes back together, which means waiting overnight for a solid cure of the JB epoxy, and then, deburring and removing the excess epoxy before reinstalling the bumper cover. No problem, I have the patience to do a sweet job.
Also, I'm pretty sure I need the "fix-it" kit for pointing the low beams. Ahh, back to Amazon!
but I want to take the time to do a nice, clean install, and call it good. As far as removing the bumper cover goes, I've noticed a lot of cracks in mine around the attachment points. It must have been removed and then over torqued when reinstalled. So, I picture myself JB welding these eye holes back together, which means waiting overnight for a solid cure of the JB epoxy, and then, deburring and removing the excess epoxy before reinstalling the bumper cover. No problem, I have the patience to do a sweet job. Also, I'm pretty sure I need the "fix-it" kit for pointing the low beams. Ahh, back to Amazon!
Last edited by Patterson; Jun 5, 2013 at 02:31 AM.

Thread
Thread Starter
Forum
Replies
Last Post
aholbro1
XJ XJ6 / XJR6 ( X300 )
18
Dec 29, 2024 06:46 PM
Andrew Fanshawe
New Member Area - Intro a MUST
7
Sep 14, 2015 07:40 PM
Currently Active Users Viewing This Thread: 1 (0 members and 1 guests)