
Headlamp removal procedure .....?

Thread Starter
|
Junior Member
Joined: Dec 2014
Posts: 4
Likes: 0
From: Wrexham
I am a proud owner of a XF 3.0d absolute black. I have a question which I have trawled the tinternet to find an answer to no success. Hopefully someone on here can help.
I have bought D3S bi Xenon 8000K replacement bulbs, for my OEM 4300k, but I cannot remove the main headlight assembly , found the two top screws, but still they won't budge once I removed these. I have done similar on my previous cars,so not a rookie. Can anyone help please on how to remove the headlight assembly?
there is no visible screw housing in the wheel arch as it completely covered by the wheel arch cover! it is the face lifted 2013 model, Do I have to remove the wheel arch cover to expose the final fixing screw/bolt? any advice or tips on doing this will be greatly received .. Thanks
Last edited by Skelly70; Dec 24, 2014 at 12:29 PM. Reason: emphasise Model


Welcome! The LED thread has lots of details and pics on headlight removal, there's a third bolt you have missed,
https://www.jaguarforums.com/forum/x...-thread-82098/
https://www.jaguarforums.com/forum/x...-thread-82098/
Veteran Member


Joined: Feb 2014
Posts: 9,021
Likes: 3,658
From: Adelaide, South Australia
Yep, the third bolt is in the wheel well, in front of the wheel (well duh!), about 2/3 the way up. It's 10 mm like the other two on top of the lights.
I've lost count of the number of times I have taken my lights out of the car, I can now do it in my sleep!
A few tips:
Turn the wheel full lock away from the side you are working on. You'll need to start the motor to do this (then shut it down once you have full lock on). Then you can easily access that third bolt. Sometimes the third bolt comes away from the car, other times it sits in it's housing, I've never had a problem either way.
Disconnect the single wiring plug. Can be fiddly to get at, just persevere.
Then carefully manoeuvre the light housing out. You need to be careful to avoid breaking the flimsy top/outer mounting tab.
Pull the light assembly straight out about 1 or 2 cm, then twist it up just a little and pull the inside (next to the grille) side out first. This takes a bit of wiggling, and I find it helps to gently pull the edge of the grille out and away from the edge of the light assembly. A couple of mm is enough.
Don't pull or twist anything too hard or you'll break that top mounting tab.
Once the light assembly is clear, if you have HID (bi-xenon) lights you will need to disconnect the headlight washer hose, from underneath the light assembly. Carefully remove the small black retaining clip (don't drop it down the inside of the bumper!) and the hose pulls off. If your washer reservoir is more than half full some water will leak out of the headlight washer hose, if your reservoir is full then a lot of water will leak out. Best bet is to place a container underneath to catch all the water, I use an 8 litre oil change drain bucket.
To state the bleeding obvious, replacement is the reverse of removal.
But don't forget to reconnect the washer hose (do that first otherwise it's near impossible to get at), and again be careful how you wiggle the assembly in to avoid breaking the top outer mounting tab. Also, do up the third mounting bolt first, the one in the wheel well, as you may need to wiggle the light assembly a tiny bit to get the bolt into the hole, and it won't wiggle if you have done up either of the other two bolts.
Disclaimer - this is the process for a 'classic' or 'pre-facelift' XF, I believe the same applies to a facelift XF, but I'm not 100% sure of that as the lights are a slightly different shape.
Last edited by OzXFR; Dec 24, 2014 at 05:51 PM.
Thread Starter
|
Junior Member
Joined: Dec 2014
Posts: 4
Likes: 0
From: Wrexham
Thanks for the information, but the procedure it as you stated pre facelift, I really wanted the new facelifted model, as there is no visible 3rd bolt in the wheel arch, the interior wheel arch is completely covered with a protective liner.
Is it a case of having to remove this liner??? to access these elusive 3rd bolts ???
Thanks
Is it a case of having to remove this liner??? to access these elusive 3rd bolts ???
Thanks
Senior Member

Joined: Apr 2010
Posts: 426
Likes: 72
From: Philadelpha Pa
Has anybody figured out how to remove the facelift headlights? I changed out all my interior lights to LED, And was thinking about changing my head light temp (HID Kelvin) but can't seem to find a thread for the newer head light removal process. I took my head lights out several times in my 2010 but this seems to be different. I cant seem to find the third wheel well screw. Also can some one recommend a good highbeam bulb that won't cause a error message, Maybe LED?
Trending Topics
Veteran Member
Joined: Feb 2014
Posts: 9,021
Likes: 3,658
From: Adelaide, South Australia
I put Philips Extreme Vision +130 H7 globes in my high beams on the old S a few months ago, then swapped them over to the R when I got it. Good strong light, still a little yellowish, and no errors or messages.
PS - I vaguely remember reading somewhere that removing the headlight assemblies on a "facelift" is a bumper off job.
PS - I vaguely remember reading somewhere that removing the headlight assemblies on a "facelift" is a bumper off job.
Senior Member
Joined: Apr 2010
Posts: 426
Likes: 72
From: Philadelpha Pa
Thanks for the response.. Bumper off Huh... That seem like a real PITA. I guess newer isn't always better in that regard... I guess this is one mod that's not happening anytime soon.
Veteran Member
Joined: Feb 2014
Posts: 9,021
Likes: 3,658
From: Adelaide, South Australia
Removing the front bumper is actually quite straightforward, if a little time consuming.
I did it three or four times on the old S, haven't needed to do so on the R yet.
It can by done by one person but it's much easier with two, mainly to hold both sides up while two or three electrical plugs are disconnected.
I did it three or four times on the old S, haven't needed to do so on the R yet.
It can by done by one person but it's much easier with two, mainly to hold both sides up while two or three electrical plugs are disconnected.
Senior Member
Joined: Apr 2010
Posts: 426
Likes: 72
From: Philadelpha Pa
Removing the front bumper is actually quite straightforward, if a little time consuming.
I did it three or four times on the old S, haven't needed to do so on the R yet.
It can by done by one person but it's much easier with two, mainly to hold both sides up while two or three electrical plugs are disconnected.
I did it three or four times on the old S, haven't needed to do so on the R yet.
It can by done by one person but it's much easier with two, mainly to hold both sides up while two or three electrical plugs are disconnected.

Senior Member
Joined: Jun 2013
Posts: 156
Likes: 46
From: Toronto
i see this all the time question is asked but never answered...i have the 3.0 xf 2013 and clearly the head light bolt is either completely cover or it�s not the same removal. Can someone answer this question.
�where is the 3 rd bolt�
thank you
�where is the 3 rd bolt�
thank you
Senior Member
Joined: Jun 2013
Posts: 156
Likes: 46
From: Toronto
If you think changing the headlight
on the face lifted XF would be the same easy 3 bolts as the previous model your in for a shock!
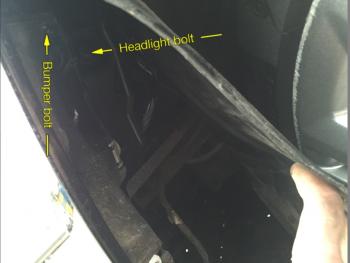
First off as before the headlamp unit must be removed, however once the bolts have been removed the unit will not fit though the hole. (not even close) also the bolt that you could see inside the wheel arch is now behind the arch cover
Remove the two bolts from the front of the unit

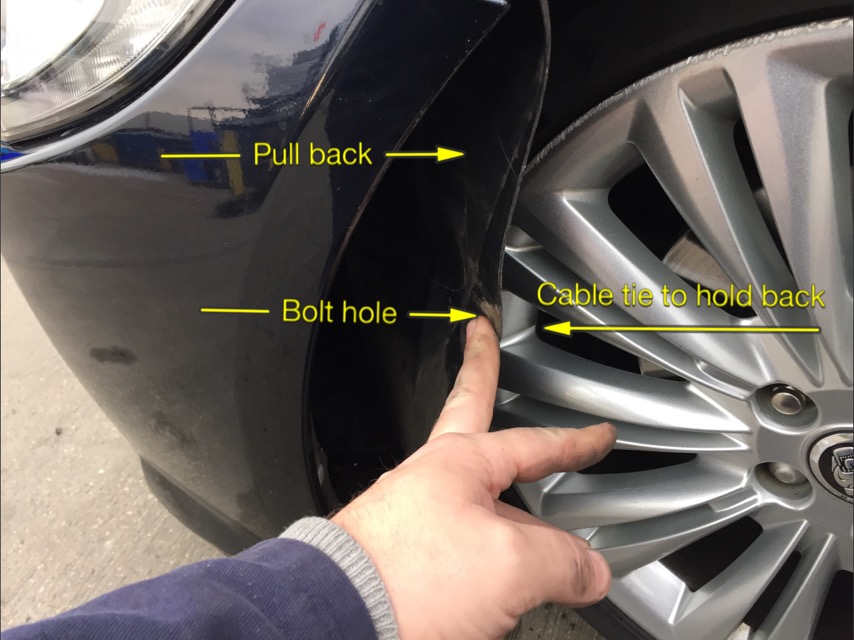
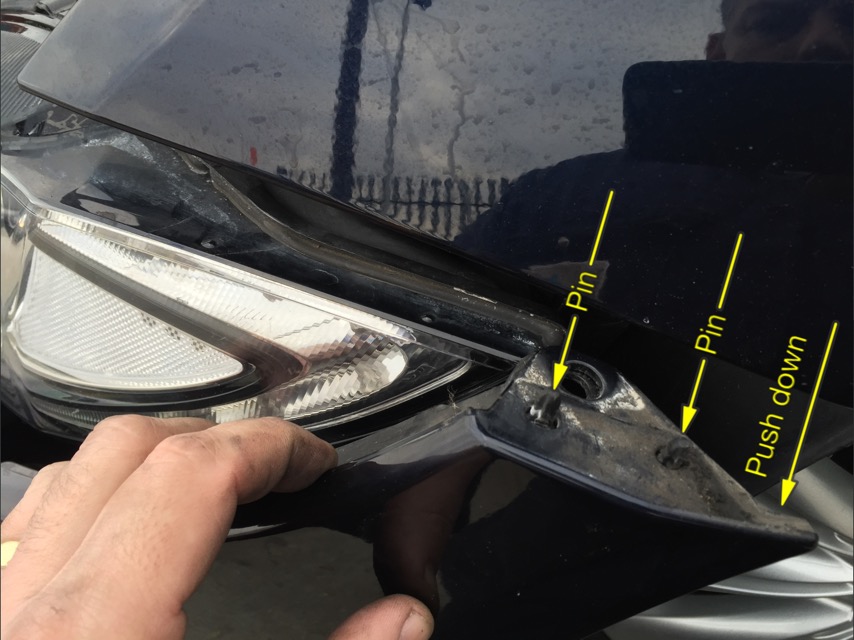
remove the three bolts on the inside of the wheel arch and cable tie back to the wheel
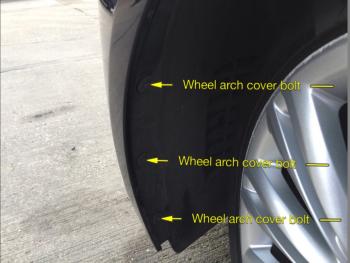

Remove the two bolts on the inside of the arch cover, one for the headlamp unit and one that clamps the bumper to the wing
Remove the five bolts that hold the front grill to the car to allow the grill to flex out
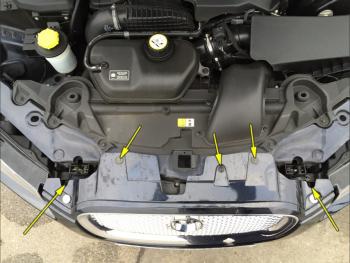
Pull the bumper at the wing down only as there are two locating pins attached to the bumber
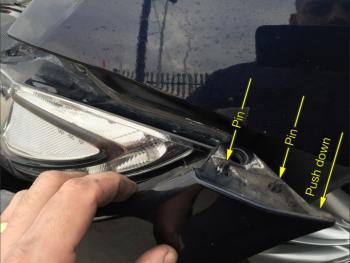
The unit can now be removed but dont forget to unplug the unit.
Not as bad as removing the entire bumper that�s for certain.....
First off as before the headlamp unit must be removed, however once the bolts have been removed the unit will not fit though the hole. (not even close) also the bolt that you could see inside the wheel arch is now behind the arch cover
Remove the two bolts from the front of the unit

remove the three bolts on the inside of the wheel arch and cable tie back to the wheel

Remove the two bolts on the inside of the arch cover, one for the headlamp unit and one that clamps the bumper to the wing

Remove the five bolts that hold the front grill to the car to allow the grill to flex out

Pull the bumper at the wing down only as there are two locating pins attached to the bumber
The unit can now be removed but dont forget to unplug the unit.
Not as bad as removing the entire bumper that�s for certain.....
Senior Member
Joined: Apr 2010
Posts: 426
Likes: 72
From: Philadelpha Pa
Yeah, They complicated the heck out of taking the head light out of the aft 2013 model year cars. I had a 2010 that was real easy but I ended up having to almost pull the front bump off this one... Its not hard but alittle more time consuming.
Senior Member
Joined: Jun 2013
Posts: 156
Likes: 46
From: Toronto
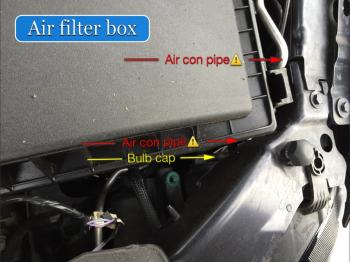
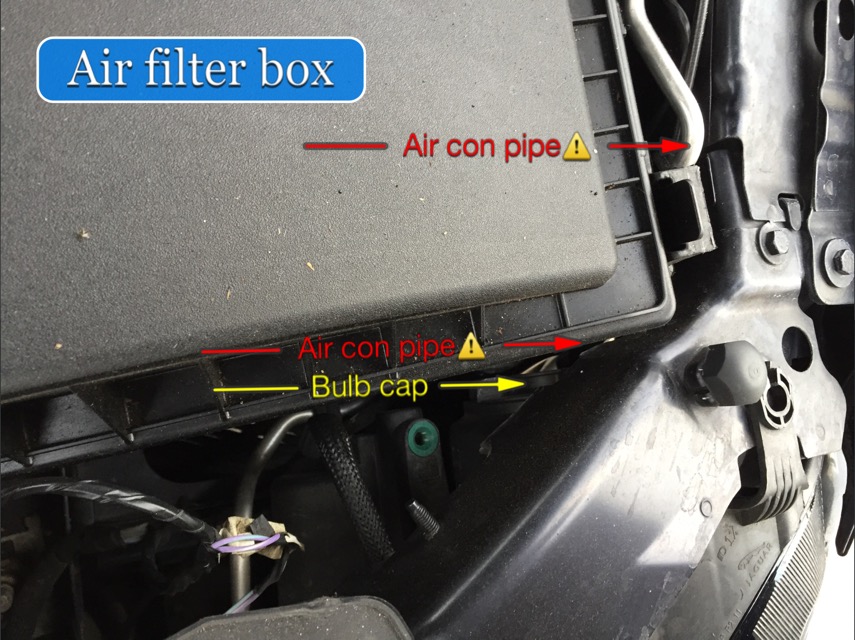
It was very hard to find a good answer to the headlight removal....many stated that the front bumper has to be removed however the post above has you only removing 6 easy to access... i also removed the air box for more room....takes about an hour per side...but a pain ...one could easily scratch the paint. Plus bending the inner well like that is not a great idea as it never fully returns...very close but off a tad.


Thread
Thread Starter
Forum
Replies
Last Post
aholbro1
XJ XJ6 / XJR6 ( X300 )
18
Dec 29, 2024 06:46 PM
Currently Active Users Viewing This Thread: 1 (0 members and 1 guests)